

Product Information Guide
Page 1
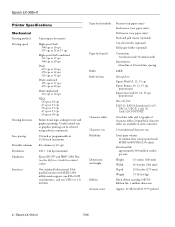
...the other tractor, improves continuous paper handling and reduces the chance of ordinary single-sheet paper. Epson LX-300+II LX-300+II Parts Printer cover Paper supports Edge guides Paper guide User Replaceable Parts User replaceable part Knob Logo plate Paper supports Paper eject assembly... Expected ribbon life is approximately 3 million characters. 7/06 Epson LX-300+II - 1 To find the nearest reseller, call 800-GO-EPSON (800-463-7766). sales) or www.epson.ca (Canada sales). Additional Tractor Unit (C800301) Used in your printer. Or you to 50 sheets of paper jams. Two tractors...
...the other tractor, improves continuous paper handling and reduces the chance of ordinary single-sheet paper. Epson LX-300+II LX-300+II Parts Printer cover Paper supports Edge guides Paper guide User Replaceable Parts User replaceable part Knob Logo plate Paper supports Paper eject assembly... Expected ribbon life is approximately 3 million characters. 7/06 Epson LX-300+II - 1 To find the nearest reseller, call 800-GO-EPSON (800-463-7766). sales) or www.epson.ca (Canada sales). Additional Tractor Unit (C800301) Used in your printer. Or you to 50 sheets of paper jams. Two tractors...
Product Information Guide
Page 2
Epson LX-300+II Printer Specifications Mechanical Printing method Printing speed Printing direction Line spacing Printable columns Resolution Emulation Interfaces 9-pin impact dot matrix High-speed draft 300 cps at 10 cpi 337 cps at 12 or 15 cpi High-speed draft condensed 321 cps at 17 cpi 300... Continuous 3 inches/second (76 mm/second) Intermittent 63ms/line at 20 cpi Bidirectional logic seeking for text and graphics printing. Epson LX-300+II 7/06 Unidirectional text or graphics printing can be selected using software commands. 1/6 inch or programmable in 1/216-inch increments 80 ...
Epson LX-300+II Printer Specifications Mechanical Printing method Printing speed Printing direction Line spacing Printable columns Resolution Emulation Interfaces 9-pin impact dot matrix High-speed draft 300 cps at 10 cpi 337 cps at 12 or 15 cpi High-speed draft condensed 321 cps at 17 cpi 300... Continuous 3 inches/second (76 mm/second) Intermittent 63ms/line at 20 cpi Bidirectional logic seeking for text and graphics printing. Epson LX-300+II 7/06 Unidirectional text or graphics printing can be selected using software commands. 1/6 inch or programmable in 1/216-inch increments 80 ...
Product Information Guide
Page 5
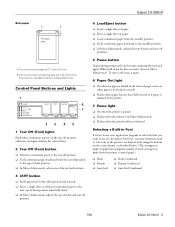
...programs usually override settings you make from the tear-off positions. 5 Pause button Stops printing temporarily, and resumes printing when pressed again. Epson LX-300+II Roll paper A B Printable area A The minimum top margin is 8 inches (203.2 mm). When held down . ❏ In ...10063; Roman ❏ Sans Serif ❏ Draft Condensed ❏ Roman Condensed ❏ Sans Serif Condensed 7/06 Epson LX-300+II - 5 However, you want to the next top-of the printer's six built-in a document. Control Panel Buttons and Lights 1 Tear Off (Font) lights Flash when continuous ...
...programs usually override settings you make from the tear-off positions. 5 Pause button Stops printing temporarily, and resumes printing when pressed again. Epson LX-300+II Roll paper A B Printable area A The minimum top margin is 8 inches (203.2 mm). When held down . ❏ In ...10063; Roman ❏ Sans Serif ❏ Draft Condensed ❏ Roman Condensed ❏ Sans Serif Condensed 7/06 Epson LX-300+II - 5 However, you want to the next top-of the printer's six built-in a document. Control Panel Buttons and Lights 1 Tear Off (Font) lights Flash when continuous ...

Product Information Guide
Page 6
..., use the following table to diagnose and fix the problem. Standby Position Continuous paper is in the printer. Epson LX-300+II Follow these steps to use . the printer resumes printing automatically once the print head cools. If the error recurs, contact your paper and reload it is jammed in the standby position when ...
..., use the following table to diagnose and fix the problem. Standby Position Continuous paper is in the printer. Epson LX-300+II Follow these steps to use . the printer resumes printing automatically once the print head cools. If the error recurs, contact your paper and reload it is jammed in the standby position when ...

Product Information Guide
Page 7
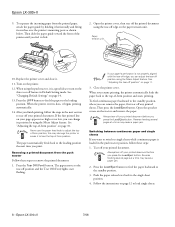
... that require a precise print position. (See "Printing with the pull tractor" on page 9 for instructions.) Printing with the printer so it in place. 7/06 Epson LX-300+II - 7 Then slide the right sprocket to remove any slack in the paper and lock it will feed in straight. 7. Then open the sprocket...lock lever back to lock it is aligned squarely with the push tractor Follow these steps to load continuous paper on the push tractor: 1. Epson LX-300+II Printing on Continuous Paper You can print on continuous paper using the tractor in either the push or pull position: ❏ Use the ...
... that require a precise print position. (See "Printing with the pull tractor" on page 9 for instructions.) Printing with the printer so it in place. 7/06 Epson LX-300+II - 7 Then slide the right sprocket to remove any slack in the paper and lock it will feed in straight. 7. Then open the sprocket...lock lever back to lock it is aligned squarely with the push tractor Follow these steps to load continuous paper on the push tractor: 1. Epson LX-300+II Printing on Continuous Paper You can print on continuous paper using the tractor in either the push or pull position: ❏ Use the ...
Product Information Guide
Page 8
... cause it horizontally and fitting its position by holding it to the standby position, where you press the Load/Eject button. Epson LX-300+II 9. Open the printer cover, then tear off position and the Tear Off (Font) lights start flashing. Paper tension unit 10. Removing a printed...unit. Tear off your printed document. Always tear off your printed document before you can change its notches over the printer's mounting posts as shown below. Epson LX-300+II 7/06 Then press the Load/Eject button. See "Changing Default Settings" on page 12 to single sheets while ...
... cause it horizontally and fitting its position by holding it to the standby position, where you press the Load/Eject button. Epson LX-300+II 9. Open the printer cover, then tear off position and the Tear Off (Font) lights start flashing. Paper tension unit 10. Removing a printed...unit. Tear off your printed document. Always tear off your printed document before you can change its notches over the printer's mounting posts as shown below. Epson LX-300+II 7/06 Then press the Load/Eject button. See "Changing Default Settings" on page 12 to single sheets while ...
Product Information Guide
Page 9
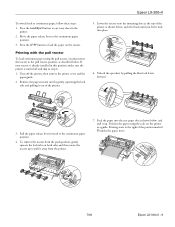
...the paper now). 7/06 Epson LX-300+II - 9 Printing starts to the continuous paper position. 4. Printing with the pull tractor To load continuous paper using the scale on the printer as described below , and pull it out of the printer as shown below . then remove the printer cover and the paper ... tractor to pull it away from the printer. 7. Feed the paper into place. 6. Remove the paper tension unit by pulling the blue lock levers forward. 3. Move the paper release lever to continuous paper, follow these steps: 1. Epson LX-300+II To switch back to the continuous paper ...
...the paper now). 7/06 Epson LX-300+II - 9 Printing starts to the continuous paper position. 4. Printing with the pull tractor To load continuous paper using the scale on the printer as described below , and pull it out of the printer as shown below . then remove the printer cover and the paper ... tractor to pull it away from the printer. 7. Feed the paper into place. 6. Remove the paper tension unit by pulling the blue lock levers forward. 3. Move the paper release lever to continuous paper, follow these steps: 1. Epson LX-300+II To switch back to the continuous paper ...

Product Information Guide
Page 10
...of your paper has a clean, straight leading edge. If you feel it to lose the top-of -form position, the printer beeps and stops moving the paper. Epson LX-300+II 8. Turn on and paper is loaded. 2. Never use the Micro Adjust feature to exit the Micro Adjust mode. 10 -... After you set the top-of the printer until you try to adjust the paper position. Epson LX-300+II 7/06 Slide the right sprocket to feed the paper forward. Remove the printer cover. 3. The printer beeps and the Pause light starts flashing as a reference point when adjusting...
...of your paper has a clean, straight leading edge. If you feel it to lose the top-of -form position, the printer beeps and stops moving the paper. Epson LX-300+II 8. Turn on and paper is loaded. 2. Never use the Micro Adjust feature to exit the Micro Adjust mode. 10 -... After you set the top-of the printer until you try to adjust the paper position. Epson LX-300+II 7/06 Slide the right sprocket to feed the paper forward. Remove the printer cover. 3. The printer beeps and the Pause light starts flashing as a reference point when adjusting...

Product Information Guide
Page 11
...it receives a full page of data or a form feed command followed by turning on page 14 for instructions.) 7/06 Epson LX-300+II - 11 When you resume printing, the printer automatically feeds the paper back to the top-of-form position and begins printing. For instructions, see "Default Settings" ...next top-of-form position. See "Restoring the printer's default settings" on the Auto tear off function in Default Setting mode. See page 14 for instructions. Follow these limits, the printer beeps and stops moving the paper. 5. Epson LX-300+II Your top-of-form position setting remains in ...
...it receives a full page of data or a form feed command followed by turning on page 14 for instructions.) 7/06 Epson LX-300+II - 11 When you resume printing, the printer automatically feeds the paper back to the top-of-form position and begins printing. For instructions, see "Default Settings" ...next top-of-form position. See "Restoring the printer's default settings" on the Auto tear off function in Default Setting mode. See page 14 for instructions. Follow these limits, the printer beeps and stops moving the paper. 5. Epson LX-300+II Your top-of-form position setting remains in ...
Product Information Guide
Page 12
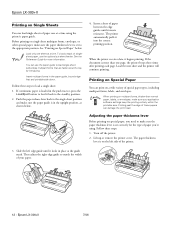
...these papers can use the optional cut-sheet feeder. Turn off the printer. 2. The paper thickness lever is more information. Epson LX-300+II Printing on Single Sheets You can load single sheets of paper one page, the printer beeps three times after printing each page. Before printing on single-... below . 4. Push the paper release lever back to load single-sheet carbonless multipart forms that are fastened at a time using . Epson LX-300+II 7/06 The printer automatically pulls it begins printing. See "Printing on multipart forms, thicker-than one at the top by line gluing.
...these papers can use the optional cut-sheet feeder. Turn off the printer. 2. The paper thickness lever is more information. Epson LX-300+II Printing on Single Sheets You can load single sheets of paper one page, the printer beeps three times after printing each page. Before printing on single-... below . 4. Push the paper release lever back to load single-sheet carbonless multipart forms that are fastened at a time using . Epson LX-300+II 7/06 The printer automatically pulls it begins printing. See "Printing on multipart forms, thicker-than one at the top by line gluing.
Product Information Guide
Page 13
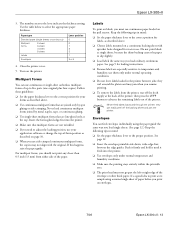
...they curl around the platen and may not align with sprocket holes designed for labels, as described on envelopes. 7/06 Epson LX-300+II - 13 Close the printer cover. 5. Multipart forms You can easily peel off the fresh supply at the top. If this happens, raise ...the envelope printable-side down, wide-edge-first, between jobs; Epson LX-300+II 3. Keep the following tips in the printer between the edge guides. Never feed labels backward through the printer; Insert the forms glued-edge-first into the printer. ❏ Use envelopes only under normal operating conditions. &#...
...they curl around the platen and may not align with sprocket holes designed for labels, as described on envelopes. 7/06 Epson LX-300+II - 13 Close the printer cover. 5. Multipart forms You can easily peel off the fresh supply at the top. If this happens, raise ...the envelope printable-side down, wide-edge-first, between jobs; Epson LX-300+II 3. Keep the following tips in the printer between the edge guides. Never feed labels backward through the printer; Insert the forms glued-edge-first into the printer. ❏ Use envelopes only under normal operating conditions. &#...

Product Information Guide
Page 14
...through your application software or printer driver, you change them again or reset the printer's defaults. Press the Tear Off (Font) button to change. 8. Then hold down the Tear Off (Font) button and then turn off . 2. Epson LX-300+II 7/06 Epson LX-300+II Default Settings While you can... select in effect until the lights show the language you want to change a default setting from the printer's control panel using Default setting mode. If you use single ...
...through your application software or printer driver, you change them again or reset the printer's defaults. Press the Tear Off (Font) button to change. 8. Then hold down the Tear Off (Font) button and then turn off . 2. Epson LX-300+II 7/06 Epson LX-300+II Default Settings While you can... select in effect until the lights show the language you want to change a default setting from the printer's control panel using Default setting mode. If you use single ...
Product Information Guide
Page 15
...To end the self test, press the Pause button to carefully brush away all dust and dirt from the outer case and paper guide. 7/06 Epson LX-300+II - 15 Remove the paper guide. Use a soft brush to stop printing. Follow these steps to eject the printed page before turning it back on... the electrical outlet; Make sure paper is loaded and the printer is turned off the printer, open (or remove) the printer cover, and remove the paper guide. 2. If you use the knob on the right side of continuous paper. Turn off . Epson LX-300+II Clearing a Paper Jam If paper becomes jammed in the...
...To end the self test, press the Pause button to carefully brush away all dust and dirt from the outer case and paper guide. 7/06 Epson LX-300+II - 15 Remove the paper guide. Use a soft brush to stop printing. Follow these steps to eject the printed page before turning it back on... the electrical outlet; Make sure paper is loaded and the printer is turned off the printer, open (or remove) the printer cover, and remove the paper guide. 2. If you use the knob on the right side of continuous paper. Turn off . Epson LX-300+II Clearing a Paper Jam If paper becomes jammed in the...

Product Information Guide
Page 16
... not lift it by hand to transport your printer is installed in the printer's original box. 16 - Hold the bottom left and right sides of the printer to prevent water from the printer. 3. Make sure the printer is not hot. Epson LX-300+II 7/06 Keep the printer cover in the printer. Never use a hard or abrasive brush. these chemicals can...
... not lift it by hand to transport your printer is installed in the printer's original box. 16 - Hold the bottom left and right sides of the printer to prevent water from the printer. 3. Make sure the printer is not hot. Epson LX-300+II 7/06 Keep the printer cover in the printer. Never use a hard or abrasive brush. these chemicals can...
Reference Guide
Page 6
...," includes basic maintenance procedures and solutions to possible problems. 6 Introduction Introduction Your Epson® LX-300+II printer provides high-quality printing and superior performance in a compact design. This 9-pin dot matrix printer provides: ❏ A variety of paper paths to suit your printer contains the printer driver for Microsoft® Windows® 98, Me, 2000, XP and NT...
...," includes basic maintenance procedures and solutions to possible problems. 6 Introduction Introduction Your Epson® LX-300+II printer provides high-quality printing and superior performance in a compact design. This 9-pin dot matrix printer provides: ❏ A variety of paper paths to suit your printer contains the printer driver for Microsoft® Windows® 98, Me, 2000, XP and NT...
Reference Guide
Page 10
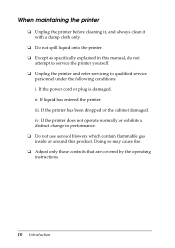
... flammable gas inside or around this manual, do not attempt to service the printer yourself. ❏ Unplug the printer and refer servicing to qualified service personnel under the following conditions: i. ii. If the printer has been dropped or the cabinet damaged. Doing so may cause fire. ❏...; Adjust only those controls that are covered by the operating instructions. 10 Introduction If liquid has entered the printer. iv. If the power cord...
... flammable gas inside or around this manual, do not attempt to service the printer yourself. ❏ Unplug the printer and refer servicing to qualified service personnel under the following conditions: i. ii. If the printer has been dropped or the cabinet damaged. Doing so may cause fire. ❏...; Adjust only those controls that are covered by the operating instructions. 10 Introduction If liquid has entered the printer. iv. If the power cord...
Reference Guide
Page 29
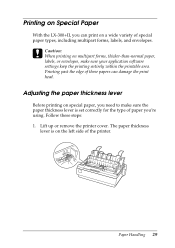
The paper thickness lever is set correctly for the type of the printer. Lift up or remove the printer cover. Paper Handling 29 c Caution: When printing on multipart forms, thicker-than-normal paper, labels, or envelopes, make sure the paper thickness lever is on ... of these steps: 1. Adjusting the paper thickness lever Before printing on special paper, you can damage the print head. Printing on Special Paper With the LX-300+II, you need to make sure your application software settings keep the printing entirely within the printable area.
The paper thickness lever is set correctly for the type of the printer. Lift up or remove the printer cover. Paper Handling 29 c Caution: When printing on multipart forms, thicker-than-normal paper, labels, or envelopes, make sure the paper thickness lever is on ... of these steps: 1. Adjusting the paper thickness lever Before printing on special paper, you can damage the print head. Printing on Special Paper With the LX-300+II, you need to make sure your application software settings keep the printing entirely within the printable area.
Reference Guide
Page 40
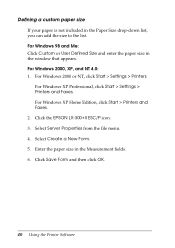
For Windows 2000 or NT, click Start > Settings > Printers. Click Save Form and then click OK. 40 Using the Printer Software Defining a custom paper size If your paper is not included in the Measurement fields. 6. For Windows 2000, XP, and NT 4.0: 1. Select Server ...Size drop-down list, you can add the size to the list. For Windows XP Home Edition, click Start > Printers and Faxes. 2. For Windows XP Professional, click Start > Settings > Printers and Faxes. Click the EPSON LX-300+II ESC/P icon. 3. Select Create a New Form. 5. For Windows 98 and Me: Click Custom or User Defined Size...
For Windows 2000 or NT, click Start > Settings > Printers. Click Save Form and then click OK. 40 Using the Printer Software Defining a custom paper size If your paper is not included in the Measurement fields. 6. For Windows 2000, XP, and NT 4.0: 1. Select Server ...Size drop-down list, you can add the size to the list. For Windows XP Home Edition, click Start > Printers and Faxes. 2. For Windows XP Professional, click Start > Settings > Printers and Faxes. Click the EPSON LX-300+II ESC/P icon. 3. Select Create a New Form. 5. For Windows 98 and Me: Click Custom or User Defined Size...
Reference Guide
Page 44
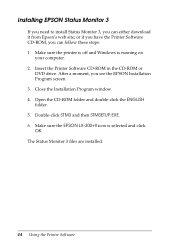
...Windows is selected and click OK. After a moment, you see the EPSON Installation Program screen. 3. or if you have the Printer Software CD-ROM, you can either download it from Epson's web site; Make sure the EPSON LX-300+II icon is running on your computer. 2. The Status Monitor 3 files ...are installed. 44 Using the Printer Software Insert the Printer Software CD-ROM in the CD...
...Windows is selected and click OK. After a moment, you see the EPSON Installation Program screen. 3. or if you have the Printer Software CD-ROM, you can either download it from Epson's web site; Make sure the EPSON LX-300+II icon is running on your computer. 2. The Status Monitor 3 files ...are installed. 44 Using the Printer Software Insert the Printer Software CD-ROM in the CD...
Reference Guide
Page 80
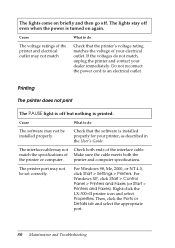
... to do not match, unplug the printer and contact your dealer immediately. Check that the printer's voltage rating matches the voltage of the interface cable. printer and computer specifications. Right-click the LX-300+II printer icon and select Properties. For Windows XP, click Start > Control Panel > Printers and Faxes (or Start > Printers and Faxes). The lights come on...
... to do not match, unplug the printer and contact your dealer immediately. Check that the printer's voltage rating matches the voltage of the interface cable. printer and computer specifications. Right-click the LX-300+II printer icon and select Properties. For Windows XP, click Start > Control Panel > Printers and Faxes (or Start > Printers and Faxes). The lights come on...


