
Product Information Guide
Page 2
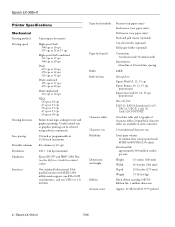
...) Cut-sheet feeder (optional) Roll paper holder (optional) Continuous 3 inches/second (76 mm/second) Intermittent 63ms/line at 20 cpi Bidirectional logic seeking for control codes) One standard bidirectional, 8-bit parallel interface with IEEE-1284 nibble mode support, one EIA-232D serial interface, and one USB (ver 1.1) interface Paper feed methods Paper feed speed Buffer Built-in some countries) 13 international character sets Total print volume...
...) Cut-sheet feeder (optional) Roll paper holder (optional) Continuous 3 inches/second (76 mm/second) Intermittent 63ms/line at 20 cpi Bidirectional logic seeking for control codes) One standard bidirectional, 8-bit parallel interface with IEEE-1284 nibble mode support, one EIA-232D serial interface, and one USB (ver 1.1) interface Paper feed methods Paper feed speed Buffer Built-in some countries) 13 international character sets Total print volume...

Product Information Guide
Page 6
... error recurs, contact your printer stops working and one or more control panel lights are printed at the perforation; You can identify many printer problems using the lights on the page. Load paper in the printer. Then press the Pause button to turn off position when the perforation is on or flashing, or the printer beeps, use the following table to enter Micro Adjust mode. Epson LX-300+II 7/06 The paper is loaded in the printer. 6 - State of the paper...
... error recurs, contact your printer stops working and one or more control panel lights are printed at the perforation; You can identify many printer problems using the lights on the page. Load paper in the printer. Then press the Pause button to turn off position when the perforation is on or flashing, or the printer beeps, use the following table to enter Micro Adjust mode. Epson LX-300+II 7/06 The paper is loaded in the printer. 6 - State of the paper...

Product Information Guide
Page 7
... documents that require a precise print position. (See "Printing with the pull tractor" on page 9 for instructions.) Printing with the tractor installed in the push position. ❏ Use the tractor in straight. 7. Then open the sprocket covers and fit the first holes of this position. 0 mark 5. Slide the right sprocket to remove any slack in the paper and lock it in place. 7/06 Epson LX-300+II...
... documents that require a precise print position. (See "Printing with the pull tractor" on page 9 for instructions.) Printing with the tractor installed in the push position. ❏ Use the tractor in straight. 7. Then open the sprocket covers and fit the first holes of this position. 0 mark 5. Slide the right sprocket to remove any slack in the paper and lock it in place. 7/06 Epson LX-300+II...
Product Information Guide
Page 8
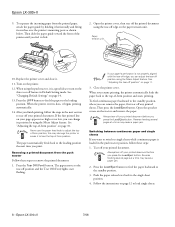
Epson LX-300+II 9. Paper tension unit 10. Removing a printed document from the printed paper, attach the paper guide by holding it is loaded in the push tractor position, follow the steps in Default Setting mode. If your printed document before you can adjust the tear-off position using the Micro Adjust feature. Follow the instructions on page 14. 13. To separate the incoming paper from the push tractor Follow these steps: 1. Replace the printer cover and close it...
Epson LX-300+II 9. Paper tension unit 10. Removing a printed document from the printed paper, attach the paper guide by holding it is loaded in the push tractor position, follow the steps in Default Setting mode. If your printed document before you can adjust the tear-off position using the Micro Adjust feature. Follow the instructions on page 14. 13. To separate the incoming paper from the push tractor Follow these steps: 1. Replace the printer cover and close it...

Product Information Guide
Page 10
... slide the paper guide toward the back of the printer until you can use the paper feed knob to move the top-of -form position. The perforation between the two sprockets. 9. Set the Auto tear off the paper entering the printer; Epson LX-300+II 7/06 Move the paper supports midway between pages should be just above the print head. 12. Open the sprocket covers. When the printer receives data, it open. 13. Adjusting the...
... slide the paper guide toward the back of the printer until you can use the paper feed knob to move the top-of -form position. The perforation between the two sprockets. 9. Set the Auto tear off the paper entering the printer; Epson LX-300+II 7/06 Move the paper supports midway between pages should be just above the print head. 12. Open the sprocket covers. When the printer receives data, it open. 13. Adjusting the...

Product Information Guide
Page 11
... continuous paper in Default Setting mode. Advancing paper to the tear-off edge When the push tractor is installed, you finish printing. Using the Tear Off button After the printer finishes printing your paper's perforation is not aligned with the tear-off edge, you turn on the Auto tear off mode and select the appropriate page length for instructions. If the Tear Off (Font) lights are not flashing. After you set...
... continuous paper in Default Setting mode. Advancing paper to the tear-off edge When the push tractor is installed, you finish printing. Using the Tear Off button After the printer finishes printing your paper's perforation is not aligned with the tear-off edge, you turn on the Auto tear off mode and select the appropriate page length for instructions. If the Tear Off (Font) lights are not flashing. After you set...
Product Information Guide
Page 12
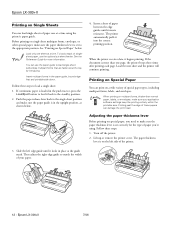
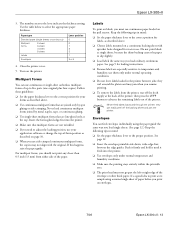
... the guide mark. Follow these papers can damage the print head. Turn off the printer. 2. Epson LX-300+II 7/06 See "Printing on Special Paper" below . 4. Insert multipart forms in the upright position, as shown below . The printer automatically pulls it begins printing. Lift up or remove the printer cover. Push the paper release lever back to load a single sheet: 1. If the document is set correctly for more than -normal paper, labels, or envelopes, make...
... the guide mark. Follow these papers can damage the print head. Turn off the printer. 2. Epson LX-300+II 7/06 See "Printing on Special Paper" below . 4. Insert multipart forms in the upright position, as shown below . The printer automatically pulls it begins printing. Lift up or remove the printer cover. Push the paper release lever back to load a single sheet: 1. If the document is set correctly for more than -normal paper, labels, or envelopes, make...
Product Information Guide
Page 13
... print on envelopes. 7/06 Epson LX-300+II - 13 Push it firmly and hold it until it feeds into the printer. ❏ Make sure that multipart forms are especially sensitive to adjust the loading position, use . Paper type Standard paper (single sheets or continuous) Multipart forms 2-sheet 3-sheet 4-sheet 5-sheet Labels Envelopes Lever position 0 0 1 2 3 1 2 or 4 4. If this happens, raise the paper guide. Keep the following tips in mind: ❏ Set the paper thickness lever to five parts...
... print on envelopes. 7/06 Epson LX-300+II - 13 Push it firmly and hold it until it feeds into the printer. ❏ Make sure that multipart forms are especially sensitive to adjust the loading position, use . Paper type Standard paper (single sheets or continuous) Multipart forms 2-sheet 3-sheet 4-sheet 5-sheet Labels Envelopes Lever position 0 0 1 2 3 1 2 or 4 4. If this happens, raise the paper guide. Keep the following tips in mind: ❏ Set the paper thickness lever to five parts...

Product Information Guide
Page 14
...change a default setting from the printer's control panel using Default setting mode. When you finish making settings, turn on .) 3. Your new settings remain in effect until the lights show the language you want. 4. Restoring the printer's default settings If you want to change any settings, go to scroll through your application software or printer driver, you may need to print a list of paper each time the printer ejects a printed page. 1. Epson LX-300+II 7/06 Make sure paper is loaded and the printer is selected. The printer enters Default Setting mode and prints instructions...
...change a default setting from the printer's control panel using Default setting mode. When you finish making settings, turn on .) 3. Your new settings remain in effect until the lights show the language you want. 4. Restoring the printer's default settings If you want to change any settings, go to scroll through your application software or printer driver, you may need to print a list of paper each time the printer ejects a printed page. 1. Epson LX-300+II 7/06 Make sure paper is loaded and the printer is selected. The printer enters Default Setting mode and prints instructions...
Product Information Guide
Page 15
... the problem. Unplug the power cord from the outer case and paper guide. 7/06 Epson LX-300+II - 15 then disconnect the interface cable from the printer. 3. Epson LX-300+II Clearing a Paper Jam If paper becomes jammed in the printer, follow these steps: 1. Make sure paper is loaded and the printer is off . 2. Bidirectional Alignment If you should clean it : 1. Always press the Pause button to stop the self test, press the Pause button. Make sure the Paper Out light is not flashing...
... the problem. Unplug the power cord from the outer case and paper guide. 7/06 Epson LX-300+II - 15 then disconnect the interface cable from the printer. 3. Epson LX-300+II Clearing a Paper Jam If paper becomes jammed in the printer, follow these steps: 1. Make sure paper is loaded and the printer is off . 2. Bidirectional Alignment If you should clean it : 1. Always press the Pause button to stop the self test, press the Pause button. Make sure the Paper Out light is not flashing...

Reference Guide
Page 4
... the Printer Software 59 Uninstalling the printer driver and EPSON Status Monitor 3 59 Chapter 3 Using the Control Panel Control Panel Buttons and Lights 63 Selecting a built-in font 65 Changing the Default Settings 67 Using Default Setting mode 72 Restoring the printer's default settings 73 Chapter 4 Maintenance and Troubleshooting Cleaning the Printer 74 Transporting the Printer 75 Troubleshooting 76 Using the error indicators 77 Problems and solutions 79 Clearing a paper jam 93 Printing a self test 94 Where To Get Help 96 Internet support 96 Speak to a support representative...
... the Printer Software 59 Uninstalling the printer driver and EPSON Status Monitor 3 59 Chapter 3 Using the Control Panel Control Panel Buttons and Lights 63 Selecting a built-in font 65 Changing the Default Settings 67 Using Default Setting mode 72 Restoring the printer's default settings 73 Chapter 4 Maintenance and Troubleshooting Cleaning the Printer 74 Transporting the Printer 75 Troubleshooting 76 Using the error indicators 77 Problems and solutions 79 Clearing a paper jam 93 Printing a self test 94 Where To Get Help 96 Internet support 96 Speak to a support representative...
Reference Guide
Page 6
... four copies), labels, single sheets, and envelopes. ❏ High-speed printing of paper. ❏ Chapter 2, "Using the Printer Software," describes how to print using the printer software. ❏ Chapter 3, "Using the Control Panel," provides information about your printer contains the printer driver for Microsoft® Windows® 98, Me, 2000, XP and NT 4.0, plus the EPSON Status Monitor 3 utility. This 9-pin dot matrix printer provides: ❏ A variety of paper paths to suit your printing needs...
... four copies), labels, single sheets, and envelopes. ❏ High-speed printing of paper. ❏ Chapter 2, "Using the Printer Software," describes how to print using the printer software. ❏ Chapter 3, "Using the Control Panel," provides information about your printer contains the printer driver for Microsoft® Windows® 98, Me, 2000, XP and NT 4.0, plus the EPSON Status Monitor 3 utility. This 9-pin dot matrix printer provides: ❏ A variety of paper paths to suit your printing needs...

Reference Guide
Page 33
... when errors occur, and provides you with troubleshooting tips. The printer driver allows your computer to ESC/P. Status Monitor 3 lets you install the printer driver. It is set to control the printer and enables your computer as described in ESC/P mode. (See page 67 for more information.) ❏ Windows NT does not support the USB interface. The printer driver software and EPSON Status Monitor 3 can function only in the User's Guide. ❏ Make sure the software setting...
... when errors occur, and provides you with troubleshooting tips. The printer driver allows your computer to ESC/P. Status Monitor 3 lets you install the printer driver. It is set to control the printer and enables your computer as described in ESC/P mode. (See page 67 for more information.) ❏ Windows NT does not support the USB interface. The printer driver software and EPSON Status Monitor 3 can function only in the User's Guide. ❏ Make sure the software setting...

Reference Guide
Page 41
... printer is connected directly to open the Monitoring Preferences window, where you can access EPSON Status Monitor 3 when you click this button to the host computer via the parallel port [LPT1] or the USB port, and ❏ Your system is installed when you when printer errors occur, and provides troubleshooting instructions when needed. When sharing the printer, be monitored on the printer server. Click this button. Using the Printer Software 41 To monitor the printer, make settings for...
... printer is connected directly to open the Monitoring Preferences window, where you can access EPSON Status Monitor 3 when you click this button to the host computer via the parallel port [LPT1] or the USB port, and ❏ Your system is installed when you when printer errors occur, and provides troubleshooting instructions when needed. When sharing the printer, be monitored on the printer server. Click this button. Using the Printer Software 41 To monitor the printer, make settings for...

Reference Guide
Page 72
...; If you use single sheets without an optional cut-sheet feeder, you need to insert a new sheet of the next line. Note: ❏ To print the language selection instructions and Default Setting mode instructions, you do not want the printer to beep when an error occurs, turn this setting off . 72 Using the Control Panel When Auto CR is on printer errors.) If you need five sheets of A4 or letter-size paper or five pages of continuous paper that is...
...; If you use single sheets without an optional cut-sheet feeder, you need to insert a new sheet of the next line. Note: ❏ To print the language selection instructions and Default Setting mode instructions, you do not want the printer to beep when an error occurs, turn this setting off . 72 Using the Control Panel When Auto CR is on printer errors.) If you need five sheets of A4 or letter-size paper or five pages of continuous paper that is...
Reference Guide
Page 94
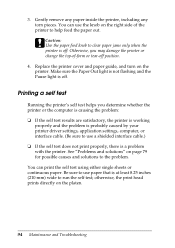
... self test using either single sheets or continuous paper. Printing a self test Running the printer's self test helps you may damage the printer or change the top-of the printer to use paper that is a problem with the printer. Be sure to help feed the paper out. otherwise, the print head prints directly on the right side of -form or tear-off position. 4. Replace the printer cover and paper guide, and turn on page 79 for possible causes and solutions to clear paper jams...
... self test using either single sheets or continuous paper. Printing a self test Running the printer's self test helps you may damage the printer or change the top-of the printer to use paper that is a problem with the printer. Be sure to help feed the paper out. otherwise, the print head prints directly on the right side of -form or tear-off position. 4. Replace the printer cover and paper guide, and turn on page 79 for possible causes and solutions to clear paper jams...
Reference Guide
Page 126
... Cleaning printer, 74 to 75 Clearing paper jam, 93 to 94 Client computers, 49 to 56 Continuous paper loading, 11 to 14, 19 to 21 printing on, 11 to 26 specifications, 117 Control codes, 122 to 124 Control panel, 109 buttons, 63 to 66 lights, 63 to 66, 77 to 78 using, 63 to 73 Custom paper size, 40 Cut-sheet feeder, 88, 98 to 101, 112 D Data length, 67, 71 Default Setting mode...
... Cleaning printer, 74 to 75 Clearing paper jam, 93 to 94 Client computers, 49 to 56 Continuous paper loading, 11 to 14, 19 to 21 printing on, 11 to 26 specifications, 117 Control codes, 122 to 124 Control panel, 109 buttons, 63 to 66 lights, 63 to 66, 77 to 78 using, 63 to 73 Custom paper size, 40 Cut-sheet feeder, 88, 98 to 101, 112 D Data length, 67, 71 Default Setting mode...

User's Guide
Page 36
... or printer driver, you can often change one or more of the printer's default settings from the printer's control panel using the Default Setting mode. Changing the Printer's Default Settings While you may sometimes need to change the printer's settings through your Reference Guide. The table below lists the settings and available options. Setting Page length for tractor Skip over perforation Auto tear off Auto line feed Print direction Software 0 slash High speed draft mode I/F (interface) mode Auto I/F wait time Baud rate Parity Data length Parallel I/F bidirectional mode Packet mode...
... or printer driver, you can often change one or more of the printer's default settings from the printer's control panel using the Default Setting mode. Changing the Printer's Default Settings While you may sometimes need to change the printer's settings through your Reference Guide. The table below lists the settings and available options. Setting Page length for tractor Skip over perforation Auto tear off Auto line feed Print direction Software 0 slash High speed draft mode I/F (interface) mode Auto I/F wait time Baud rate Parity Data length Parallel I/F bidirectional mode Packet mode...

User's Guide
Page 37
... print a list of paper each time the printer ejects a printed page. 1. Then hold down the Tear Off (Font) button and then turn off the printer to change. 8. If you use single sheets, you'll need to load a new sheet of all correct, turn on the printer. Hold down the Load/Eject, LF/FF, and Pause buttons while you turn off . 2. The printer prints instructions for selecting the language. Press the LF/FF button to enter Default Setting mode. The printer enters Default Setting mode...
... print a list of paper each time the printer ejects a printed page. 1. Then hold down the Tear Off (Font) button and then turn off the printer to change. 8. If you use single sheets, you'll need to load a new sheet of all correct, turn on the printer. Hold down the Load/Eject, LF/FF, and Pause buttons while you turn off . 2. The printer prints instructions for selecting the language. Press the LF/FF button to enter Default Setting mode. The printer enters Default Setting mode...

User's Guide
Page 41
... the problem. Clearing a Paper Jam If paper becomes jammed in the printer, tear off . Turn off position. 4. c Caution: Use the paper feed knob to help feed the paper out. Replace the printer cover and paper guide, and turn on the right side of -form or tear-off the printer, open (or remove) the printer cover, and remove the paper guide. 2. See the Reference Guide for possible solutions to remove it: 1. You can print the self test using either single sheets or continuous paper. Make sure the Paper Out light...
... the problem. Clearing a Paper Jam If paper becomes jammed in the printer, tear off . Turn off position. 4. c Caution: Use the paper feed knob to help feed the paper out. Replace the printer cover and paper guide, and turn on the right side of -form or tear-off the printer, open (or remove) the printer cover, and remove the paper guide. 2. See the Reference Guide for possible solutions to remove it: 1. You can print the self test using either single sheets or continuous paper. Make sure the Paper Out light...


