

Product Information Guide
Page 1
... Unit (C800301) Used in your printer. sales) or www.epson.ca (Canada sales). Epson LX-300+II LX-300+II Parts Printer cover Paper supports Edge guides Paper guide User Replaceable Parts User replaceable part Knob Logo plate Paper supports Paper eject assembly Printer cover assembly Sheet guide assembly Reference ...-sheet paper. Black Ribbon Cartridge (#8750) Expected ribbon life is approximately 3 million characters. 7/06 Epson LX-300+II - 1 To find the nearest reseller, call 800-GO-EPSON (800-463-7766). Or you to 50 sheets of paper jams. Two tractors are especially useful...
... Unit (C800301) Used in your printer. sales) or www.epson.ca (Canada sales). Epson LX-300+II LX-300+II Parts Printer cover Paper supports Edge guides Paper guide User Replaceable Parts User replaceable part Knob Logo plate Paper supports Paper eject assembly Printer cover assembly Sheet guide assembly Reference ...-sheet paper. Black Ribbon Cartridge (#8750) Expected ribbon life is approximately 3 million characters. 7/06 Epson LX-300+II - 1 To find the nearest reseller, call 800-GO-EPSON (800-463-7766). Or you to 50 sheets of paper jams. Two tractors are especially useful...
Product Information Guide
Page 2
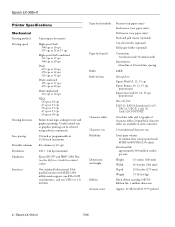
...; and IBM® 2380 Plus (see the Reference Guide for text and graphics printing. Epson LX-300+II 7/06 Epson LX-300+II Printer Specifications Mechanical Printing method Printing speed Printing direction Line spacing Printable columns Resolution Emulation Interfaces 9-pin impact dot matrix High-speed draft 300 cps at 10 cpi 337 cps at 12 or 15 cpi High-speed draft...
...; and IBM® 2380 Plus (see the Reference Guide for text and graphics printing. Epson LX-300+II 7/06 Epson LX-300+II Printer Specifications Mechanical Printing method Printing speed Printing direction Line spacing Printable columns Resolution Emulation Interfaces 9-pin impact dot matrix High-speed draft 300 cps at 10 cpi 337 cps at 12 or 15 cpi High-speed draft...
Product Information Guide
Page 5
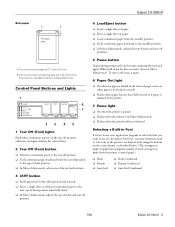
...; Advances continuous paper to the tear-off position. ❏ Feeds continuous paper backward from the printer's control panel.) ❏ Draft ❏ Roman ❏ Sans Serif ❏ Draft Condensed ❏ Roman Condensed ❏ Sans Serif Condensed 7/06 Epson LX-300+II - 5 To turn it off, press it again. 6 Paper Out light ❏ On when no paper...
...; Advances continuous paper to the tear-off position. ❏ Feeds continuous paper backward from the printer's control panel.) ❏ Draft ❏ Roman ❏ Sans Serif ❏ Draft Condensed ❏ Roman Condensed ❏ Sans Serif Condensed 7/06 Epson LX-300+II - 5 To turn it off, press it again. 6 Paper Out light ❏ On when no paper...

Product Information Guide
Page 6
... and one or more control panel lights are printed at the perforation; You can identify many printer problems using the lights on but not loaded in the selected paper source. Epson LX-300+II Follow these steps to use the following table to diagnose and fix the problem. The Pause ...the lights on the control panel indicate the font you press a control panel button when the corresponding function is on the control panel. Epson LX-300+II 7/06 Hold down the Pause button for several minutes; Press the Pause button to enter Micro Adjust mode. Continuous paper is overheated. Tear...
... and one or more control panel lights are printed at the perforation; You can identify many printer problems using the lights on but not loaded in the selected paper source. Epson LX-300+II Follow these steps to use the following table to diagnose and fix the problem. The Pause ...the lights on the control panel indicate the font you press a control panel button when the corresponding function is on the control panel. Epson LX-300+II 7/06 Hold down the Pause button for several minutes; Press the Pause button to enter Micro Adjust mode. Continuous paper is overheated. Tear...

Product Information Guide
Page 7
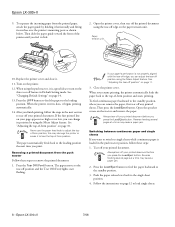
... fit the first holes of this position. 0 mark 5. Make sure your continuous paper behind the printer. Slide the right sprocket to lock it in place. 7/06 Epson LX-300+II - 7 Move the paper support so it will be tearing off the printer. 2. Stack your paper has a clean, straight, leading edge. Close the covers. Slide the left...
... fit the first holes of this position. 0 mark 5. Make sure your continuous paper behind the printer. Slide the right sprocket to lock it in place. 7/06 Epson LX-300+II - 7 Move the paper support so it will be tearing off the printer. 2. Stack your paper has a clean, straight, leading edge. Close the covers. Slide the left...
Product Information Guide
Page 8
...feed knob to the standby position. 3. Close the printer cover. Then press the Load/Eject button. Open the sprocket covers on page 14. 13. Press the Load/Eject button to feed the paper backward to adjust the topof-form position; Epson LX-300+II 7/06 Turn on page 10. Press the Tear Off... and close it begins printing automatically. 14. The paper moves to lose the top-of -form position" on the printer. 12. Epson LX-300+II 9. See "Adjusting the tear-off your printed document. this may cause a paper jam. The paper automatically feeds back to the loading position ...
...feed knob to the standby position. 3. Close the printer cover. Then press the Load/Eject button. Open the sprocket covers on page 14. 13. Press the Load/Eject button to feed the paper backward to adjust the topof-form position; Epson LX-300+II 7/06 Turn on page 10. Press the Tear Off... and close it begins printing automatically. 14. The paper moves to lose the top-of -form position" on the printer. 12. Epson LX-300+II 9. See "Adjusting the tear-off your printed document. this may cause a paper jam. The paper automatically feeds back to the loading position ...
Product Information Guide
Page 9
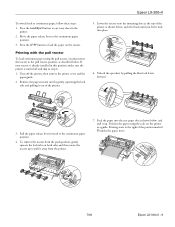
... tractor to the continuous paper position. 3. To remove the tractor from the printer. 7. Position the paper using the pull tractor, you feel it out of the position marked 0 (under the paper now). 7/06 Epson LX-300+II - 9 Remove the paper tension unit by pulling the blue lock levers forward.... 3. Pull the paper release lever forward to the right of the printer. 5. then remove the printer cover and the paper guide. 2. Turn off and ...
... tractor to the continuous paper position. 3. To remove the tractor from the printer. 7. Position the paper using the pull tractor, you feel it out of the position marked 0 (under the paper now). 7/06 Epson LX-300+II - 9 Remove the paper tension unit by pulling the blue lock levers forward.... 3. Pull the paper release lever forward to the right of the printer. 5. then remove the printer cover and the paper guide. 2. Turn off and ...

Product Information Guide
Page 10
... feature in the Default Setting mode to match the width of -form position If your paper has a clean, straight leading edge. Make sure the printer is turned on the page. After you feel it in place. Move the paper supports midway between pages should be just above the print head.... 12. Adjusting the top-of your paper, but leave it begins printing automatically. If you can use the default position as the printer enters Micro Adjust mode. 4. Epson LX-300+II 7/06 Epson LX-300+II 8. Turn the paper feed knob to adjust the top-ofform position;
... feature in the Default Setting mode to match the width of -form position If your paper has a clean, straight leading edge. Make sure the printer is turned on the page. After you feel it in place. Move the paper supports midway between pages should be just above the print head.... 12. Adjusting the top-of your paper, but leave it begins printing automatically. If you can use the default position as the printer enters Micro Adjust mode. 4. Epson LX-300+II 7/06 Epson LX-300+II 8. Turn the paper feed knob to adjust the top-ofform position;

Product Information Guide
Page 11
... instructions. See "Restoring the printer's default settings" on page 14. so you resume printing, the printer automatically feeds the paper back to the top-of-form position and begins printing. The printer advances the paper to the tear-off the printer. Epson LX-300+II Your top-of-form position ...setting remains in effect until you change it, even if you turn off the printer. (If you want to the tear-off the...
... instructions. See "Restoring the printer's default settings" on page 14. so you resume printing, the printer automatically feeds the paper back to the top-of-form position and begins printing. The printer advances the paper to the tear-off the printer. Epson LX-300+II Your top-of-form position ...setting remains in effect until you change it, even if you turn off the printer. (If you want to the tear-off the...
Product Information Guide
Page 12
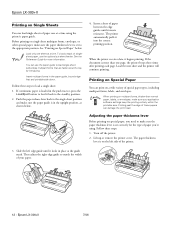
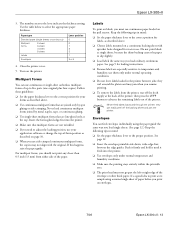
... pulls it back to load a single sheet: 1. The paper thickness lever is more information. Load the next sheet and the printer will continue printing. Epson LX-300+II Printing on Single Sheets You can print on a wide variety of special paper types, including multipart forms, labels, and envelopes. Slide the left side of ...the printing entirely within the printable area. See "Printing on Special Paper" below . 4. Push the paper release lever back to match the width of the printer. 3. Printing on multipart forms, thicker-than one sheet at a time using . Epson LX-300+II 7/06
... pulls it back to load a single sheet: 1. The paper thickness lever is more information. Load the next sheet and the printer will continue printing. Epson LX-300+II Printing on Single Sheets You can print on a wide variety of special paper types, including multipart forms, labels, and envelopes. Slide the left side of ...the printing entirely within the printable area. See "Printing on Special Paper" below . 4. Push the paper release lever back to match the width of the printer. 3. Printing on multipart forms, thicker-than one sheet at a time using . Epson LX-300+II 7/06
Product Information Guide
Page 13
... labels as described above . ❏ Choose labels mounted on envelopes. 7/06 Epson LX-300+II - 13 See page 9 for your application software or change the top-of the printer; Never feed labels backward through the printer; Close the printer cover. 5. Follow these guidelines: ❏ Set the paper thickness lever to... the lever indicate the thickness setting. Push it firmly and hold it until it feeds into the printer. ❏ Make sure that are not wrinkled. ❏ If you need to the proper position. If this happens, raise the paper guide. Epson LX-300+II 3.
... labels as described above . ❏ Choose labels mounted on envelopes. 7/06 Epson LX-300+II - 13 See page 9 for your application software or change the top-of the printer; Never feed labels backward through the printer; Close the printer cover. 5. Follow these guidelines: ❏ Set the paper thickness lever to... the lever indicate the thickness setting. Push it firmly and hold it until it feeds into the printer. ❏ Make sure that are not wrinkled. ❏ If you need to the proper position. If this happens, raise the paper guide. Epson LX-300+II 3.

Product Information Guide
Page 14
... for selecting the language. Press the Tear Off (Font) button. The printer enters Default Setting mode and prints instructions for changing the settings. 7. The table below to enter Default Setting mode. Epson LX-300+II 7/06 If you want a different language, press the LF/FF button ... Tear Off (Font) button to select the next setting you may need to load a new sheet of all the factory default settings, turn on the printer. Epson LX-300+II Default Settings While you can select in inches: 3, 3.5, 4, 5.5, 6, 7, 8, 8.5, 11, 70/6, 12, 14, 17 On, Off On, Off On, ...
... for selecting the language. Press the Tear Off (Font) button. The printer enters Default Setting mode and prints instructions for changing the settings. 7. The table below to enter Default Setting mode. Epson LX-300+II 7/06 If you want a different language, press the LF/FF button ... Tear Off (Font) button to select the next setting you may need to load a new sheet of all the factory default settings, turn on the printer. Epson LX-300+II Default Settings While you can select in inches: 3, 3.5, 4, 5.5, 6, 7, 8, 8.5, 11, 70/6, 12, 14, 17 On, Off On, Off On, ...
Product Information Guide
Page 15
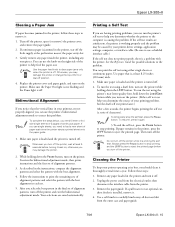
... the interface cable from the outer case and paper guide. 7/06 Epson LX-300+II - 15 It enters the bidirectional adjustment mode, then prints instructions and the first set . 5. Your selections are satisfactory, the printer is printing the self test. Do not turn it is working properly... 3.To end the self test, press the Pause button to eject the printed page before turning it : 1. Epson LX-300+II Clearing a Paper Jam If paper becomes jammed in the printer, press the LF/FF button to eject the printed page. Turn off . 2. Follow the instructions to remove...
... the interface cable from the outer case and paper guide. 7/06 Epson LX-300+II - 15 It enters the bidirectional adjustment mode, then prints instructions and the first set . 5. Your selections are satisfactory, the printer is printing the self test. Do not turn it is working properly... 3.To end the self test, press the Pause button to eject the printed page before turning it : 1. Epson LX-300+II Clearing a Paper Jam If paper becomes jammed in the printer, press the LF/FF button to eject the printed page. Turn off . 2. Follow the instructions to remove...

Product Information Guide
Page 16
... is still dirty, clean it . If the outer case or paper guide is not hot. Keep the printer cover in the push position. 5. Related Documentation( Manual Epson LX-300+II User's Guide CD-ROM containing the on-screen Reference Guide Part number 4105348-00/CPD-21412 3101470-00/CPD...with mild detergent dissolved in the printer. If any paper loaded in water. Epson LX-300+II 7/06 Be careful not to get water on top of the printer firmly to fall. unsuitable lubricants can damage the printer components as well as the holder may be hot; Epson LX-300+II 5. Do not use alcohols ...
... is still dirty, clean it . If the outer case or paper guide is not hot. Keep the printer cover in the push position. 5. Related Documentation( Manual Epson LX-300+II User's Guide CD-ROM containing the on-screen Reference Guide Part number 4105348-00/CPD-21412 3101470-00/CPD...with mild detergent dissolved in the printer. If any paper loaded in water. Epson LX-300+II 7/06 Be careful not to get water on top of the printer firmly to fall. unsuitable lubricants can damage the printer components as well as the holder may be hot; Epson LX-300+II 5. Do not use alcohols ...

Reference Guide
Page 2
... from the use of any options or any use with Seiko Epson Corporation's operating and maintenance instructions. Seiko Epson Corporation shall not be liable for any consumable products other printers. Epson and Epson ESC/P are for damages, losses, costs, or expenses incurred by Seiko Epson Corporation. Epson disclaims any means, electronic, mechanical, photocopying, recording, or otherwise, without...
... from the use of any options or any use with Seiko Epson Corporation's operating and maintenance instructions. Seiko Epson Corporation shall not be liable for any consumable products other printers. Epson and Epson ESC/P are for damages, losses, costs, or expenses incurred by Seiko Epson Corporation. Epson disclaims any means, electronic, mechanical, photocopying, recording, or otherwise, without...
Reference Guide
Page 3
...About This Manual 6 Warnings, Cautions, and Notes 7 Safety Instructions 7 Hot parts caution symbol 7 When setting up the printer 8 When operating the printer 9 When handling paper 9 When maintaining the printer 10 Chapter 1 Paper Handling Printing on Continuous Paper 11 Printing with the push tractor 12 Printing with the pull tractor 17...Printing on Special Paper 29 Adjusting the paper thickness lever 29 Multipart forms 30 Labels 31 Envelopes 32 Chapter 2 Using the Printer Software Accessing the Printer Driver 34 From Windows applications 34 From the Start menu 36 Changing the...
...About This Manual 6 Warnings, Cautions, and Notes 7 Safety Instructions 7 Hot parts caution symbol 7 When setting up the printer 8 When operating the printer 9 When handling paper 9 When maintaining the printer 10 Chapter 1 Paper Handling Printing on Continuous Paper 11 Printing with the push tractor 12 Printing with the pull tractor 17...Printing on Special Paper 29 Adjusting the paper thickness lever 29 Multipart forms 30 Labels 31 Envelopes 32 Chapter 2 Using the Printer Software Accessing the Printer Driver 34 From Windows applications 34 From the Start menu 36 Changing the...

Reference Guide
Page 4
... Setting up EPSON Status Monitor 3 42 Accessing EPSON Status Monitor 3 43 Installing EPSON Status Monitor 3 44 Setting Up Your Printer on a Network 45 Setting up the printer server 45 Setting up the clients 49 Installing the printer driver from the CD-ROM 57 Canceling Printing 58 Uninstalling the Printer Software 59 Uninstalling the printer driver and EPSON Status Monitor...
... Setting up EPSON Status Monitor 3 42 Accessing EPSON Status Monitor 3 43 Installing EPSON Status Monitor 3 44 Setting Up Your Printer on a Network 45 Setting up the printer server 45 Setting up the clients 49 Installing the printer driver from the CD-ROM 57 Canceling Printing 58 Uninstalling the Printer Software 59 Uninstalling the printer driver and EPSON Status Monitor...
Reference Guide
Page 5
Chapter 5 Options and Consumables Cut-sheet Feeder 98 Optional Tractor 102 Roll Paper Holder 104 Replacing the Ribbon Cartridge 105 Chapter 6 Product Information Printer Parts 109 Specifications 111 Mechanical 111 Electronic 113 Electrical 115 Environmental 115 Paper 115 Printable area 119 Paper alignment 121 Command Lists 122 EPSON ESC/P control codes 122 IBM 2380 Plus emulation control codes 123 Standards and approvals 125 Safety approvals 125 CE marking 125 Index 126 5
Chapter 5 Options and Consumables Cut-sheet Feeder 98 Optional Tractor 102 Roll Paper Holder 104 Replacing the Ribbon Cartridge 105 Chapter 6 Product Information Printer Parts 109 Specifications 111 Mechanical 111 Electronic 113 Electrical 115 Environmental 115 Paper 115 Printable area 119 Paper alignment 121 Command Lists 122 EPSON ESC/P control codes 122 IBM 2380 Plus emulation control codes 123 Standards and approvals 125 Safety approvals 125 CE marking 125 Index 126 5
Reference Guide
Page 6
...Epson® LX-300+II printer provides high-quality printing and superior performance in a compact design. About This Manual This manual provides detailed information about your printer contains the printer driver for Microsoft® Windows® 98, Me, 2000, XP and NT 4.0, plus the EPSON Status Monitor 3 utility. This 9-pin dot matrix printer... the control panel functions, including how to change the printer's default settings. ❏ Chapter 4, "Maintenance and Troubleshooting," includes basic maintenance procedures and solutions to 300 cps (characters per second) at 10 cpi (characters...
...Epson® LX-300+II printer provides high-quality printing and superior performance in a compact design. About This Manual This manual provides detailed information about your printer contains the printer driver for Microsoft® Windows® 98, Me, 2000, XP and NT 4.0, plus the EPSON Status Monitor 3 utility. This 9-pin dot matrix printer... the control panel functions, including how to change the printer's default settings. ❏ Chapter 4, "Maintenance and Troubleshooting," includes basic maintenance procedures and solutions to 300 cps (characters per second) at 10 cpi (characters...
Reference Guide
Page 7
...5, "Options and Consumables," describes how to use options such as the roll paper holder and cut-sheet feeder, and explains how to your printer. For setup instructions and basic information, please see the User's Guide. Never touch these safety instructions before touching them cool for a few minutes... before using the printer and follow all of your equipment. Safety Instructions Read all warnings and instructions marked on the print head and other parts to ...
...5, "Options and Consumables," describes how to use options such as the roll paper holder and cut-sheet feeder, and explains how to your printer. For setup instructions and basic information, please see the User's Guide. Never touch these safety instructions before touching them cool for a few minutes... before using the printer and follow all of your equipment. Safety Instructions Read all warnings and instructions marked on the print head and other parts to ...


