

Product Information Guide
Page 1
...You can purchase online at www.epsonstore.com (U.S. sales) or www.epson.ca (Canada sales). Black Ribbon Cartridge (#8750) Expected ribbon life is approximately 3 million characters. 7/06 Epson LX-300+II - 1 Additional Tractor Unit (C800301) Used in your printer. Or you to use 8.5-inch roll paper in combination with the...sheet paper. To find the nearest reseller, call 800-GO-EPSON (800-463-7766). Single-bin Cut-sheet Feeder (C806371) Feeds up to 50 sheets of paper jams. Two tractors are especially useful for printing on continuous multipart forms. Roll Paper Holder (C12C811141 or 8310)...
...You can purchase online at www.epsonstore.com (U.S. sales) or www.epson.ca (Canada sales). Black Ribbon Cartridge (#8750) Expected ribbon life is approximately 3 million characters. 7/06 Epson LX-300+II - 1 Additional Tractor Unit (C800301) Used in your printer. Or you to use 8.5-inch roll paper in combination with the...sheet paper. To find the nearest reseller, call 800-GO-EPSON (800-463-7766). Single-bin Cut-sheet Feeder (C806371) Feeds up to 50 sheets of paper jams. Two tractors are especially useful for printing on continuous multipart forms. Roll Paper Holder (C12C811141 or 8310)...
Product Information Guide
Page 2
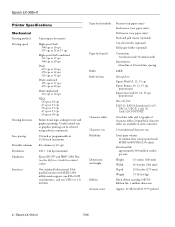
... (76 mm/second) Intermittent 63ms/line at 20 cpi Bidirectional logic seeking for text and graphics printing. Epson LX-300+II Printer Specifications Mechanical Printing method Printing speed Printing direction Line spacing Printable columns Resolution Emulation Interfaces 9-pin impact dot matrix High-speed draft 300 cps at 10 cpi 337 cps at 12 or 15 cpi High-speed draft condensed 321...
... (76 mm/second) Intermittent 63ms/line at 20 cpi Bidirectional logic seeking for text and graphics printing. Epson LX-300+II Printer Specifications Mechanical Printing method Printing speed Printing direction Line spacing Printable columns Resolution Emulation Interfaces 9-pin impact dot matrix High-speed draft 300 cps at 10 cpi 337 cps at 12 or 15 cpi High-speed draft condensed 321...
Product Information Guide
Page 4
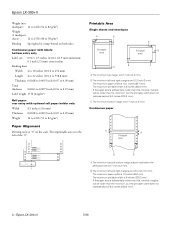
...margins will be wider than the minimum, but the printable width does not increase beyond 8.0 inches (203.2 mm). 4 - Epson LX-300+II 7/06 The maximum printable width is 8 inches (203.2 mm). The maximum paper width is 0.17 inch (4.2 mm). Printable...and envelopes A B A Printable area Printable B area B C C A The minimum top margin is 10 inches (254 mm). Epson LX-300+II Weight (not multipart) 14 to 22 lb (52 to 82 g/m2) Weight (1 multipart sheet) 12 to 15 lb (40 ... "0". If the paper size is to 82 g/m2) Paper Alignment Printing starts at "0" on the scale.
...margins will be wider than the minimum, but the printable width does not increase beyond 8.0 inches (203.2 mm). 4 - Epson LX-300+II 7/06 The maximum printable width is 8 inches (203.2 mm). The maximum paper width is 0.17 inch (4.2 mm). Printable...and envelopes A B A Printable area Printable B area B C C A The minimum top margin is 10 inches (254 mm). Epson LX-300+II Weight (not multipart) 14 to 22 lb (52 to 82 g/m2) Weight (1 multipart sheet) 12 to 15 lb (40 ... "0". If the paper size is to 82 g/m2) Paper Alignment Printing starts at "0" on the scale.
Product Information Guide
Page 5
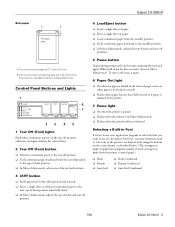
...; In Micro Adjust mode, selects one of the six built-in the tear-off positions. 5 Pause button Stops printing temporarily, and resumes printing when pressed again. otherwise, the lights indicate the selected font. 2 Tear Off (Font) button ❏ Advances...control panel, as described below. (The settings you make from the printer's control panel.) ❏ Draft ❏ Roman ❏ Sans Serif ❏ Draft Condensed ❏ Roman Condensed ❏ Sans Serif Condensed 7/06 Epson LX-300+II - 5 Epson LX-300+II Roll paper A B Printable area A The minimum top margin is ...
...; In Micro Adjust mode, selects one of the six built-in the tear-off positions. 5 Pause button Stops printing temporarily, and resumes printing when pressed again. otherwise, the lights indicate the selected font. 2 Tear Off (Font) button ❏ Advances...control panel, as described below. (The settings you make from the printer's control panel.) ❏ Draft ❏ Roman ❏ Sans Serif ❏ Draft Condensed ❏ Roman Condensed ❏ Sans Serif Condensed 7/06 Epson LX-300+II - 5 Epson LX-300+II Roll paper A B Printable area A The minimum top margin is ...

Product Information Guide
Page 6
... Continuous paper is attached to select a built-in font: 1. f Paper Out - Turn off the printer and leave it again. then turn off the printed document at the perforation; Epson LX-300+II 7/06 Move the paper release lever to the correct position and press the Load/Eject button to turn off...paper is in the standby position when it . Epson LX-300+II Follow these steps to use the control panel to the tractor but not printing. 2. Hold down the Pause button for several minutes; Your selection stays in the printer. If your printed document at the top-of -form position is ...
... Continuous paper is attached to select a built-in font: 1. f Paper Out - Turn off the printer and leave it again. then turn off the printed document at the perforation; Epson LX-300+II 7/06 Move the paper release lever to the correct position and press the Load/Eject button to turn off...paper is in the standby position when it . Epson LX-300+II Follow these steps to use the control panel to the tractor but not printing. 2. Hold down the Pause button for several minutes; Your selection stays in the printer. If your printed document at the top-of -form position is ...

Product Information Guide
Page 7
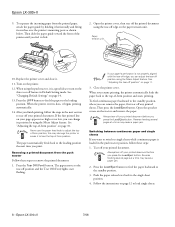
... tractor: 1. Make sure your continuous paper behind the printer. Then open the sprocket covers and fit the first holes of this position. 0 mark 5. Close the covers. Turn off continuous paper sheet-by pulling the blue lock levers forward. 8. Epson LX-300+II Printing on Continuous Paper You can print on continuous paper using the tractor in either...
... tractor: 1. Make sure your continuous paper behind the printer. Then open the sprocket covers and fit the first holes of this position. 0 mark 5. Close the covers. Turn off continuous paper sheet-by pulling the blue lock levers forward. 8. Epson LX-300+II Printing on Continuous Paper You can print on continuous paper using the tractor in either...
Product Information Guide
Page 8
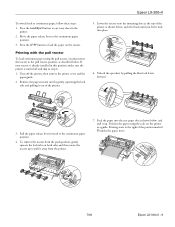
... the steps in the push tractor position, follow these steps to the top-of the printer until you can adjust the tear-off your printed document before you press the Load/Eject button. Epson LX-300+II 9. To separate the incoming paper from the push tractor Follow these steps: 1. After you can change its notches over...
... the steps in the push tractor position, follow these steps to the top-of the printer until you can adjust the tear-off your printed document before you press the Load/Eject button. Epson LX-300+II 9. To separate the incoming paper from the push tractor Follow these steps: 1. After you can change its notches over...
Product Information Guide
Page 9
...top of the position marked 0 (under the paper now). 7/06 Epson LX-300+II - 9 Pull the paper release lever forward to eject any sheet in this position, make sure the printer is already installed in the printer. 2. Printing with the pull tractor To load continuous paper using the scale on ...rotate the tractor up . Turn off and skip to the right of the printer as shown below . Printing starts to step 6. 1. Move the paper release lever to continuous paper, follow these steps: 1. Epson LX-300+II To switch back to the continuous paper position. 3. Press the LF/FF button...
...top of the position marked 0 (under the paper now). 7/06 Epson LX-300+II - 9 Pull the paper release lever forward to eject any sheet in this position, make sure the printer is already installed in the printer. 2. Printing with the pull tractor To load continuous paper using the scale on ...rotate the tractor up . Turn off and skip to the right of the printer as shown below . Printing starts to step 6. 1. Move the paper release lever to continuous paper, follow these steps: 1. Epson LX-300+II To switch back to the continuous paper position. 3. Press the LF/FF button...

Product Information Guide
Page 10
... first holes of -form position If your paper has a clean, straight leading edge. Remove any slack in place. Hold it open. 13. Remove the printer cover. 3. Adjusting the top-of the paper over the printer's mounting posts. Make sure the printer is loaded. 2. Replace the printer cover but do not lock it begins printing automatically. Epson LX-300+II 8.
... first holes of -form position If your paper has a clean, straight leading edge. Remove any slack in place. Hold it open. 13. Remove the printer cover. 3. Adjusting the top-of the paper over the printer's mounting posts. Make sure the printer is loaded. 2. Replace the printer cover but do not lock it begins printing automatically. Epson LX-300+II 8.

Product Information Guide
Page 11
...-off feature to advance your printed documents to the tearoff position, you finish printing. If you resume printing, the printer automatically feeds the paper back to turn on , the printer automatically advances the paper to flash as the printer enters Micro Adjust mode. 4. Hold down the Pause button for instructions.) 7/06 Epson LX-300+II - 11 See page 14 for...
...-off feature to advance your printed documents to the tearoff position, you finish printing. If you resume printing, the printer automatically feeds the paper back to turn on , the printer automatically advances the paper to flash as the printer enters Micro Adjust mode. 4. Hold down the Pause button for instructions.) 7/06 Epson LX-300+II - 11 See page 14 for...
Product Information Guide
Page 12
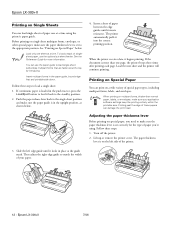
... paper. 12 - See the Reference Guide for the type of the printer. 3. Follow these steps: 1. Slide the left side of paper you need to load a single sheet: 1. Load the next sheet and the printer will continue printing. Epson LX-300+II Printing on Single Sheets You can print on a wide variety of special paper types, including multipart forms, labels...
... paper. 12 - See the Reference Guide for the type of the printer. 3. Follow these steps: 1. Slide the left side of paper you need to load a single sheet: 1. Load the next sheet and the printer will continue printing. Epson LX-300+II Printing on Single Sheets You can print on a wide variety of special paper types, including multipart forms, labels...
Product Information Guide
Page 13
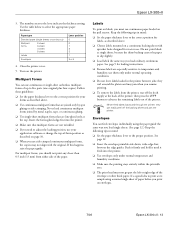
... Envelopes You can use them only under normal temperature and humidity conditions. ❏ Make sure the printing stays entirely within the printable area. ❏ The print head must use continuous paper loaded on page 10. ❏ When you use . Push it ...described on the pull tractor. Never feed labels backward through the printer; Paper type Standard paper (single sheets or continuous) Multipart forms 2-sheet 3-sheet 4-sheet 5-sheet Labels Envelopes Lever position 0 0 1 2 3 1 2 or 4 4. Epson LX-300+II 3. Use the table below to the lever indicate the thickness ...
... Envelopes You can use them only under normal temperature and humidity conditions. ❏ Make sure the printing stays entirely within the printable area. ❏ The print head must use continuous paper loaded on page 10. ❏ When you use . Push it ...described on the pull tractor. Never feed labels backward through the printer; Paper type Standard paper (single sheets or continuous) Multipart forms 2-sheet 3-sheet 4-sheet 5-sheet Labels Envelopes Lever position 0 0 1 2 3 1 2 or 4 4. Epson LX-300+II 3. Use the table below to the lever indicate the thickness ...

Product Information Guide
Page 14
...'ll need to change . 8. Then hold down the Tear Off (Font) button and then turn on the printer. 14 - Epson LX-300+II 7/06 Make sure paper is loaded and the printer is selected. Press the Tear Off (Font) button to exit Default Setting mode. If you want to scroll through... On, Off On, Off Table 1, Table 2 * These settings take effect only when IBM 2380 Plus emulation is off the printer to print a list of paper each time the printer ejects a printed page. 1. If the settings are on. (For English, only the Pause light is indicated by which control panel lights are ...
...'ll need to change . 8. Then hold down the Tear Off (Font) button and then turn on the printer. 14 - Epson LX-300+II 7/06 Make sure paper is loaded and the printer is selected. Press the Tear Off (Font) button to exit Default Setting mode. If you want to scroll through... On, Off On, Off Table 1, Table 2 * These settings take effect only when IBM 2380 Plus emulation is off the printer to print a list of paper each time the printer ejects a printed page. 1. If the settings are on. (For English, only the Pause light is indicated by which control panel lights are ...
Product Information Guide
Page 15
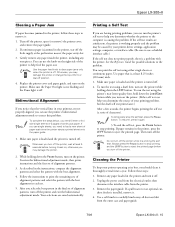
... and dirt from the outer case and paper guide. 7/06 Epson LX-300+II - 15 Remove any torn pieces. then disconnect the interface cable from the electrical outlet; Replace the printer cover and paper guide, and turn off the printer, wait at least 8.25 inches (210 mm) wide. 1.... is turned off position. 4. It enters the bidirectional adjustment mode, then prints instructions and the first set . 5. Always press the Pause button to stop printing and the LF/FF button to the problem. Epson LX-300+II Clearing a Paper Jam If paper becomes jammed in the printer, follow these steps: 1.
... and dirt from the outer case and paper guide. 7/06 Epson LX-300+II - 15 Remove any torn pieces. then disconnect the interface cable from the electrical outlet; Replace the printer cover and paper guide, and turn off the printer, wait at least 8.25 inches (210 mm) wide. 1.... is turned off position. 4. It enters the bidirectional adjustment mode, then prints instructions and the first set . 5. Always press the Pause button to stop printing and the LF/FF button to the problem. Epson LX-300+II Clearing a Paper Jam If paper becomes jammed in the printer, follow these steps: 1.

Product Information Guide
Page 16
... place them in water. Epson LX-300+II 5. You need to remove the ribbon cartridge. Then remove the ribbon cartridge. 7. Epson LX-300+II 7/06 Make sure the tractor that comes with mild detergent dissolved in their original boxes. 6. Make sure the print head is still dirty, clean it with a soft, clean cloth dampened with your printer for a few minutes...
... place them in water. Epson LX-300+II 5. You need to remove the ribbon cartridge. Then remove the ribbon cartridge. 7. Epson LX-300+II 7/06 Make sure the tractor that comes with mild detergent dissolved in their original boxes. 6. Make sure the print head is still dirty, clean it with a soft, clean cloth dampened with your printer for a few minutes...
Reference Guide
Page 3
... Instructions 7 Hot parts caution symbol 7 When setting up the printer 8 When operating the printer 9 When handling paper 9 When maintaining the printer 10 Chapter 1 Paper Handling Printing on Continuous Paper 11 Printing with the push tractor 12 Printing with the pull tractor 17 Adjusting the top-of-form position ... to the tear-off edge 23 Printing on Single Sheets 26 Printing on Special Paper 29 Adjusting the paper thickness lever 29 Multipart forms 30 Labels 31 Envelopes 32 Chapter 2 Using the Printer Software Accessing the Printer Driver 34 From Windows applications 34 ...
... Instructions 7 Hot parts caution symbol 7 When setting up the printer 8 When operating the printer 9 When handling paper 9 When maintaining the printer 10 Chapter 1 Paper Handling Printing on Continuous Paper 11 Printing with the push tractor 12 Printing with the pull tractor 17 Adjusting the top-of-form position ... to the tear-off edge 23 Printing on Single Sheets 26 Printing on Special Paper 29 Adjusting the paper thickness lever 29 Multipart forms 30 Labels 31 Envelopes 32 Chapter 2 Using the Printer Software Accessing the Printer Driver 34 From Windows applications 34 ...

Reference Guide
Page 4
... EPSON Status Monitor 3 41 Setting up EPSON Status Monitor 3 42 Accessing EPSON Status Monitor 3 43 Installing EPSON Status Monitor 3 44 Setting Up Your Printer on a Network 45 Setting up the printer server 45 Setting up the clients 49 Installing the printer driver from the CD-ROM 57 Canceling Printing 58 Uninstalling the Printer Software 59 Uninstalling the printer driver and EPSON...
... EPSON Status Monitor 3 41 Setting up EPSON Status Monitor 3 42 Accessing EPSON Status Monitor 3 43 Installing EPSON Status Monitor 3 44 Setting Up Your Printer on a Network 45 Setting up the printer server 45 Setting up the clients 49 Installing the printer driver from the CD-ROM 57 Canceling Printing 58 Uninstalling the Printer Software 59 Uninstalling the printer driver and EPSON...
Reference Guide
Page 6
Introduction Your Epson® LX-300+II printer provides high-quality printing and superior performance in a compact design. About This Manual This manual provides detailed information about the control panel functions, including how to change the printer's default settings. ❏ Chapter 4, "Maintenance and Troubleshooting," includes basic maintenance procedures and solutions to possible problems. 6 Introduction The CD-ROM that...
Introduction Your Epson® LX-300+II printer provides high-quality printing and superior performance in a compact design. About This Manual This manual provides detailed information about the control panel functions, including how to change the printer's default settings. ❏ Chapter 4, "Maintenance and Troubleshooting," includes basic maintenance procedures and solutions to possible problems. 6 Introduction The CD-ROM that...
Reference Guide
Page 7
... on the print head and other parts to indicate that they may be observed to avoid damage to your printer. Let them . c Cautions must be followed carefully to replace the ribbon cartridge. ❏ Chapter 6, "Product Information," contains technical information about the printer. For setup...information, please see the User's Guide. Hot parts caution symbol K This symbol is placed on the operation of these parts just after the printer has been used. Introduction 7 Warnings, Cautions, and Notes w Warnings must be hot. ❏ Chapter 5, "Options and Consumables," describes ...
... on the print head and other parts to indicate that they may be observed to avoid damage to your printer. Let them . c Cautions must be followed carefully to replace the ribbon cartridge. ❏ Chapter 6, "Product Information," contains technical information about the printer. For setup...information, please see the User's Guide. Hot parts caution symbol K This symbol is placed on the operation of these parts just after the printer has been used. Introduction 7 Warnings, Cautions, and Notes w Warnings must be hot. ❏ Chapter 5, "Options and Consumables," describes ...
Reference Guide
Page 9
... it . otherwise, you may need to move the print head by a qualified technician. ❏ Whenever you have just used the printer, the print head may be checked when the print head is printing the self test. If you turn off the printer while it is replaced. ❏ You may damage it.... ❏ Do not turn off the printer. ❏ Do not reconnect the power ...
... it . otherwise, you may need to move the print head by a qualified technician. ❏ Whenever you have just used the printer, the print head may be checked when the print head is printing the self test. If you turn off the printer while it is replaced. ❏ You may damage it.... ❏ Do not turn off the printer. ❏ Do not reconnect the power ...


