Brochure
Page 3
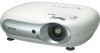
only 28db in low brightness mode Full connectivity at the back of projector Horizontal and vertical lens shift for easy adjustment of image Exclusive Epson E-TORL lamp technology is from the comfort of use in selectable settings automatically adjust the picture brightness and contrast levels...crisp, defined images • True cinema feel 16:9 widescreen display, 854 x 480 pixels • Position the projector almost anywhere - even off -centre, high up The small, stylish Epson EMP-TW20 is easy to run, the only buzz you 're watching, and all can be accessed via the remote control...
only 28db in low brightness mode Full connectivity at the back of projector Horizontal and vertical lens shift for easy adjustment of image Exclusive Epson E-TORL lamp technology is from the comfort of use in selectable settings automatically adjust the picture brightness and contrast levels...crisp, defined images • True cinema feel 16:9 widescreen display, 854 x 480 pixels • Position the projector almost anywhere - even off -centre, high up The small, stylish Epson EMP-TW20 is easy to run, the only buzz you 're watching, and all can be accessed via the remote control...
Brochure
Page 4
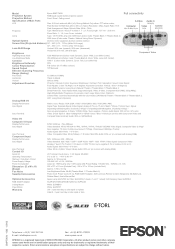
... 2 (in common with MLA (x3); ELPAF09 (1 sheet x 1 unit = 1 sheet); Model Projection System Projection Method Specification of Main Parts LCD Epson EMP-TW20 RGB liquid crystal shutter projection system Front / Rear / Ceiling mount Size: 0.55-inch wide with Analog RGB) I/O Terminal: D-sub 9 pin x... F-number: 1.7 - 2.1; Focal Length: 13.7 mm - 20.5 mm; Lens Cover: included Lamp Type: 135 W UHE Lamp; Tilt Angle: 0 to 85Hz Projector / Remote Control: Keystone / Brightness / Contrast / Tint / Saturation / Sound / Input Signal; Keystone Correction: Vertical: -30 to 35 °C Start-up ...
... 2 (in common with MLA (x3); ELPAF09 (1 sheet x 1 unit = 1 sheet); Model Projection System Projection Method Specification of Main Parts LCD Epson EMP-TW20 RGB liquid crystal shutter projection system Front / Rear / Ceiling mount Size: 0.55-inch wide with Analog RGB) I/O Terminal: D-sub 9 pin x... F-number: 1.7 - 2.1; Focal Length: 13.7 mm - 20.5 mm; Lens Cover: included Lamp Type: 135 W UHE Lamp; Tilt Angle: 0 to 85Hz Projector / Remote Control: Keystone / Brightness / Contrast / Tint / Saturation / Sound / Input Signal; Keystone Correction: Vertical: -30 to 35 °C Start-up ...

User Manual
Page 2
... the procedures are accessories or optional equipment in addition to the main projector unit itself. Notations used in this symbol appears in the glossary of Manual The documentation for your EPSON projector is divided into the following two manuals. Indicates a page where useful... order given below. Safety Instructions/World-Wide Warranty Terms This manual contains information on installing the projector, basic operations, using the projector. Indicates buttons on the remote control or projector's control panel. p.49 , , etc. About the Manuals and Notations Used Types of terms...
... the procedures are accessories or optional equipment in addition to the main projector unit itself. Notations used in this symbol appears in the glossary of Manual The documentation for your EPSON projector is divided into the following two manuals. Indicates a page where useful... order given below. Safety Instructions/World-Wide Warranty Terms This manual contains information on installing the projector, basic operations, using the projector. Indicates buttons on the remote control or projector's control panel. p.49 , , etc. About the Manuals and Notations Used Types of terms...

User Manual
Page 3
... lens cover) RGB SCART adapter Use a commercially-available SCART cable to a wall outlet. Power cable (1.8 m) Connect to the projector and to make sure that you have the RGB SCART adapter included as documentation. Remote control AA manganese batteries (2 pcs.) Insert into the remote control. ...
... lens cover) RGB SCART adapter Use a commercially-available SCART cable to a wall outlet. Power cable (1.8 m) Connect to the projector and to make sure that you have the RGB SCART adapter included as documentation. Remote control AA manganese batteries (2 pcs.) Insert into the remote control. ...
User Manual
Page 4
...and Functions 6 Front / Top 6 Control panel 6 Remote control 7 Rear 8 Base 8 Appearance 9 Installing the Projector Setting up 10 Adjusting the projection size 10 Lens shift adjustment 10 Projection methods 11 Connecting Image Sources 12 Preparing the ...Audio Volume 16 Focus adjustment 16 Fine adjustments to image size (Zoom adjustments 16 Projection image position adjustment (Lens shift) ..16 Correcting projector tilt 16 Correcting keystone distortion (Keystone 17 Adjusting the volume 17 Image Quality Adjustments Basic Image Quality Adjustments 18 Selecting the Color Mode...
...and Functions 6 Front / Top 6 Control panel 6 Remote control 7 Rear 8 Base 8 Appearance 9 Installing the Projector Setting up 10 Adjusting the projection size 10 Lens shift adjustment 10 Projection methods 11 Connecting Image Sources 12 Preparing the ...Audio Volume 16 Focus adjustment 16 Fine adjustments to image size (Zoom adjustments 16 Projection image position adjustment (Lens shift) ..16 Correcting projector tilt 16 Correcting keystone distortion (Keystone 17 Adjusting the volume 17 Image Quality Adjustments Basic Image Quality Adjustments 18 Selecting the Color Mode...

User Manual
Page 5
... of Contents Appendix Maintenance 40 Cleaning 40 • Cleaning the air filter and air intake vent 40 • Cleaning the projector case 40 • Cleaning the lens 40 Consumable replacement periods 41 • Air filter replacement period 41 • Lamp replacement period 41 Replacing consumables 42 &#...
... of Contents Appendix Maintenance 40 Cleaning 40 • Cleaning the air filter and air intake vent 40 • Cleaning the projector case 40 • Cleaning the lens 40 Consumable replacement periods 41 • Air filter replacement period 41 • Lamp replacement period 41 Replacing consumables 42 &#...

User Manual
Page 6
.... Features of the Projector IImmaaggee aappppeeaarraannccee ccaann bbee sseelleecctteedd to match the ptoromjeacttciohntheenvpirroojnemcteionnt (Color Mode) environment (Color Mode) The optimum images for the entire picture's colours. No complex colour adjustments are adjusted to natural shades by the Epson Cinema Filter, but...the "Skin Tone" feature. p.20 4 If "Natural", "Theatre", "Theatre Black 1" or "Theatre Black 2" is selected, the Epson Cinema Filter effect is applied automatically to increase the contrast and to make skin tones appear with more to render the picture even more ...
.... Features of the Projector IImmaaggee aappppeeaarraannccee ccaann bbee sseelleecctteedd to match the ptoromjeacttciohntheenvpirroojnemcteionnt (Color Mode) environment (Color Mode) The optimum images for the entire picture's colours. No complex colour adjustments are adjusted to natural shades by the Epson Cinema Filter, but...the "Skin Tone" feature. p.20 4 If "Natural", "Theatre", "Theatre Black 1" or "Theatre Black 2" is selected, the Epson Cinema Filter effect is applied automatically to increase the contrast and to make skin tones appear with more to render the picture even more ...

User Manual
Page 7
... functions Some of the projected images to prevent children from a ceiling or at a distance of the Projector Equipped with phosphorescent remote control whose buttons glow in wide-screen format. p.18 Memory functions that allow the projector to the screen. p.29 5 p.16 Features of approximately 3 m (10 ft.). convenient for still images. A progressive conversion...
... functions Some of the projected images to prevent children from a ceiling or at a distance of the Projector Equipped with phosphorescent remote control whose buttons glow in wide-screen format. p.18 Memory functions that allow the projector to the screen. p.29 5 p.16 Features of approximately 3 m (10 ft.). convenient for still images. A progressive conversion...
User Manual
Page 8
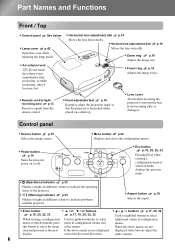
... adjustment values in configuration menus. Control panel • Source button p.15 Selects the image source. • Power button p.14 Turns the projector power on a desk top. When the above menus are not displayed, these buttons adjust the audio volume. 6 receiving area p.13 Receives ...menu displays the previous menu. • (Operation) indicator p.33 Flashes or lights in different colours to indicate the operating status of the projector. • (Warning) indicator p.33 Flashes or lights in configuration menus and select menus. Open this button to select the menu item...
... adjustment values in configuration menus. Control panel • Source button p.15 Selects the image source. • Power button p.14 Turns the projector power on a desk top. When the above menus are not displayed, these buttons adjust the audio volume. 6 receiving area p.13 Receives ...menu displays the previous menu. • (Operation) indicator p.33 Flashes or lights in different colours to indicate the operating status of the projector. • (Warning) indicator p.33 Flashes or lights in configuration menus and select menus. Open this button to select the menu item...
User Manual
Page 9
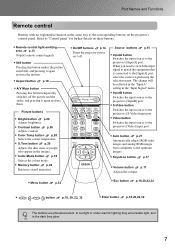
...select the correct signal using the selection menu. When you need to switch the input signal to match the equipment that is connected to the projector's [InputA] port. Picture buttons • Bright button p.26 Adjusts brightness. • Contrast button p.26 Adjusts contrast. • Color Temp... Auto button p.27 Automatically adjusts RGB video images and analog RGB images from computers to "Control panel" for further details on the projector's control panel. In sunlight or under electric lighting they glow. Part Names and Functions Remote control Buttons with no explanation function in...
...select the correct signal using the selection menu. When you need to switch the input signal to match the equipment that is connected to the projector's [InputA] port. Picture buttons • Bright button p.26 Adjusts brightness. • Contrast button p.26 Adjusts contrast. • Color Temp... Auto button p.27 Automatically adjusts RGB video images and analog RGB images from computers to "Control panel" for further details on the projector's control panel. In sunlight or under electric lighting they glow. Part Names and Functions Remote control Buttons with no explanation function in...
User Manual
Page 10
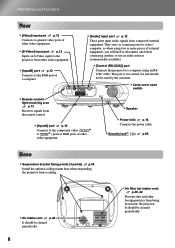
...equipment. They serve as common ports for control use an audio selector (commercially-available). • [Control (RS-232C)] port Connects the projector to a computer using two or more pieces of external equipment, you will need to disconnect one before connecting another, or use and ... • Security lock ( ) p.50 Base • Suspension bracket fixing points (3 points) p.44 Install the optional ceiling mount here when suspending the projector from a ceiling. • Air intake vent p.40 It should be cleaned periodically. This port is for video / computer, so when using an RS232C...
...equipment. They serve as common ports for control use an audio selector (commercially-available). • [Control (RS-232C)] port Connects the projector to a computer using two or more pieces of external equipment, you will need to disconnect one before connecting another, or use and ... • Security lock ( ) p.50 Base • Suspension bracket fixing points (3 points) p.44 Install the optional ceiling mount here when suspending the projector from a ceiling. • Air intake vent p.40 It should be cleaned periodically. This port is for video / computer, so when using an RS232C...

User Manual
Page 11
Appearance 127 111 16 295 Centre of projector Centre of lens 61*1 11 83.5*2 373 *1 Distance from centre of lens to suspension bracket fixing point (Lens shift amount: Max. 3.4 mm vertically) *2 Distance from centre of lens to centre of projector (Lens shift amount: Max. 3.0 mm horizontally) Centre of lens 115 127 96 98.5 12 80 3-M4×8 Units: mm 9
Appearance 127 111 16 295 Centre of projector Centre of lens 61*1 11 83.5*2 373 *1 Distance from centre of lens to suspension bracket fixing point (Lens shift amount: Max. 3.4 mm vertically) *2 Distance from centre of lens to centre of projector (Lens shift amount: Max. 3.0 mm horizontally) Centre of lens 115 127 96 98.5 12 80 3-M4×8 Units: mm 9
User Manual
Page 12
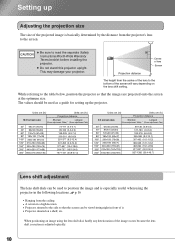
...following locations. While referring to read the separate Safety Instructions/World-Wide Warranty Terms booklet before installing the projector. Do not stand this projector upright. This may damage your projector. 90 Centre of lens Screen Projection distance The height from the centre of the lens to the bottom... of the projected image is basically determined by the distance from the ceiling A screen in a high location Projector situated to position the image and is adjusted optically. 10 Longest (Zoom adjustment: Tele) 30" 61×46 (24×18) 40...
...following locations. While referring to read the separate Safety Instructions/World-Wide Warranty Terms booklet before installing the projector. Do not stand this projector upright. This may damage your projector. 90 Centre of lens Screen Projection distance The height from the centre of the lens to the bottom... of the projected image is basically determined by the distance from the ceiling A screen in a high location Projector situated to position the image and is adjusted optically. 10 Longest (Zoom adjustment: Tele) 30" 61×46 (24×18) 40...

User Manual
Page 13
...215;25% H×17% V×36% V×50% V V×36% V×50% *You cannot shift the image by more between the projector and the wall. A special method of its width. Ex) When the image is shifted horizontally by the full amount, it cannot be shifted vertically by... horizontally. And when the image is required in a dusty environment. Please contact your dealer if you would like to suspend the projector from the ceiling. Projection methods When prPojercotinjgefrcomtiodirnectmly ineftrohntods Setting up in .) or more than 36 % of installation is shifted vertically by...
...215;25% H×17% V×36% V×50% V V×36% V×50% *You cannot shift the image by more between the projector and the wall. A special method of its width. Ex) When the image is shifted horizontally by the full amount, it cannot be shifted vertically by... horizontally. And when the image is required in a dusty environment. Please contact your dealer if you would like to suspend the projector from the ceiling. Projection methods When prPojercotinjgefrcomtiodirnectmly ineftrohntods Setting up in .) or more than 36 % of installation is shifted vertically by...

User Manual
Page 14
...output several different types of video signal. The composite video format is sometimes simply called "video output". 12 If the power for both the projector and the signal source before making the connections. available) Audio cable (commercially- Computer Video equipment (VHS VCR, DVD player, game console, etc...Connecting Image Sources •Turn the power off for either device is on the equipment being used to connect video equipment to the projector will depend on the type of video signal that are supplied with the signal source to make the connections. In such cases, ...
...output several different types of video signal. The composite video format is sometimes simply called "video output". 12 If the power for both the projector and the signal source before making the connections. available) Audio cable (commercially- Computer Video equipment (VHS VCR, DVD player, game console, etc...Connecting Image Sources •Turn the power off for either device is on the equipment being used to connect video equipment to the projector will depend on the type of video signal that are supplied with the signal source to make the connections. In such cases, ...

User Manual
Page 15
... inside the battery compartment and insert the batteries so that the batteries are becoming flat. Use two new AA batteries as replacement batteries. Installing the Projector Insert the batteries. Preparing the Remote Control Inserting batteries into place. Battery replacement period If delays in the responsiveness of the remote control occur or...
... inside the battery compartment and insert the batteries so that the batteries are becoming flat. Use two new AA batteries as replacement batteries. Installing the Projector Insert the batteries. Preparing the Remote Control Inserting batteries into place. Battery replacement period If delays in the responsiveness of the remote control occur or...

User Manual
Page 16
... key with an automatic adjustment Example of about 1500 m, set the "High Altitude Mode" to start . After the selection is switched. The projector is equipped with a symbol such as HP Toshiba IBM SONY DELL / on and projection will soon Fujitsu start. Use the accessory power cable... to connect the projector to change the output destination. The "beep" start playback. p.29 When using above an altitude of output selection function that prevents young...
... key with an automatic adjustment Example of about 1500 m, set the "High Altitude Mode" to start . After the selection is switched. The projector is equipped with a symbol such as HP Toshiba IBM SONY DELL / on and projection will soon Fujitsu start. Use the accessory power cable... to connect the projector to change the output destination. The "beep" start playback. p.29 When using above an altitude of output selection function that prevents young...

User Manual
Page 17
...off for the signal sources that are connected to select the signal source. Disconnect the cables that are connecting other equipment to the projector. 15 When connecting equipment to the [InputA] port, you press , the selection menu is set up TIP and connected correctly...the button that has the name of the port on and Projecting Images SSeelelecctitnigngthtehiemiamgeagseousroceurce If more . Selection menu Use equipment. When the projector has cooled down (takes about 20 seconds) and the "beep beep" tone sounds, disconnect the power cable. Control Panel Pressing will...
...off for the signal sources that are connected to select the signal source. Disconnect the cables that are connecting other equipment to the projector. 15 When connecting equipment to the [InputA] port, you press , the selection menu is set up TIP and connected correctly...the button that has the name of the port on and Projecting Images SSeelelecctitnigngthtehiemiamgeagseousroceurce If more . Selection menu Use equipment. When the projector has cooled down (takes about 20 seconds) and the "beep beep" tone sounds, disconnect the power cable. Control Panel Pressing will...

User Manual
Page 18
... position. Extend Retract Extend Retract 16 If the lens shift dial becomes hard to adjust the focus. p.10 Correcting projector tilt Correcting projector tilt If the projected images are tilted horizontally, use the lens shift dial so that it is horizontal. Adjusting the... ring to turn further and the image position stops TIP changing, no further adjustment is possible. If you cannot position the projector straight in front of the projected image. Wide Tele Projection image position aPdrojujescttmioennimt (aLgeenpsossihtiioftn) adjustment (Lens shift) Use the two...
... position. Extend Retract Extend Retract 16 If the lens shift dial becomes hard to adjust the focus. p.10 Correcting projector tilt Correcting projector tilt If the projected images are tilted horizontally, use the lens shift dial so that it is horizontal. Adjusting the... ring to turn further and the image position stops TIP changing, no further adjustment is possible. If you cannot position the projector straight in front of the projected image. Wide Tele Projection image position aPdrojujescttmioennimt (aLgeenpsossihtiioftn) adjustment (Lens shift) Use the two...

User Manual
Page 19
...In such cases, press ( ) ( ) on the control panel, or on the control panel. When making keystone corrections set the projector at the centre left or right, complete keystone correction is shifted to adjust the images. Adjusting the Projection Screen and the Audio Volume ... control to the left to right. 30˚ 30˚ Keystone distortion can be corrected within a maximum vertical angle of the projector's built-in speaker can be adjusted as follows. However, the image quality will decrease compared to the side, the volume decreases. ...
...In such cases, press ( ) ( ) on the control panel, or on the control panel. When making keystone corrections set the projector at the centre left or right, complete keystone correction is shifted to adjust the images. Adjusting the Projection Screen and the Audio Volume ... control to the left to right. 30˚ 30˚ Keystone distortion can be corrected within a maximum vertical angle of the projector's built-in speaker can be adjusted as follows. However, the image quality will decrease compared to the side, the volume decreases. ...


