
Owners Manual
Page 3
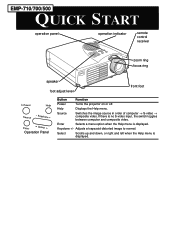
... video.If there is no S-video input, the switch toggles between computer and composite video. EMP-710/700/500 QUICK START operation panel operation indicator remote control receiver zoom ring focus ring speaker foot adjust lever front foot Power Help Source Keystone Enter Select Operation Panel Button Function Power Turns the projector on or off.
... video.If there is no S-video input, the switch toggles between computer and composite video. EMP-710/700/500 QUICK START operation panel operation indicator remote control receiver zoom ring focus ring speaker foot adjust lever front foot Power Help Source Keystone Enter Select Operation Panel Button Function Power Turns the projector on or off.
Owners Manual
Page 4
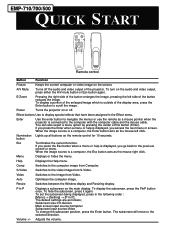
... Video. button Esc Terminates the current function. To display the subscreen, press the PinP button once. Volume +/- Power Turns the projector on the audio and video output, press either the A/V mute button or Esc button again. Effect buttons Use to the video...The subscreen will move to the image from Computer. To hide the subscreen, press it again. EMP-710/700/500 QUICK START Freeze A/V Mute E-Zoom Power R/C ON OFF 2 3 4 1 5 Enter Esc Remote control Button Function Freeze Keeps the current computer or video image on the screen. A/V Mute Turns ...
... Video. button Esc Terminates the current function. To display the subscreen, press the PinP button once. Volume +/- Power Turns the projector on the audio and video output, press either the A/V mute button or Esc button again. Effect buttons Use to the video...The subscreen will move to the image from Computer. To hide the subscreen, press it again. EMP-710/700/500 QUICK START Freeze A/V Mute E-Zoom Power R/C ON OFF 2 3 4 1 5 Enter Esc Remote control Button Function Freeze Keeps the current computer or video image on the screen. A/V Mute Turns ...
Owners Manual
Page 8
... and Off 29 Focusing and Positioning the Screen Image 31 Resize Button 33 Controlling the Projector 34 Using the Remote Control 35 Using the Operation Panel 38 Projector Status Indicators 39 Operation Indicator 39 Lamp Indicator 40 Temperature Indicator 40 3 Using the Projector Menus 41 Accessing the Main Menu 42 Changing a Menu Setting 43 Menu ... Menu 49 User's Logo Menu 50 Reset All Menu 52 Advanced Menu 53 About Menu 54 4 Maintenance 55 Cleaning the Lens 56 Cleaning the Projector Case 56 Cleaning the Air Filter 57 Replacing the Lamp 58 s s s s iv Contents
... and Off 29 Focusing and Positioning the Screen Image 31 Resize Button 33 Controlling the Projector 34 Using the Remote Control 35 Using the Operation Panel 38 Projector Status Indicators 39 Operation Indicator 39 Lamp Indicator 40 Temperature Indicator 40 3 Using the Projector Menus 41 Accessing the Main Menu 42 Changing a Menu Setting 43 Menu ... Menu 49 User's Logo Menu 50 Reset All Menu 52 Advanced Menu 53 About Menu 54 4 Maintenance 55 Cleaning the Lens 56 Cleaning the Projector Case 56 Cleaning the Air Filter 57 Replacing the Lamp 58 s s s s iv Contents
Owners Manual
Page 11
...control mouse operations on your projector through a hand-held remote control unit, with menus being provided for presentations. You control your computer screen during presentations. A totally new AVTSS™ (Automatic Video Tracking and Synchronization Sensing, patent pending) provides automatic set-up of 800 x 600 pixels (EMP-500). s s s s ss s s s s s s s s s Introduction Your compact, lightweight EPSON EMP-710/700/500 projector...be easily seen in full color (16,670,000 colors) at a XGA resolution of 1024 x 768 pixels (EMP-710/700) or SVGA resolution of image from a computer.
...control mouse operations on your projector through a hand-held remote control unit, with menus being provided for presentations. You control your computer screen during presentations. A totally new AVTSS™ (Automatic Video Tracking and Synchronization Sensing, patent pending) provides automatic set-up of 800 x 600 pixels (EMP-500). s s s s ss s s s s s s s s s Introduction Your compact, lightweight EPSON EMP-710/700/500 projector...be easily seen in full color (16,670,000 colors) at a XGA resolution of 1024 x 768 pixels (EMP-710/700) or SVGA resolution of image from a computer.
Owners Manual
Page 14
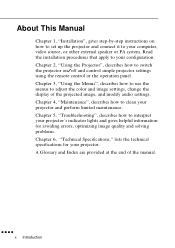
..., and modify audio settings. Chapter 3, "Using the Menus", describes how to use the menus to switch the projector on how to set up the projector and connect it to your configuration. Read the installation procedures that apply to your computer, video source, or other... speaker or PA system. Chapter 2, "Using the Projector", describes how to adjust the color and image settings, change the display of the manual. About This Manual Chapter 1, "Installation", gives step-by-step instructions on /off and control simple projector settings using the remote control or the operation panel.
..., and modify audio settings. Chapter 3, "Using the Menus", describes how to use the menus to switch the projector on how to set up the projector and connect it to your configuration. Read the installation procedures that apply to your computer, video source, or other... speaker or PA system. Chapter 2, "Using the Projector", describes how to adjust the color and image settings, change the display of the manual. About This Manual Chapter 1, "Installation", gives step-by-step instructions on /off and control simple projector settings using the remote control or the operation panel.

Owners Manual
Page 16
... as a car. 16. Refer all servicing to service this User's Guide, do not attempt to qualified service personnel. Do not place the projector and remote control on a sofa, rug or other soft surface, or in a closed-in a heated place, such as specifically explained in performance, indicating a... need for extended periods. 15. Do not place the projector on top of heat-producing equipment or in cabinet unless proper ventilation is damaged ...
... as a car. 16. Refer all servicing to service this User's Guide, do not attempt to qualified service personnel. Do not place the projector and remote control on a sofa, rug or other soft surface, or in a closed-in a heated place, such as specifically explained in performance, indicating a... need for extended periods. 15. Do not place the projector on top of heat-producing equipment or in cabinet unless proper ventilation is damaged ...

Owners Manual
Page 19
... camera or laser disc player before it to use the remote control as a wireless mouse. • Provide audio for one or both image sources. s s s s s s 1 The audio source can project any images. s s s s ss s s s s s s s s s 1 Installation This chapter describes how to unpack and set up your projector, and connect it can be connected to amplify the...
... camera or laser disc player before it to use the remote control as a wireless mouse. • Provide audio for one or both image sources. s s s s s s 1 The audio source can project any images. s s s s ss s s s s s s s s s 1 Installation This chapter describes how to unpack and set up your projector, and connect it can be connected to amplify the...

Owners Manual
Page 20
Save all these components. It should be transported in the future. s s s s 2 Unpacking the Projector When you unpack the projector, make sure you have all these components: • Projector • Remote control • 2 AA batteries • Power cord • Computer cable • Audio/Video cable (A/V cable) • PS/2 mouse cable • USB mouse cable • Mac ... Owner's manual • Softcase Depending on the configuration of your equipment, you may not need all packaging materials in case you need to ship the projector in its original packaging or the equivalent.
Save all these components. It should be transported in the future. s s s s 2 Unpacking the Projector When you unpack the projector, make sure you have all these components: • Projector • Remote control • 2 AA batteries • Power cord • Computer cable • Audio/Video cable (A/V cable) • PS/2 mouse cable • USB mouse cable • Mac ... Owner's manual • Softcase Depending on the configuration of your equipment, you may not need all packaging materials in case you need to ship the projector in its original packaging or the equivalent.
Owners Manual
Page 23
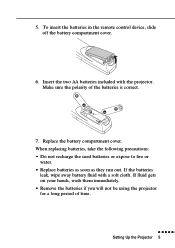
... gets on your hands, wash them immediately. • Remove the batteries if you will not be using the projector for a long period of the batteries is correct. 7. To insert the batteries in the remote control device, slide off the battery compartment cover. 6. When replacing batteries, take the following precautions: • Do not recharge...
... gets on your hands, wash them immediately. • Remove the batteries if you will not be using the projector for a long period of the batteries is correct. 7. To insert the batteries in the remote control device, slide off the battery compartment cover. 6. When replacing batteries, take the following precautions: • Do not recharge...

Owners Manual
Page 26
... cable. Connecting the Mouse Cables If you need to the projector's Computer port. 3. USB mouse port Mouse/Com port PS/2 mouse cable USB mouse cable s s s s 8 If you will be viewing the video on your computer. 2. Refer to use the remote control as the projector screen, disconnect the monitor cable from the video port on...
... cable. Connecting the Mouse Cables If you need to the projector's Computer port. 3. USB mouse port Mouse/Com port PS/2 mouse cable USB mouse cable s s s s 8 If you will be viewing the video on your computer. 2. Refer to use the remote control as the projector screen, disconnect the monitor cable from the video port on...

Owners Manual
Page 27
If you will be using the remote control as a mouse.) Connecting the Audio Cable 1. Audio n jack audio cable 2. Connect the 9-pin end of the audio cable to the Audio In jack on the projector. 2. s s s s s s Connecting to the Mouse/Com or USB mouse port on the projector. Connect the other end of the PS/2 mouse cable...
If you will be using the remote control as a mouse.) Connecting the Audio Cable 1. Audio n jack audio cable 2. Connect the 9-pin end of the audio cable to the Audio In jack on the projector. 2. s s s s s s Connecting to the Mouse/Com or USB mouse port on the projector. Connect the other end of the PS/2 mouse cable...

Owners Manual
Page 28
... computer if they are on all connectors. See your computer manual for the cables you need to your projector. Connecting the Computer Cable First connect the projector's computer cable to connect. Computer port computer cable 1. Tighten the screws on . ♦ Note: Laptop configurations vary. s s s ... the video cable to the projector's Computer port. 2. Connecting to a PC Laptop Computer To connect the projector to your PC laptop computer, you need to: • Connect the computer cable • Connect the mouse cable (if you want to use the remote control as a mouse) •...
... computer if they are on all connectors. See your computer manual for the cables you need to your projector. Connecting the Computer Cable First connect the projector's computer cable to connect. Computer port computer cable 1. Tighten the screws on . ♦ Note: Laptop configurations vary. s s s ... the video cable to the projector's Computer port. 2. Connecting to a PC Laptop Computer To connect the projector to your PC laptop computer, you need to: • Connect the computer cable • Connect the mouse cable (if you want to use the remote control as a mouse) •...

Owners Manual
Page 29
... Cables If you want to use the remote control as a mouse, you need to this illustration while following the steps below. Connect the 6-pin (mini-DIN) end of the PS/2 mouse cable or USB mouse cable to the external mouse port or USB port on the projector. 2. Refer to connect the PS/2 mouse...
... Cables If you want to use the remote control as a mouse, you need to this illustration while following the steps below. Connect the 6-pin (mini-DIN) end of the PS/2 mouse cable or USB mouse cable to the external mouse port or USB port on the projector. 2. Refer to connect the PS/2 mouse...

Owners Manual
Page 31
...computer cable s s s s s s Connecting to use the remote control as you need to: • Connect the computer cable • Connect the mouse cable (if you want to a Computer 13 Connecting to a Desktop Macintosh To connect the projector to your projector. Refer to this illustration as a mouse) • Connect ...the location of the ports needed to connect your desktop Macintosh, you need to connect. Before beginning, turn off the projector and computer if they are on. ♦ Note: Macintosh configurations vary. See your computer manual for the cables you follow the steps...
...computer cable s s s s s s Connecting to use the remote control as you need to: • Connect the computer cable • Connect the mouse cable (if you want to a Computer 13 Connecting to a Desktop Macintosh To connect the projector to your projector. Refer to this illustration as a mouse) • Connect ...the location of the ports needed to connect your desktop Macintosh, you need to connect. Before beginning, turn off the projector and computer if they are on. ♦ Note: Macintosh configurations vary. See your computer manual for the cables you follow the steps...
Owners Manual
Page 33
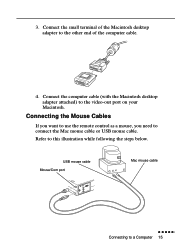
Connecting the Mouse Cables If you want to use the remote control as a mouse, you need to the other end of the Macintosh desktop adapter to connect the Mac mouse cable or USB mouse cable. Connect the small terminal of the computer cable. 4. Connect the computer cable (with the Macintosh desktop adapter attached) to this illustration while following the steps below. Refer to the video-out port on your Macintosh. USB mouse cable Mouse/Com port Mac mouse cable s s s s s s Connecting to a Computer 15 3.
Connecting the Mouse Cables If you want to use the remote control as a mouse, you need to the other end of the Macintosh desktop adapter to connect the Mac mouse cable or USB mouse cable. Connect the small terminal of the computer cable. 4. Connect the computer cable (with the Macintosh desktop adapter attached) to this illustration while following the steps below. Refer to the video-out port on your Macintosh. USB mouse cable Mouse/Com port Mac mouse cable s s s s s s Connecting to a Computer 15 3.

Owners Manual
Page 35
... turn off the projector and computer if they are on. ♦ Note: PowerBook configurations vary, so the location of your PowerBook manual for the cables you need to: • Connect the computer cable • Connect the mouse cable (if you want to use the remote control as you 'll... be projecting with audio) Follow the steps in order to connect to a Computer 17 Refer to connect. See your computer's ports may not match the illustrations. Connecting the Computer Cable First connect the computer cable. To connect the projector to your PowerBook...
... turn off the projector and computer if they are on. ♦ Note: PowerBook configurations vary, so the location of your PowerBook manual for the cables you need to: • Connect the computer cable • Connect the mouse cable (if you want to use the remote control as you 'll... be projecting with audio) Follow the steps in order to connect to a Computer 17 Refer to connect. See your computer's ports may not match the illustrations. Connecting the Computer Cable First connect the computer cable. To connect the projector to your PowerBook...

Owners Manual
Page 38
Connect one end of the projector's Mac mouse cable or USB mouse cable to this illustration while following the steps below. s s s s 20 Refer to the Mouse/Com or USB Mouse port on the projector. Mouse/Com port Mac mouse cable USB mouse cable 1. Connecting the Mouse Cables If you want to use the remote control as a mouse, you need to connect the Mac mouse cable or USB mouse cable.
Connect one end of the projector's Mac mouse cable or USB mouse cable to this illustration while following the steps below. s s s s 20 Refer to the Mouse/Com or USB Mouse port on the projector. Mouse/Com port Mac mouse cable USB mouse cable 1. Connecting the Mouse Cables If you want to use the remote control as a mouse, you need to connect the Mac mouse cable or USB mouse cable.

Owners Manual
Page 45
s s s s ss s s s s s s s s s 2 Using the Projector This chapter provides the following information about using your projector: • Turning the equipment on and off • Focusing and positioning the screen image • Controlling the projector with the remote control and the operation panel • Monitoring the projector's operating status s s s s s s 27
s s s s ss s s s s s s s s s 2 Using the Projector This chapter provides the following information about using your projector: • Turning the equipment on and off • Focusing and positioning the screen image • Controlling the projector with the remote control and the operation panel • Monitoring the projector's operating status s s s s s s 27

Owners Manual
Page 46
The illustration below identifies the parts of your projector. operation indicator operation panel remote control receiver zoom ring focus ring speaker foot adjust lever front foot s s s s 28
The illustration below identifies the parts of your projector. operation indicator operation panel remote control receiver zoom ring focus ring speaker foot adjust lever front foot s s s s 28

Owners Manual
Page 47
... video signal is projected. ♦ Warning: Never look into the lens when the lamp is on first with the remote control, be sure to look into the lens. ♦ Caution: When turning the projector on or off the equipment, do so in the following order. 1. s s s s s s Turning the ...Equipment On and Off 29 When you turn the remote control on . This can damage your eyes. When the projector is especially important that children are not allowed to turn off with the power switch. It is fully warmed up . Remove...
... video signal is projected. ♦ Warning: Never look into the lens when the lamp is on first with the remote control, be sure to look into the lens. ♦ Caution: When turning the projector on or off the equipment, do so in the following order. 1. s s s s s s Turning the ...Equipment On and Off 29 When you turn the remote control on . This can damage your eyes. When the projector is especially important that children are not allowed to turn off with the power switch. It is fully warmed up . Remove...


