
Owners Manual
Page 4
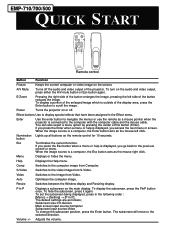
... button once. Effect buttons Use to the selected direction. Help Displays the Help menu. Video Switches to the computer image from Computer. The default settings are as the mouse left side of the projector. The subscreen will move to display special effects that have been assigned in the Effect menu. Comp Switches to the image from S-Video. EMP-710/700/500 QUICK START Freeze A/V Mute E-Zoom Power R/C ON OFF 2 3 4 1 5 Enter Esc Remote control Button Function Freeze Keeps...
... button once. Effect buttons Use to the selected direction. Help Displays the Help menu. Video Switches to the computer image from Computer. The default settings are as the mouse left side of the projector. The subscreen will move to display special effects that have been assigned in the Effect menu. Comp Switches to the image from S-Video. EMP-710/700/500 QUICK START Freeze A/V Mute E-Zoom Power R/C ON OFF 2 3 4 1 5 Enter Esc Remote control Button Function Freeze Keeps...
Owners Manual
Page 8
...34 Using the Remote Control 35 Using the Operation Panel 38 Projector Status Indicators 39 Operation Indicator 39 Lamp Indicator 40 Temperature Indicator 40 3 Using the Projector Menus 41 Accessing the Main Menu 42 Changing a Menu Setting 43 Menu Options 45 Video Menu (Image source = Computer 45 Video Menu (Image source = Video 47 Audio Menu 48 Effect Menu 49 Setting Menu 49 User's Logo Menu 50 Reset All Menu 52 Advanced Menu 53 About Menu 54 4 Maintenance 55 Cleaning the Lens 56 Cleaning the Projector Case 56 Cleaning the Air Filter 57 Replacing the Lamp 58...
...34 Using the Remote Control 35 Using the Operation Panel 38 Projector Status Indicators 39 Operation Indicator 39 Lamp Indicator 40 Temperature Indicator 40 3 Using the Projector Menus 41 Accessing the Main Menu 42 Changing a Menu Setting 43 Menu Options 45 Video Menu (Image source = Computer 45 Video Menu (Image source = Video 47 Audio Menu 48 Effect Menu 49 Setting Menu 49 User's Logo Menu 50 Reset All Menu 52 Advanced Menu 53 About Menu 54 4 Maintenance 55 Cleaning the Lens 56 Cleaning the Projector Case 56 Cleaning the Air Filter 57 Replacing the Lamp 58...
Owners Manual
Page 9
5 Troubleshooting 61 Problems with the Projector 62 Problems with the Image or Sound 64 6 Technical Specifications 67 Supported Monitor Displays 69 Computer In connector pin assignments 71 Glossary 73 Index 75 World-Wide Warranty Terms 77 s s s s s s v
5 Troubleshooting 61 Problems with the Projector 62 Problems with the Image or Sound 64 6 Technical Specifications 67 Supported Monitor Displays 69 Computer In connector pin assignments 71 Glossary 73 Index 75 World-Wide Warranty Terms 77 s s s s s s v
Owners Manual
Page 11
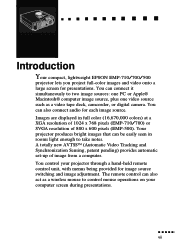
... pixels (EMP-500). Images are displayed in rooms light enough to control mouse operations on your projector through a hand-held remote control unit, with menus being provided for presentations. You control your computer screen during presentations. You can also act as a video tape deck, camcorder, or digital camera. s s s s ss s s s s s s s s s Introduction Your compact, lightweight EPSON EMP-710/700/500 projector lets you project full-color images and video onto a large screen for image source switching and image adjustment.
... pixels (EMP-500). Images are displayed in rooms light enough to control mouse operations on your projector through a hand-held remote control unit, with menus being provided for presentations. You control your computer screen during presentations. You can also act as a video tape deck, camcorder, or digital camera. s s s s ss s s s s s s s s s Introduction Your compact, lightweight EPSON EMP-710/700/500 projector lets you project full-color images and video onto a large screen for image source switching and image adjustment.

Owners Manual
Page 22
... video source. ♦ Caution: Do not hold the projector by an orange power indicator. ♦ Warning: Never look into the lens. Connect the other end to look into the lens when the projector is on a sturdy, level surface within five feet of the power cable to determine the correct distance. s s s s 4 The distance between the projector and the screen determines the actual image size. If the projector is not in sleep mode, indicated...
... video source. ♦ Caution: Do not hold the projector by an orange power indicator. ♦ Warning: Never look into the lens. Connect the other end to look into the lens when the projector is on a sturdy, level surface within five feet of the power cable to determine the correct distance. s s s s 4 The distance between the projector and the screen determines the actual image size. If the projector is not in sleep mode, indicated...

Owners Manual
Page 27
Audio n jack audio cable 2. Connect the other end of the audio cable to the Audio In jack on the computer's sound card. Connect the 9-pin end of the audio cable to the speaker or audio out port on the projector. 1. If you are using audio, connect one end of the PS/2 mouse cable or, the USB mouse cable to a Computer 9 s s s s s s Connecting to the Mouse/Com or USB mouse port on the back of your...
Audio n jack audio cable 2. Connect the other end of the audio cable to the Audio In jack on the computer's sound card. Connect the 9-pin end of the audio cable to the speaker or audio out port on the projector. 1. If you are using audio, connect one end of the PS/2 mouse cable or, the USB mouse cable to a Computer 9 s s s s s s Connecting to the Mouse/Com or USB mouse port on the back of your...
Owners Manual
Page 33
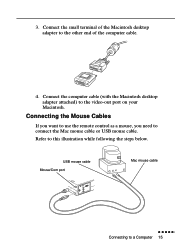
Connecting the Mouse Cables If you want to use the remote control as a mouse, you need to a Computer 15 USB mouse cable Mouse/Com port Mac mouse cable s s s s s s Connecting to connect the Mac mouse cable or USB mouse cable. Connect the computer cable (with the Macintosh desktop adapter attached) to this illustration while following the steps below. 3. Refer to the video-out port on your Macintosh. Connect the small terminal of the Macintosh desktop adapter to the other end of the computer cable. 4.
Connecting the Mouse Cables If you want to use the remote control as a mouse, you need to a Computer 15 USB mouse cable Mouse/Com port Mac mouse cable s s s s s s Connecting to connect the Mac mouse cable or USB mouse cable. Connect the computer cable (with the Macintosh desktop adapter attached) to this illustration while following the steps below. 3. Refer to the video-out port on your Macintosh. Connect the small terminal of the Macintosh desktop adapter to the other end of the computer cable. 4.

Owners Manual
Page 36
See your Macintosh documentation for additional information on the Macintosh desktop adapter and set its DIP switches in accordance with the resolution you to connect the computer cable directly to the computer without using a video-out cable. Remove the small cover on connecting a computer cable. 1. ♦ Note: Some new PowerBooks may allow you want to use (such as 16-inch mode). See your PowerBook manual for instructions. Connect one end of the computer cable to the projector's Computer port. 2. s s s s 18
See your Macintosh documentation for additional information on the Macintosh desktop adapter and set its DIP switches in accordance with the resolution you to connect the computer cable directly to the computer without using a video-out cable. Remove the small cover on connecting a computer cable. 1. ♦ Note: Some new PowerBooks may allow you want to use (such as 16-inch mode). See your PowerBook manual for instructions. Connect one end of the computer cable to the projector's Computer port. 2. s s s s 18

Owners Manual
Page 39
... the Mac mouse cable or USB mouse cable to display on the projector and computer, you'll need to choose Mirroring in the Display Control Panel if you will be using audio, connect one end of the audio cable to the audio-out port on your PowerBook. ♦ Note: After you turn on the LCD screen as well as the projector screen. Connect the other end of the audio cable to a Computer 21 2. Connecting the Audio Cable 1.
... the Mac mouse cable or USB mouse cable to display on the projector and computer, you'll need to choose Mirroring in the Display Control Panel if you will be using audio, connect one end of the audio cable to the audio-out port on your PowerBook. ♦ Note: After you turn on the LCD screen as well as the projector screen. Connect the other end of the audio cable to a Computer 21 2. Connecting the Audio Cable 1.

Owners Manual
Page 47
... light remains orange. 3. The power indicator flashes green as the projector warms up , this light remains green. External speaker or PA system (if necessary) 5. Remove the projector lens cap. 2. This can damage your eyes. Turning the Equipment On and Off Turn on the projector and its attached equipment in the projector power cord, the power indicator flashes orange for few seconds. If computer or video equipment is attached, the computer or video signal is projected. ♦ Warning...
... light remains orange. 3. The power indicator flashes green as the projector warms up , this light remains green. External speaker or PA system (if necessary) 5. Remove the projector lens cap. 2. This can damage your eyes. Turning the Equipment On and Off Turn on the projector and its attached equipment in the projector power cord, the power indicator flashes orange for few seconds. If computer or video equipment is attached, the computer or video signal is projected. ♦ Warning...

Owners Manual
Page 54
... center of the button enlarges the image, pressing the left click. Illumination button Lights up all buttons on the screen. Menu Displays or hides the menu. To turn on the remote control. Power Turns the projector on or off the audio and video output of the enlarged image which is displayed, you go back to scroll the image. If you press the Enter when a menu or help is connected to display special effects that...
... center of the button enlarges the image, pressing the left click. Illumination button Lights up all buttons on the screen. Menu Displays or hides the menu. To turn on the remote control. Power Turns the projector on or off the audio and video output of the enlarged image which is displayed, you go back to scroll the image. If you press the Enter when a menu or help is connected to display special effects that...

Owners Manual
Page 57
... Displays machine condition. Color Status Meaning Orange Green Lit Flashing Sleep mode. (The projector is plugged in, but not projecting.) The projector is not on the air temperature. There is an internal projector problem and the power to do if a warning light comes on . Projector Status Indicators The power and lamp indicators at the top of the projector tell you if a serious problem occurs. Off The projector is warming up. Operation Indicator Lamp Indicator Temperature Indicator ♦ Caution: A red indicator warns you its operating status. Cooling time...
... Displays machine condition. Color Status Meaning Orange Green Lit Flashing Sleep mode. (The projector is plugged in, but not projecting.) The projector is not on the air temperature. There is an internal projector problem and the power to do if a warning light comes on . Projector Status Indicators The power and lamp indicators at the top of the projector tell you if a serious problem occurs. Off The projector is warming up. Operation Indicator Lamp Indicator Temperature Indicator ♦ Caution: A red indicator warns you its operating status. Cooling time...

Owners Manual
Page 58
... sensor. Color Status Meaning - Red Flashing There is in a normal condition. s s s s 40 Temperature Indicator Displays the internal temperature condition. Orange Flashing The projector is a problem with the projection lamp, lamp power supply, lamp fuse, or a circuit malfunctioned in the projector. This indicator is in a normal condition. Red Flashing There is too hot. Color Status Meaning - Lamp Indicator Displays lamp condition. Orange Flashing Projection lamp has reached the time to be replaced. Red Lit The projector has turned off...
... sensor. Color Status Meaning - Red Flashing There is in a normal condition. s s s s 40 Temperature Indicator Displays the internal temperature condition. Orange Flashing The projector is a problem with the projection lamp, lamp power supply, lamp fuse, or a circuit malfunctioned in the projector. This indicator is in a normal condition. Red Flashing There is too hot. Color Status Meaning - Lamp Indicator Displays lamp condition. Orange Flashing Projection lamp has reached the time to be replaced. Red Lit The projector has turned off...

Owners Manual
Page 68
... press the Enter button to display the confirmation screen. Select this item and then press the Enter button to reset the menu. Prompt Temporarily displays a message on when there is no input source. A/V Mute Turns off or keep the lamp power on the projector screen to the A/V Mute button s s s s 50 Menu item Description No-Signal Msg Specifies whether a black screen, a blue screen, or a user logo displays when the screen is providing the image. Creating a user logo requires...
... press the Enter button to display the confirmation screen. Select this item and then press the Enter button to reset the menu. Prompt Temporarily displays a message on when there is no input source. A/V Mute Turns off or keep the lamp power on the projector screen to the A/V Mute button s s s s 50 Menu item Description No-Signal Msg Specifies whether a black screen, a blue screen, or a user logo displays when the screen is providing the image. Creating a user logo requires...

Owners Manual
Page 72
... sync polarity of the computer. Video Signal Displays the input image signal mode. s s s s 54 Image source = Computer or Component Video Menu item Description Lamp Displays the number of the computer video output. When this happens, replace the projector lamp with a new one as soon as possible. Displays the output resolution of hours the current lamp has been used . When this happens, replace the projector lamp with a new one as soon as possible. The lamp light turns red when the projector lamp needs to be replaced. SYNC Mode Resolution Displays the sync mode...
... sync polarity of the computer. Video Signal Displays the input image signal mode. s s s s 54 Image source = Computer or Component Video Menu item Description Lamp Displays the number of the computer video output. When this happens, replace the projector lamp with a new one as soon as possible. Displays the output resolution of hours the current lamp has been used . When this happens, replace the projector lamp with a new one as soon as possible. The lamp light turns red when the projector lamp needs to be replaced. SYNC Mode Resolution Displays the sync mode...

Owners Manual
Page 73
... projector and keep the lens clean because any cover on the screen. Refer all other part needs replacing, contact your dealer or a qualified service person. ♦ Warning: Before you severely. Never open any dirt or smears appear on the projector, except the lamp and filter covers. s s s s s s 55 A clogged air filter can injure you clean any other servicing to periodically clean the air filter. If any part of the projector, turn off the projector and unplug the power cord...
... projector and keep the lens clean because any cover on the screen. Refer all other part needs replacing, contact your dealer or a qualified service person. ♦ Warning: Before you severely. Never open any dirt or smears appear on the projector, except the lamp and filter covers. s s s s s s 55 A clogged air filter can injure you clean any other servicing to periodically clean the air filter. If any part of the projector, turn off the projector and unplug the power cord...
Owners Manual
Page 76
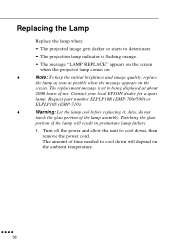
...; The projection lamp indicator is set to being displayed at about 2000 hours of use. The replacement message is flashing orange . • The message "LAMP REPLACE" appears on the screen when the projector lamp comes on. ♦ Note: To keep the initial brightness and image quality, replace the lamp as soon as possible when the message appears on the ambient temperature. Turn off the power and allow the unit to cool down , then remove the power cord. Contact...
...; The projection lamp indicator is set to being displayed at about 2000 hours of use. The replacement message is flashing orange . • The message "LAMP REPLACE" appears on the screen when the projector lamp comes on. ♦ Note: To keep the initial brightness and image quality, replace the lamp as soon as possible when the message appears on the ambient temperature. Turn off the power and allow the unit to cool down , then remove the power cord. Contact...

Owners Manual
Page 80
... projector. Turn off the projector, check that the power cable is flashing orange and you see these warning lights or encounter other specific problems with the projector. Operation Indicator Lamp Indicator Temperature Indicator See the following pages for information on what to do when you cannot turn on the projector. s s s s 62 u Projected images get darker or start to deteriorate, or the lamp indicator is cooling down. u The operation indicator is connected securely both at the top of the projector. Replace the projector lamp...
... projector. Turn off the projector, check that the power cable is flashing orange and you see these warning lights or encounter other specific problems with the projector. Operation Indicator Lamp Indicator Temperature Indicator See the following pages for information on what to do when you cannot turn on the projector. s s s s 62 u Projected images get darker or start to deteriorate, or the lamp indicator is cooling down. u The operation indicator is connected securely both at the top of the projector. Replace the projector lamp...
Owners Manual
Page 82
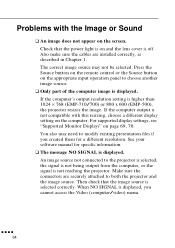
... the image. An image source not connected to both the projector and the image source. Problems with this resizing, choose a different display setting on the computer. Check that the image source is displayed. The correct image source may need to choose another image source. Press the Source button on the remote control or the Source button on the appropriate input operation panel to modify existing presentation files if you cannot access the Video (computer/video) menu. See your software manual for a different resolution...
... the image. An image source not connected to both the projector and the image source. Problems with this resizing, choose a different display setting on the computer. Check that the image source is displayed. The correct image source may need to choose another image source. Press the Source button on the remote control or the Source button on the appropriate input operation panel to modify existing presentation files if you cannot access the Video (computer/video) menu. See your software manual for a different resolution...
Owners Manual
Page 96
... purchased. When using your projector is subject to purchase the original EPSON power supply cable produced for the relevant country, or, if none is current as Lamps or optional equipment b.In case the product was damaged due to inappropriate use or failure to properly use in accordance with details of this manual, or transportation c.In case the product was repaired or modified...
... purchased. When using your projector is subject to purchase the original EPSON power supply cable produced for the relevant country, or, if none is current as Lamps or optional equipment b.In case the product was damaged due to inappropriate use or failure to properly use in accordance with details of this manual, or transportation c.In case the product was repaired or modified...


