
Instruction Manual
Page 2
... accessories from their box, check that the following items are missing, contact your vendor or an Epson Service Center. • Projector main unit • Lens cover with cord • Remote control • Two remote control batteries (AA manganese, R6) • Power cord • Computer cable • A/V .../yellow) • USB mouse cable • PS/2 mouse cable • Instruction Manual (this manual) PS/2 • Soft case Some references to "the unit" or "the projector" in this Manual also refer to accessories supplied with the...
... accessories from their box, check that the following items are missing, contact your vendor or an Epson Service Center. • Projector main unit • Lens cover with cord • Remote control • Two remote control batteries (AA manganese, R6) • Power cord • Computer cable • A/V .../yellow) • USB mouse cable • PS/2 mouse cable • Instruction Manual (this manual) PS/2 • Soft case Some references to "the unit" or "the projector" in this Manual also refer to accessories supplied with the...
Instruction Manual
Page 3
... distance details Projecting Images Connecting with different devices and projecting and adjusting images What You Can Do Functions to get the most out of your projector Menu Functions (Remote Control Only) Basic menu functions and settings Troubleshooting Troubleshooting projection failure, bad projection, and other problems Maintenance Performing lamp replacement and other...
... distance details Projecting Images Connecting with different devices and projecting and adjusting images What You Can Do Functions to get the most out of your projector Menu Functions (Remote Control Only) Basic menu functions and settings Troubleshooting Troubleshooting projection failure, bad projection, and other problems Maintenance Performing lamp replacement and other...

Instruction Manual
Page 5
... 50 5.5 Setting Menu 51 5.6 Advanced Menu 53 5.7 About Menu 54 5.8 Reset All Menu 55 6. Troubleshooting 6.1 Possible Failures 58 6.2 When Indicators Do Not Help 60 7. Maintenance 7.1 Projector Cleaning, Lens Replacement, Air Intake Vent Cleaning 66 7.2 Lamp Replacement 68 8. 5.
... 50 5.5 Setting Menu 51 5.6 Advanced Menu 53 5.7 About Menu 54 5.8 Reset All Menu 55 6. Troubleshooting 6.1 Possible Failures 58 6.2 When Indicators Do Not Help 60 7. Maintenance 7.1 Projector Cleaning, Lens Replacement, Air Intake Vent Cleaning 66 7.2 Lamp Replacement 68 8. 5.

Instruction Manual
Page 6
... carrying. Presentation Effects Function (Remote control Effect button, see page 38) The remote control allows wireless operation of various projector functions, including cursor/stamp, horizontal bar display, and image enlargement and reduction. Global Video Signal Compatibility Your unit projects ...NTSC4.43, PAL, M-PAL, N-PAL, PAL60, and SECAM. Features Compact and Lightweight The compact, lightweight design of your projector provides clear, sharp presentations even in function allows easy correction of trapezoidal distortion caused by projection angle. Cursor/Stamp Horizontal bar ...
... carrying. Presentation Effects Function (Remote control Effect button, see page 38) The remote control allows wireless operation of various projector functions, including cursor/stamp, horizontal bar display, and image enlargement and reduction. Global Video Signal Compatibility Your unit projects ...NTSC4.43, PAL, M-PAL, N-PAL, PAL60, and SECAM. Features Compact and Lightweight The compact, lightweight design of your projector provides clear, sharp presentations even in function allows easy correction of trapezoidal distortion caused by projection angle. Cursor/Stamp Horizontal bar ...

Instruction Manual
Page 10
... Improper operation that country. If the power cord becomes damaged, consult your projector, read these safety precautions completely. 1.1 Safety Precautions To ensure safe and proper use of your vendor or an Epson Service Center. 8 Warning: Improper operation that the power cord specifications are ...correct. Warning: If any of the following malfunctions occur, immediately shut off and unplug the projector and consult your vendor or an Epson Service Center. • Occurrence of smoking, odour, or abnormal noise • Failure of projection or sound ...
... Improper operation that country. If the power cord becomes damaged, consult your projector, read these safety precautions completely. 1.1 Safety Precautions To ensure safe and proper use of your vendor or an Epson Service Center. 8 Warning: Improper operation that the power cord specifications are ...correct. Warning: If any of the following malfunctions occur, immediately shut off and unplug the projector and consult your vendor or an Epson Service Center. • Occurrence of smoking, odour, or abnormal noise • Failure of projection or sound ...

Instruction Manual
Page 11
... power cord plug and unit connector with wet hands. • Do not use care to fire. 9 The projector cabinet contains lenses, a lamp, and many other high temperature location. Do not insert or drop metal, flammable,... or other foreign objects into the lens. Heat may cause fire or electric shock. When the projector is on, never look into the intake or exhaust vents of liquid, medicines, or similar items on the unit. Spillage ... small children are present, take particular care. The intense light may damage your vendor or an Epson Service Center for repair.
... power cord plug and unit connector with wet hands. • Do not use care to fire. 9 The projector cabinet contains lenses, a lamp, and many other high temperature location. Do not insert or drop metal, flammable,... or other foreign objects into the lens. Heat may cause fire or electric shock. When the projector is on, never look into the intake or exhaust vents of liquid, medicines, or similar items on the unit. Spillage ... small children are present, take particular care. The intense light may damage your vendor or an Epson Service Center for repair.

Instruction Manual
Page 12
... slots of smoke or steam. Do not set up and store the unit out of reach of children. When moving the unit, switch off the projector, allow at least 20cm (7.87inches) from all cables are disconnected. Fire or electric shock may result. Set up near a food preparation area or humidifier, or...
... slots of smoke or steam. Do not set up and store the unit out of reach of children. When moving the unit, switch off the projector, allow at least 20cm (7.87inches) from all cables are disconnected. Fire or electric shock may result. Set up near a food preparation area or humidifier, or...

Instruction Manual
Page 13
... to direct sunlight. • Do not attempt projection with the lens cover in place. Heat may deform the lens cover. • The LCD panel is a product of extremely high-precision technology and contains more than 0.01% of the pixels are non-functioning or light improperly. 11 Take ...particular care not to leave the projector for storage (-10°C to 60°C) may cause malfunction and deformation of the cabinet. Dispose of batteries in mind that less than ...
... to direct sunlight. • Do not attempt projection with the lens cover in place. Heat may deform the lens cover. • The LCD panel is a product of extremely high-precision technology and contains more than 0.01% of the pixels are non-functioning or light improperly. 11 Take ...particular care not to leave the projector for storage (-10°C to 60°C) may cause malfunction and deformation of the cabinet. Dispose of batteries in mind that less than ...

Instruction Manual
Page 14
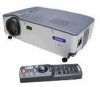
1.2 Component Names and Functions Projector Unit [Front] Operation Display Indicator Operating Panel Problem/Alarm Display Indicator Wide/Tele Button Focus Ring Front Foot Remote Control Receiver [Side] Lens Cover Front Foot Speaker Air Exhaust Vent Power Terminal Foot Lever [Rear] Air Intake Vent Air Intake Vent Input/Output Terminals [Bottom] Front Foot Front Foot Rear Foot 12 Lamp Cover
1.2 Component Names and Functions Projector Unit [Front] Operation Display Indicator Operating Panel Problem/Alarm Display Indicator Wide/Tele Button Focus Ring Front Foot Remote Control Receiver [Side] Lens Cover Front Foot Speaker Air Exhaust Vent Power Terminal Foot Lever [Rear] Air Intake Vent Air Intake Vent Input/Output Terminals [Bottom] Front Foot Front Foot Rear Foot 12 Lamp Cover

Instruction Manual
Page 15
... page 39) Used when using the remote control as a wireless mouse. [Wide/Tele Button (see page 41)] Press the right side of audio signal from projector. Keystone (Select) Button (see pages 29, 35) Switches power on and off . Audio Out Terminal (See page 27) For output of the button (Tele) to...
... page 39) Used when using the remote control as a wireless mouse. [Wide/Tele Button (see page 41)] Press the right side of audio signal from projector. Keystone (Select) Button (see pages 29, 35) Switches power on and off . Audio Out Terminal (See page 27) For output of the button (Tele) to...

Instruction Manual
Page 16
R/C On Off Button (see page 29, 35) Switches projector power on and off . Volume Button (See page 34) Adjusts volume. [Back] Indicator Lights during signal output from remote control. Effect Button (See page 42) ...
R/C On Off Button (see page 29, 35) Switches projector power on and off . Volume Button (See page 34) Adjusts volume. [Back] Indicator Lights during signal output from remote control. Effect Button (See page 42) ...

Instruction Manual
Page 17
... • Situate the remote control receiver out of the remote control when the control is pointed towards the remote control receiver on the projector. Replace the batteries with a fresh set. 15 1.3 Remote Control Operating Range The remote control may not operate beyond certain distances and ...angles from the receiver on the projector unit. • Certain screens may need changing. These may cause the remote control to reflect its signal during use the remote control....
... • Situate the remote control receiver out of the remote control when the control is pointed towards the remote control receiver on the projector. Replace the batteries with a fresh set. 15 1.3 Remote Control Operating Range The remote control may not operate beyond certain distances and ...angles from the receiver on the projector unit. • Certain screens may need changing. These may cause the remote control to reflect its signal during use the remote control....

Instruction Manual
Page 20
...below ] 90º Caution: • Do not block the air exhaust vent on the side of the projector or the air intake vents on Setup The best picture is obtained when the projector and screen are set up the projector near walls, allow at least 20cm (7.87inches) from all walls. 18 Set your... projector and screen up this way. [View from right or left] 9 90º 1 Upward approximately 15º Downward ...
...below ] 90º Caution: • Do not block the air exhaust vent on the side of the projector or the air intake vents on Setup The best picture is obtained when the projector and screen are set up the projector near walls, allow at least 20cm (7.87inches) from all walls. 18 Set your... projector and screen up this way. [View from right or left] 9 90º 1 Upward approximately 15º Downward ...

Instruction Manual
Page 21
2.2 Setup Instructions Your projector allows projection in the following two ways. Set up the projector as your location requires. [Viewing from the front] [Projection on a semi-transparent screen and viewing from the rear] 19
2.2 Setup Instructions Your projector allows projection in the following two ways. Set up the projector as your location requires. [Viewing from the front] [Projection on a semi-transparent screen and viewing from the rear] 19

Instruction Manual
Page 22
....)61-21.(0252-92..3.06661)-.65(6-41.93.73.3)11-.417-(13.2.924.3) 71-4.03-.13.11) 0.2(m)* a space of 0.2(m)* at least 20 cm between the projector and the wall. Size 300" 610x460 (cm) 410x300 305x228 244x183 200x150 160x120 120x90 81x6611x4567x43 Size 200" Size 150" Size 120" Size 100" Size 80" Size...
....)61-21.(0252-92..3.06661)-.65(6-41.93.73.3)11-.417-(13.2.924.3) 71-4.03-.13.11) 0.2(m)* a space of 0.2(m)* at least 20 cm between the projector and the wall. Size 300" 610x460 (cm) 410x300 305x228 244x183 200x150 160x120 120x90 81x6611x4567x43 Size 200" Size 150" Size 120" Size 100" Size 80" Size...

Instruction Manual
Page 24
... using for the computer that you are using for connection meet the following page] The resolution and frequency of the video signal output by your projector in the instruction manual for projection. 22 A port that the computer has a video signal output port. Consult the section describing "connection to an external monitor...
... using for the computer that you are using for connection meet the following page] The resolution and frequency of the video signal output by your projector in the instruction manual for projection. 22 A port that the computer has a video signal output port. Consult the section describing "connection to an external monitor...
Instruction Manual
Page 26
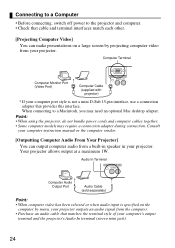
... interface. Consult your computer instruction manual or the computer vendor. [Outputting Computer Audio From Your Projector] You can make presentations on the computer by menu, your projector outputs an audio signal from the computer. • Purchase an audio cable that cable and... terminal interfaces match each other. [Projecting Computer Video] You can output computer audio from your projector. Connecting to a Computer • Before connecting, switch off power to a Macintosh, you may require a connection adapter during connection. Computer...
... interface. Consult your computer instruction manual or the computer vendor. [Outputting Computer Audio From Your Projector] You can make presentations on the computer by menu, your projector outputs an audio signal from the computer. • Purchase an audio cable that cable and... terminal interfaces match each other. [Projecting Computer Video] You can output computer audio from your projector. Connecting to a Computer • Before connecting, switch off power to a Macintosh, you may require a connection adapter during connection. Computer...

Instruction Manual
Page 27
3.2 Connecting to an A/V Device [Inputting a Composite Video Signal] R-Audio Terminal (Red) L-Audio Terminal (White) To video terminal (Yellow) To (L) audio terminal (White) To (R) audio terminal (Red) Video Terminal (Yellow) A/V Cable (supplied with projector) [Inputting an S-Video Signal] R-Audio Terminal (Red) L-Audio Terminal (White) To S-Video Terminal A/V Cable (supplied with projector) To (L) audio terminal (White) To (R) audio terminal (Red) S-Video Cable (sold separately) S-Video Terminal 25
3.2 Connecting to an A/V Device [Inputting a Composite Video Signal] R-Audio Terminal (Red) L-Audio Terminal (White) To video terminal (Yellow) To (L) audio terminal (White) To (R) audio terminal (Red) Video Terminal (Yellow) A/V Cable (supplied with projector) [Inputting an S-Video Signal] R-Audio Terminal (Red) L-Audio Terminal (White) To S-Video Terminal A/V Cable (supplied with projector) To (L) audio terminal (White) To (R) audio terminal (Red) S-Video Cable (sold separately) S-Video Terminal 25

Instruction Manual
Page 28
...4:3 and 16:9, select Video > Aspect Ratio menu. 26 To D-terminal D-terminal cable (optional part) L-Audio Terminal (White) A/V cable (supplied with projector) To (L) audio terminal (White) To (R) audio terminal (Red) • If using a D terminal cable Computer/Component Terminal R-Audio Terminal (Red)...Pb or Cb terminal (Blue) To Pr or Cr terminal (Red) Component video cable (optional part) L-Audio Terminal (White) A/V cable (supplied with projector) To (L) audio terminal (White) To (R) audio terminal (Red) Point: • When projecting a component video image, select "YCbCr" or "YPbPr"...
...4:3 and 16:9, select Video > Aspect Ratio menu. 26 To D-terminal D-terminal cable (optional part) L-Audio Terminal (White) A/V cable (supplied with projector) To (L) audio terminal (White) To (R) audio terminal (Red) • If using a D terminal cable Computer/Component Terminal R-Audio Terminal (Red)...Pb or Cb terminal (Blue) To Pr or Cr terminal (Red) Component video cable (optional part) L-Audio Terminal (White) A/V cable (supplied with projector) To (L) audio terminal (White) To (R) audio terminal (Red) Point: • When projecting a component video image, select "YCbCr" or "YPbPr"...

Instruction Manual
Page 29
...connection cable, thoroughly check the connection interface style of audio. 3.3 Providing Sound Through an External Audio Device Connecting the Audio Out terminal of your projector to a PA system, active speaker system, or other speakers with built-in the case of A/V devices, the audio output corresponds to the ...audio devices connected to a 3.5mm (0.14inches) stereo mini-jack plug. Audio will no longer be output from the projector speaker. • Though the projector outputs audio for projected video images, in amplifiers provides powerful, pleasing sound.
...connection cable, thoroughly check the connection interface style of audio. 3.3 Providing Sound Through an External Audio Device Connecting the Audio Out terminal of your projector to a PA system, active speaker system, or other speakers with built-in the case of A/V devices, the audio output corresponds to the ...audio devices connected to a 3.5mm (0.14inches) stereo mini-jack plug. Audio will no longer be output from the projector speaker. • Though the projector outputs audio for projected video images, in amplifiers provides powerful, pleasing sound.


