
Instruction Manual
Page 2
... your vendor or an Epson Service Center. • Projector main unit • Lens cover with cord • Remote control • Two remote control batteries (AA manganese, R6) • Power cord • Computer cable • A/V cable (red/white/yellow) • USB mouse cable • PS/2 mouse cable • Instruction Manual (this manual) PS/2 • Soft case Some references to "the unit" or "the projector" in this Manual also refer to accessories supplied with the projector or components sold...
... your vendor or an Epson Service Center. • Projector main unit • Lens cover with cord • Remote control • Two remote control batteries (AA manganese, R6) • Power cord • Computer cable • A/V cable (red/white/yellow) • USB mouse cable • PS/2 mouse cable • Instruction Manual (this manual) PS/2 • Soft case Some references to "the unit" or "the projector" in this Manual also refer to accessories supplied with the projector or components sold...
Instruction Manual
Page 3
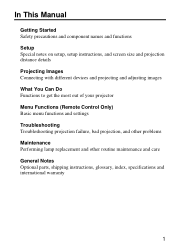
... functions Setup Special notes on setup, setup instructions, and screen size and projection distance details Projecting Images Connecting with different devices and projecting and adjusting images What You Can Do Functions to get the most out of your projector Menu Functions (Remote Control Only) Basic menu functions and settings Troubleshooting Troubleshooting projection failure, bad projection, and other problems Maintenance Performing lamp replacement and other routine maintenance and care General Notes Optional parts, shipping instructions, glossary, index, specifications and international...
... functions Setup Special notes on setup, setup instructions, and screen size and projection distance details Projecting Images Connecting with different devices and projecting and adjusting images What You Can Do Functions to get the most out of your projector Menu Functions (Remote Control Only) Basic menu functions and settings Troubleshooting Troubleshooting projection failure, bad projection, and other problems Maintenance Performing lamp replacement and other routine maintenance and care General Notes Optional parts, shipping instructions, glossary, index, specifications and international...

Instruction Manual
Page 16
...] Indicator Lights during signal output from remote control. Enter Button Used for addressing problems. Use this button when problems occur. Menu Button (See page 46) Displays or cancels menus. Auto Button (See page 34) Optimizes computer video. E-Zoom Button (See page 40) Executes the E-Zoom function. Battery Cover 14 A/V Mute Button (See page 43) Temporarily eliminates picture and sound. To release muting, press the button again or adjust the volume. R/C On Off Button (see page 29, 35) Switches projector power on...
...] Indicator Lights during signal output from remote control. Enter Button Used for addressing problems. Use this button when problems occur. Menu Button (See page 46) Displays or cancels menus. Auto Button (See page 34) Optimizes computer video. E-Zoom Button (See page 40) Executes the E-Zoom function. Battery Cover 14 A/V Mute Button (See page 43) Temporarily eliminates picture and sound. To release muting, press the button again or adjust the volume. R/C On Off Button (see page 29, 35) Switches projector power on...

Instruction Manual
Page 17
... be switched to "On" to malfunction. • If the remote control malfunctions or stops operating, the batteries may cause the remote control to use . • Situate the remote control receiver out of direct sunlight, fluorescent light, and similar light sources. Replace the batteries with a fresh set. 15 These may need changing. Observe the following conditions during use the remote control. • Point the remote control towards the remote control receiver on the projector.
... be switched to "On" to malfunction. • If the remote control malfunctions or stops operating, the batteries may cause the remote control to use . • Situate the remote control receiver out of direct sunlight, fluorescent light, and similar light sources. Replace the batteries with a fresh set. 15 These may need changing. Observe the following conditions during use the remote control. • Point the remote control towards the remote control receiver on the projector.

Instruction Manual
Page 27
3.2 Connecting to an A/V Device [Inputting a Composite Video Signal] R-Audio Terminal (Red) L-Audio Terminal (White) To video terminal (Yellow) To (L) audio terminal (White) To (R) audio terminal (Red) Video Terminal (Yellow) A/V Cable (supplied with projector) [Inputting an S-Video Signal] R-Audio Terminal (Red) L-Audio Terminal (White) To S-Video Terminal A/V Cable (supplied with projector) To (L) audio terminal (White) To (R) audio terminal (Red) S-Video Cable (sold separately) S-Video Terminal 25
3.2 Connecting to an A/V Device [Inputting a Composite Video Signal] R-Audio Terminal (Red) L-Audio Terminal (White) To video terminal (Yellow) To (L) audio terminal (White) To (R) audio terminal (Red) Video Terminal (Yellow) A/V Cable (supplied with projector) [Inputting an S-Video Signal] R-Audio Terminal (Red) L-Audio Terminal (White) To S-Video Terminal A/V Cable (supplied with projector) To (L) audio terminal (White) To (R) audio terminal (Red) S-Video Cable (sold separately) S-Video Terminal 25

Instruction Manual
Page 30
... other cables may deform the lens cover. Power Cord Plug Point: Buttons cannot be operated while the operation display indicator is switched on the projector and insert the connector firmly and completely into the terminal. Power cord Outlet 4. Caution: • Do not attempt projection with the power terminal on . Power Terminal Power cord 1. Align the power cord connector with the lens cover in an outlet. Power Cord Connector 3. Use of the power cord in place. 3.4 Projecting Images Here we begin projecting images...
... other cables may deform the lens cover. Power Cord Plug Point: Buttons cannot be operated while the operation display indicator is switched on the projector and insert the connector firmly and completely into the terminal. Power cord Outlet 4. Caution: • Do not attempt projection with the power terminal on . Power Terminal Power cord 1. Align the power cord connector with the lens cover in an outlet. Power Cord Connector 3. Use of the power cord in place. 3.4 Projecting Images Here we begin projecting images...

Instruction Manual
Page 31
"No-Signal" is displayed. To use the remote control, turn the remote control R/C On Off switch to flash green, and projection begins. Press the Power button to switch power on your settings, there may be no display. (See page 51) After approximately 30 seconds, the operation display indicator changes from flashing green to steady green. Depending on . Projection When preparations are complete, you are ready for projection. 1. The operation display indicator begins to "On". 2. The operation display indicator lights green. 29
"No-Signal" is displayed. To use the remote control, turn the remote control R/C On Off switch to flash green, and projection begins. Press the Power button to switch power on your settings, there may be no display. (See page 51) After approximately 30 seconds, the operation display indicator changes from flashing green to steady green. Depending on . Projection When preparations are complete, you are ready for projection. 1. The operation display indicator begins to "On". 2. The operation display indicator lights green. 29
Instruction Manual
Page 33
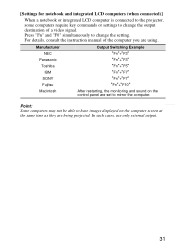
... the computer screen at the same time as they are being projected. Press "Fn" and "F0" simultaneously to mirror the computer. For details, consult the instruction manual of a video signal. [Settings for notebook and integrated LCD computers (when connected)] When a notebook or integrated LCD computer is connected to the projector, some computers require key commands or settings to have images displayed on the control panel are set to change the output...
... the computer screen at the same time as they are being projected. Press "Fn" and "F0" simultaneously to mirror the computer. For details, consult the instruction manual of a video signal. [Settings for notebook and integrated LCD computers (when connected)] When a notebook or integrated LCD computer is connected to the projector, some computers require key commands or settings to have images displayed on the control panel are set to change the output...

Instruction Manual
Page 36
... the Auto button to disengage these cases, use the Video Menu commands to "Menu Screen Operations (Remote Control Only)" (see page 47). • When functions such as E-Zoom or A/V muting are "Tracking", "Position (vertical and horizontal)", and "Sync". In these functions before adjustment. [Opening a Menu For Adjustment] Press the Menu button and perform adjustment using the Video Menu. Point: Adjustment is not available if there is a video signal, this function does not operate. Adjusting Images (Remote Control Only) [Optimizing Computer Video (Using the Auto button...
... the Auto button to disengage these cases, use the Video Menu commands to "Menu Screen Operations (Remote Control Only)" (see page 47). • When functions such as E-Zoom or A/V muting are "Tracking", "Position (vertical and horizontal)", and "Sync". In these functions before adjustment. [Opening a Menu For Adjustment] Press the Menu button and perform adjustment using the Video Menu. Point: Adjustment is not available if there is a video signal, this function does not operate. Adjusting Images (Remote Control Only) [Optimizing Computer Video (Using the Auto button...

Instruction Manual
Page 37
Press the Power button again. Point: • The flashing orange operation display indicator indicates that the operation display indicator lights orange. Press the Power button. Operation display indicator lights orange. 2. Buttons cannot be operated during cool-down is complete, the indicator switches to shut the power, press another button. Point: If you do not wish to steady orange. 3.6 Ending After the Projection Ending 1. The projector lamp goes out, the operation display indicator flashes orange, and after 7 seconds. 3. Or, if no action is displayed. Check that...
Press the Power button again. Point: • The flashing orange operation display indicator indicates that the operation display indicator lights orange. Press the Power button. Operation display indicator lights orange. 2. Buttons cannot be operated during cool-down is complete, the indicator switches to shut the power, press another button. Point: If you do not wish to steady orange. 3.6 Ending After the Projection Ending 1. The projector lamp goes out, the operation display indicator flashes orange, and after 7 seconds. 3. Or, if no action is displayed. Check that...

Instruction Manual
Page 38
... the lens cover. 36 This may cause a malfunction or shorten the projector lamp life. 5. Pull the power cord plug out of current will not be supplied to Off. Caution: Do not pull the power cord plug out of the outlet while the operation display indicator is switched off, a small amount of the outlet. Point: Unless the remote control R/C On Off switch is flashing orange. Foot Levers 1. Set the remote control R/C On Off switch...
... the lens cover. 36 This may cause a malfunction or shorten the projector lamp life. 5. Pull the power cord plug out of current will not be supplied to Off. Caution: Do not pull the power cord plug out of the outlet while the operation display indicator is switched off, a small amount of the outlet. Point: Unless the remote control R/C On Off switch is flashing orange. Foot Levers 1. Set the remote control R/C On Off switch...

Instruction Manual
Page 41
Connect the computer USB port and the projector USB mouse terminal. Mouse/Com, USB Terminal Mouse/USB Port Mouse Cable (supplied with the power on can cause malfunction or failure. • Use only the mouse cable supplied. When using a USB mouse, note the following. • Windows The only compatible models are those pre-installed with the standard USB interface configuration in Windows2000 and Windows98. Making a Connection Before making a connection, switch off power to Windows98 and Windows2000...
Connect the computer USB port and the projector USB mouse terminal. Mouse/Com, USB Terminal Mouse/USB Port Mouse Cable (supplied with the power on can cause malfunction or failure. • Use only the mouse cable supplied. When using a USB mouse, note the following. • Windows The only compatible models are those pre-installed with the standard USB interface configuration in Windows2000 and Windows98. Making a Connection Before making a connection, switch off power to Windows98 and Windows2000...

Instruction Manual
Page 50
...) ON : Auto Setup active OFF : Auto Setup not active Select the video mode to Manual. To reset all menus to give projected images a more natural look) Select the input signal of projected image. Menu Brightness Contrast Color Tint Sharpness Gamma Input Signal Auto Setup Mode Aspect Ratio Reset 48 D-Sub15: Computer/Component video Video: Video image Content Video Projection D-Sub15 Video Adjusts image brightness. +: Brightens image. - : Darkens image. Adjusts tint. +: Strengthens red. - : Strengthens green. Natural : Weakens contrast to natural colors. (Used to factory...
...) ON : Auto Setup active OFF : Auto Setup not active Select the video mode to Manual. To reset all menus to give projected images a more natural look) Select the input signal of projected image. Menu Brightness Contrast Color Tint Sharpness Gamma Input Signal Auto Setup Mode Aspect Ratio Reset 48 D-Sub15: Computer/Component video Video: Video image Content Video Projection D-Sub15 Video Adjusts image brightness. +: Brightens image. - : Darkens image. Adjusts tint. +: Strengthens red. - : Strengthens green. Natural : Weakens contrast to natural colors. (Used to factory...

Instruction Manual
Page 56
...the top menu displayed, and press the Enter button to move to zero. Sets cumulative lamp-on screen. Displays input resolution. Use this function when replacing the lamp. H: Displays the horizontal scanning frequency. Displays sync attributes. Displays sync polarity. Computer/Component Video Projection Video Projection Menu Lamp Reset Lamp Timer Video Source Input Signal Frequency SYNC Polarity SYNC Mode Resolution Refresh Rate Video Signal 54 D-Sub15: Computer/Component video Video: Video image Content Video Projection D-Sub15 Video Displays cumulative lamp-on time.
...the top menu displayed, and press the Enter button to move to zero. Sets cumulative lamp-on screen. Displays input resolution. Use this function when replacing the lamp. H: Displays the horizontal scanning frequency. Displays sync attributes. Displays sync polarity. Computer/Component Video Projection Video Projection Menu Lamp Reset Lamp Timer Video Source Input Signal Frequency SYNC Polarity SYNC Mode Resolution Refresh Rate Video Signal 54 D-Sub15: Computer/Component video Video: Video image Content Video Projection D-Sub15 Video Displays cumulative lamp-on time.
Instruction Manual
Page 62
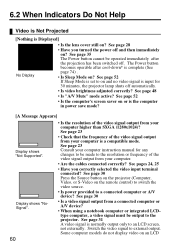
... in power save mode? [A Message Appears] Display shows "Not Supported". Switch the video signal to on the remote control) to switch the video source. • Is power provided to an LCD screen, not externally. See page 48 • Is "A/V Mute" mode active? See page 35 The Power button cannot be output to the projector. The Power button becomes operable after the projection has been switched off. See page 52 If Sleep Mode is Displayed] • Is the lens cover...
... in power save mode? [A Message Appears] Display shows "Not Supported". Switch the video signal to on the remote control) to switch the video source. • Is power provided to an LCD screen, not externally. See page 48 • Is "A/V Mute" mode active? See page 35 The Power button cannot be output to the projector. The Power button becomes operable after the projection has been switched off. See page 52 If Sleep Mode is Displayed] • Is the lens cover...

Instruction Manual
Page 63
... images 61 screen even when a video signal is Unclear • Blurry image • Image only partially focused • Not focused at all • Is the focus adjusted correctly? Set up the projector in the instruction manual of the connected computer. See page 48 Use the Menu > Video > Mode menu items to video signal input is 1.0m (39.37inches) to an Externally Connected Monitor" in this range. • Is the lens dirty? Auto detection according to select a video signal...
... images 61 screen even when a video signal is Unclear • Blurry image • Image only partially focused • Not focused at all • Is the focus adjusted correctly? Set up the projector in the instruction manual of the connected computer. See page 48 Use the Menu > Video > Mode menu items to video signal input is 1.0m (39.37inches) to an Externally Connected Monitor" in this range. • Is the lens dirty? Auto detection according to select a video signal...

Instruction Manual
Page 64
... image • Noisy • Are cables connected correctly? See page 48 Use the Menu > Video > Mode menu items to adjust. • Are the video signal mode settings correct? See page 47 Use the Menu > Video > Position menu items to the external output. 62 See page 72. • Are cables too long? Auto detection according to modifying the signal. • Press the Auto button on the remote control. See page 31 Change the resolution to provide a full LCD display...
... image • Noisy • Are cables connected correctly? See page 48 Use the Menu > Video > Mode menu items to adjust. • Are the video signal mode settings correct? See page 47 Use the Menu > Video > Position menu items to the external output. 62 See page 72. • Are cables too long? Auto detection according to modifying the signal. • Press the Auto button on the remote control. See page 31 Change the resolution to provide a full LCD display...
Instruction Manual
Page 70
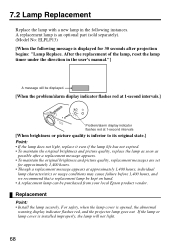
... a replacement lamp be kept on hand. • A replacement lamp can be purchased from your local Epson product vendor. Replacement Point: • Install the lamp securely. If the lamp or lamp cover is opened, the abnormal warning display indicator flashes red, and the projector lamp goes out. A replacement lamp is an optional part (sold separately). (Model No: ELPLP13) [When the following instances. 7.2 Lamp Replacement Replace the lamp with a new lamp in the user's manual."] A message will not light. 68 After the replacement of the lamp, reset the lamp timer...
... a replacement lamp be kept on hand. • A replacement lamp can be purchased from your local Epson product vendor. Replacement Point: • Install the lamp securely. If the lamp or lamp cover is opened, the abnormal warning display indicator flashes red, and the projector lamp goes out. A replacement lamp is an optional part (sold separately). (Model No: ELPLP13) [When the following instances. 7.2 Lamp Replacement Replace the lamp with a new lamp in the user's manual."] A message will not light. 68 After the replacement of the lamp, reset the lamp timer...

Instruction Manual
Page 78
... Power Cord 28 Power Terminal 12, 28 Problem/Alarm Display Indicator 12, 59, 68 Projection Distance 20 Prompt 51 PS/2 Mouse Cable 39 [R] R/C On Off Button . . . 14, 29, 36 Rear Foot 12 Rear Projection 53 Refresh Rate 54 Remote Control 14, 15 Remote Control Receiver . . . 12 Reset 48, 49, 50, 52, 53 Reset All Menu 55 Reset Lamp Timer 54 Resolution 54 [S] Screen Size 20 Setting Menu 51 Setup Instructions 19 Sharpness 48 Shipping Instructions 73 Sleep Mode 52 Source (Enter) Button...
... Power Cord 28 Power Terminal 12, 28 Problem/Alarm Display Indicator 12, 59, 68 Projection Distance 20 Prompt 51 PS/2 Mouse Cable 39 [R] R/C On Off Button . . . 14, 29, 36 Rear Foot 12 Rear Projection 53 Refresh Rate 54 Remote Control 14, 15 Remote Control Receiver . . . 12 Reset 48, 49, 50, 52, 53 Reset All Menu 55 Reset Lamp Timer 54 Resolution 54 [S] Screen Size 20 Setting Menu 51 Setup Instructions 19 Sharpness 48 Shipping Instructions 73 Sleep Mode 52 Source (Enter) Button...

Instruction Manual
Page 79
8.5 Specifications Product Model Model Panel Size Display Format Pixel Count Focus Adjustment Zoom Adjustment Lamp (Light Source) Maximum Audio Output Speaker Power Supply Power Consumption Usage Temperature Range Storage Temperature Range Weight Connection Terminals Multi-Media Projector EMP-70/50 300(W) x 80(H) x 220(D)mm (11.81(W) x 3.15(H) x 8.46(D)inches) (not including protruding parts) 0.7 Polysilicon TFT 786,432 (1,024 (Horizontal) x 768 (Vertical) dots) x 3 480,000 (800 (Horizontal) x 600 (Vertical) dots) x 3 Manual Electronic 0.8 : 1 UHE lamp, Rated 150W ELPLP13 1W monaural 1 100...
8.5 Specifications Product Model Model Panel Size Display Format Pixel Count Focus Adjustment Zoom Adjustment Lamp (Light Source) Maximum Audio Output Speaker Power Supply Power Consumption Usage Temperature Range Storage Temperature Range Weight Connection Terminals Multi-Media Projector EMP-70/50 300(W) x 80(H) x 220(D)mm (11.81(W) x 3.15(H) x 8.46(D)inches) (not including protruding parts) 0.7 Polysilicon TFT 786,432 (1,024 (Horizontal) x 768 (Vertical) dots) x 3 480,000 (800 (Horizontal) x 600 (Vertical) dots) x 3 Manual Electronic 0.8 : 1 UHE lamp, Rated 150W ELPLP13 1W monaural 1 100...


