Instruction Manual
Page 3
... distance details Projecting Images Connecting with different devices and projecting and adjusting images What You Can Do Functions to get the most out of your projector Menu Functions (Remote Control Only) Basic menu functions and settings Troubleshooting Troubleshooting projection failure, bad projection, and other problems Maintenance Performing...
... distance details Projecting Images Connecting with different devices and projecting and adjusting images What You Can Do Functions to get the most out of your projector Menu Functions (Remote Control Only) Basic menu functions and settings Troubleshooting Troubleshooting projection failure, bad projection, and other problems Maintenance Performing...

Instruction Manual
Page 5
Maintenance 7.1 Projector Cleaning, Lens Replacement, Air Intake Vent Cleaning 66 7.2 Lamp Replacement 68 8. Troubleshooting 6.1 Possible Failures 58 6.2 When Indicators Do Not Help 60 7. 5. General Notes 8.1 Optional Parts 72 8.2 Shipping Instructions 73 8.3 Glossary 74 8.4 Index 75 8.5 Specifications ...
Maintenance 7.1 Projector Cleaning, Lens Replacement, Air Intake Vent Cleaning 66 7.2 Lamp Replacement 68 8. Troubleshooting 6.1 Possible Failures 58 6.2 When Indicators Do Not Help 60 7. 5. General Notes 8.1 Optional Parts 72 8.2 Shipping Instructions 73 8.3 Glossary 74 8.4 Index 75 8.5 Specifications ...

Instruction Manual
Page 11
... location. The intense light may cause fire or electric shock. When handling any broken components, use the cable to fire. 9 When the projector is on the unit. Where small children are present, take particular care. Treat the power cord plug and connector as follows. • ...dusty or dirty plug or connector in a closed automobile, area of the unit. The projector cabinet contains lenses, a lamp, and many other glass components. Spillage or penetration may damage your vendor or an Epson Service Center for repair. Heat may deform the unit or remote control or cause internal ...
... location. The intense light may cause fire or electric shock. When handling any broken components, use the cable to fire. 9 When the projector is on the unit. Where small children are present, take particular care. Treat the power cord plug and connector as follows. • ...dusty or dirty plug or connector in a closed automobile, area of the unit. The projector cabinet contains lenses, a lamp, and many other glass components. Spillage or penetration may damage your vendor or an Epson Service Center for repair. Heat may deform the unit or remote control or cause internal ...

Instruction Manual
Page 12
.... For safety, always unplug the unit when it will cause internal heat build-up the unit in fire. When moving the unit, switch off the projector, allow at least 20cm (7.87inches) from all cables are disconnected. The unit may result in the following locations. • In closets, bookshelves, or ... set up and may fall or tip and cause injury. The unit may result. Blockage will not be used for complete cooling. Never remove the lamp immediately after use. Caution: Do not sit, stand, or place heavy objects on an unsteady base, inclined location, or other cloths. Do not ...
.... For safety, always unplug the unit when it will cause internal heat build-up the unit in fire. When moving the unit, switch off the projector, allow at least 20cm (7.87inches) from all cables are disconnected. The unit may result in the following locations. • In closets, bookshelves, or ... set up and may fall or tip and cause injury. The unit may result. Blockage will not be used for complete cooling. Never remove the lamp immediately after use. Caution: Do not sit, stand, or place heavy objects on an unsteady base, inclined location, or other cloths. Do not ...

Instruction Manual
Page 14
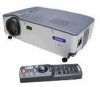
1.2 Component Names and Functions Projector Unit [Front] Operation Display Indicator Operating Panel Problem/Alarm Display Indicator Wide/Tele Button Focus Ring Front Foot Remote Control Receiver [Side] Lens Cover Front Foot Speaker Air Exhaust Vent Power Terminal Foot Lever [Rear] Air Intake Vent Air Intake Vent Input/Output Terminals [Bottom] Front Foot Front Foot Rear Foot 12 Lamp Cover
1.2 Component Names and Functions Projector Unit [Front] Operation Display Indicator Operating Panel Problem/Alarm Display Indicator Wide/Tele Button Focus Ring Front Foot Remote Control Receiver [Side] Lens Cover Front Foot Speaker Air Exhaust Vent Power Terminal Foot Lever [Rear] Air Intake Vent Air Intake Vent Input/Output Terminals [Bottom] Front Foot Front Foot Rear Foot 12 Lamp Cover

Instruction Manual
Page 37
Press the Power button again. The projector lamp goes out, the operation display indicator flashes orange, and after 7 seconds. 3. 3.6 Ending After the Projection Ending 1. Point: If you do not wish to steady orange. ...
Press the Power button again. The projector lamp goes out, the operation display indicator flashes orange, and after 7 seconds. 3. 3.6 Ending After the Projection Ending 1. Point: If you do not wish to steady orange. ...

Instruction Manual
Page 38
... cord plug out of the outlet. Set the remote control R/C On Off switch to the remote control and exhaust the batteries. Foot Levers 1. Support the projector unit with your hands, pull upward on the foot levers with your fingers, and lower the unit slowly. 2. This may cause a malfunction or shorten the...
... cord plug out of the outlet. Set the remote control R/C On Off switch to the remote control and exhaust the batteries. Foot Levers 1. Support the projector unit with your hands, pull upward on the foot levers with your fingers, and lower the unit slowly. 2. This may cause a malfunction or shorten the...

Instruction Manual
Page 56
..." from a computer/component versus a video device. Displays input resolution. H: Displays the horizontal scanning frequency. Sets cumulative lamp-on time to Auto in the About menu differs as shown below during video projection from the top menu displayed, and... Display : No display V: Displays the vertical scanning frequency. Use this function when replacing the lamp. Displays frequencies. Computer/Component Video Projection Video Projection Menu Lamp Reset Lamp Timer Video Source Input Signal Frequency SYNC Polarity SYNC Mode Resolution Refresh Rate Video Signal 54 ...
..." from a computer/component versus a video device. Displays input resolution. H: Displays the horizontal scanning frequency. Sets cumulative lamp-on time to Auto in the About menu differs as shown below during video projection from the top menu displayed, and... Display : No display V: Displays the vertical scanning frequency. Use this function when replacing the lamp. Displays frequencies. Computer/Component Video Projection Video Projection Menu Lamp Reset Lamp Timer Video Source Input Signal Frequency SYNC Polarity SYNC Mode Resolution Refresh Rate Video Signal 54 ...

Instruction Manual
Page 57
5.8 Reset All Menu Displaying Menus Press the Menu button, and use the Enter button to initial settings. (Lamp and language settings excluded) * Note that rear and invert settings will also be cleared by this operation. 55 Settings Menu Reset All Content Returns all menu settings to select "Reset All" from the top-level menu displayed.
5.8 Reset All Menu Displaying Menus Press the Menu button, and use the Enter button to initial settings. (Lamp and language settings excluded) * Note that rear and invert settings will also be cleared by this operation. 55 Settings Menu Reset All Content Returns all menu settings to select "Reset All" from the top-level menu displayed.
Instruction Manual
Page 60
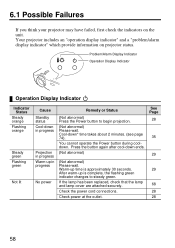
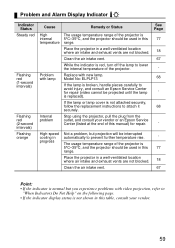
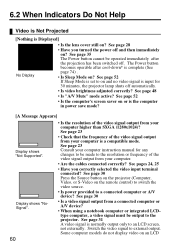
... green indicator changes to begin projection. (Not abnormal) Please wait. 6.1 Possible Failures If you think your projector may have failed, first check the indicators on projector status. If the lamp has been replaced, check that the lamp and lamp cover are attached securely. Check the power cord connections. Warm-up in progress No power Remedy...
... green indicator changes to begin projection. (Not abnormal) Please wait. 6.1 Possible Failures If you think your projector may have failed, first check the indicators on projector status. If the lamp has been replaced, check that the lamp and lamp cover are attached securely. Check the power cord connections. Warm-up in progress No power Remedy...
Instruction Manual
Page 61
... to attach it securely. Place the projector in this table, consult your vendor or an Epson Service Center (listed at the end of this manual) for repair (video cannot be used in this temperature range. If the lamp or lamp cover is 5°C-35°C, and the projector should be interrupted automatically to prevent further...
... to attach it securely. Place the projector in this table, consult your vendor or an Epson Service Center (listed at the end of this manual) for repair (video cannot be used in this temperature range. If the lamp or lamp cover is 5°C-35°C, and the projector should be interrupted automatically to prevent further...
Instruction Manual
Page 62
...computer higher than SXGA (1280x1024)? See page 30 • Is a video signal output from your computer instruction manual for 30 minutes, the projector lamp shuts off automatically. • Is video brightness adjusted correctly? See page 31 A video signal is a compatible mode. The Power button ...becomes operable after the projection has been switched off and then immediately on an LCD See page 23 • Check that the frequency of the video signal output from your computer. • Are the cables connected correctly...
...computer higher than SXGA (1280x1024)? See page 30 • Is a video signal output from your computer instruction manual for 30 minutes, the projector lamp shuts off automatically. • Is video brightness adjusted correctly? See page 31 A video signal is a compatible mode. The Power button ...becomes operable after the projection has been switched off and then immediately on an LCD See page 23 • Check that the frequency of the video signal output from your computer. • Are the cables connected correctly...

Instruction Manual
Page 65
...Poor • Is image brightness adjusted correctly? See pages 24, 25 • Is contrast* adjusted correctly? See page 68 A nearly expired lamp can produce dark images or poor tint and should be active. See page 27 • Have you selected the video whose audio you wish ...audio input setup correct? See page 48 • Is contrast* adjusted correctly? Press the Volume button to a computer monitor or LCD may also be replaced with a fresh lamp. • Is image brightness adjusted correctly? RGB: Computer images YUV: Color difference images YCbCr: DVD images YPbPr: HDTV images Images...
...Poor • Is image brightness adjusted correctly? See pages 24, 25 • Is contrast* adjusted correctly? See page 68 A nearly expired lamp can produce dark images or poor tint and should be active. See page 27 • Have you selected the video whose audio you wish ...audio input setup correct? See page 48 • Is contrast* adjusted correctly? Press the Volume button to a computer monitor or LCD may also be replaced with a fresh lamp. • Is image brightness adjusted correctly? RGB: Computer images YUV: Color difference images YCbCr: DVD images YPbPr: HDTV images Images...

Instruction Manual
Page 68
...cleaning paper. Improper handling may degrade the cabinet or strip the finish. Switch off power and remove the lamp after switching off power to your projector to the projector and disconnect the power cord before cleaning. Do not use . · Heat may cause burns or other...take your vendor or an Epson Service Center. • Use care when handling the power plug and connector. Caution: • Never attempt to remove the lamp immediately after use waxes, benzene, thinners, or other injury. · Wait approximately 60 minutes after the projector has cooled completely. &#...
...cleaning paper. Improper handling may degrade the cabinet or strip the finish. Switch off power and remove the lamp after switching off power to your projector to the projector and disconnect the power cord before cleaning. Do not use . · Heat may cause burns or other...take your vendor or an Epson Service Center. • Use care when handling the power plug and connector. Caution: • Never attempt to remove the lamp immediately after use waxes, benzene, thinners, or other injury. · Wait approximately 60 minutes after the projector has cooled completely. &#...
Instruction Manual
Page 70
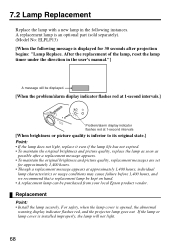
...indicator flashes red, and the projector lamp goes out. Replacement Point: • Install the lamp securely. If the lamp or lamp cover is inferior to its original state.] Point: • If the lamp does not light, replace it even if the lamp life has not expired. &#... original brightness and picture quality, replace the lamp as soon as possible after projection begins: "Lamp Replace. 7.2 Lamp Replacement Replace the lamp with a new lamp in the user's manual."] A message will be purchased from your local Epson product vendor. A replacement lamp is an optional part (sold separately). (...
...indicator flashes red, and the projector lamp goes out. Replacement Point: • Install the lamp securely. If the lamp or lamp cover is inferior to its original state.] Point: • If the lamp does not light, replace it even if the lamp life has not expired. &#... original brightness and picture quality, replace the lamp as soon as possible after projection begins: "Lamp Replace. 7.2 Lamp Replacement Replace the lamp with a new lamp in the user's manual."] A message will be purchased from your local Epson product vendor. A replacement lamp is an optional part (sold separately). (...

Instruction Manual
Page 71
... out diagonally. 3. Switch off power to the projector and disconnect the power cord after cool-down time varies according to external temperature and other factors. Align the lamp properly, insert the lamp until it into the projector until you hear the catches click into place.... After the projector has cooled completely, remove the lamp cover. • The projector requires approximately 60 minutes to tighten the two lamp retaining screws firmly. 5. ...
... out diagonally. 3. Switch off power to the projector and disconnect the power cord after cool-down time varies according to external temperature and other factors. Align the lamp properly, insert the lamp until it into the projector until you hear the catches click into place.... After the projector has cooled completely, remove the lamp cover. • The projector requires approximately 60 minutes to tighten the two lamp retaining screws firmly. 5. ...

Instruction Manual
Page 74
Purchase these as your application requires. • Replacement Lamp (ELPLP13) Recommended for purchase before lamp life expires (screwdriver included). • Portable screen 50 inch screen: ELPSC06 60 inch screen: ELPSC07 80 inch screen: ELPSC08 • RGB extension cable ELCCB05... computer cable included is not long enough. (For mini D-sub 15-pin/mini D-sub 15pin) • Mac Adapter Set (ELPAP01) For use in connecting the projector to a Macintosh computer. • Component Video Cable (ELPKC19: 3.0m) (For Mini D-Sub 15-pin/RCA) • D terminal cable (ELPKC22: 3.0m) (For D-sub 15/D ...
Purchase these as your application requires. • Replacement Lamp (ELPLP13) Recommended for purchase before lamp life expires (screwdriver included). • Portable screen 50 inch screen: ELPSC06 60 inch screen: ELPSC07 80 inch screen: ELPSC08 • RGB extension cable ELCCB05... computer cable included is not long enough. (For mini D-sub 15-pin/mini D-sub 15pin) • Mac Adapter Set (ELPAP01) For use in connecting the projector to a Macintosh computer. • Component Video Cable (ELPKC19: 3.0m) (For Mini D-Sub 15-pin/RCA) • D terminal cable (ELPKC22: 3.0m) (For D-sub 15/D ...

Instruction Manual
Page 76
...relatively low-speed peripheral device. Cool-Down After the Power button is pressed and the lamp goes out, lamp cooling is not matched, a projected image displays broad vertical bands. 74 SXGA Refers... universal serial bus, an interface for an IBM PC/AT-compatible (DOS/V) computer. XGA Refers to other available publications. When tracking is continued. This adjustment is not achieved,... in color lightness and darkness that provides a sharper or softer view of your projector cannot match that frequency, a clear image cannot be obtained. Term Description A/V Mute...
...relatively low-speed peripheral device. Cool-Down After the Power button is pressed and the lamp goes out, lamp cooling is not matched, a projected image displays broad vertical bands. 74 SXGA Refers... universal serial bus, an interface for an IBM PC/AT-compatible (DOS/V) computer. XGA Refers to other available publications. When tracking is continued. This adjustment is not achieved,... in color lightness and darkness that provides a sharper or softer view of your projector cannot match that frequency, a clear image cannot be obtained. Term Description A/V Mute...

Instruction Manual
Page 77
... Initial Settings 56 Input Signal 48, 54 Input/Output Terminals . . . . . .12 Inserting Batteries 16 [K] Keystone 51 Keystone (Select) Button 13, 33 [L] L/R Audio Terminals . . . . .13, 25 Lamp 54 Lamp Cover 12 Lamp Replacement 68 Language 53 Lens Cover 12 75
... Initial Settings 56 Input Signal 48, 54 Input/Output Terminals . . . . . .12 Inserting Batteries 16 [K] Keystone 51 Keystone (Select) Button 13, 33 [L] L/R Audio Terminals . . . . .13, 25 Lamp 54 Lamp Cover 12 Lamp Replacement 68 Language 53 Lens Cover 12 75

Instruction Manual
Page 78
... Rear Projection 53 Refresh Rate 54 Remote Control 14, 15 Remote Control Receiver . . . 12 Reset 48, 49, 50, 52, 53 Reset All Menu 55 Reset Lamp Timer 54 Resolution 54 [S] Screen Size 20 Setting Menu 51 Setup Instructions 19 Sharpness 48 Shipping Instructions 73 Sleep Mode 52 Source (Enter) Button . . . 13...
... Rear Projection 53 Refresh Rate 54 Remote Control 14, 15 Remote Control Receiver . . . 12 Reset 48, 49, 50, 52, 53 Reset All Menu 55 Reset Lamp Timer 54 Resolution 54 [S] Screen Size 20 Setting Menu 51 Setup Instructions 19 Sharpness 48 Shipping Instructions 73 Sleep Mode 52 Source (Enter) Button . . . 13...


