Network Installation Guide
Page 34
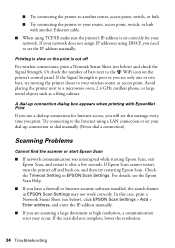
...message every time you use a dial-up connection to your network. For details, see only one or two bars, try restarting Epson Scan. If Epson Scan cannot restart, turn the printer off For wireless connections, print a Network Status Sheet (see below ) and check the ... have a firewall or Internet security software installed, the search feature in EPSON Scan Settings. Scanning Problems Cannot find the scanner or start Epson Scan ■ If network communication was interrupted while starting Epson Scan, exit Epson Scan, and restart it after a few seconds. Check the Timeout Setting...
...message every time you use a dial-up connection to your network. For details, see only one or two bars, try restarting Epson Scan. If Epson Scan cannot restart, turn the printer off For wireless connections, print a Network Status Sheet (see below ) and check the ... have a firewall or Internet security software installed, the search feature in EPSON Scan Settings. Scanning Problems Cannot find the scanner or start Epson Scan ■ If network communication was interrupted while starting Epson Scan, exit Epson Scan, and restart it after a few seconds. Check the Timeout Setting...
Quick Guide
Page 2
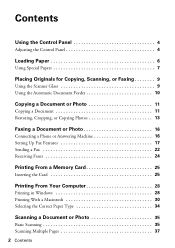
Contents Using the Control Panel 4 Adjusting the Control Panel 4 Loading Paper 6 Using Special Papers 7 Placing Originals for Copying, Scanning, or Faxing 9 Using the Scanner Glass 9 Using the Automatic Document Feeder 10 Copying a Document or Photo 11 Copying a Document 11 Restoring, Cropping, or Copying Photos 13 Faxing a Document or Photo ...
Contents Using the Control Panel 4 Adjusting the Control Panel 4 Loading Paper 6 Using Special Papers 7 Placing Originals for Copying, Scanning, or Faxing 9 Using the Scanner Glass 9 Using the Automatic Document Feeder 10 Copying a Document or Photo 11 Copying a Document 11 Restoring, Cropping, or Copying Photos 13 Faxing a Document or Photo ...

Quick Guide
Page 9
... you don't move the original(s). Placing Originals for Copying, Scanning, or Faxing Before you copy, scan, or fax, place your original face-down on the scanner glass (below) or in the Automatic Document Feeder (see page 10). Placing Originals for Copying, Scanning, or Faxing 9 1/4 inch (5 mm) or 4 × 6-inch ...you can place one or two photos or a document up to make color or black and white copies. 1. Place them at a time on the scanner glass to two at least 1/4 inch (5 mm) apart. 1/4 inch (5 mm) 2. Close the cover gently so you 're scanning 3 × 5- Using the...
... you don't move the original(s). Placing Originals for Copying, Scanning, or Faxing Before you copy, scan, or fax, place your original face-down on the scanner glass (below) or in the Automatic Document Feeder (see page 10). Placing Originals for Copying, Scanning, or Faxing 9 1/4 inch (5 mm) or 4 × 6-inch ...you can place one or two photos or a document up to make color or black and white copies. 1. Place them at a time on the scanner glass to two at least 1/4 inch (5 mm) apart. 1/4 inch (5 mm) 2. Close the cover gently so you 're scanning 3 × 5- Using the...

Quick Guide
Page 11
... white copies. Press l or r to select Color or B&W (black and white) copies. 6. See: ■ "Copying a Document" below ■ "Restoring, Cropping, or Copying Photos" on the scanner glass or in the Automatic Document Feeder (see page 9). 2. Press + or - Place your originals on page 13 Copying a Document 1.
... white copies. Press l or r to select Color or B&W (black and white) copies. 6. See: ■ "Copying a Document" below ■ "Restoring, Cropping, or Copying Photos" on the scanner glass or in the Automatic Document Feeder (see page 9). 2. Press + or - Place your originals on page 13 Copying a Document 1.
Quick Guide
Page 12
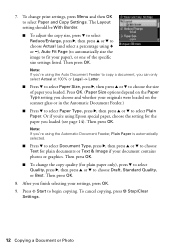
... d to select Quality, press r, then press u or d to choose Text for the paper you loaded (see page 14). Note: If you're using Epson special paper, choose the setting for plain documents or Text & Image if your settings, press OK. 9. The Layout setting should be With Border. ■ To...select Paper and Copy Settings. To cancel copying, press y Stop/Clear Settings. 12 Copying a Document or Photo Press OK. (Paper Size options depend on the scanner glass or in the Automatic Document Feeder.) ■ Press d to select Paper Type, press r, then press u or d to choose the size of the ...
... d to select Quality, press r, then press u or d to choose Text for the paper you loaded (see page 14). Note: If you're using Epson special paper, choose the setting for plain documents or Text & Image if your settings, press OK. 9. The Layout setting should be With Border. ■ To...select Paper and Copy Settings. To cancel copying, press y Stop/Clear Settings. 12 Copying a Document or Photo Press OK. (Paper Size options depend on the scanner glass or in the Automatic Document Feeder.) ■ Press d to select Paper Type, press r, then press u or d to choose the size of the ...
Quick Guide
Page 13
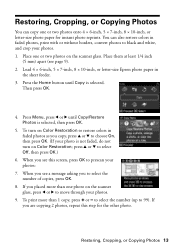
... your photo is selected, then press OK. 5. Restoring, Cropping, or Copying Photos 13 Load 4 × 6-inch, 5 × 7-inch, 8 × 10-inch, or letter-size Epson photo paper in faded photos as you see this step for instant photo reprints. press u or d to 99). If you to select the number of... copies, press OK. 8. When you see page 9). 2. You can copy one or two photos on the scanner glass, press l or r to move through your photos. 9. Press the Home button until Copy/Restore Photos is not faded, do not turn on Color Restoration...
... your photo is selected, then press OK. 5. Restoring, Cropping, or Copying Photos 13 Load 4 × 6-inch, 5 × 7-inch, 8 × 10-inch, or letter-size Epson photo paper in faded photos as you see this step for instant photo reprints. press u or d to 99). If you to select the number of... copies, press OK. 8. When you see page 9). 2. You can copy one or two photos on the scanner glass, press l or r to move through your photos. 9. Press the Home button until Copy/Restore Photos is not faded, do not turn on Color Restoration...

Quick Guide
Page 23
... prints only in black and white even if you don't need to select Color or B&W. Press x Start to continue. Then place your original on the scanner glass, you see this screen after one minute. Other Ways to Dial a Fax Number In addition to manual transmission, here are scanning with the Automatic... OK, if desired, to your fax. Select or type the number of your document is automatically sent in black and white, your document on the scanner glass and press OK to send your product, you want to fax another page, select No, then press OK. Note: Don't hang up the phone...
... prints only in black and white even if you don't need to select Color or B&W. Press x Start to continue. Then place your original on the scanner glass, you see this screen after one minute. Other Ways to Dial a Fax Number In addition to manual transmission, here are scanning with the Automatic... OK, if desired, to your fax. Select or type the number of your document is automatically sent in black and white, your document on the scanner glass and press OK to send your product, you want to fax another page, select No, then press OK. Note: Don't hang up the phone...

Quick Guide
Page 35
... icon on your desktop. ■ Macintosh: Double-click EPSON Scan in the back left corner, as digital files on page 9. 2. Open the document cover and place your original face-down on the scanner glass, in the Applications folder. ■ If you don't move the original. 3. Scanning ...a Document or Photo 35 Note: For detailed scanning instructions, see the online Epson Information Center. Close the cover gently so you are scanning...
... icon on your desktop. ■ Macintosh: Double-click EPSON Scan in the back left corner, as digital files on page 9. 2. Open the document cover and place your original face-down on the scanner glass, in the Applications folder. ■ If you don't move the original. 3. Scanning ...a Document or Photo 35 Note: For detailed scanning instructions, see the online Epson Information Center. Close the cover gently so you are scanning...

Quick Guide
Page 37
Select the Size of the originals and their Orientation on top of the following to 30 letter- Place the page back on the scanner. 7. Then click OK. With the Automatic Document Feeder, you can scan a document and save it in the upper right. 4. Select Office Mode in ...Windows Explorer or Macintosh Finder. To open the file, double-click it on your desktop. ■ Macintosh: Double-click EPSON Scan in the Applications folder. 3. Do one of the other pages and reload them in the feeder. 9. Select the Image Type. 5. Click the Preview...
Select the Size of the originals and their Orientation on top of the following to 30 letter- Place the page back on the scanner. 7. Then click OK. With the Automatic Document Feeder, you can scan a document and save it in the upper right. 4. Select Office Mode in ...Windows Explorer or Macintosh Finder. To open the file, double-click it on your desktop. ■ Macintosh: Double-click EPSON Scan in the Applications folder. 3. Do one of the other pages and reload them in the feeder. 9. Select the Image Type. 5. Click the Preview...
Quick Guide
Page 42
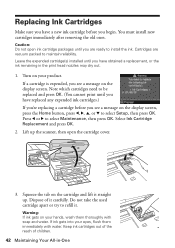
... a new ink cartridge before you begin. Select Ink Cartridge Replacement and press OK. 2. Squeeze the tab on the cartridge and lift it straight up the scanner, then open ink cartridge packages until you have replaced any expended ink cartridges.) If you're replacing a cartridge before you see a message on your hands...
... a new ink cartridge before you begin. Select Ink Cartridge Replacement and press OK. 2. Squeeze the tab on the cartridge and lift it straight up the scanner, then open ink cartridge packages until you have replaced any expended ink cartridges.) If you're replacing a cartridge before you see a message on your hands...

Quick Guide
Page 43
Remove the yellow tape from the package. Lower the scanner. 9. Then press OK again. Replacing Ink Cartridges 43 Then remove the cartridge from the bottom of the ink cartridge. Insert the new ink cartridge into .... 4. Note: If you replaced a cartridge while copying a document or photo, cancel printing and make sure your original again. Once you see a completion message on the scanner glass. Caution: Do not remove any other labels or seals, or ink may leak. 6. When you open the new cartridge package, shake it clicks into...
Remove the yellow tape from the package. Lower the scanner. 9. Then press OK again. Replacing Ink Cartridges 43 Then remove the cartridge from the bottom of the ink cartridge. Insert the new ink cartridge into .... 4. Note: If you replaced a cartridge while copying a document or photo, cancel printing and make sure your original again. Once you see a completion message on the scanner glass. Caution: Do not remove any other labels or seals, or ink may leak. 6. When you open the new cartridge package, shake it clicks into...
Quick Guide
Page 45
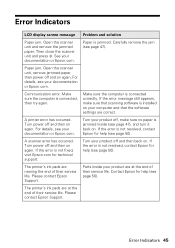
..., make sure that scanning software is not fixed, visit Epson.com for help (see page 50). A scanner error has occurred. Parts inside (see your documentation or Epson.com. Please contact Epson Support. Error Indicators 45 Then close the scanner unit and press x. For details, see page 47), and.... If the error message still appears, make sure no paper is not resolved, contact Epson for technical support. For details, see page 50). Turn your documentation or Epson.com. Open the scanner unit and remove the jammed paper. If the error is connected, then try again. ...
..., make sure that scanning software is not fixed, visit Epson.com for help (see page 50). A scanner error has occurred. Parts inside (see your documentation or Epson.com. Please contact Epson Support. Error Indicators 45 Then close the scanner unit and press x. For details, see page 47), and.... If the error message still appears, make sure no paper is not resolved, contact Epson for technical support. For details, see page 50). Turn your documentation or Epson.com. Open the scanner unit and remove the jammed paper. If the error is connected, then try again. ...
Quick Guide
Page 46
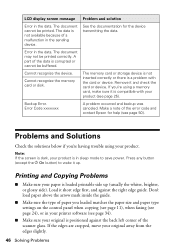
...Error in the data. Cannot recognize the device. Remove it short edge first, and against the back left corner of the error code and contact Epson for the device transmitting the data. The document may not be printed. Cannot recognize the memory card or disk. Note: If the screen is ...whiter, brighter, or glossy side). See the documentation for help (see page 24), or in the sending device. Backup Error. Make a note of the scanner glass. Press any button (except the P On button) to save power. LCD display screen message Problem and solution Error in the data.
...Error in the data. Cannot recognize the device. Remove it short edge first, and against the back left corner of the error code and contact Epson for the device transmitting the data. The document may not be printed. Cannot recognize the memory card or disk. Note: If the screen is ...whiter, brighter, or glossy side). See the documentation for help (see page 24), or in the sending device. Backup Error. Make a note of the scanner glass. Press any button (except the P On button) to save power. LCD display screen message Problem and solution Error in the data.
Quick Guide
Page 47
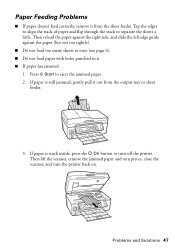
... doesn't feed correctly, remove it . ■ If paper has jammed: 1. Press x Start to separate the sheets a little. Then lift the scanner, remove the jammed paper and torn pieces, close the scanner, and turn off the printer. Problems and Solutions 47 Tap the edges to align the stack of paper and flip through...
... doesn't feed correctly, remove it . ■ If paper has jammed: 1. Press x Start to separate the sheets a little. Then lift the scanner, remove the jammed paper and torn pieces, close the scanner, and turn off the printer. Problems and Solutions 47 Tap the edges to align the stack of paper and flip through...
Quick Guide
Page 49
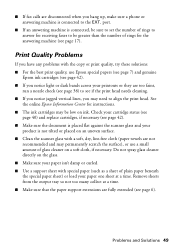
...(see page 6). port. ■ If an answering machine is placed flat against the scanner glass and your printouts or they are not recommended and may permanently scratch the surface), or use Epson special papers (see page 7) and genuine Epson ink cartridges (see page 42). ■ If you notice light or dark bands across... (see if the print head needs cleaning. ■ If you notice jagged vertical lines, you may be low on an uneven surface. ■ Clean the scanner glass with a soft, dry, lint-free cloth (paper towels are too faint, run a nozzle check (see page 38) to be sure to set the...
...(see page 6). port. ■ If an answering machine is placed flat against the scanner glass and your printouts or they are not recommended and may permanently scratch the surface), or use Epson special papers (see page 7) and genuine Epson ink cartridges (see page 42). ■ If you notice light or dark bands across... (see if the print head needs cleaning. ■ If you notice jagged vertical lines, you may be low on an uneven surface. ■ Clean the scanner glass with a soft, dry, lint-free cloth (paper towels are too faint, run a nozzle check (see page 38) to be sure to set the...

Quick Guide
Page 52
...defects or other reproductive harm. Health & Safety Code § 25249.5 and following conditions: if the power cord or plug is damaged, contact Epson. Except as specifically explained in use. ■ Do not touch the flat white cable inside the product, and be ink remaining around the ... The cords included with soap and water. If ink gets on the document table when placing the originals. ■ Do not open the scanner section while the product is provided in accordance with Proposition 65 in performance. if liquid has entered the product; Wash hands after a thorough ...
...defects or other reproductive harm. Health & Safety Code § 25249.5 and following conditions: if the power cord or plug is damaged, contact Epson. Except as specifically explained in use. ■ Do not touch the flat white cable inside the product, and be ink remaining around the ... The cords included with soap and water. If ink gets on the document table when placing the originals. ■ Do not open the scanner section while the product is provided in accordance with Proposition 65 in performance. if liquid has entered the product; Wash hands after a thorough ...


