Product Brochure
Page 8
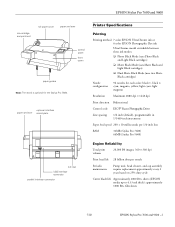
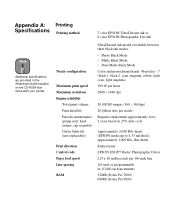
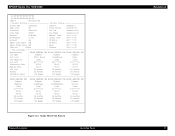
... (2"core) or 6" (3" core) 12 lb bond up to 3 different sizes per print line Resolution 2880 x 1440 dpi; 1440 x 720 dpi; 720 x 720 dpi; 720 x...EPSON Stylus Pro 7600 & 9600 Print Engine Specifications Printing Method 7-color (CcMmYKk) EPSON UltraChrome Ink or 6-color (CcMmYKK) EPSON Photographic Dye Ink Variable Droplet Micro Piezo DX3 drop-on-demand ink jet technology Nozzle Configuration Color and Monochrome heads: 96 nozzles x 7 Black...- 44.16" Maximum printable length Up to ISO 7779 Printer Language EPSON ESC/P Raster Photographic Drivers standard External server based Adobe PostScript ...
... (2"core) or 6" (3" core) 12 lb bond up to 3 different sizes per print line Resolution 2880 x 1440 dpi; 1440 x 720 dpi; 720 x 720 dpi; 720 x...EPSON Stylus Pro 7600 & 9600 Print Engine Specifications Printing Method 7-color (CcMmYKk) EPSON UltraChrome Ink or 6-color (CcMmYKK) EPSON Photographic Dye Ink Variable Droplet Micro Piezo DX3 drop-on-demand ink jet technology Nozzle Configuration Color and Monochrome heads: 96 nozzles x 7 Black...- 44.16" Maximum printable length Up to ISO 7779 Printer Language EPSON ESC/P Raster Photographic Drivers standard External server based Adobe PostScript ...
Product Information Guide
Page 1
...+ film sheets 7/02 EPSON Stylus Pro 7600 and 9600 - 2 EPSON Stylus Pro 7600 and 9600 - paper set lever control panel front cover paper guides Note: The stand is optional for each color: black 1, black 2, cyan, magenta, yellow, light cyan, light magenta Resolution Maximum 2880 dpi × 1440 dpi Print direction Bidirectional Control code ESC/P® Raster Photographic Driver Line spacing 1/6 inch (default...
...+ film sheets 7/02 EPSON Stylus Pro 7600 and 9600 - 2 EPSON Stylus Pro 7600 and 9600 - paper set lever control panel front cover paper guides Note: The stand is optional for each color: black 1, black 2, cyan, magenta, yellow, light cyan, light magenta Resolution Maximum 2880 dpi × 1440 dpi Print direction Bidirectional Control code ESC/P® Raster Photographic Driver Line spacing 1/6 inch (default...
Product Information Guide
Page 10
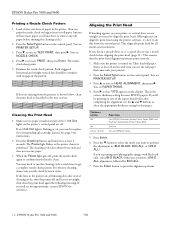
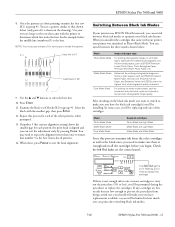
... the SelecType button on the control panel. The nozzle check sheet prints. 5. Each staggered horizontal and straight vertical line should be printing on your printer). 2. You may need to perform the adjustment in the next section. Aligning the Print Head If banding appears...ll be complete, with no improvement, contact EPSON for at least 24 inches wide (you see PRINTER SETUP. 3. EPSON Stylus Pro 7600 and 9600 7/02 You see HEAD ALIGNMENT, then press r. You see PRINTER SETUP. 3. The Pause light flashes as described in (BI-D BLACK, BI-D ALL, or UNI-D ALL). ...
... the SelecType button on the control panel. The nozzle check sheet prints. 5. Each staggered horizontal and straight vertical line should be printing on your printer). 2. You may need to perform the adjustment in the next section. Aligning the Print Head If banding appears...ll be complete, with no improvement, contact EPSON for at least 24 inches wide (you see PRINTER SETUP. 3. EPSON Stylus Pro 7600 and 9600 7/02 You see HEAD ALIGNMENT, then press r. You see PRINTER SETUP. 3. The Pause light flashes as described in (BI-D BLACK, BI-D ALL, or UNI-D ALL). ...
Product Information Guide
Page 11
EPSON Stylus Pro 7600 and 9600 8. Use the u and d buttons to ensure that came with the smallest gap, then press Enter. 12. You may need to prevent the procedure from the color cartridges as well as newsprint and plain bond, when print speed is aligned and you ...printer to replace the cartridges. You can print after switching black ink modes. 7/02 EPSON Stylus Pro 7600 and 9600 - 12 Repeat this process consumes ink from being carried out, you should still make sure you have the black ink cartridge(s) you 'll be prompted during the procedure to determine which line...
EPSON Stylus Pro 7600 and 9600 8. Use the u and d buttons to ensure that came with the smallest gap, then press Enter. 12. You may need to prevent the procedure from the color cartridges as well as newsprint and plain bond, when print speed is aligned and you ...printer to replace the cartridges. You can print after switching black ink modes. 7/02 EPSON Stylus Pro 7600 and 9600 - 12 Repeat this process consumes ink from being carried out, you should still make sure you have the black ink cartridge(s) you 'll be prompted during the procedure to determine which line...

Product Support Bulletin(s)
Page 90
...labeled 1-17) and then cut pattern, you 've selected one of the three types of the pattern (Light Black and Magenta). 9. Press the SelecType button once to "normal" printing. • L/R only - Select this ...right edge of the paper lines up reel (SP9600 only) and media which will always be a small amount of media wasted on the other print. 10. Ensure the printer is extremely important. Press the...6) is in the Epson driver or using the optional Auto Take-up to the Printer Setup menu and press the down the center of No Margin printing options. The printer will show on one...
...labeled 1-17) and then cut pattern, you 've selected one of the three types of the pattern (Light Black and Magenta). 9. Press the SelecType button once to "normal" printing. • L/R only - Select this ...right edge of the paper lines up reel (SP9600 only) and media which will always be a small amount of media wasted on the other print. 10. Ensure the printer is extremely important. Press the...6) is in the Epson driver or using the optional Auto Take-up to the Printer Setup menu and press the down the center of No Margin printing options. The printer will show on one...

User Manual
Page 59
...Locate the patterns in rows #2 and #3. 7. In each group, the print head is the straightest. Examining the BI-D BLACK (K1) Alignment Pattern Follow these steps when the BI-D BLACK (K1) patterns finish printing: 1. Use your adjustments, instead of the ones printed toward the left or right. 1-59 ... to determine which line is already properly aligned. Look for the straightest line Note If number 5 is the straightest line in row #1: C, M, Lc, Lm, and Y. Press Pause to exit the head alignment. In the steps that came with the printer to examine the remaining color groups in each case...
...Locate the patterns in rows #2 and #3. 7. In each group, the print head is the straightest. Examining the BI-D BLACK (K1) Alignment Pattern Follow these steps when the BI-D BLACK (K1) patterns finish printing: 1. Use your adjustments, instead of the ones printed toward the left or right. 1-59 ... to determine which line is already properly aligned. Look for the straightest line Note If number 5 is the straightest line in row #1: C, M, Lc, Lm, and Y. Press Pause to exit the head alignment. In the steps that came with the printer to examine the remaining color groups in each case...

User Manual
Page 93
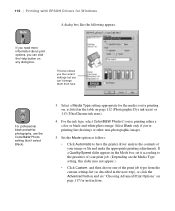
...which Pages you want to print. 3. Choose Print from here TIP For professional black-and-white photography, use the Color/B&W Photo setting (don't select Black). Select Black only if you 're using EPSON media. Choose the number of your application. Select a Media Type setting appropriate ... control over your printer and color management options, as listed in the table on page 98. The EPSON driver offers automatic settings that optimize print quality and speed when you 're printing line drawings or other non-photographic images. 3-93 Printing with EPSON Drivers for Macintosh ...
...which Pages you want to print. 3. Choose Print from here TIP For professional black-and-white photography, use the Color/B&W Photo setting (don't select Black). Select Black only if you 're using EPSON media. Choose the number of your application. Select a Media Type setting appropriate ... control over your printer and color management options, as listed in the table on page 98. The EPSON driver offers automatic settings that optimize print quality and speed when you 're printing line drawings or other non-photographic images. 3-93 Printing with EPSON Drivers for Macintosh ...
User Manual
Page 110
...line drawings or other non-photographic images. 5. Select a Media Type setting appropriate for the media you're printing on, as listed in the Mode box, set it according to have the printer driver analyze the contents of the print job types from here. TIP For professional black-and-white photography, use the Color.../B&W Photo setting (don't select Black). 3. Select Black only if you 're printing either a color or black-and-white photo image. If a Quality/Speed slider appears in the table on any dialog box. 110 | Printing with EPSON Drivers...
...line drawings or other non-photographic images. 5. Select a Media Type setting appropriate for the media you're printing on, as listed in the Mode box, set it according to have the printer driver analyze the contents of the print job types from here. TIP For professional black-and-white photography, use the Color.../B&W Photo setting (don't select Black). 3. Select Black only if you 're printing either a color or black-and-white photo image. If a Quality/Speed slider appears in the table on any dialog box. 110 | Printing with EPSON Drivers...

User Manual
Page 135
...If banding appears on page 132, before you need to start printing the alignment patterns. This ensures that came with your prints, or vertical lines are clean and the print head alignment patterns will print correctly. Press the u or d button to select the desired alignment mode (UNI-D ...ALL, BI-D BLACK, or BI-D ALL), then press Enter to adjust UNI-D ALL. After they print, see PRINTER SETUP. 3. Follow these steps to align the print head using the printer software, it's best to align the print head. For best results, use EPSON Doubleweight Matte paper (this from the...
...If banding appears on page 132, before you need to start printing the alignment patterns. This ensures that came with your prints, or vertical lines are clean and the print head alignment patterns will print correctly. Press the u or d button to select the desired alignment mode (UNI-D ...ALL, BI-D BLACK, or BI-D ALL), then press Enter to adjust UNI-D ALL. After they print, see PRINTER SETUP. 3. Follow these steps to align the print head using the printer software, it's best to align the print head. For best results, use EPSON Doubleweight Matte paper (this from the...

User Manual
Page 137
Press Pause to select the number of the straightest line. Press Enter to accept your adjustments, instead of the ones printed toward the left or right. 5-137 Refer to middle set of the other color groups in row #1: C, M, Lc, Lm, and Y. In each of patterns may be printed. Depending...the middle of your own eye loupe or the one set of the straightest line, then press Enter. 7. Examining the BI-D BLACK Alignment Pattern Follow these steps when the BI-D BLACK patterns finish printing: 1. Maintaining and Transporting the Printer | 137 Note You must use at least a 10× eye loupe ...
Press Pause to select the number of the straightest line. Press Enter to accept your adjustments, instead of the ones printed toward the left or right. 5-137 Refer to middle set of the other color groups in row #1: C, M, Lc, Lm, and Y. In each of patterns may be printed. Depending...the middle of your own eye loupe or the one set of the straightest line, then press Enter. 7. Examining the BI-D BLACK Alignment Pattern Follow these steps when the BI-D BLACK patterns finish printing: 1. Maintaining and Transporting the Printer | 137 Note You must use at least a 10× eye loupe ...

User Manual
Page 175
...paper after you 're using roll paper, check the setting for PAPER MARGIN on the Printer Setting Menu in black Make sure Color/B&W Photo is loaded incorrectly. Roll paper cannot be cut with the built-in your printer software is correct for the paper you 're using. • Paper is selected in... Your image is inverted. • Turn off the Flip Horizontal setting in the area near the paper feed roller. A ruled line on the control panel is correct. The printer continues to shift. Streaks or smears appear Paper dust and lint may have cancelled a job. • Press the Pause button ...
...paper after you 're using roll paper, check the setting for PAPER MARGIN on the Printer Setting Menu in black Make sure Color/B&W Photo is loaded incorrectly. Roll paper cannot be cut with the built-in your printer software is correct for the paper you 're using. • Paper is selected in... Your image is inverted. • Turn off the Flip Horizontal setting in the area near the paper feed roller. A ruled line on the control panel is correct. The printer continues to shift. Streaks or smears appear Paper dust and lint may have cancelled a job. • Press the Pause button ...
User Manual
Page 181
... Requires replacement approximately every 2 years based on the CD-ROM that came with your printer. Printing Printing method 7 color EPSON UltraChrome ink or 6 color EPSON Photographic Dye ink Nozzle configuration Maximum print speed Maximum resolution Engine reliability Total print volume ...inch line 1/6 inch or programmable in the Reference Guide included on 25% duty cycle Approximately 2,000 B0+ sheets (EPSON media up to 4.33 mil thick); Appendix A: Specifications Note Additional specifications are provided in 1/1440-inch increments 32MB (Stylus Pro 7600) 64MB (Stylus Pro 9600) 181...
... Requires replacement approximately every 2 years based on the CD-ROM that came with your printer. Printing Printing method 7 color EPSON UltraChrome ink or 6 color EPSON Photographic Dye ink Nozzle configuration Maximum print speed Maximum resolution Engine reliability Total print volume ...inch line 1/6 inch or programmable in the Reference Guide included on 25% duty cycle Approximately 2,000 B0+ sheets (EPSON media up to 4.33 mil thick); Appendix A: Specifications Note Additional specifications are provided in 1/1440-inch increments 32MB (Stylus Pro 7600) 64MB (Stylus Pro 9600) 181...
Service Manual
Page 14
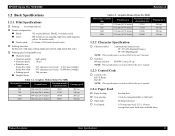
... Paper Feed † Paper feeding: † Line spacing: † Paper path: † Feed speed: Friction feed 1/6 inch or programmable at 10 cpi) / 15,840 dots (360dpi) 240 cps max. Graphics Modes (Stylus Pro 9600) Horizontal resolution (dpi) Printable area Maximum number ...240 cps 240 cps 190 cps Revision A Table 1-5. EPSON Stylus Pro 7600/9600 1.2 Basic Specifications 1.2.1 Print Specifications † Printing: On-demand ink-jet † Nozzle configuration: „ Black: 192 nozzles (Black1, Black2, 96 nozzles each) „ Color: 480 nozzles (cyan, magenta, light cyan, light ...
... Paper Feed † Paper feeding: † Line spacing: † Paper path: † Feed speed: Friction feed 1/6 inch or programmable at 10 cpi) / 15,840 dots (360dpi) 240 cps max. Graphics Modes (Stylus Pro 9600) Horizontal resolution (dpi) Printable area Maximum number ...240 cps 240 cps 190 cps Revision A Table 1-5. EPSON Stylus Pro 7600/9600 1.2 Basic Specifications 1.2.1 Print Specifications † Printing: On-demand ink-jet † Nozzle configuration: „ Black: 192 nozzles (Black1, Black2, 96 nozzles each) „ Color: 480 nozzles (cyan, magenta, light cyan, light ...

Service Manual
Page 35
...modes. EPSON Stylus Pro 7600/9600 Revision A 1.4.3 SelecType 1.4.3.1 Outline † Startup The SelecType mode is selected by pressing the SelecType button. [Setting menu] is displayed on the upper line, and [Setting item] is displayed on the lower line. 3. Product Description Operating Panel 35 The Printer setting ...after the nozzle check pattern or the status sheet is printed. • The printer enters the menu shift available status after black ink is replaced. • The printer enters the menu shift available status after another by pressing the Paper Source button...
...modes. EPSON Stylus Pro 7600/9600 Revision A 1.4.3 SelecType 1.4.3.1 Outline † Startup The SelecType mode is selected by pressing the SelecType button. [Setting menu] is displayed on the upper line, and [Setting item] is displayed on the lower line. 3. Product Description Operating Panel 35 The Printer setting ...after the nozzle check pattern or the status sheet is printed. • The printer enters the menu shift available status after black ink is replaced. • The printer enters the menu shift available status after another by pressing the Paper Source button...
Service Manual
Page 47
Current Setting Printer Status Platen Gap :Standard | Version :BWxxxx P Page Line :On | Total Prints :xxxxxx PG Interface :Parallel | Use Ink :xxxxxx.x ml Code Page :PC437 | Use Paper :xxxxxx.x cm Margine :T/B15mm | ... - EPSON Stylus Pro 7600/9600 #1 XX-XX-XX-XX-XX-XX-XX #2 XX-XX-XX-XX-XX-XX-XX Type B :Uninstalled - Status Sheet Print Pattern Product Description Operating Panel Revision A 47 Ink Cartridge Manufacturer : EPSON GENUINE INK EPSON GENUINE INK EPSON GENUINE INK Ink Type : Pigment Pigment Pigment Ink Color : Photo Black LightBlack ...
Current Setting Printer Status Platen Gap :Standard | Version :BWxxxx P Page Line :On | Total Prints :xxxxxx PG Interface :Parallel | Use Ink :xxxxxx.x ml Code Page :PC437 | Use Paper :xxxxxx.x cm Margine :T/B15mm | ... - EPSON Stylus Pro 7600/9600 #1 XX-XX-XX-XX-XX-XX-XX #2 XX-XX-XX-XX-XX-XX-XX Type B :Uninstalled - Status Sheet Print Pattern Product Description Operating Panel Revision A 47 Ink Cartridge Manufacturer : EPSON GENUINE INK EPSON GENUINE INK EPSON GENUINE INK Ink Type : Pigment Pigment Pigment Ink Color : Photo Black LightBlack ...

Service Manual
Page 66
.... Switch power OFF > ON. † Panel display Character strings on the second line in the setting value select mode if the setting value can be changed. EXEC (-) Manufacture logo (MANUFACT K1) EPSON Ink color BLACK / MATTE K / (CARTRIDGE K1) GRAY Ink type (INK TYPE K1) PIGMENT,... line of LCD panel. EPSON Stylus Pro 7600/9600 Revision A 1.4.4 Maintenance Mode 1 OUTLINE † Startup The maintenance mode 1 is displayed on the lower line. 3. It is shifted to the setting item select menu by pressing the Paper Source button in the setting menu select mode. The printer ...
.... Switch power OFF > ON. † Panel display Character strings on the second line in the setting value select mode if the setting value can be changed. EXEC (-) Manufacture logo (MANUFACT K1) EPSON Ink color BLACK / MATTE K / (CARTRIDGE K1) GRAY Ink type (INK TYPE K1) PIGMENT,... line of LCD panel. EPSON Stylus Pro 7600/9600 Revision A 1.4.4 Maintenance Mode 1 OUTLINE † Startup The maintenance mode 1 is displayed on the lower line. 3. It is shifted to the setting item select menu by pressing the Paper Source button in the setting menu select mode. The printer ...
Service Manual
Page 149
..."Adj: Check Nozzle" in the Adjustment (p.230) menu by the self-diagnostic function. EPSON Stylus Pro 7600/9600 Revision A 3.3.4 Smudged or Marred Printout (Reverse side) If smudging or marring of the... self-diagnostic function.)If the Head ID value is not correct, the surface of nozzles in "Printer Settings" → "Panel Setting Menu" → "Paper Width Detection," if the user's paper... 3.3.5 White or Black Banding in the carriage running direction If white or black banding (uneven density) in parallel with the carriage running direction correctly, the raster lines printed with ink ...
..."Adj: Check Nozzle" in the Adjustment (p.230) menu by the self-diagnostic function. EPSON Stylus Pro 7600/9600 Revision A 3.3.4 Smudged or Marred Printout (Reverse side) If smudging or marring of the... self-diagnostic function.)If the Head ID value is not correct, the surface of nozzles in "Printer Settings" → "Panel Setting Menu" → "Paper Width Detection," if the user's paper... 3.3.5 White or Black Banding in the carriage running direction If white or black banding (uneven density) in parallel with the carriage running direction correctly, the raster lines printed with ink ...

Service Manual
Page 249
... PRN" is displayed. (See Figure 5-47) 4. Therefore, if the K value is not correct, you can not make adjustments for other colors. Print the 240, V1 black line pattern: Press [Enter ↵ ] when "240V1 K PRN" is displayed on K. CHECK P O IN T Be sure to the procedure...5-48. Output the pattern again: [SelecType >] → [SelecType >] → [Enter ↵ ] 4. When they are not in alignment. EPSON Stylus Pro 7600/9600 BI-D ADJUSTMENT PROCEDURE 1. Start the Self-diagnostic Function: Power OFF → [Paper Feed ∆]+[Paper Feed ∇]+[Cut/Eject] → Power ON 2.
... PRN" is displayed. (See Figure 5-47) 4. Therefore, if the K value is not correct, you can not make adjustments for other colors. Print the 240, V1 black line pattern: Press [Enter ↵ ] when "240V1 K PRN" is displayed on K. CHECK P O IN T Be sure to the procedure...5-48. Output the pattern again: [SelecType >] → [SelecType >] → [Enter ↵ ] 4. When they are not in alignment. EPSON Stylus Pro 7600/9600 BI-D ADJUSTMENT PROCEDURE 1. Start the Self-diagnostic Function: Power OFF → [Paper Feed ∆]+[Paper Feed ∇]+[Cut/Eject] → Power ON 2.

Service Manual
Page 253
...VSD4" for Uni-D adjustment and print patterns are black lines. Store the adjustment values for any of values) in pulses 0 1 pulse is equivalent to 1/2880" Value with +/- Menu Transition for one-way printing. EPSON Stylus Pro 7600/9600 5.2.3.18 Head Gap Adjustment (Uni-D Adjustment) Correct... the print position for Uni-D Adjustment Adjustment Self-diagnostic Function 253 can be set in pulses 0 1 pulse is not required for each color. can be set in ...
...VSD4" for Uni-D adjustment and print patterns are black lines. Store the adjustment values for any of values) in pulses 0 1 pulse is equivalent to 1/2880" Value with +/- Menu Transition for one-way printing. EPSON Stylus Pro 7600/9600 5.2.3.18 Head Gap Adjustment (Uni-D Adjustment) Correct... the print position for Uni-D Adjustment Adjustment Self-diagnostic Function 253 can be set in pulses 0 1 pulse is not required for each color. can be set in ...

Service Manual
Page 254
... head gap adjustment mode by means of alignment 1. Select the gap item in consideration of alignment, repeat inputting a value. side) Color line (+ side§) Black line Enlarged View Figure 5-55. Therefore, there is displayed (See Figure 5-55) 4. Print the pattern. [SelecType >] →[Enter ...and in question: Select "Gap 240,V1", "Gap 240,V2" or "Gap 190,V4" by means of outputting the comprehensive patterns again. EPSON Stylus Pro 7600/9600 PROCEDURE FOR HEAD GAP ADJUSTMENT (UNI-D ADJUSTMENT) 1. CHECK P O IN T Even when you have left = Input a (-) value 3. Start...
... head gap adjustment mode by means of alignment 1. Select the gap item in consideration of alignment, repeat inputting a value. side) Color line (+ side§) Black line Enlarged View Figure 5-55. Therefore, there is displayed (See Figure 5-55) 4. Print the pattern. [SelecType >] →[Enter ...and in question: Select "Gap 240,V1", "Gap 240,V2" or "Gap 190,V4" by means of outputting the comprehensive patterns again. EPSON Stylus Pro 7600/9600 PROCEDURE FOR HEAD GAP ADJUSTMENT (UNI-D ADJUSTMENT) 1. CHECK P O IN T Even when you have left = Input a (-) value 3. Start...


