

Printer Basics
Page 75
... and hold the P power button to remove the excess. Turn on the back of your printouts, clean the paper rollers. Clean the black plastic area inside your printer) in the sheet feeder, long edge first. 6. If there is ink on the printer. 2. Caution: Never use a hard or abrasive brush, or benzine, alcohol, or thinner for...
... and hold the P power button to remove the excess. Turn on the back of your printouts, clean the paper rollers. Clean the black plastic area inside your printer) in the sheet feeder, long edge first. 6. If there is ink on the printer. 2. Caution: Never use a hard or abrasive brush, or benzine, alcohol, or thinner for...

Printer Basics
Page 84
... described on page 65. ■ Make sure your paper meets the specifications listed in the on page 65. ■ Clean the automatic roll paper cutter (see page 68) and/or the paper rollers (see page 12; see page 57 for most papers. Set it to m for instructions. ■ Select a higher print ...shinier. ■ Check the adjust lever. Quality Problems You see page 59. ■ Align the print head as described on -screen Reference Guide. ■ Use EPSON papers for proper saturation and absorption of genuine EPSON inks. ■ Check the adjust lever. see banding (light lines).
... described on page 65. ■ Make sure your paper meets the specifications listed in the on page 65. ■ Clean the automatic roll paper cutter (see page 68) and/or the paper rollers (see page 12; see page 57 for most papers. Set it to m for instructions. ■ Select a higher print ...shinier. ■ Check the adjust lever. Quality Problems You see page 59. ■ Align the print head as described on -screen Reference Guide. ■ Use EPSON papers for proper saturation and absorption of genuine EPSON inks. ■ Check the adjust lever. see banding (light lines).

Service Manual
Page 6
... 1.3.10 Panel Operation for Thick Paper Printing 33 1.3.11 Panel Operation in Roller Cleaning Mode 34 1.3.12 Indicator Display in Normal Mode 35 1.3.13 Error Status 36 1.4 Casing Specifications 37 1.5 Accessories 37 1.6 Environment Specification Items 38 Chapter 2 OPERATING PRINCIPLES 2.1 Overview 40 2.2 Printer Mechanism 40 2.2.1 Carriage Mechanism 41 2.2.2 Print Mode 44 2.2.3 Paper Feeding Mechanism...
... 1.3.10 Panel Operation for Thick Paper Printing 33 1.3.11 Panel Operation in Roller Cleaning Mode 34 1.3.12 Indicator Display in Normal Mode 35 1.3.13 Error Status 36 1.4 Casing Specifications 37 1.5 Accessories 37 1.6 Environment Specification Items 38 Chapter 2 OPERATING PRINCIPLES 2.1 Overview 40 2.2 Printer Mechanism 40 2.2.1 Carriage Mechanism 41 2.2.2 Print Mode 44 2.2.3 Paper Feeding Mechanism...
Service Manual
Page 7
...14 Removing the DE Unit and ASF/Pump Motor 171 4.2.15 Removing the PF Roller 175 4.2.16 Removing the Paper Eject Roller Shaft A 179 4.2.17 Removing the PF Roller Support 181 4.2.18 Disassembling the Cutter Unit 182 4.2.19 Fitting the Protective Materials...6 Maintenance 6.1 Overview 215 6.1.1 ROM Replacement 215 6.1.2 Cleaning 215 6.1.3 Service Maintenance 216 6.1.4 Lubrication 217 Chapter 7 APPENDIX 7.1 Connector Summary 227 7.1.1 Connectors and Pin Layouts 227 7.1.2 EEPROM Address Map 231 7.2 Exploded Diagram 236 7.3 Parts List for EPSON Stylus Photo 2100 248 7.4 Circuit Diagram 253
...14 Removing the DE Unit and ASF/Pump Motor 171 4.2.15 Removing the PF Roller 175 4.2.16 Removing the Paper Eject Roller Shaft A 179 4.2.17 Removing the PF Roller Support 181 4.2.18 Disassembling the Cutter Unit 182 4.2.19 Fitting the Protective Materials...6 Maintenance 6.1 Overview 215 6.1.1 ROM Replacement 215 6.1.2 Cleaning 215 6.1.3 Service Maintenance 216 6.1.4 Lubrication 217 Chapter 7 APPENDIX 7.1 Connector Summary 227 7.1.1 Connectors and Pin Layouts 227 7.1.2 EEPROM Address Map 231 7.2 Exploded Diagram 236 7.3 Parts List for EPSON Stylus Photo 2100 248 7.4 Circuit Diagram 253

Service Manual
Page 27
EPSON Stylus PHOTO 2100/2200 FUNCTIONS AT POWER-ON Table 1-11. Power-on Page 30. 00h Firmware version, selected Code Page, Waste ink counter and nozzle test pattern are 20-... "EEPROM Address Map" on Page 231. *c : The corresponding addresses of the EEPROM are printed. 01h Hexadecimal dump mode *b : For details, refer to "Panel Operation in Roller Cleaning Mode" on Page 34. *c : For details, refer to "Default Setting Selection Function" on Page 27. Special Setting Mode *a Switch Function Paper switch EEPROM and Timer...
EPSON Stylus PHOTO 2100/2200 FUNCTIONS AT POWER-ON Table 1-11. Power-on Page 30. 00h Firmware version, selected Code Page, Waste ink counter and nozzle test pattern are 20-... "EEPROM Address Map" on Page 231. *c : The corresponding addresses of the EEPROM are printed. 01h Hexadecimal dump mode *b : For details, refer to "Panel Operation in Roller Cleaning Mode" on Page 34. *c : For details, refer to "Default Setting Selection Function" on Page 27. Special Setting Mode *a Switch Function Paper switch EEPROM and Timer...

Service Manual
Page 34
... off . EPSON Stylus PHOTO 2100/2200 1.3.11 Panel Operation in roller cleaning mode 1. In this phenomenon has occurred, start and end the roller cleaning mode and operate the panel during the roller cleaning mode. Initial status: Power off . The Paper LED and all Ink LEDs go off 2. Operating procedure in Roller Cleaning Mode If the ink concentration is increased within the printer driver...
... off . EPSON Stylus PHOTO 2100/2200 1.3.11 Panel Operation in roller cleaning mode 1. In this phenomenon has occurred, start and end the roller cleaning mode and operate the panel during the roller cleaning mode. Initial status: Power off . The Paper LED and all Ink LEDs go off 2. Operating procedure in Roller Cleaning Mode If the ink concentration is increased within the printer driver...

Service Manual
Page 51
...feed switch differ between when 02 is removed from under the PE sensor in the cutter self-cleaning mode. 3. When roll paper is fed, 02 is written to the EEPROM 3F area,...paper cut sheets and roll paper. Move the Release lever to feed paper from the printer front and rear manually. EPSON Stylus PHOTO 2100/2200 Revision B 2.2.3.4 Manual Paper Feeding Mechanism (Board Paper) To enable direct printing onto ... edge reaches a position about 1cm from the PF/Driven roller, and set the Release lever in the thick paper mode. The printer back-feeds the paper to the paper print starting position ...
...feed switch differ between when 02 is removed from under the PE sensor in the cutter self-cleaning mode. 3. When roll paper is fed, 02 is written to the EEPROM 3F area,...paper cut sheets and roll paper. Move the Release lever to feed paper from the printer front and rear manually. EPSON Stylus PHOTO 2100/2200 Revision B 2.2.3.4 Manual Paper Feeding Mechanism (Board Paper) To enable direct printing onto ... edge reaches a position about 1cm from the PF/Driven roller, and set the Release lever in the thick paper mode. The printer back-feeds the paper to the paper print starting position ...
Service Manual
Page 63
...color depending on both ends of the cutter operation area, detect whether the Cutter blade operates properly, and displays Cutter position error or Cutter jam error according to the Periodic large-amount flushing timer. Cutter Mechanism OPERATING PRINCIPLES Printer Mechanism 63 Flushing This printer...Paper hold - Timer cleaning This printer consumes the ink of up to the Periodic flushing timer. Operation during cutting. Right HP sensor Left HP sensor Cutter motor Relay board Paper eject roller shaft Paper hold -down flap Figure 2-16. EPSON Stylus PHOTO 2100/2200 !
...color depending on both ends of the cutter operation area, detect whether the Cutter blade operates properly, and displays Cutter position error or Cutter jam error according to the Periodic large-amount flushing timer. Cutter Mechanism OPERATING PRINCIPLES Printer Mechanism 63 Flushing This printer...Paper hold - Timer cleaning This printer consumes the ink of up to the Periodic flushing timer. Operation during cutting. Right HP sensor Left HP sensor Cutter motor Relay board Paper eject roller shaft Paper hold -down flap Figure 2-16. EPSON Stylus PHOTO 2100/2200 !
Service Manual
Page 83
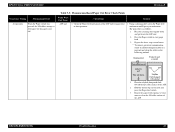
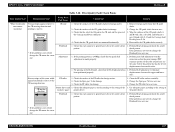
...cleaning sheet, clean the Paper feed mechanism and Paper eject mechanism. The procedure is not fed. Table 3-5. Check the Paper feed mechanism of the ASF. EPSON Stylus PHOTO 2100/2200 Revision B Occurrence Timing Phenomenon Detail At operation When the Paper switch was pressed, the LD rollers...feed. 3 Repeat the above steps several times to a postcard and clean the rollers in the following method. TROUBLESHOOTING Troubleshooting 83 Cleaning sheet Postcard used as follows. 1 Place the cleaning sheet upside down Stapling Cloth damped with alcohol 1 Place the alcohol-...
...cleaning sheet, clean the Paper feed mechanism and Paper eject mechanism. The procedure is not fed. Table 3-5. Check the Paper feed mechanism of the ASF. EPSON Stylus PHOTO 2100/2200 Revision B Occurrence Timing Phenomenon Detail At operation When the Paper switch was pressed, the LD rollers...feed. 3 Repeat the above steps several times to a postcard and clean the rollers in the following method. TROUBLESHOOTING Troubleshooting 83 Cleaning sheet Postcard used as follows. 1 Place the cleaning sheet upside down Stapling Cloth damped with alcohol 1 Place the alcohol-...
Service Manual
Page 85
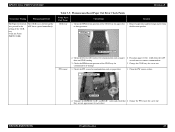
... foreign matter from the ASF several times to each other. Pass plain paper of the CD-R tray. (Only for Stylus PHOTO 2100) Table 3-5. Check the PW sensor for contamination such as paper dust. 1. Carriage unit bottom PW sensor 2....roller surface for contamination such as paper dust and CD-R coating. 3. Change the CD-R tray for a new one . 1. Change the PW sensor for a new one . Clean the PW sensor surface. they are not approximate to remove contamination. 3. Check the HP detection position of the CD-R tray for paper dust 1. EPSON Stylus PHOTO 2100/2200...
... foreign matter from the ASF several times to each other. Pass plain paper of the CD-R tray. (Only for Stylus PHOTO 2100) Table 3-5. Check the PW sensor for contamination such as paper dust. 1. Carriage unit bottom PW sensor 2....roller surface for contamination such as paper dust and CD-R coating. 3. Change the CD-R tray for a new one . 1. Change the PW sensor for a new one . Clean the PW sensor surface. they are not approximate to remove contamination. 3. Check the HP detection position of the CD-R tray for paper dust 1. EPSON Stylus PHOTO 2100/2200...
Service Manual
Page 107
... color nozzle lines are the same. Check that the print timings (PZT response speeds) of the CR guide shafts for a new one . Perform Head cleaning and check the nozzle check pattern. PF roller 1. Use adequate paper according to make correction so that each segment is printed correctly in the nozzle check pattern. 1. EPSON Stylus PHOTO 2100/2200...
... color nozzle lines are the same. Check that the print timings (PZT response speeds) of the CR guide shafts for a new one . Perform Head cleaning and check the nozzle check pattern. PF roller 1. Use adequate paper according to make correction so that each segment is printed correctly in the nozzle check pattern. 1. EPSON Stylus PHOTO 2100/2200...

Service Manual
Page 109
...has solidified in contamination. Change the Front paper guide (Ink pads) for ink stain. 1. Paper eject unit 1. Clean the Front paper guide with a soft cloth. 1. TROUBLESHOOTING Troubleshooting 109 Check the Front paper guide for a new ...it has been confirmed that of ink are installed securely and evenly in the setting position. Clean the Star wheel rollers with a soft cloth carefully. After removing the ink, therefore, install new Ink pads. Check...have risen, reinstall the Ink pads correctly. 1. EPSON Stylus PHOTO 2100/2200 Revision B Table 3-18.
...has solidified in contamination. Change the Front paper guide (Ink pads) for ink stain. 1. Paper eject unit 1. Clean the Front paper guide with a soft cloth. 1. TROUBLESHOOTING Troubleshooting 109 Check the Front paper guide for a new ...it has been confirmed that of ink are installed securely and evenly in the setting position. Clean the Star wheel rollers with a soft cloth carefully. After removing the ink, therefore, install new Ink pads. Check...have risen, reinstall the Ink pads correctly. 1. EPSON Stylus PHOTO 2100/2200 Revision B Table 3-18.

Service Manual
Page 110
... area of the paper, resulting in contamination. Check the Paper eject roller B for ink stain. TROUBLESHOOTING Troubleshooting 110 Clean the Paper eject roller B with a soft cloth carefully. 1. Clean the Lower paper guide with a soft cloth carefully. Clean the Driven rollers with a soft cloth. EPSON Stylus PHOTO 2100/2200 Print Quality State Phenomenon Detail Ink stain of paper Ink sticks to...
... area of the paper, resulting in contamination. Check the Paper eject roller B for ink stain. TROUBLESHOOTING Troubleshooting 110 Clean the Paper eject roller B with a soft cloth carefully. 1. Clean the Lower paper guide with a soft cloth carefully. Clean the Driven rollers with a soft cloth. EPSON Stylus PHOTO 2100/2200 Print Quality State Phenomenon Detail Ink stain of paper Ink sticks to...

Service Manual
Page 111
... B Remedy 1. Check that wiping operation was performed properly. Clean the PF roller with a soft cloth carefully Ink sticks to other than the print area of the paper, resulting in contamination. Wiper part 1. Table 3-18. TROUBLESHOOTING Troubleshooting 111 Ink unit 1. EPSON Stylus PHOTO 2100/2200 Print Quality State Phenomenon Detail Ink stain of paper Ink sticks to...
... B Remedy 1. Check that wiping operation was performed properly. Clean the PF roller with a soft cloth carefully Ink sticks to other than the print area of the paper, resulting in contamination. Wiper part 1. Table 3-18. TROUBLESHOOTING Troubleshooting 111 Ink unit 1. EPSON Stylus PHOTO 2100/2200 Print Quality State Phenomenon Detail Ink stain of paper Ink sticks to...

Service Manual
Page 177
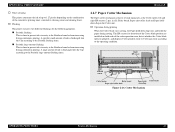
EPSON Stylus PHOTO 2100/2200 Revision B C A U T IO N " Since the joggle of the PF Roller and Spur Gear 76 (including the Bush 12) and does not include the PF Scale. Refer to Figure 4-128, "Removing the PF Roller". CHECK P O IN T In the ASP structure, the PF Roller...When removing the PF Roller, fully be careful when removing and reinstalling it from the printer front. Refer to Figure 4-128, "Removing the PF Roller". CR tooth skip prevention mechanism adjustment 3. Refer to Figure 4-128, "Removing the PF Roller". " When cleaning the surface, use a soft, clean brush. " After ...
EPSON Stylus PHOTO 2100/2200 Revision B C A U T IO N " Since the joggle of the PF Roller and Spur Gear 76 (including the Bush 12) and does not include the PF Scale. Refer to Figure 4-128, "Removing the PF Roller". CHECK P O IN T In the ASP structure, the PF Roller...When removing the PF Roller, fully be careful when removing and reinstalling it from the printer front. Refer to Figure 4-128, "Removing the PF Roller". CR tooth skip prevention mechanism adjustment 3. Refer to Figure 4-128, "Removing the PF Roller". " When cleaning the surface, use a soft, clean brush. " After ...

Service Manual
Page 195
...Item and Priority List 2 CR Motor Replacement PF Motor Replacement ASF/Pump Motor Replacement PF Encoder Sensor Replacement CR Unit Removal PF Roller Replacement Paper Eject Roller A Removal ... the Waste ink pads. *c: Since the ASP mechanism is submitted to print inspection and cleaning in the processes and is then packed after removal of the Board unit, Head, ASF... the new mechanism. EPSON Stylus PHOTO 2100/2200 Revision B Adjustment Item Main board data read from the old board.
...Item and Priority List 2 CR Motor Replacement PF Motor Replacement ASF/Pump Motor Replacement PF Encoder Sensor Replacement CR Unit Removal PF Roller Replacement Paper Eject Roller A Removal ... the Waste ink pads. *c: Since the ASP mechanism is submitted to print inspection and cleaning in the processes and is then packed after removal of the Board unit, Head, ASF... the new mechanism. EPSON Stylus PHOTO 2100/2200 Revision B Adjustment Item Main board data read from the old board.

Service Manual
Page 215
EPSON Stylus PHOTO 2100/2200 Revision B 6.1 Overview This section provides information to maintain the printer in the figure below. ROM C387 MAIN Board Figure 6-1. C A U T IO N " " " " " " ! These chemicals may deform the components of the printer or deteriorate the quality of the ROM is shown in its optimum condition. 6.1.1 ROM Replacement This printer... the ROM. MAINTENANCE Overview 215 In such cases, use the supplied cleaning sheet for normal usage. Therefore, when returning the printer to clean the ASF LD roller surface, it off. ! If the Housings are made. Housing Never...
EPSON Stylus PHOTO 2100/2200 Revision B 6.1 Overview This section provides information to maintain the printer in the figure below. ROM C387 MAIN Board Figure 6-1. C A U T IO N " " " " " " ! These chemicals may deform the components of the printer or deteriorate the quality of the ROM is shown in its optimum condition. 6.1.1 ROM Replacement This printer... the ROM. MAINTENANCE Overview 215 In such cases, use the supplied cleaning sheet for normal usage. Therefore, when returning the printer to clean the ASF LD roller surface, it off. ! If the Housings are made. Housing Never...

Service Manual
Page 216
Confirm that the printer is not blinking ! EPSON Stylus PHOTO 2100/2200 ! Printing Pattern Where Paper Eject Roller Marks Occur Revision B 6.1.3 Service Maintenance If print irregularity (missing dot, white line, etc.) has occurred or the printer indicates "Maintenance Error", take the following actions to clear the error. 6.1.3.1 Head Cleaning: The printer has a built-in head cleaning function, which is activated by...
Confirm that the printer is not blinking ! EPSON Stylus PHOTO 2100/2200 ! Printing Pattern Where Paper Eject Roller Marks Occur Revision B 6.1.3 Service Maintenance If print irregularity (missing dot, white line, etc.) has occurred or the printer indicates "Maintenance Error", take the following actions to clear the error. 6.1.3.1 Head Cleaning: The printer has a built-in head cleaning function, which is activated by...

Service Manual
Page 220
...Apply grease to stand for 1 minute. ! After lubrication, leave the pad ring to the entire periphery. Feed roller assembly mounting hole in the far side position and apply grease. G-26 ! φ1mm x entire periphery of...): φ1mm x 3/4 tooth surface 3) Release lever (far side): φ1mm x 10mm Place the Release levers in a clean pan-shaped vessel and immerse the pad there for 1 minute, and mount it to Figure 6-16. ! Holes of Oil pad ring... shaft side. Lubrication Type/Point Remarks ! Lubrication Type/Point Remarks ! EPSON Stylus PHOTO 2100/2200 Table 6-2.
...Apply grease to stand for 1 minute. ! After lubrication, leave the pad ring to the entire periphery. Feed roller assembly mounting hole in the far side position and apply grease. G-26 ! φ1mm x entire periphery of...): φ1mm x 3/4 tooth surface 3) Release lever (far side): φ1mm x 10mm Place the Release levers in a clean pan-shaped vessel and immerse the pad there for 1 minute, and mount it to Figure 6-16. ! Holes of Oil pad ring... shaft side. Lubrication Type/Point Remarks ! Lubrication Type/Point Remarks ! EPSON Stylus PHOTO 2100/2200 Table 6-2.


