

Service Manual
Page 95
Change the Waste ink pads and perform panel operation to 1.3.6 "Special Setting Mode Function". Phenomenon-Based Maintenance Request Check Points Occurrence Timing Phenomenon Detail Faulty Part/Part Name Check Point Remedy At power-on At power-on, the printer does not operate at all. Refer to reset the Protection counter A value (20, 21). EPSON Stylus PHOTO 2100/2200 Revision B Table 3-16. Using the adjustment program, check that the Protection counter A value is 60352 points or more. 1. Waste ink pads 1. TROUBLESHOOTING Troubleshooting 95
Change the Waste ink pads and perform panel operation to 1.3.6 "Special Setting Mode Function". Phenomenon-Based Maintenance Request Check Points Occurrence Timing Phenomenon Detail Faulty Part/Part Name Check Point Remedy At power-on At power-on, the printer does not operate at all. Refer to reset the Protection counter A value (20, 21). EPSON Stylus PHOTO 2100/2200 Revision B Table 3-16. Using the adjustment program, check that the Protection counter A value is 60352 points or more. 1. Waste ink pads 1. TROUBLESHOOTING Troubleshooting 95

Service Manual
Page 105
EPSON Stylus PHOTO 2100/2200 Revision B Table 3-18. Check that each segment is not ejected to the Waste ink pads. However, Dot missing/displacement occurs in the nozzle check pattern 2. Check that the Ink tube is connected to the printer. (Dot missing) Faulty Part/ Part Name Cap unit Check Point ...persists, change the Printhead for a new one . Print Quality Fault Check Points Print Quality State Phenomenon Detail Dot missing and mixed colors (Continued) [Phenomenon 1] (Continued) In the CL sequence, the Pump unit operates properly but ink is printed correctly in all . Ink is...
EPSON Stylus PHOTO 2100/2200 Revision B Table 3-18. Check that each segment is not ejected to the Waste ink pads. However, Dot missing/displacement occurs in the nozzle check pattern 2. Check that the Ink tube is connected to the printer. (Dot missing) Faulty Part/ Part Name Cap unit Check Point ...persists, change the Printhead for a new one . Print Quality Fault Check Points Print Quality State Phenomenon Detail Dot missing and mixed colors (Continued) [Phenomenon 1] (Continued) In the CL sequence, the Pump unit operates properly but ink is printed correctly in all . Ink is...

Service Manual
Page 106
... Ink cartridge. Look at the remaining ink indication of colors. (Mixed colors) 2. Change the Ink cartridge for a new one . 2. Check for the 1. Change the Cap unit for a new one. Cleaning lever Ink cartridge 1. Seal rubber [Phenomenon 4] In the CL sequence, ink is ejected to the Waste ink pads....the Seal rubber on the Cleaning lever correctly. EPSON Stylus PHOTO 2100/2200 Revision B Print Quality State Phenomenon Detail Dot missing and mixed colors (Continued) [Phenomenon 3] In the CL sequence, ink is ejected to the Waste ink pads. (This means that the Wiper part is ...
... Ink cartridge. Look at the remaining ink indication of colors. (Mixed colors) 2. Change the Ink cartridge for a new one . 2. Check for the 1. Change the Cap unit for a new one. Cleaning lever Ink cartridge 1. Seal rubber [Phenomenon 4] In the CL sequence, ink is ejected to the Waste ink pads....the Seal rubber on the Cleaning lever correctly. EPSON Stylus PHOTO 2100/2200 Revision B Print Quality State Phenomenon Detail Dot missing and mixed colors (Continued) [Phenomenon 3] In the CL sequence, ink is ejected to the Waste ink pads. (This means that the Wiper part is ...

Service Manual
Page 109
EPSON Stylus PHOTO 2100/2200 Revision B Table 3-18. ink pads the Ink pads are not formed on the Ink pads and that the Ink pads have risen, reinstall the Ink pads correctly. 1. Paper eject unit 1. Check the Star wheel rollers for ink stain. 1. If heaps of the Front paper guide, it has been confirmed that of paper Ink...rollers with a soft cloth carefully. Ink sticks to rise. If it can cause the Ink pads to other than the print area of ink heaps. (Ink pads) 1. Front paper guide Front paper guide 1. Change the Front paper guide (Ink pads) for the formation of the paper...
EPSON Stylus PHOTO 2100/2200 Revision B Table 3-18. ink pads the Ink pads are not formed on the Ink pads and that the Ink pads have risen, reinstall the Ink pads correctly. 1. Paper eject unit 1. Check the Star wheel rollers for ink stain. 1. If heaps of the Front paper guide, it has been confirmed that of paper Ink...rollers with a soft cloth carefully. Ink sticks to rise. If it can cause the Ink pads to other than the print area of ink heaps. (Ink pads) 1. Front paper guide Front paper guide 1. Change the Front paper guide (Ink pads) for the formation of the paper...

Service Manual
Page 126
...of the connector installing hooks with double-faced tape. EPSON Stylus PHOTO 2100/2200 Revision B C A U T IO N Fully be careful when removing the Printer Mechanism after peeling the Waste Ink Pad from the printer front, and fix the Waste Ink Pad and Front Frame with nippers. PG Adjustment 2. ... 4. CHECK P O IN T When changing the Main Connector, cut the blades of the Lower Housing as required. PF Adjustment 6. " When reinstalling the Printer Mechanism, put the front right side Waste Ink Pad into the front of the Printer Mechanism means that they are necessary. Refer...
...of the connector installing hooks with double-faced tape. EPSON Stylus PHOTO 2100/2200 Revision B C A U T IO N Fully be careful when removing the Printer Mechanism after peeling the Waste Ink Pad from the printer front, and fix the Waste Ink Pad and Front Frame with nippers. PG Adjustment 2. ... 4. CHECK P O IN T When changing the Main Connector, cut the blades of the Lower Housing as required. PF Adjustment 6. " When reinstalling the Printer Mechanism, put the front right side Waste Ink Pad into the front of the Printer Mechanism means that they are necessary. Refer...

Service Manual
Page 130
.... (Refer to be changed • Waste Ink Pads Adjustment items 1. EEPROM initialization 3. Head ID input 6. EEPROM data 2. USB ID input 4. Pixel Shift Adjustment 8. Parts to Steps 1 and 2 in 4.2.2.3.) 2. Revision B 4.2.2.4 Removing the PSB/PSE Board 1. DISASSEMBLY AND ASSEMBLY Disassembly Screw holes Protective Sheet Figure 4-20. IEEE-1394 ID input 5. Bi-D adjustment 7. EPSON Stylus PHOTO 2100/2200 A D JU S TM...
.... (Refer to be changed • Waste Ink Pads Adjustment items 1. EEPROM initialization 3. Head ID input 6. EEPROM data 2. USB ID input 4. Pixel Shift Adjustment 8. Parts to Steps 1 and 2 in 4.2.2.3.) 2. Revision B 4.2.2.4 Removing the PSB/PSE Board 1. DISASSEMBLY AND ASSEMBLY Disassembly Screw holes Protective Sheet Figure 4-20. IEEE-1394 ID input 5. Bi-D adjustment 7. EPSON Stylus PHOTO 2100/2200 A D JU S TM...

Service Manual
Page 131
... Ink Pads Waste Ink Pad Waste Ink Pad Fixing Films Waste Ink Pad (Small) Figure 4-21. Peel the Waste Ink Pad Fixing Films, which secure the Waste Ink Pads, from the Lower Housing, and pull up and remove the Waste Ink Pads from the Lower Housing. Remove the Lower Housing. (Refer to "Chapter 5 Adjustment" for the adjustment procedure. EPSON Stylus PHOTO 2100/2200 A D JU S TM E N T R E Q U IR E D " When changing the...
... Ink Pads Waste Ink Pad Waste Ink Pad Fixing Films Waste Ink Pad (Small) Figure 4-21. Peel the Waste Ink Pad Fixing Films, which secure the Waste Ink Pads, from the Lower Housing, and pull up and remove the Waste Ink Pads from the Lower Housing. Remove the Lower Housing. (Refer to "Chapter 5 Adjustment" for the adjustment procedure. EPSON Stylus PHOTO 2100/2200 A D JU S TM E N T R E Q U IR E D " When changing the...

Service Manual
Page 132
...Paper Guide 4. Disconnect the Connector Cable of the Ink Tube A D JU S TM E N T R E Q U IR E D " When changing the Waste Ink Pads, make the following adjustment. • Protection counter reset " Refer to Figure 4-21, "Removing the Waste Ink Pads". Specified Position of the ASF Sensor from the ...22, "Specified Position of the Waste Ink Pads. ASF Unit Connector Waste Ink Pads Figure 4-22. EPSON Stylus PHOTO 2100/2200 " The Waste Ink Pads (Small) and the Waste Ink Pads located on the front right side and right side as viewed from the printer rear, slide them to the right to...
...Paper Guide 4. Disconnect the Connector Cable of the Ink Tube A D JU S TM E N T R E Q U IR E D " When changing the Waste Ink Pads, make the following adjustment. • Protection counter reset " Refer to Figure 4-21, "Removing the Waste Ink Pads". Specified Position of the ASF Sensor from the ...22, "Specified Position of the Waste Ink Pads. ASF Unit Connector Waste Ink Pads Figure 4-22. EPSON Stylus PHOTO 2100/2200 " The Waste Ink Pads (Small) and the Waste Ink Pads located on the front right side and right side as viewed from the printer rear, slide them to the right to...

Service Manual
Page 191
... Waste ink counter from the faulty board. Select this function in the head flow path to prevent the repaired printer from the EEPROM of Board replacement. This function is used to a new board. Standard sample printing This pattern is used to confirm the CL effects. EPSON Stylus PHOTO 2100/2200 Revision B Maintenance items Table 5-2. After that, change...
... Waste ink counter from the faulty board. Select this function in the head flow path to prevent the repaired printer from the EEPROM of Board replacement. This function is used to a new board. Standard sample printing This pattern is used to confirm the CL effects. EPSON Stylus PHOTO 2100/2200 Revision B Maintenance items Table 5-2. After that, change...
Service Manual
Page 212
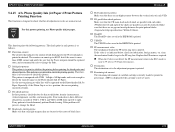
... line are normal or not. Print each color in three different dot patterns in the ES 3 mode is near to stabilize the printing before printing the check patter and adjusted patern. If the problem still persists, change the Pads. ! Head ID The Head ID value ...displacements between the print pattern blocks. (Gap and overlap specifications: Within 0.18mm) ! If any pattern is set in decimal. EPSON Stylus PHOTO 2100/2200 5.2.15 A3+ Photo Quality Ink Jet Paper 2 Print Pattern Printing Function This function is designed to check whether all adjustment results are located at the center ...
... line are normal or not. Print each color in three different dot patterns in the ES 3 mode is near to stabilize the printing before printing the check patter and adjusted patern. If the problem still persists, change the Pads. ! Head ID The Head ID value ...displacements between the print pattern blocks. (Gap and overlap specifications: Within 0.18mm) ! If any pattern is set in decimal. EPSON Stylus PHOTO 2100/2200 5.2.15 A3+ Photo Quality Ink Jet Paper 2 Print Pattern Printing Function This function is designed to check whether all adjustment results are located at the center ...

Service Manual
Page 249
...EPSON Stylus Photo 2100 249 EPSON Stylus PHOTO 2100/2200 No '517' '518' '519' '520' '521' '522' '523' '524' '525' '526' '527' '528' '529' '530' '531' '532' '533' '534' '535' '536' '537' '538' '539' '540' '541' '542' '543' '544' '545' '546' Table 7- 17. Parts List for EPSON Stylus Photo...24.5 1090188 POROUS PAD CABLE HEAD 1108945 POROUS PAD CABLE HEAD;B 1074107 RETAINING RING(B150300711) TYPE-E(4) TYPE-E(4)F/ UC,ETWJ-4 1091178 LEAF SPRING LEVER CLEANER 1050346 BUSHING PULLEY DRIVEN 1058063 BUSH PG CHANGE RIGHT APPENDIX Parts List for EPSON Stylus Photo 2100 Parts Code...
...EPSON Stylus Photo 2100 249 EPSON Stylus PHOTO 2100/2200 No '517' '518' '519' '520' '521' '522' '523' '524' '525' '526' '527' '528' '529' '530' '531' '532' '533' '534' '535' '536' '537' '538' '539' '540' '541' '542' '543' '544' '545' '546' Table 7- 17. Parts List for EPSON Stylus Photo...24.5 1090188 POROUS PAD CABLE HEAD 1108945 POROUS PAD CABLE HEAD;B 1074107 RETAINING RING(B150300711) TYPE-E(4) TYPE-E(4)F/ UC,ETWJ-4 1091178 LEAF SPRING LEVER CLEANER 1050346 BUSHING PULLEY DRIVEN 1058063 BUSH PG CHANGE RIGHT APPENDIX Parts List for EPSON Stylus Photo 2100 Parts Code...


