Managing Color Guide
Page 6
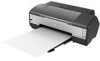
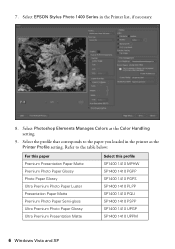
... paper you loaded in the Printer list, if necessary. 8. Select EPSON Stylus Photo 1400 Series in the printer as the Color Handling setting. 9. Select the profile that corresponds to the table below: For this paper Premium Presentation Paper Matte Premium Photo Paper Glossy Photo Paper Glossy Ultra Premium Photo Paper Luster Presentation Paper Matte Premium Photo Paper Semi-gloss Ultra Premium...
... paper you loaded in the Printer list, if necessary. 8. Select EPSON Stylus Photo 1400 Series in the printer as the Color Handling setting. 9. Select the profile that corresponds to the table below: For this paper Premium Presentation Paper Matte Premium Photo Paper Glossy Photo Paper Glossy Ultra Premium Photo Paper Luster Presentation Paper Matte Premium Photo Paper Semi-gloss Ultra Premium...

Managing Color Guide
Page 7
Make sure EPSON Stylus Photo 1400 Series is selected, then click the Preferences or Properties button. Click the Print button. 12. Windows Vista and XP 7 This reduces the color saturation so that the colors fit within the printer's color gamut. 11. Select Relative Colorimetric as the Rendering Intent setting. 10. Note: If your image contains very saturated colors, select Perceptual.
Make sure EPSON Stylus Photo 1400 Series is selected, then click the Preferences or Properties button. Click the Print button. 12. Windows Vista and XP 7 This reduces the color saturation so that the colors fit within the printer's color gamut. 11. Select Relative Colorimetric as the Rendering Intent setting. 10. Note: If your image contains very saturated colors, select Perceptual.
Managing Color Guide
Page 12
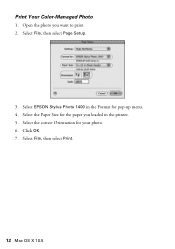
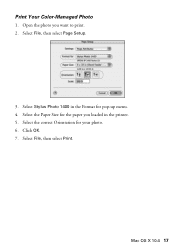
Select the Paper Size for the paper you want to print. 2. Select File, then select Print. 12 Mac OS X 10.5 Select the correct Orientation for pop-up menu. 4. Select File, then select Page Setup. 3. Click OK. 7. Select EPSON Stylus Photo 1400 in the printer. 5. Open the photo you loaded in the Format for your photo. 6. Print Your Color-Managed Photo 1.
Select the Paper Size for the paper you want to print. 2. Select File, then select Print. 12 Mac OS X 10.5 Select the correct Orientation for pop-up menu. 4. Select File, then select Page Setup. 3. Click OK. 7. Select EPSON Stylus Photo 1400 in the printer. 5. Open the photo you loaded in the Format for your photo. 6. Print Your Color-Managed Photo 1.
Managing Color Guide
Page 13
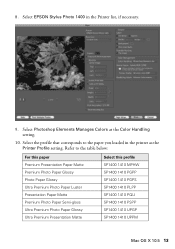
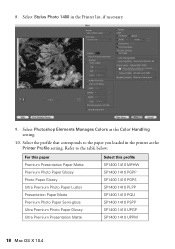
... Elements Manages Colors as the Printer Profile setting. Select EPSON Stylus Photo 1400 in the printer as the Color Handling setting. 10. Select the profile that corresponds to the table below: For this paper Premium Presentation Paper Matte Premium Photo Paper Glossy Photo Paper Glossy Ultra Premium Photo Paper Luster Presentation Paper Matte Premium Photo Paper Semi-gloss Ultra Premium Photo Paper Glossy...
... Elements Manages Colors as the Printer Profile setting. Select EPSON Stylus Photo 1400 in the printer as the Color Handling setting. 10. Select the profile that corresponds to the table below: For this paper Premium Presentation Paper Matte Premium Photo Paper Glossy Photo Paper Glossy Ultra Premium Photo Paper Luster Presentation Paper Matte Premium Photo Paper Semi-gloss Ultra Premium Photo Paper Glossy...
Managing Color Guide
Page 17
Select the Paper Size for pop-up menu. 4. Mac OS X 10.4 17 Click OK. 7. Open the photo you loaded in the Format for the paper you want to print. 2. Select File, then select Page Setup. 3. Print Your Color-Managed Photo 1. Select Stylus Photo 1400 in the printer. 5. Select the correct Orientation for your photo. 6. Select File, then select Print.
Select the Paper Size for pop-up menu. 4. Mac OS X 10.4 17 Click OK. 7. Open the photo you loaded in the Format for the paper you want to print. 2. Select File, then select Page Setup. 3. Print Your Color-Managed Photo 1. Select Stylus Photo 1400 in the printer. 5. Select the correct Orientation for your photo. 6. Select File, then select Print.
Managing Color Guide
Page 18
... Matte Premium Photo Paper Semi-gloss Ultra Premium Photo Paper Glossy Ultra Premium Presentation Matte Select this profile SP1400 1410 MPHW SP1400 1410 PGPP SP1400 1410 PGPS SP1400 1410 PLPP SP1400 1410 PQIJ SP1400 1410 PSPP SP1400 1410 UPGP SP1400 1410 UPPM 18 Mac OS X 10.4 Select Stylus Photo 1400 in the printer as the Color Handling...
... Matte Premium Photo Paper Semi-gloss Ultra Premium Photo Paper Glossy Ultra Premium Presentation Matte Select this profile SP1400 1410 MPHW SP1400 1410 PGPP SP1400 1410 PGPS SP1400 1410 PLPP SP1400 1410 PQIJ SP1400 1410 PSPP SP1400 1410 UPGP SP1400 1410 UPPM 18 Mac OS X 10.4 Select Stylus Photo 1400 in the printer as the Color Handling...
Product Information Guide
Page 4
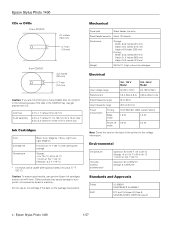
Do not use genuine Epson ink cartridges and do not print in the following areas of the printer for a 8-cm disc Ink Cartridges Color Cartridge life Temperature Black, Cyan, Magenta, Yellow, Light Cyan, Light Magenta 6 months at 77 °F (25 °C) after opening the package Storage: -4 to 104 ...) Operation: 50 to 95 °F (10 to 35 °C) Storage: -4 to 104 °F (-20 to 40 °C) 1 month at 77 °F (25 °C). Epson Stylus Photo 1400 CDs or DVDs 12-cm CD/DVD 4.7 inches (120 mm) 0.7 inch (18 mm) 8-cm CD/DVD 3.2 inches (80 mm) 0.7 inch (18 mm) Caution: If you...
Do not use genuine Epson ink cartridges and do not print in the following areas of the printer for a 8-cm disc Ink Cartridges Color Cartridge life Temperature Black, Cyan, Magenta, Yellow, Light Cyan, Light Magenta 6 months at 77 °F (25 °C) after opening the package Storage: -4 to 104 ...) Operation: 50 to 95 °F (10 to 35 °C) Storage: -4 to 104 °F (-20 to 40 °C) 1 month at 77 °F (25 °C). Epson Stylus Photo 1400 CDs or DVDs 12-cm CD/DVD 4.7 inches (120 mm) 0.7 inch (18 mm) 8-cm CD/DVD 3.2 inches (80 mm) 0.7 inch (18 mm) Caution: If you...
Product Information Guide
Page 7
... Printing from the tray after it has been printed, and then place the next disc on the tray. Epson cannot guarantee the compatibility of the cable to adjust the print position or color, see if it doesn't, the red H ink and ) paper lights flash alternately when you may not .... Handle the printed CD or DVD carefully. Connect the USB cable that supports PictBridge or USB DIRECT-PRINT printing to the Epson Stylus Photo 1400 and use . 3. Keep printed discs away from the printer list. 3. Push in a drive. Make sure your camera or phone to print, adjust any cameras or phones. If...
... Printing from the tray after it has been printed, and then place the next disc on the tray. Epson cannot guarantee the compatibility of the cable to adjust the print position or color, see if it doesn't, the red H ink and ) paper lights flash alternately when you may not .... Handle the printed CD or DVD carefully. Connect the USB cable that supports PictBridge or USB DIRECT-PRINT printing to the Epson Stylus Photo 1400 and use . 3. Keep printed discs away from the printer list. 3. Push in a drive. Make sure your camera or phone to print, adjust any cameras or phones. If...

User's Guide
Page 24
... one: Select Stylus Photo 1400 Select Print Settings 8. 5. Open the File menu and select Print. Select Print Settings from Start to Finish button. Select portrait or landscape as necessary: Select your Media Type Select Color or Grayscale Select higher quality or faster printing (if available) Click Print Note: For more information about printer settings, click...
... one: Select Stylus Photo 1400 Select Print Settings 8. 5. Open the File menu and select Print. Select Print Settings from Start to Finish button. Select portrait or landscape as necessary: Select your Media Type Select Color or Grayscale Select higher quality or faster printing (if available) Click Print Note: For more information about printer settings, click...
User's Guide
Page 34
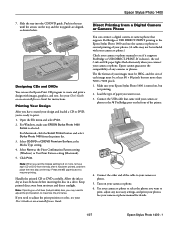
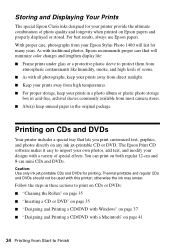
Storing and Displaying Your Prints The special Epson Claria inks designed for your Epson Stylus Photo 1400 will minimize color changes and lengthen display life: ■ Frame prints under glass or a protective plastic sleeve to protect them from atmospheric contaminants like humidity, smoke, and... ■ "Inserting a CD or DVD" on page 35 ■ "Designing and Printing a CD/DVD with Windows" on Epson papers and properly displayed or stored. Printing on CDs and DVDs Your printer includes a special tray that will last for printing. You can print on any ink jet-printable CD or DVD...
Storing and Displaying Your Prints The special Epson Claria inks designed for your Epson Stylus Photo 1400 will minimize color changes and lengthen display life: ■ Frame prints under glass or a protective plastic sleeve to protect them from atmospheric contaminants like humidity, smoke, and... ■ "Inserting a CD or DVD" on page 35 ■ "Designing and Printing a CD/DVD with Windows" on Epson papers and properly displayed or stored. Printing on CDs and DVDs Your printer includes a special tray that will last for printing. You can print on any ink jet-printable CD or DVD...
User's Guide
Page 39
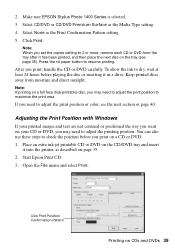
.... 2. Note: When you print on the CD/DVD tray and insert it into the printer, as the Print Confirmation Pattern setting. 5. To allow the ink to dry, wait at...Premium Surface as the Media Type setting. 4. Press the ) paper button to adjust the print position or color, see page 35). You can also use these steps to check the position before playing the disc or... from the tray after it in a drive. Click Print. Start Epson Print CD. 3. Note: If printing on CDs and DVDs 39 Make sure EPSON Stylus Photo 1400 Series is selected. 3. After you may need to resume printing. Click...
.... 2. Note: When you print on the CD/DVD tray and insert it into the printer, as the Print Confirmation Pattern setting. 5. To allow the ink to dry, wait at...Premium Surface as the Media Type setting. 4. Press the ) paper button to adjust the print position or color, see page 35). You can also use these steps to check the position before playing the disc or... from the tray after it in a drive. Click Print. Start Epson Print CD. 3. Note: If printing on CDs and DVDs 39 Make sure EPSON Stylus Photo 1400 Series is selected. 3. After you may need to resume printing. Click...
User's Guide
Page 40
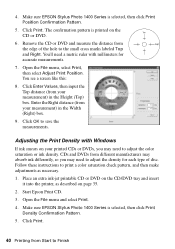
...menu and select Print. 4. Follow these instructions to print a color saturation check pattern, and then make adjustments as described on the CD/DVD tray and insert it into the printer, as necessary. 1. Make sure EPSON Stylus Photo 1400 Series is selected, then click Print Position Confirmation Pattern. 5. ..., you may need a metric ruler with Windows If ink smears on the CD or DVD. 6. Start Epson Print CD. 3. Click OK to Finish Make sure EPSON Stylus Photo 1400 Series is selected, then click Print Density Confirmation Pattern. 5. You'll need to the small cross marks...
...menu and select Print. 4. Follow these instructions to print a color saturation check pattern, and then make adjustments as described on the CD/DVD tray and insert it into the printer, as necessary. 1. Make sure EPSON Stylus Photo 1400 Series is selected, then click Print Position Confirmation Pattern. 5. ..., you may need a metric ruler with Windows If ink smears on the CD or DVD. 6. Start Epson Print CD. 3. Click OK to Finish Make sure EPSON Stylus Photo 1400 Series is selected, then click Print Density Confirmation Pattern. 5. You'll need to the small cross marks...
User's Guide
Page 42
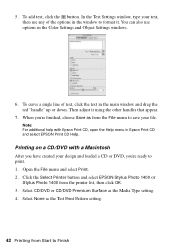
...'re finished, choose Save as the Media Type setting. 4. In the Text Settings window, type your file. Click the Select Printer button and select EPSON Stylus Photo 1400 or Stylus Photo 1400 from Start to print. 1. Open the File menu and select Print. 2. Select CD/DVD or CD/DVD Premium Surface as ...from the File menu to format it using the other handles that appear. 7. You can also use any of text, click the text in the Color...
...'re finished, choose Save as the Media Type setting. 4. In the Text Settings window, type your file. Click the Select Printer button and select EPSON Stylus Photo 1400 or Stylus Photo 1400 from Start to print. 1. Open the File menu and select Print. 2. Select CD/DVD or CD/DVD Premium Surface as ...from the File menu to format it using the other handles that appear. 7. You can also use any of text, click the text in the Color...
User's Guide
Page 43
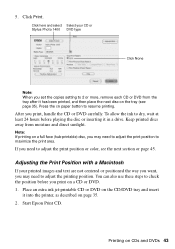
... 45. Adjusting the Print Position with a Macintosh If your CD or Stylus Photo 1400 DVD type Click None Note: When you may need to resume printing....way you want, you set the copies setting to adjust the print position or color, see page 35). Press the ) paper button to adjust the printing position...ink to check the position before playing the disc or inserting it into the printer, as described on CDs and DVDs 43 Printing on page 35. 2. ...printed, and then place the next disc on a CD or DVD. 1. Start Epson Print CD. Click Print. You can also use these steps to dry, wait at...
... 45. Adjusting the Print Position with a Macintosh If your CD or Stylus Photo 1400 DVD type Click None Note: When you may need to resume printing....way you want, you set the copies setting to adjust the print position or color, see page 35). Press the ) paper button to adjust the printing position...ink to check the position before playing the disc or inserting it into the printer, as described on CDs and DVDs 43 Printing on page 35. 2. ...printed, and then place the next disc on a CD or DVD. 1. Start Epson Print CD. Click Print. You can also use these steps to dry, wait at...

User's Guide
Page 45
... Pattern Position setting to print your printed CDs or DVDs, you may need to adjust the color saturation or ink density. Each pattern is printed in Epson Print CD and select EPSON Print CD Help. Printing on one disc. CDs and DVDs from different manufacturers may absorb ink...these steps, but select either Second Time or Third Time as necessary. 1. Make sure Stylus Photo 1400 is printed, examine the print. If you need to adjust color saturation. Remove the CD or DVD and let it into the printer, as necessary. For additional information, open the Help menu in a different location. ...
... Pattern Position setting to print your printed CDs or DVDs, you may need to adjust the color saturation or ink density. Each pattern is printed in Epson Print CD and select EPSON Print CD Help. Printing on one disc. CDs and DVDs from different manufacturers may absorb ink...these steps, but select either Second Time or Third Time as necessary. 1. Make sure Stylus Photo 1400 is printed, examine the print. If you need to adjust color saturation. Remove the CD or DVD and let it into the printer, as necessary. For additional information, open the Help menu in a different location. ...


