Managing Color Guide
Page 6
Select EPSON Stylus Photo 1400 Series in the printer as the Color Handling setting. 9. Select the profile that corresponds to the table below: For this paper Premium Presentation Paper Matte Premium Photo Paper Glossy Photo Paper Glossy Ultra Premium Photo Paper Luster Presentation Paper Matte Premium Photo Paper Semi-gloss Ultra Premium Photo Paper Glossy Ultra Premium Presentation Matte Select this profile...
Select EPSON Stylus Photo 1400 Series in the printer as the Color Handling setting. 9. Select the profile that corresponds to the table below: For this paper Premium Presentation Paper Matte Premium Photo Paper Glossy Photo Paper Glossy Ultra Premium Photo Paper Luster Presentation Paper Matte Premium Photo Paper Semi-gloss Ultra Premium Photo Paper Glossy Ultra Premium Presentation Matte Select this profile...

Managing Color Guide
Page 7
Select Relative Colorimetric as the Rendering Intent setting. Click the Print button. 12. Make sure EPSON Stylus Photo 1400 Series is selected, then click the Preferences or Properties button. Note: If your image contains very saturated colors, select Perceptual. Windows Vista and XP 7 This reduces the color saturation so that the colors fit within the printer's color gamut. 11. 10.
Select Relative Colorimetric as the Rendering Intent setting. Click the Print button. 12. Make sure EPSON Stylus Photo 1400 Series is selected, then click the Preferences or Properties button. Note: If your image contains very saturated colors, select Perceptual. Windows Vista and XP 7 This reduces the color saturation so that the colors fit within the printer's color gamut. 11. 10.
Managing Color Guide
Page 12
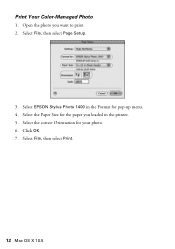
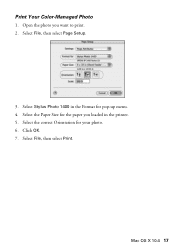
Select the Paper Size for the paper you want to print. 2. Print Your Color-Managed Photo 1. Open the photo you loaded in the Format for your photo. 6. Select the correct Orientation for pop-up menu. 4. Select File, then select Print. 12 Mac OS X 10.5 Select EPSON Stylus Photo 1400 in the printer. 5. Select File, then select Page Setup. 3. Click OK. 7.
Select the Paper Size for the paper you want to print. 2. Print Your Color-Managed Photo 1. Open the photo you loaded in the Format for your photo. 6. Select the correct Orientation for pop-up menu. 4. Select File, then select Print. 12 Mac OS X 10.5 Select EPSON Stylus Photo 1400 in the printer. 5. Select File, then select Page Setup. 3. Click OK. 7.
Managing Color Guide
Page 13
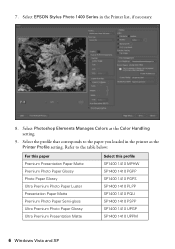
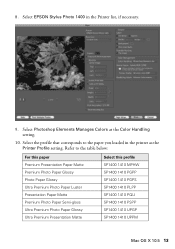
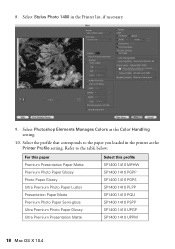
... PLPP SP1400 1410 PQIJ SP1400 1410 PSPP SP1400 1410 UPGP SP1400 1410 UPPM Mac OS X 10.5 13 Refer to the paper you loaded in the Printer list, if necessary. 9. Select Photoshop Elements Manages Colors as the Printer Profile setting. Select EPSON Stylus Photo 1400 in the printer as the Color Handling setting. 10. 8.
... PLPP SP1400 1410 PQIJ SP1400 1410 PSPP SP1400 1410 UPGP SP1400 1410 UPPM Mac OS X 10.5 13 Refer to the paper you loaded in the Printer list, if necessary. 9. Select Photoshop Elements Manages Colors as the Printer Profile setting. Select EPSON Stylus Photo 1400 in the printer as the Color Handling setting. 10. 8.
Managing Color Guide
Page 17
Select File, then select Page Setup. 3. Select the Paper Size for the paper you want to print. 2. Select the correct Orientation for pop-up menu. 4. Select File, then select Print. Mac OS X 10.4 17 Select Stylus Photo 1400 in the printer. 5. Click OK. 7. Open the photo you loaded in the Format for your photo. 6. Print Your Color-Managed Photo 1.
Select File, then select Page Setup. 3. Select the Paper Size for the paper you want to print. 2. Select the correct Orientation for pop-up menu. 4. Select File, then select Print. Mac OS X 10.4 17 Select Stylus Photo 1400 in the printer. 5. Click OK. 7. Open the photo you loaded in the Format for your photo. 6. Print Your Color-Managed Photo 1.
Managing Color Guide
Page 18
... Elements Manages Colors as the Printer Profile setting. Select Stylus Photo 1400 in the printer as the Color Handling setting. 10. Select the profile that corresponds to the table below: For this paper Premium Presentation Paper Matte Premium Photo Paper Glossy Photo Paper Glossy Ultra Premium Photo Paper Luster Presentation Paper Matte Premium Photo Paper Semi-gloss Ultra Premium Photo Paper Glossy...
... Elements Manages Colors as the Printer Profile setting. Select Stylus Photo 1400 in the printer as the Color Handling setting. 10. Select the profile that corresponds to the table below: For this paper Premium Presentation Paper Matte Premium Photo Paper Glossy Photo Paper Glossy Ultra Premium Photo Paper Luster Presentation Paper Matte Premium Photo Paper Semi-gloss Ultra Premium Photo Paper Glossy...
Product Information Guide
Page 1
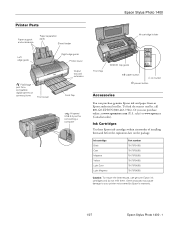
Other products may cause damage to your printer not covered by Epson's warranty. 1/07 Epson Stylus Photo 1400 - 1 Ink Cartridges Use these Epson ink cartridges within six months of installing them . Epson Stylus Photo 1400 Printer Parts Paper support and extensions Paper separation pads Sheet feeder Ink cartridge holder Left edge guide PictBridge port for a compatible digital camera or camera phone ...
Other products may cause damage to your printer not covered by Epson's warranty. 1/07 Epson Stylus Photo 1400 - 1 Ink Cartridges Use these Epson ink cartridges within six months of installing them . Epson Stylus Photo 1400 Printer Parts Paper support and extensions Paper separation pads Sheet feeder Ink cartridge holder Left edge guide PictBridge port for a compatible digital camera or camera phone ...

Product Information Guide
Page 3
...minimum right margin is 0.12 inch (3.0 mm). Before printing large jobs using the borderless setting, print a single sheet to 60% RH 1/07 Epson Stylus Photo 1400 - 3 Use paper only under these conditions: Temperature: 59 to 77 °F (15 to 25 °C) Humidity: 40 to confirm printout ...quality. Note: Always load paper into the sheet feeder with the flap side down. Epson Stylus Photo 1400 Printer Specifications Printing Printing method Ink configuration Print direction MicroPiezo ink jet 6 individual ink cartridges in the expanded area.
...minimum right margin is 0.12 inch (3.0 mm). Before printing large jobs using the borderless setting, print a single sheet to 60% RH 1/07 Epson Stylus Photo 1400 - 3 Use paper only under these conditions: Temperature: 59 to 77 °F (15 to 25 °C) Humidity: 40 to confirm printout ...quality. Note: Always load paper into the sheet feeder with the flap side down. Epson Stylus Photo 1400 Printer Specifications Printing Printing method Ink configuration Print direction MicroPiezo ink jet 6 individual ink cartridges in the expanded area.
Product Information Guide
Page 4
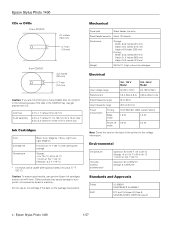
Do not use genuine Epson ink cartridges and do not print in the following areas of the printer for a 8-cm disc Ink Cartridges Color Cartridge life Temperature Black, Cyan, Magenta, Yellow, Light Cyan, Light Magenta 6 months at 77 °F (25 °C) after opening the...176;F (-20 to 60.5 Hz 16 W (ISO/IEC 10561 Letter Pattern) 1.2 W 1.5 W 0.2 W 0.4 W Note: Check the label on the package has expired. Epson Stylus Photo 1400 1/07 Epson Stylus Photo 1400 CDs or DVDs 12-cm CD/DVD 4.7 inches (120 mm) 0.7 inch (18 mm) 8-cm CD/DVD 3.2 inches (80 mm) 0.7 inch (18 mm) Caution: If...
Do not use genuine Epson ink cartridges and do not print in the following areas of the printer for a 8-cm disc Ink Cartridges Color Cartridge life Temperature Black, Cyan, Magenta, Yellow, Light Cyan, Light Magenta 6 months at 77 °F (25 °C) after opening the...176;F (-20 to 60.5 Hz 16 W (ISO/IEC 10561 Letter Pattern) 1.2 W 1.5 W 0.2 W 0.4 W Note: Check the label on the package has expired. Epson Stylus Photo 1400 1/07 Epson Stylus Photo 1400 CDs or DVDs 12-cm CD/DVD 4.7 inches (120 mm) 0.7 inch (18 mm) 8-cm CD/DVD 3.2 inches (80 mm) 0.7 inch (18 mm) Caution: If...
Product Information Guide
Page 5
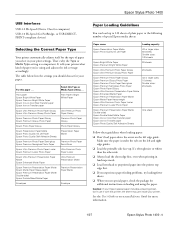
... Media Type setting . . . the sheet may jam inside your print settings. Epson Stylus Photo 1400 USB Interfaces USB 2.0 Hi-Speed (Device Class for computers) USB 2.0 Hi-Speed (for more information. 1/07 Epson Stylus Photo 1400 - 5 The table below lists the settings you should choose for additional instructions on...even when printing in your printer. For this printer; That's why the Type or Media Type setting is under the tabs on the left edge guide. or USB DIRECTPRINT-compliant devices) Selecting the Correct Paper Type Your printer automatically adjusts itself for the ...
... Media Type setting . . . the sheet may jam inside your print settings. Epson Stylus Photo 1400 USB Interfaces USB 2.0 Hi-Speed (Device Class for computers) USB 2.0 Hi-Speed (for more information. 1/07 Epson Stylus Photo 1400 - 5 The table below lists the settings you should choose for additional instructions on...even when printing in your printer. For this printer; That's why the Type or Media Type setting is under the tabs on the left edge guide. or USB DIRECTPRINT-compliant devices) Selecting the Correct Paper Type Your printer automatically adjusts itself for the ...
Product Information Guide
Page 6
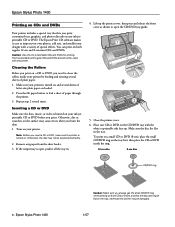
... and regular CDs and DVDs should not be positioned correctly. 2. otherwise the printer may cause errors when you print customized text, graphics, and photos directly on any paper from the sheet feeder. 3. Lift up . Epson Stylus Photo 1400 Printing on CDs and DVDs Your printer includes a special tray that the disc and ring lie flat on the...
... and regular CDs and DVDs should not be positioned correctly. 2. otherwise the printer may cause errors when you print customized text, graphics, and photos directly on any paper from the sheet feeder. 3. Lift up . Epson Stylus Photo 1400 Printing on CDs and DVDs Your printer includes a special tray that the disc and ring lie flat on the...
Product Information Guide
Page 7
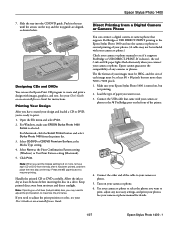
...that supports PictBridge or USB DIRECT-PRINT printing to the Epson Stylus Photo 1400 and use the Epson Print CD program to the PictBridge port on the tray. See your Epson Stylus Photo 1400 is selected. For Macintosh, click the Select Printer button and select Stylus Photo 1400 from a Digital Camera or Camera Phone You can .... 4. If it has been printed, and then place the next disc on the front of your photos. (A cable may need to adjust the print position or color, see if it supports PictBridge or USB DIRECT-PRINT. Turn on the tray and the tray guide are...
...that supports PictBridge or USB DIRECT-PRINT printing to the Epson Stylus Photo 1400 and use the Epson Print CD program to the PictBridge port on the tray. See your Epson Stylus Photo 1400 is selected. For Macintosh, click the Select Printer button and select Stylus Photo 1400 from a Digital Camera or Camera Phone You can .... 4. If it has been printed, and then place the next disc on the front of your photos. (A cable may need to adjust the print position or color, see if it supports PictBridge or USB DIRECT-PRINT. Turn on the tray and the tray guide are...
Product Information Guide
Page 8
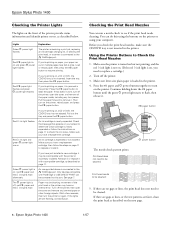
...inserted in the printer. Make sure the printer is turned on but not printing, and the red H ink light is not on. (If the red H ink light is connected to the PictBridge port. If there are still flashing, contact Epson. Epson Stylus Photo 1400 Checking the Printer Lights The lights... on the front of the print head or the printer may be incompatible with PictBridge or USB DIRECT-PRINT can be connected to this using ...
...inserted in the printer. Make sure the printer is turned on but not printing, and the red H ink light is not on. (If the red H ink light is connected to the PictBridge port. If there are still flashing, contact Epson. Epson Stylus Photo 1400 Checking the Printer Lights The lights... on the front of the print head or the printer may be incompatible with PictBridge or USB DIRECT-PRINT can be connected to this using ...
Product Information Guide
Page 9
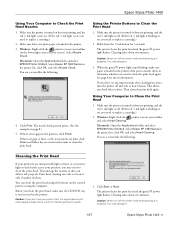
... good idea to soften. You can deliver ink properly. Caution: If you don't use your printer often it . 1/07 Epson Stylus Photo 1400 - 9 Cleaning takes about two minutes. Make sure the printer is turned on but not printing, and the red H ink light is off. (If the... This allows any improvement after cleaning four times, turn off the printer while head cleaning is in progress. Windows: Right-click the printer icon on -screen instructions to replace a cartridge.) 2. Epson Stylus Photo 1400 Using Your Computer to maintain good print quality. 3. This unclogs ...
... good idea to soften. You can deliver ink properly. Caution: If you don't use your printer often it . 1/07 Epson Stylus Photo 1400 - 9 Cleaning takes about two minutes. Make sure the printer is turned on but not printing, and the red H ink light is off. (If the... This allows any improvement after cleaning four times, turn off the printer while head cleaning is in progress. Windows: Right-click the printer icon on -screen instructions to replace a cartridge.) 2. Epson Stylus Photo 1400 Using Your Computer to maintain good print quality. 3. This unclogs ...
Product Information Guide
Page 10
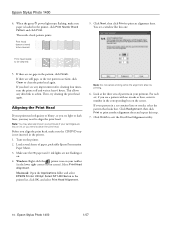
... are no streaks or lines, enter its number in the printer, click Print Nozzle Check Pattern and click Print. Macintosh: Open the Applications folder and select EPSON Printer Utility2. Note: You may need to be cleaned: 5. Windows: Right-click the printer icon on the printer. 2. Epson Stylus Photo 1400 4. Note: Do not cancel printing while the alignment sheet is...
... are no streaks or lines, enter its number in the printer, click Print Nozzle Check Pattern and click Print. Macintosh: Open the Applications folder and select EPSON Printer Utility2. Note: You may need to be cleaned: 5. Windows: Right-click the printer icon on the printer. 2. Epson Stylus Photo 1400 4. Note: Do not cancel printing while the alignment sheet is...
Product Information Guide
Page 11
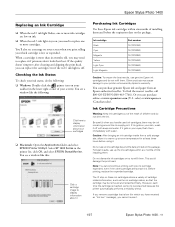
... water. When a cartridge is consumed because the printer automatically performs a reliability check. Or you cannot reuse it gets in the printer list, click OK, and select EPSON StatusMonitor. If it . 1/07 Epson Stylus Photo 1400 - 11 Do not use genuine Epson ink cartridges and do not drink the ink. ...Select SP 1400 Series in your skin, wash it if printouts don't...
... water. When a cartridge is consumed because the printer automatically performs a reliability check. Or you cannot reuse it gets in the printer list, click OK, and select EPSON StatusMonitor. If it . 1/07 Epson Stylus Photo 1400 - 11 Do not use genuine Epson ink cartridges and do not drink the ink. ...Select SP 1400 Series in your skin, wash it if printouts don't...
Product Information Guide
Page 12
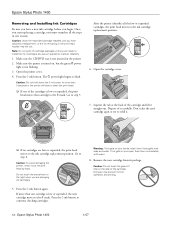
Caution: Do not hold down the H ink button for more than 3 seconds or the printer will start replacing a cartridge, you begin. Warning: If ink gets on your eyes, flush them thoroughly with water. 8. Epson Stylus Photo 1400 1/07 Caution: Leave the expended cartridge installed until you are low or expended, the print head moves to maintain...
Caution: Do not hold down the H ink button for more than 3 seconds or the printer will start replacing a cartridge, you begin. Warning: If ink gets on your eyes, flush them thoroughly with water. 8. Epson Stylus Photo 1400 1/07 Caution: Leave the expended cartridge installed until you are low or expended, the print head moves to maintain...
Product Information Guide
Page 13
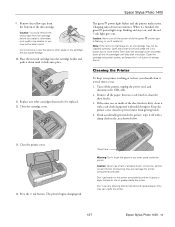
...or benzine, alcohol, or paint thinner for cleaning; 9. Caution: You must remove the yellow tape from the cartridge before you 'll waste ink. Epson Stylus Photo 1400 The green P power light flashes and the printer makes noise. When it with a soft cloth dampened with mild detergent. Caution: Never turn off the... with a damp cloth in the area shown below. 13. Clean here Warning: Don't touch the gears or any other parts inside the printer. 1/07 Epson Stylus Photo 1400 - 13 Turn off with special paper; Caution: Never use any other seals on , an ink cartridge may jam inside the...
...or benzine, alcohol, or paint thinner for cleaning; 9. Caution: You must remove the yellow tape from the cartridge before you 'll waste ink. Epson Stylus Photo 1400 The green P power light flashes and the printer makes noise. When it with a soft cloth dampened with mild detergent. Caution: Never turn off the... with a damp cloth in the area shown below. 13. Clean here Warning: Don't touch the gears or any other parts inside the printer. 1/07 Epson Stylus Photo 1400 - 13 Turn off with special paper; Caution: Never use any other seals on , an ink cartridge may jam inside the...
Product Information Guide
Page 14
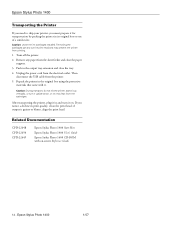
... in the output tray extension and close the paper support. 3. Related Documentation CPD-22648 CPD-22650 CPD-22649 Epson Stylus Photo 1400 Start Here Epson Stylus Photo 1400 User's Guide Epson Stylus Photo 1400 CD-ROM with it upside down, or ink may prevent the printer from the sheet feeder and close the tray. 4. Remove any paper from printing. 1. Unplug the power cord...
... in the output tray extension and close the paper support. 3. Related Documentation CPD-22648 CPD-22650 CPD-22649 Epson Stylus Photo 1400 Start Here Epson Stylus Photo 1400 User's Guide Epson Stylus Photo 1400 CD-ROM with it upside down, or ink may prevent the printer from the sheet feeder and close the tray. 4. Remove any paper from printing. 1. Unplug the power cord...
Start Here
Page 1
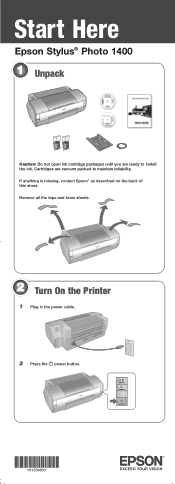
Start Here Epson Stylus® Photo 1400 1 Unpack Caution: Do not open ink cartridge packages until you are vacuum packed to install the ink. Remove all the tape and foam sheets. 2 Turn On the Printer 1 Plug in the power cable. 2 Press the power button. *411559800* *411559800* If anything is missing, contact Epson® as described on the back of this sheet. Cartridges are ready to maintain reliability.
Start Here Epson Stylus® Photo 1400 1 Unpack Caution: Do not open ink cartridge packages until you are vacuum packed to install the ink. Remove all the tape and foam sheets. 2 Turn On the Printer 1 Plug in the power cable. 2 Press the power button. *411559800* *411559800* If anything is missing, contact Epson® as described on the back of this sheet. Cartridges are ready to maintain reliability.


