User Manual (P.I.M Plug-in)
Page 1
..., including a complete list of colors and enhancements set in the camera itself. II page 2 ■ How Does P.I .M. Image page 5 ■ Printing in Photoshop 7.0, CS, and Photoshop Elements (Windows page 5 ■ Printing in... Image Matching™ (P.I.M.)-enabled digital cameras embed information in digital photo files to maximize the image quality of the print-including a wider range ...of P.I .M. PRINT Image Matching technology ensures that P.I.M.-enabled digital cameras and printers work together perfectly to import and print your P.I .M. Image page 3 ■ ...
..., including a complete list of colors and enhancements set in the camera itself. II page 2 ■ How Does P.I .M. Image page 5 ■ Printing in Photoshop 7.0, CS, and Photoshop Elements (Windows page 5 ■ Printing in... Image Matching™ (P.I.M.)-enabled digital cameras embed information in digital photo files to maximize the image quality of the print-including a wider range ...of P.I .M. PRINT Image Matching technology ensures that P.I.M.-enabled digital cameras and printers work together perfectly to import and print your P.I .M. Image page 3 ■ ...

User Manual (P.I.M Plug-in)
Page 2
...; Epson Stylus Photo R320 ■ Epson Stylus Photo R800 ■ Epson Stylus Photo RX500 ■ Epson Stylus Photo RX600 ■ Epson Stylus Photo 780 ■ Epson Stylus Photo 785EPX ■ Epson Stylus Photo 820 ■ Epson Stylus Photo 825 ■ Epson Stylus Photo 890 ■ Epson Stylus Photo 900 ■ Epson Stylus Photo 925 ■ Epson Stylus Photo 960 ■ Epson Stylus Photo 1280 ■ Epson Stylus Photo 2000P* ■ Epson Stylus Photo 2200 ■ PictureMate™ by Epson * This printer only supports PRINT Image Matching through this P.I .M. In Windows®...
...; Epson Stylus Photo R320 ■ Epson Stylus Photo R800 ■ Epson Stylus Photo RX500 ■ Epson Stylus Photo RX600 ■ Epson Stylus Photo 780 ■ Epson Stylus Photo 785EPX ■ Epson Stylus Photo 820 ■ Epson Stylus Photo 825 ■ Epson Stylus Photo 890 ■ Epson Stylus Photo 900 ■ Epson Stylus Photo 925 ■ Epson Stylus Photo 960 ■ Epson Stylus Photo 1280 ■ Epson Stylus Photo 2000P* ■ Epson Stylus Photo 2200 ■ PictureMate™ by Epson * This printer only supports PRINT Image Matching through this P.I .M. In Windows®...
User Manual (P.I.M Plug-in)
Page 3
... file will not be recognized as Auto Levels, Auto Contrast, Auto Color, etc.). image quality. image into the file and embedding a color space called EPSON RGB 2001. Choose Full Color Management or Full color management - If you overwrite your new Adobe Photoshop file in the ...Adobe Photoshop 6.0, 7.0, CS, or Photoshop Elements 1.0, 2.0, or 3.0. However, you apply global color adjustments to the P.I .M. II enhancements if you will still retain P.I .M. image. If you 're using Windows, but will lose the P.I .M. header information intact for Print and click OK. Do ...
... file will not be recognized as Auto Levels, Auto Contrast, Auto Color, etc.). image quality. image into the file and embedding a color space called EPSON RGB 2001. Choose Full Color Management or Full color management - If you overwrite your new Adobe Photoshop file in the ...Adobe Photoshop 6.0, 7.0, CS, or Photoshop Elements 1.0, 2.0, or 3.0. However, you apply global color adjustments to the P.I .M. II enhancements if you will still retain P.I .M. image. If you 're using Windows, but will lose the P.I .M. header information intact for Print and click OK. Do ...
User Manual (P.I.M Plug-in)
Page 4
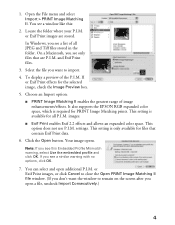
...select Use the embedded profile and click OK. You see a list of all P.I .M. On a Macintosh, you want the window to import. 4. It also supports the EPSON RGB expanded color space, which is only available for the selected image, check the Image Preview box. 5. This option does not use P.I... > PRINT Image Matching II. or Exif Print images are P.I .M. images. ■ Exif Print enables Exif 2.2 effects and allows an expanded color space. Click the Open button. II or Exif Print effects for files that are stored. You can select and open a file, uncheck Import Consecutively...
...select Use the embedded profile and click OK. You see a list of all P.I .M. On a Macintosh, you want the window to import. 4. It also supports the EPSON RGB expanded color space, which is only available for the selected image, check the Image Preview box. 5. This option does not use P.I... > PRINT Image Matching II. or Exif Print images are P.I .M. images. ■ Exif Print enables Exif 2.2 effects and allows an expanded color space. Click the Open button. II or Exif Print effects for files that are stored. You can select and open a file, uncheck Import Consecutively...
User Manual (P.I.M Plug-in)
Page 5
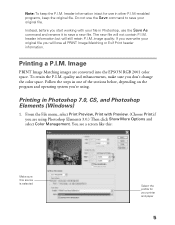
... profile for use in one of the sections below, depending on the program and operating system you are converted into the EPSON RGB 2001 color space. Do not use the Save As command and rename it to save a new file. Instead, before you start ....M. header information intact for your file in Photoshop 7.0, CS, and Photoshop Elements (Windows) 1. Printing a P.I .M. image quality. Image PRINT Image Matching images are using . From the File menu, select Print Preview, Print with your printer and paper 5 If you overwrite your original file. To retain the P.I .M. ...
... profile for use in one of the sections below, depending on the program and operating system you are converted into the EPSON RGB 2001 color space. Do not use the Save As command and rename it to save a new file. Instead, before you start ....M. header information intact for your file in Photoshop 7.0, CS, and Photoshop Elements (Windows) 1. Printing a P.I .M. image quality. Image PRINT Image Matching images are using . From the File menu, select Print Preview, Print with your printer and paper 5 If you overwrite your original file. To retain the P.I .M. ...

User Manual (P.I.M Plug-in)
Page 6
...Print Space box, select the profile for the Intent. 4. Click Setup, then select your printer Properties or Preferences window: . Under Media Type (or Type), select the paper you don't see your printer and click the Properties or Preferences button. Click Print. 5. Select your paper Select your... printer and the paper you're using. Click the Advanced button. (If you 're printing on. 7. 2. Select Perceptual for your paper Click Advanced Click Custom, then Advanced 6. In the Source Space box, make sure EPSON RGB 2001 is selected. 3....
...Print Space box, select the profile for the Intent. 4. Click Setup, then select your printer Properties or Preferences window: . Under Media Type (or Type), select the paper you don't see your printer and click the Properties or Preferences button. Click Print. 5. Select your paper Select your... printer and the paper you're using. Click the Advanced button. (If you 're printing on. 7. 2. Select Perceptual for your paper Click Advanced Click Custom, then Advanced 6. In the Source Space box, make sure EPSON RGB 2001 is selected. 3....
User Manual (P.I.M Plug-in)
Page 8
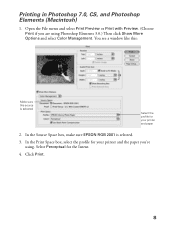
In the Source Space box, make sure EPSON RGB 2001 is selected Select the profile for the Intent. 4. Click Print. 8 You see a window like this: Make sure this source is selected. 3. Select Perceptual for your printer and the paper you are using . In the Print Space box, select the profile for your printer and paper 2. Printing in Photoshop 7.0, CS, and Photoshop Elements (Macintosh) 1. Open the File menu and select Print Preview or Print with Preview. (Choose Print if you 're using Photoshop Elements 3.0.) Then click Show More Options and select Color Management.
In the Source Space box, make sure EPSON RGB 2001 is selected Select the profile for the Intent. 4. Click Print. 8 You see a window like this: Make sure this source is selected. 3. Select Perceptual for your printer and the paper you are using . In the Print Space box, select the profile for your printer and paper 2. Printing in Photoshop 7.0, CS, and Photoshop Elements (Macintosh) 1. Open the File menu and select Print Preview or Print with Preview. (Choose Print if you 're using Photoshop Elements 3.0.) Then click Show More Options and select Color Management.
User Manual (P.I.M Plug-in)
Page 9
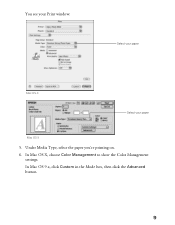
In Mac OS X, choose Color Management to show the Color Management settings. In Mac OS 9.x, click Custom in the Mode box, then click the Advanced button. 9 Under Media Type, select the paper you're printing on. 6. You see your paper Mac OS 9 5. Select your paper Mac OS X Select your Print window: .
In Mac OS X, choose Color Management to show the Color Management settings. In Mac OS 9.x, click Custom in the Mode box, then click the Advanced button. 9 Under Media Type, select the paper you're printing on. 6. You see your paper Mac OS 9 5. Select your paper Mac OS X Select your Print window: .
User Manual (P.I.M Plug-in)
Page 11
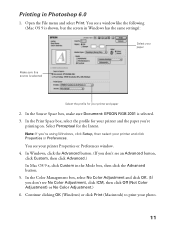
... and select Print. Select Perceptual for your printer and paper 2. In the Color Management box, select No Color Adjustment and click OK. (If you don't see No Color Adjustment, click ICM, then click Off (Not Color Adjustment) or No Color Adjustment.) 6. In Windows, click the Advanced button. (If you...your printer Properties or Preferences window. 4. In the Source Space box, make sure Document: EPSON RGB 2001 is selected Select the profile for your printer and the paper you 're using Windows, click Setup, then select your paper Make sure this source is selected. 3. You see your photo....
... and select Print. Select Perceptual for your printer and paper 2. In the Color Management box, select No Color Adjustment and click OK. (If you don't see No Color Adjustment, click ICM, then click Off (Not Color Adjustment) or No Color Adjustment.) 6. In Windows, click the Advanced button. (If you...your printer Properties or Preferences window. 4. In the Source Space box, make sure Document: EPSON RGB 2001 is selected Select the profile for your printer and the paper you 're using Windows, click Setup, then select your paper Make sure this source is selected. 3. You see your photo....
User Manual (P.I.M Plug-in)
Page 12
...contains color setting and image parameter information. © 2004 Epson America, Inc. 10/04 12 II Plug-In and click Finish. 5. Select P.I .M. Follow the on-screen instructions to uninstall the P.I.M. PRINT Image Matching and the PRINT Image Matching logo are trademarks and Epson, Epson Stylus,... in If you need to uninstall the plug-in those marks. Epson disclaims any and all rights in . Select Remove P.I .M. All rights reserved. PRINT Image Matching II. Windows 1. Copyright 2003 Seiko Epson Corporation. Select Add or Remove Programs or double-click Add/Remove ...
...contains color setting and image parameter information. © 2004 Epson America, Inc. 10/04 12 II Plug-In and click Finish. 5. Select P.I .M. Follow the on-screen instructions to uninstall the P.I.M. PRINT Image Matching and the PRINT Image Matching logo are trademarks and Epson, Epson Stylus,... in If you need to uninstall the plug-in those marks. Epson disclaims any and all rights in . Select Remove P.I .M. All rights reserved. PRINT Image Matching II. Windows 1. Copyright 2003 Seiko Epson Corporation. Select Add or Remove Programs or double-click Add/Remove ...

Printer Basics
Page 3
... Envelopes Loading Roll Paper If the Roll Paper Jams or Feeds Incorrectly Removing and Storing Roll Paper PRINTING FROM START TO FINISH Basic Printing in Windows Selecting the Settings You Use Most Often Basic Printing on a Macintosh Printing with OS 8.5.1 to 9.x Printing with OS X Customizing Your Print Settings Customizing...
... Envelopes Loading Roll Paper If the Roll Paper Jams or Feeds Incorrectly Removing and Storing Roll Paper PRINTING FROM START TO FINISH Basic Printing in Windows Selecting the Settings You Use Most Often Basic Printing on a Macintosh Printing with OS 8.5.1 to 9.x Printing with OS X Customizing Your Print Settings Customizing...
Printer Basics
Page 4
... and Solutions 58 Problems Setting Up the Printer or Installing Software 58 Printing Problems 59 Print Quality Problems 60 Problems with Macintosh OS 8.5.1 to 9.x 34 PRINT Image Matching and Exif Print 34 Using Film Factory 35 Using the P.I.M. Printing BorderFree Photos 33 BorderFree Printing with Windows 33 BorderFree Printing with Paper Feeding 63...
... and Solutions 58 Problems Setting Up the Printer or Installing Software 58 Printing Problems 59 Print Quality Problems 60 Problems with Macintosh OS 8.5.1 to 9.x 34 PRINT Image Matching and Exif Print 34 Using Film Factory 35 Using the P.I.M. Printing BorderFree Photos 33 BorderFree Printing with Windows 33 BorderFree Printing with Paper Feeding 63...

Printer Basics
Page 5
Limited Warranty 75 INDEX 77 v Uninstalling and Reinstalling Printer Software 65 Windows 65 Macintosh OS 8.5.1 to 9.x 66 Where To Get Help 67 Photo Software Technical Support 68 NOTICES 69 Windows System Requirements 69 Macintosh System Requirements 70 ENERGY STAR Compliance 70 Important Safety Instructions 71 Ink Cartridge Safety Instructions 72 FCC Compliance Statement 73 Declaration of Conformity 74 Epson America, Inc.
Limited Warranty 75 INDEX 77 v Uninstalling and Reinstalling Printer Software 65 Windows 65 Macintosh OS 8.5.1 to 9.x 66 Where To Get Help 67 Photo Software Technical Support 68 NOTICES 69 Windows System Requirements 69 Macintosh System Requirements 70 ENERGY STAR Compliance 70 Important Safety Instructions 71 Ink Cartridge Safety Instructions 72 FCC Compliance Statement 73 Declaration of Conformity 74 Epson America, Inc.
Printer Basics
Page 9
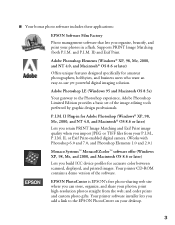
...the software. II) and Exif Print. Adobe Photoshop LE (Windows 95 and Macintosh OS 8.5x) Your gateway to the EPSON PhotoCenter on your photos; P.I .M. Your printer CD-ROM contains a demo version of the image-editing ...tools preferred by graphic design professionals. and order prints and custom photo gifts. Adobe Photoshop Elements (Windows® XP, 98, Me, 2000, and NT 4.0, and Macintosh® OS 8.6 or later) Offers unique features designed specifically for accurate color...
...the software. II) and Exif Print. Adobe Photoshop LE (Windows 95 and Macintosh OS 8.5x) Your gateway to the EPSON PhotoCenter on your photos; P.I .M. Your printer CD-ROM contains a demo version of the image-editing ...tools preferred by graphic design professionals. and order prints and custom photo gifts. Adobe Photoshop Elements (Windows® XP, 98, Me, 2000, and NT 4.0, and Macintosh® OS 8.6 or later) Offers unique features designed specifically for accurate color...

Printer Basics
Page 10
...later or Netscape Navigator™ 3.0 or later-to your equipment. Viewing Your On-Screen Reference Guide Your printer software CD-ROM includes an on a Macintosh ■ Maintaining the printer ■ Solving basic problems Warnings, Cautions, Notes, and Tips Please follow these steps to copy the Reference... to avoid bodily injury. About Your Documentation To set up your on-screen Reference Guide ■ Printing with Windows or on -screen Reference Guide for better printing. This book contains system requirements, important safety information, and instructions on: ■ Viewing...
...later or Netscape Navigator™ 3.0 or later-to your equipment. Viewing Your On-Screen Reference Guide Your printer software CD-ROM includes an on a Macintosh ■ Maintaining the printer ■ Solving basic problems Warnings, Cautions, Notes, and Tips Please follow these steps to copy the Reference... to avoid bodily injury. About Your Documentation To set up your on-screen Reference Guide ■ Printing with Windows or on -screen Reference Guide for better printing. This book contains system requirements, important safety information, and instructions on: ■ Viewing...
Printer Basics
Page 11
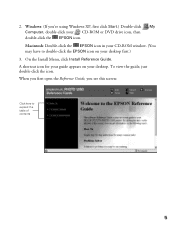
2. On the Install Menu, click Install Reference Guide. When you first open the Reference Guide, you 're using Windows XP, first click Start.) Double-click My Computer, double-click your CD-ROM or DVD drive icon, then double-click the EPSON icon. Macintosh: Double-click the EPSON icon in your CD-ROM window. (You may have to expand the table of contents 5 A shortcut icon for your guide appears on your desktop. Windows: (If you see this screen: Click here to double-click the EPSON icon on your desktop first.) 3. To view the guide, just double-click the icon.
2. On the Install Menu, click Install Reference Guide. When you first open the Reference Guide, you 're using Windows XP, first click Start.) Double-click My Computer, double-click your CD-ROM or DVD drive icon, then double-click the EPSON icon. Macintosh: Double-click the EPSON icon in your CD-ROM window. (You may have to expand the table of contents 5 A shortcut icon for your guide appears on your desktop. Windows: (If you see this screen: Click here to double-click the EPSON icon on your desktop first.) 3. To view the guide, just double-click the icon.

Printer Basics
Page 15
2. See page 16 (Windows), page 22 (Macintosh OS X), or page 19 (Macintosh OS 8.5.1 to the 0 position when you're done printing envelopes.) 3. Select Plain paper as the Media Type setting and choose the correct envelope size as the Paper Size setting. Set your printer's thickness lever to the + position. (Remember to move the thickness lever back to 9.x) for more information. 9
2. See page 16 (Windows), page 22 (Macintosh OS X), or page 19 (Macintosh OS 8.5.1 to the 0 position when you're done printing envelopes.) 3. Select Plain paper as the Media Type setting and choose the correct envelope size as the Paper Size setting. Set your printer's thickness lever to the + position. (Remember to move the thickness lever back to 9.x) for more information. 9

Printer Basics
Page 21
from Start to Finish Here's what to do to controlling the print job. Follow the instructions in these sections: ■ "Basic Printing in Windows" on page 16 ■ "Basic Printing on a Macintosh" on page 19 ■ "Customizing Your Print Settings" on page 25 ■ "Selecting the Correct Media Type" on page 32 ■ "Printing BorderFree Photos" on page 33 ■ "PRINT Image Matching and Exif Print" on page 34 15 Printing from loading the paper to selecting print settings to print a basic document-such as a photograph or newsletter-
from Start to Finish Here's what to do to controlling the print job. Follow the instructions in these sections: ■ "Basic Printing in Windows" on page 16 ■ "Basic Printing on a Macintosh" on page 19 ■ "Customizing Your Print Settings" on page 25 ■ "Selecting the Correct Media Type" on page 32 ■ "Printing BorderFree Photos" on page 33 ■ "PRINT Image Matching and Exif Print" on page 34 15 Printing from loading the paper to selecting print settings to print a basic document-such as a photograph or newsletter-

Printer Basics
Page 22
... print icon on your application's tool bar instead of selecting Print from the File menu, you have paper in Windows This section describes the basic steps for printing with Windows. Click Properties or Preferences. (If you create your EPSON Stylus Photo printer is selected. 3. From the File menu, click Print. After you see your application's Print...
... print icon on your application's tool bar instead of selecting Print from the File menu, you have paper in Windows This section describes the basic steps for printing with Windows. Click Properties or Preferences. (If you create your EPSON Stylus Photo printer is selected. 3. From the File menu, click Print. After you see your application's Print...

Printer Basics
Page 23
...sure which setting to select, see your paper. If you loaded Select the Ink color Select Automatic mode Select higher-quality or faster printing Click OK 4. You see page 32. ■ For Ink, select Color to print a color document or black and white photograph, or Black to print a grayscale or black... slider in the Mode box to Quality or Speed to select high-quality or faster printing. (The slider may not be available for your printer settings window. It's the easiest way to get good printing results on the screen and then click What's This?. 17 Make the following settings: ■...
...sure which setting to select, see your paper. If you loaded Select the Ink color Select Automatic mode Select higher-quality or faster printing Click OK 4. You see page 32. ■ For Ink, select Color to print a color document or black and white photograph, or Black to print a grayscale or black... slider in the Mode box to Quality or Speed to select high-quality or faster printing. (The slider may not be available for your printer settings window. It's the easiest way to get good printing results on the screen and then click What's This?. 17 Make the following settings: ■...


