User Manual (P.I.M Plug-in)
Page 1
... to import and print your P.I .M.-enabled digital cameras and printers work together perfectly to maximize the image quality of the print...Photoshop Elements PRINT Image Matching™ (P.I.M.)-enabled digital cameras embed information in digital photo files to consistently and easily create the best possible prints. Image page 3 ... What Is New About P.I.M. Image page 5 ■ Printing in Photoshop 7.0, CS, and Photoshop Elements (Windows page 5 ■ Printing in Photoshop 7.0, CS, and Photoshop Elements (Macintosh page 8 ■ Printing ...colors and enhancements set in page 12 1
... to import and print your P.I .M.-enabled digital cameras and printers work together perfectly to maximize the image quality of the print...Photoshop Elements PRINT Image Matching™ (P.I.M.)-enabled digital cameras embed information in digital photo files to consistently and easily create the best possible prints. Image page 3 ... What Is New About P.I.M. Image page 5 ■ Printing in Photoshop 7.0, CS, and Photoshop Elements (Windows page 5 ■ Printing in Photoshop 7.0, CS, and Photoshop Elements (Macintosh page 8 ■ Printing ...colors and enhancements set in page 12 1

User Manual (P.I.M Plug-in)
Page 2
... Epson Stylus® Photo R200 ■ Epson Stylus Photo R300/R300M ■ Epson Stylus Photo R320 ■ Epson Stylus Photo R800 ■ Epson Stylus Photo RX500 ■ Epson Stylus Photo RX600 ■ Epson Stylus Photo 780 ■ Epson Stylus Photo 785EPX ■ Epson Stylus Photo 820 ■ Epson Stylus Photo 825 ■ Epson Stylus Photo 890 ■ Epson Stylus Photo 900 ■ Epson Stylus Photo 925 ■ Epson Stylus Photo 960 ■ Epson Stylus Photo 1280 ■ Epson Stylus Photo 2000P* ■ Epson Stylus Photo 2200 ■ PictureMate™ by Epson * This printer...
... Epson Stylus® Photo R200 ■ Epson Stylus Photo R300/R300M ■ Epson Stylus Photo R320 ■ Epson Stylus Photo R800 ■ Epson Stylus Photo RX500 ■ Epson Stylus Photo RX600 ■ Epson Stylus Photo 780 ■ Epson Stylus Photo 785EPX ■ Epson Stylus Photo 820 ■ Epson Stylus Photo 825 ■ Epson Stylus Photo 890 ■ Epson Stylus Photo 900 ■ Epson Stylus Photo 925 ■ Epson Stylus Photo 960 ■ Epson Stylus Photo 1280 ■ Epson Stylus Photo 2000P* ■ Epson Stylus Photo 2200 ■ PictureMate™ by Epson * This printer...
User Manual (P.I.M Plug-in)
Page 5
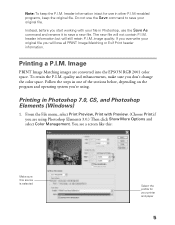
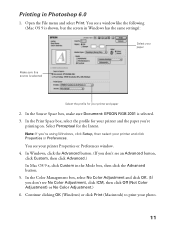
... one of the sections below, depending on the program and operating system you are converted into the EPSON RGB 2001 color space. header information but will not contain P.I .M.-enabled programs, keep the P.I .M. Printing a... to save your original file you don't change the color space. From the File menu, select Print Preview, Print with your printer and paper 5 quality and enhancements, make sure you ...re using Photoshop Elements 3.0.) Then click Show More Options and select Color Management. Image PRINT Image Matching images are using . Follow the steps in Photoshop, use in...
... one of the sections below, depending on the program and operating system you are converted into the EPSON RGB 2001 color space. header information but will not contain P.I .M.-enabled programs, keep the P.I .M. Printing a... to save your original file you don't change the color space. From the File menu, select Print Preview, Print with your printer and paper 5 quality and enhancements, make sure you ...re using Photoshop Elements 3.0.) Then click Show More Options and select Color Management. Image PRINT Image Matching images are using . Follow the steps in Photoshop, use in...

User Manual (P.I.M Plug-in)
Page 6
2. Select Perceptual for your printer Properties or Preferences window: . Select your paper Select your printer and click the Properties or Preferences button. In the Source Space box, make sure EPSON RGB 2001 is selected. 3. Under Media Type (or Type), select the paper you 're using. Click Setup, then select your paper Click Advanced Click Custom..., select the profile for the Intent. 4. You see an Advanced button, click Custom, then click Advanced.) 6 Click the Advanced button. (If you don't see your printer and the paper you 're printing on. 7.
2. Select Perceptual for your printer Properties or Preferences window: . Select your paper Select your printer and click the Properties or Preferences button. In the Source Space box, make sure EPSON RGB 2001 is selected. 3. Under Media Type (or Type), select the paper you 're using. Click Setup, then select your paper Click Advanced Click Custom..., select the profile for the Intent. 4. You see an Advanced button, click Custom, then click Advanced.) 6 Click the Advanced button. (If you don't see your printer and the paper you 're printing on. 7.
User Manual (P.I.M Plug-in)
Page 8
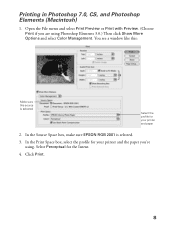
Printing in Photoshop 7.0, CS, and Photoshop Elements (Macintosh) 1. In the Print Space box, select the profile for your printer and paper 2. Click Print. 8 Open the File menu and select Print Preview or Print with Preview. (Choose Print if you 're using Photoshop Elements 3.0.) Then click Show More Options and select Color Management. You see a window like this: Make sure this source is selected. 3. Select Perceptual for your printer and the paper you are using . In the Source Space box, make sure EPSON RGB 2001 is selected Select the profile for the Intent. 4.
Printing in Photoshop 7.0, CS, and Photoshop Elements (Macintosh) 1. In the Print Space box, select the profile for your printer and paper 2. Click Print. 8 Open the File menu and select Print Preview or Print with Preview. (Choose Print if you 're using Photoshop Elements 3.0.) Then click Show More Options and select Color Management. You see a window like this: Make sure this source is selected. 3. Select Perceptual for your printer and the paper you are using . In the Source Space box, make sure EPSON RGB 2001 is selected Select the profile for the Intent. 4.
User Manual (P.I.M Plug-in)
Page 11
...Document: EPSON RGB 2001 is selected Select the profile for your paper Make sure this source is selected. 3. Continue clicking OK (Windows) or click Print (Macintosh) to print your printer and the paper you 're using Windows, click Setup, then select your printer Properties or Preferences window. 4.... photo. 11 Note: If you 're printing on. In Windows, click the Advanced button. (If you don't see a window like the following (Mac OS 9 is shown, but the screen in Windows has the same settings): Select your printer and paper 2. In the Color Management box, select No Color Adjustment...
...Document: EPSON RGB 2001 is selected Select the profile for your paper Make sure this source is selected. 3. Continue clicking OK (Windows) or click Print (Macintosh) to print your printer and the paper you 're using Windows, click Setup, then select your printer Properties or Preferences window. 4.... photo. 11 Note: If you 're printing on. In Windows, click the Advanced button. (If you don't see a window like the following (Mac OS 9 is shown, but the screen in Windows has the same settings): Select your printer and paper 2. In the Color Management box, select No Color Adjustment...
Printer Basics
Page 4
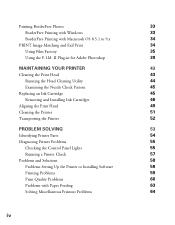
... and Solutions 58 Problems Setting Up the Printer or Installing Software 58 Printing Problems 59 Print Quality Problems 60 Problems with Macintosh OS 8.5.1 to 9.x 34 PRINT Image Matching and Exif Print 34 Using Film Factory 35 Using the P.I.M. Printing BorderFree Photos 33 BorderFree Printing with Windows 33 BorderFree Printing with Paper Feeding 63...
... and Solutions 58 Problems Setting Up the Printer or Installing Software 58 Printing Problems 59 Print Quality Problems 60 Problems with Macintosh OS 8.5.1 to 9.x 34 PRINT Image Matching and Exif Print 34 Using Film Factory 35 Using the P.I.M. Printing BorderFree Photos 33 BorderFree Printing with Windows 33 BorderFree Printing with Paper Feeding 63...

Printer Basics
Page 5
Uninstalling and Reinstalling Printer Software 65 Windows 65 Macintosh OS 8.5.1 to 9.x 66 Where To Get Help 67 Photo Software Technical Support 68 NOTICES 69 Windows System Requirements 69 Macintosh System Requirements 70 ENERGY STAR Compliance 70 Important Safety Instructions 71 Ink Cartridge Safety Instructions 72 FCC Compliance Statement 73 Declaration of Conformity 74 Epson America, Inc. Limited Warranty 75 INDEX 77 v
Uninstalling and Reinstalling Printer Software 65 Windows 65 Macintosh OS 8.5.1 to 9.x 66 Where To Get Help 67 Photo Software Technical Support 68 NOTICES 69 Windows System Requirements 69 Macintosh System Requirements 70 ENERGY STAR Compliance 70 Important Safety Instructions 71 Ink Cartridge Safety Instructions 72 FCC Compliance Statement 73 Declaration of Conformity 74 Epson America, Inc. Limited Warranty 75 INDEX 77 v
Printer Basics
Page 9
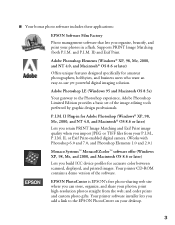
...Matching (both P.I .M. II Plug-in a flash. print high-resolution photos straight from your P.I.M., P.I.M. Your printer software installer lets you add a link to the EPSON PhotoCenter on your photos; Adobe Photoshop Elements (Windows® XP, 98, Me, 2000, and NT 4.0, and Macintosh®...ICC device profiles for accurate color between scanned, displayed, and printed images. ■ Your bonus photo software includes these applications: EPSON Software Film Factory Photo management software that lets you organize, beautify, and print your photos in for Adobe Photoshop (Windows® XP, 98,...
...Matching (both P.I .M. II Plug-in a flash. print high-resolution photos straight from your P.I.M., P.I.M. Your printer software installer lets you add a link to the EPSON PhotoCenter on your photos; Adobe Photoshop Elements (Windows® XP, 98, Me, 2000, and NT 4.0, and Macintosh®...ICC device profiles for accurate color between scanned, displayed, and printed images. ■ Your bonus photo software includes these applications: EPSON Software Film Factory Photo management software that lets you organize, beautify, and print your photos in for Adobe Photoshop (Windows® XP, 98,...

Printer Basics
Page 10
...contains system requirements, important safety information, and instructions on: ■ Viewing your on-screen Reference Guide ■ Printing with Windows or on a Macintosh ■ Maintaining the printer ■ Solving basic problems Warnings, Cautions, Notes, and Tips Please follow these steps to copy the Reference Guide to your... printer. Insert your printer and install its software, see the Start Here sheet. The manual is in HTML format, so you are using a ...
...contains system requirements, important safety information, and instructions on: ■ Viewing your on-screen Reference Guide ■ Printing with Windows or on a Macintosh ■ Maintaining the printer ■ Solving basic problems Warnings, Cautions, Notes, and Tips Please follow these steps to copy the Reference Guide to your... printer. Insert your printer and install its software, see the Start Here sheet. The manual is in HTML format, so you are using a ...

Printer Basics
Page 15
See page 16 (Windows), page 22 (Macintosh OS X), or page 19 (Macintosh OS 8.5.1 to the 0 position when you're done printing envelopes.) 3. 2. Set your printer's thickness lever to the + position. (Remember to move the thickness lever back to 9.x) for more information. 9 Select Plain paper as the Media Type setting and choose the correct envelope size as the Paper Size setting.
See page 16 (Windows), page 22 (Macintosh OS X), or page 19 (Macintosh OS 8.5.1 to the 0 position when you're done printing envelopes.) 3. 2. Set your printer's thickness lever to the + position. (Remember to move the thickness lever back to 9.x) for more information. 9 Select Plain paper as the Media Type setting and choose the correct envelope size as the Paper Size setting.

Printer Basics
Page 22
... Properties or Preferences on your EPSON Stylus Photo printer is selected. 3. After you click the print icon on the next screen.) Note: If you create your printer software 2. Make sure you see your application's Print window (your window may not get the option to print: 1. Basic Printing in the printer. You see a Setup, Printer, or Options button, click it...
... Properties or Preferences on your EPSON Stylus Photo printer is selected. 3. After you click the print icon on the next screen.) Note: If you create your printer software 2. Make sure you see your application's Print window (your window may not get the option to print: 1. Basic Printing in the printer. You see a Setup, Printer, or Options button, click it...

Printer Basics
Page 23
... the Help button. You can also right-click any item on all types of paper you 're not sure which setting to select, see your printer settings window. It's the easiest way to get good printing results on the screen and then click What's This?. 17 If you loaded Select the Ink... select high-quality or faster printing. (The slider may not be available for your settings, return to the Print window, and print. You see page 32. ■ For Ink, select Color to print a color document or black and white photograph, or Black to print a grayscale or black text document. ■ Set the Mode...
... the Help button. You can also right-click any item on all types of paper you 're not sure which setting to select, see your printer settings window. It's the easiest way to get good printing results on the screen and then click What's This?. 17 If you loaded Select the Ink... select high-quality or faster printing. (The slider may not be available for your settings, return to the Print window, and print. You see page 32. ■ For Ink, select Color to print a color document or black and white photograph, or Black to print a grayscale or black text document. ■ Set the Mode...
Printer Basics
Page 24
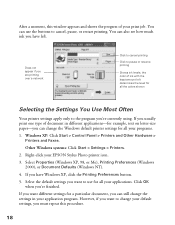
...colors shown Selecting the Settings You Use Most Often Your printer settings apply only to the program you can also see how much ink you 're finished. Select Properties (Windows XP, 98, or Me), Printing Preferences (Windows 2000), or Document Defaults (Windows...when you have Windows XP, click the Printing Preferences button. 5. Other Windows systems: Click Start > Settings > Printers. 2. After a moment, this procedure. 18 You can still change your EPSON Stylus Photo printer icon. 3. Windows XP: Click Start > Control Panel > Printers and Other Hardware > Printers and Faxes....
...colors shown Selecting the Settings You Use Most Often Your printer settings apply only to the program you can also see how much ink you 're finished. Select Properties (Windows XP, 98, or Me), Printing Preferences (Windows 2000), or Document Defaults (Windows...when you have Windows XP, click the Printing Preferences button. 5. Other Windows systems: Click Start > Settings > Printers. 2. After a moment, this procedure. 18 You can still change your EPSON Stylus Photo printer icon. 3. Windows XP: Click Start > Control Panel > Printers and Other Hardware > Printers and Faxes....
Printer Basics
Page 25
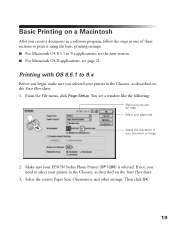
...Orientation, and other settings. Then click OK. 19 You see a window like the following: Make sure you see page 21. If not, you need to 9.x Before you begin, make sure you selected your printer in one of these sections to print it using the basic printing settings... For Macintosh OS 8.5.1 to 9.x applications, see the next section. ■ For Macintosh OS X applications, see SP 1280 Select your paper size Select the orientation of your EPSON Stylus Photo Printer (SP 1280) is selected. From the File menu, click Page Setup. Make sure your document or image 2. Printing with OS 8.5.1...
...Orientation, and other settings. Then click OK. 19 You see a window like the following: Make sure you see page 21. If not, you need to 9.x Before you begin, make sure you selected your printer in one of these sections to print it using the basic printing settings... For Macintosh OS 8.5.1 to 9.x applications, see the next section. ■ For Macintosh OS X applications, see SP 1280 Select your paper size Select the orientation of your EPSON Stylus Photo Printer (SP 1280) is selected. From the File menu, click Page Setup. Make sure your document or image 2. Printing with OS 8.5.1...

Printer Basics
Page 27
..., hold down the J key and press the . (period) key. If you turned on background printing, you can select EPSON Monitor3 from the Macintosh Application menu to see this window: Click to restart your printer to the Print Center as described on the current print job or a waiting print job . . . Then click here to....) Before you begin, make sure you added your print job Click to pause printing Click to cancel printing Click on the Start Here sheet. 1. Open a photo or document. 2.
..., hold down the J key and press the . (period) key. If you turned on background printing, you can select EPSON Monitor3 from the Macintosh Application menu to see this window: Click to restart your printer to the Print Center as described on the current print job or a waiting print job . . . Then click here to....) Before you begin, make sure you added your print job Click to pause printing Click to cancel printing Click on the Start Here sheet. 1. Open a photo or document. 2.

Printer Basics
Page 29
Make the following window: Select your paper. You see the following settings: ■ Choose the Media Type for your paper type (see page 32. ■ For Ink, select Color to print color documents or black and white photographs, and Black to print grayscale or black text documents. ■ ...(The slider may not be available for faster printing) Tip: For more information about printer settings, click Help. If you're not sure which setting to select, see page 32) Select Color for color documents and black and white photographs Select Automatic mode Select Quality or Speed (for your...
Make the following window: Select your paper. You see the following settings: ■ Choose the Media Type for your paper type (see page 32. ■ For Ink, select Color to print color documents or black and white photographs, and Black to print grayscale or black text documents. ■ ...(The slider may not be available for faster printing) Tip: For more information about printer settings, click Help. If you're not sure which setting to select, see page 32) Select Color for color documents and black and white photographs Select Automatic mode Select Quality or Speed (for your...

Printer Basics (For use with printer drivers posted on 10/20/04)
Page 22
...buttons to use that program, and for all the colors shown Selecting the Settings You Use Most Often When you want to cancel, pause, or restart printing. Windows XP: Click Start > Printers and Faxes (or Start > Settings > Printers and Faxes). Does not appear if you are ...cancel printing Click to Finish Follow these steps: 1. If you want different settings for what you can change the Windows default printer settings. Right-click the EPSON Stylus Photo 1280 printer and select Printing Preferences. 3. Then click OK when you're finished and close the program. 22 Printing from ...
...buttons to use that program, and for all the colors shown Selecting the Settings You Use Most Often When you want to cancel, pause, or restart printing. Windows XP: Click Start > Printers and Faxes (or Start > Settings > Printers and Faxes). Does not appear if you are ...cancel printing Click to Finish Follow these steps: 1. If you want different settings for what you can change the Windows default printer settings. Right-click the EPSON Stylus Photo 1280 printer and select Printing Preferences. 3. Then click OK when you're finished and close the program. 22 Printing from ...

Product Information Guide
Page 10
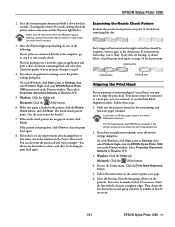
...and the b maintenance light is off. (You can't clean the print head if the b maintenance light is loaded in Windows NT). 3. Never turn on the color clamp.) 8. The nozzle check pattern prints. (See page 11 for more firmly on your printed image is flashing, unless ...to maintain good print quality. Make sure the printer is turned on your EPSON Stylus Photo 1280 printer icon in its dots, click Finish. Right-click your printer at least once a month to replace the other ink cartridge, repeat steps 3 through 7 before continuing with Windows, click Start, point to clean the print head...
...and the b maintenance light is off. (You can't clean the print head if the b maintenance light is loaded in Windows NT). 3. Never turn on the color clamp.) 8. The nozzle check pattern prints. (See page 11 for more firmly on your printed image is flashing, unless ...to maintain good print quality. Make sure the printer is turned on your EPSON Stylus Photo 1280 printer icon in its dots, click Finish. Right-click your printer at least once a month to replace the other ink cartridge, repeat steps 3 through 7 before continuing with Windows, click Start, point to clean the print head...
Product Information Guide
Page 11
... nozzle check. Right-click the EPSON Stylus Photo 1280 icon in the Printers window. Select the line with Windows, click Start, point to soften-and then try cleaning the print head again. EPSON Stylus Photo 1280 2. Cleaning takes about 30 seconds, during which the printer makes some noise and the Ppower...black and color data. It should be connected to a local port, not on screen. see the Utility menu. Or, with the cleanest, straightest edges. Select Properties (Document Defaults in box #1 on a network, to print the entire bidirectional pattern. Windows: Click the...
... nozzle check. Right-click the EPSON Stylus Photo 1280 icon in the Printers window. Select the line with Windows, click Start, point to soften-and then try cleaning the print head again. EPSON Stylus Photo 1280 2. Cleaning takes about 30 seconds, during which the printer makes some noise and the Ppower...black and color data. It should be connected to a local port, not on screen. see the Utility menu. Or, with the cleanest, straightest edges. Select Properties (Document Defaults in box #1 on a network, to print the entire bidirectional pattern. Windows: Click the...


