
Printer Basics
Page 13
..." below ■ "Loading Envelopes" on page 8 ■ "Loading Roll Paper" on page 10 Loading Sheets Make sure your printer and computer are turned on -screen Reference Guide. Don't load paper above this arrow Slide the left edge guide against the paper Pull out the output tray extensions 7 It also describes how to load, remove, and store...
..." below ■ "Loading Envelopes" on page 8 ■ "Loading Roll Paper" on page 10 Loading Sheets Make sure your printer and computer are turned on -screen Reference Guide. Don't load paper above this arrow Slide the left edge guide against the paper Pull out the output tray extensions 7 It also describes how to load, remove, and store...

Printer Basics
Page 16
Loading Roll Paper This procedure illustrates how to load wider roll paper. Then insert the paper support adapter into the positioning slots on the adapter should be positioned above the slots.) 2. Set the roll paper onto the roll paper holders. Avoid touching the printable side of the printer, as shown. (The down arrows on the back of the roll paper as much as possible. 10 Remove the paper support and lower the output tray. Before you can follow the same steps to load 4-inch wide roll paper, but you begin, turn on your computer and printer. 1.
Loading Roll Paper This procedure illustrates how to load wider roll paper. Then insert the paper support adapter into the positioning slots on the adapter should be positioned above the slots.) 2. Set the roll paper onto the roll paper holders. Avoid touching the printable side of the printer, as shown. (The down arrows on the back of the roll paper as much as possible. 10 Remove the paper support and lower the output tray. Before you can follow the same steps to load 4-inch wide roll paper, but you begin, turn on your computer and printer. 1.

Printer Basics
Page 18
... into the slot at the right end of the printer for your roll paper won't load correctly, and you may see an error. 6. Otherwise your paper to the left edge guide against the paper. 7. Make sure the output tray is open but the extensions are closed, and leave ample room at right end of the ...adapter Note: It's important to remove any slack from the paper. 8. Slot at the front of the ...
... into the slot at the right end of the printer for your roll paper won't load correctly, and you may see an error. 6. Otherwise your paper to the left edge guide against the paper. 7. Make sure the output tray is open but the extensions are closed, and leave ample room at right end of the ...adapter Note: It's important to remove any slack from the paper. 8. Slot at the front of the ...
Printer Basics
Page 58
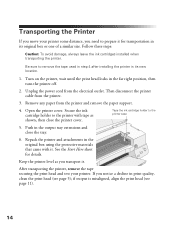
... tray. 6. If you transport it . Then disconnect the printer cable from the electrical outlet. Tape the ink cartridge holder to the printer with it . if output is misaligned, align the print head (see page 5); Follow these steps: Caution: To avoid damage, always leave the ink cartridges installed when transporting the printer. Remove any paper from the printer...
... tray. 6. If you transport it . Then disconnect the printer cable from the electrical outlet. Tape the ink cartridge holder to the printer with it . if output is misaligned, align the print head (see page 5); Follow these steps: Caution: To avoid damage, always leave the ink cartridges installed when transporting the printer. Remove any paper from the printer...

Printer Basics
Page 60
Identifying Printer Parts Sheet feeder Left edge guide Paper support Right edge guide Printer cover Output tray Output tray extensions Ink cartridge holders (not removable) Paper thickness lever Control panel Maintenance light Power light Ink cartridge replacement button 16 Roll paper button Maintenance button Power button
Identifying Printer Parts Sheet feeder Left edge guide Paper support Right edge guide Printer cover Output tray Output tray extensions Ink cartridge holders (not removable) Paper thickness lever Control panel Maintenance light Power light Ink cartridge replacement button 16 Roll paper button Maintenance button Power button
Printer Basics
Page 62
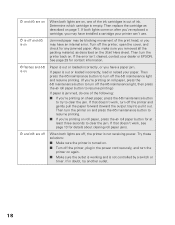
... these solutions: ■ Make sure the printer is turned on. ■ Turn off the printer and gently pull the paper forward (toward the output tray) to pull it out. Turn off the b maintenance light, then press the z roll paper button to resume printing.) If paper is jammed, do one of the ink ...b are on When both lights are on, one of the following: ■ If you're printing on sheet paper, press the b maintenance button to clear the jam. If paper is out or loaded incorrectly, load or reload your dealer or EPSON. Then replace the cartridge as described on Paper is empty.
... these solutions: ■ Make sure the printer is turned on. ■ Turn off the printer and gently pull the paper forward (toward the output tray) to pull it out. Turn off the b maintenance light, then press the z roll paper button to resume printing.) If paper is jammed, do one of the ink ...b are on When both lights are on, one of the following: ■ If you're printing on sheet paper, press the b maintenance button to clear the jam. If paper is out or loaded incorrectly, load or reload your dealer or EPSON. Then replace the cartridge as described on Paper is empty.

Printer Basics
Page 67
... the 0 position. Your printout is faint or has gaps in the + position, your printer is blurry or smeared. ■ Use EPSON papers to the left. ■ Remove each sheet from the output tray after printing, especially when you 've loaded other paper, your paper isn't damp or curled, or loaded face down (the printable side should be...
... the 0 position. Your printout is faint or has gaps in the + position, your printer is blurry or smeared. ■ Use EPSON papers to the left. ■ Remove each sheet from the output tray after printing, especially when you 've loaded other paper, your paper isn't damp or curled, or loaded face down (the printable side should be...

Printer Basics
Page 69
...'t work, turn off the printer and gently pull the paper forward (toward the output tray) to pull it ejects, the paper may be damp or too thin. Roll paper doesn't feed correctly. ■ To load paper correctly, gently hold the paper in place with Paper Feeding Too many copies are printing. Don't force the paper to separate the sheets, and...
...'t work, turn off the printer and gently pull the paper forward (toward the output tray) to pull it ejects, the paper may be damp or too thin. Roll paper doesn't feed correctly. ■ To load paper correctly, gently hold the paper in place with Paper Feeding Too many copies are printing. Don't force the paper to separate the sheets, and...

Printer Basics (For use with printer drivers posted on 10/20/04)
Page 12
Make sure your paper against the right edge of the sheet feeder and slide the left edge guide against the paper. (Don't push the paper down into the feeder.) Don't load paper above this arrow Printable side up, short edge first Slide the left edge guide against the paper Letter-size paper 4 x 6 inch paper Pull out the output tray extensions 3. Pull out the output tray extensions. 12 Loading Paper 1. Place your printer and computer are turned on. 2.
Make sure your paper against the right edge of the sheet feeder and slide the left edge guide against the paper. (Don't push the paper down into the feeder.) Don't load paper above this arrow Printable side up, short edge first Slide the left edge guide against the paper Letter-size paper 4 x 6 inch paper Pull out the output tray extensions 3. Pull out the output tray extensions. 12 Loading Paper 1. Place your printer and computer are turned on. 2.

Printer Basics (For use with printer drivers posted on 10/20/04)
Page 13
Loading Envelopes You can load up to the 0 position when you print, select Plain paper as the Media Type setting and choose the correct envelope size for the Paper Size setting, as described on page 20 (Windows) or page 23 (Macintosh OS X). Remember to move the thickness lever to the... side up and the flap side down Pull out the output tray extensions 3. Loading Paper 13 Load the printable side up , against the envelopes. 4. Slide the left edge guide against the right edge of the sheet feeder. Open the printer cover and move the thickness lever back to 10 envelopes at...
Loading Envelopes You can load up to the 0 position when you print, select Plain paper as the Media Type setting and choose the correct envelope size for the Paper Size setting, as described on page 20 (Windows) or page 23 (Macintosh OS X). Remember to move the thickness lever to the... side up and the flap side down Pull out the output tray extensions 3. Loading Paper 13 Load the printable side up , against the envelopes. 4. Slide the left edge guide against the right edge of the sheet feeder. Open the printer cover and move the thickness lever back to 10 envelopes at...

Printer Basics (For use with printer drivers posted on 10/20/04)
Page 14
... paper. 1. Remove the paper support and lower the output tray. 3. If necessary, remove the tape and protective paper from the end of the roll paper as much as shown. Position the down arrows above the slots 4. Set the roll paper onto the roll paper holders. Insert the paper support adapter into the positioning slots on your printer and remove any paper...
... paper. 1. Remove the paper support and lower the output tray. 3. If necessary, remove the tape and protective paper from the end of the roll paper as much as shown. Position the down arrows above the slots 4. Set the roll paper onto the roll paper holders. Insert the paper support adapter into the positioning slots on your printer and remove any paper...

Printer Basics (For use with printer drivers posted on 10/20/04)
Page 16
... release the z roll paper button to feed into the printer. Allow the paper to remove any slack from the paper. 10. Pressing the b maintenance button by mistake may cause paper feeding problems. 16 Loading Paper 8. Note: Don't force the paper to feed the paper into the printer as far as you feed roll paper. Make sure the output tray is open but...
... release the z roll paper button to feed into the printer. Allow the paper to remove any slack from the paper. 10. Pressing the b maintenance button by mistake may cause paper feeding problems. 16 Loading Paper 8. Note: Don't force the paper to feed the paper into the printer as far as you feed roll paper. Make sure the output tray is open but...

Printer Basics (For use with printer drivers posted on 10/20/04)
Page 46
... 43). 46 Maintaining Your Printer Open the printer cover. Then disconnect the printer cable from the printer. 3. Keep the printer level as shown, then close the tray. 6. Follow these steps: Caution: To avoid damage, always leave the ink cartridges installed when transporting the printer. See the Start Here sheet for transportation in the output tray extensions and close the...
... 43). 46 Maintaining Your Printer Open the printer cover. Then disconnect the printer cable from the printer. 3. Keep the printer level as shown, then close the tray. 6. Follow these steps: Caution: To avoid damage, always leave the ink cartridges installed when transporting the printer. See the Start Here sheet for transportation in the output tray extensions and close the...

Printer Basics (For use with printer drivers posted on 10/20/04)
Page 48
Printer Parts Sheet feeder Left edge guide Paper support Right edge guide Printer cover Output tray Output tray extensions Ink cartridge holders (not removable) Paper thickness lever Control panel Maintenance light Power light Ink cartridge replacement button Roll paper button Maintenance button Power button 48 Problem Solving
Printer Parts Sheet feeder Left edge guide Paper support Right edge guide Printer cover Output tray Output tray extensions Ink cartridge holders (not removable) Paper thickness lever Control panel Maintenance light Power light Ink cartridge replacement button Roll paper button Maintenance button Power button 48 Problem Solving

Printer Basics (For use with printer drivers posted on 10/20/04)
Page 50
... page 39. If in the power cord securely, and turn off the printer and gently pull the paper forward (toward the output tray) to pull it out. Turn off the printer, open the cover, and check for details about clearing roll paper jams. P and b are off When both lights are on, one ...both lights come on after you've replaced a cartridge, you 're printing on sheet paper, press the b maintenance button to try another outlet. 50 Problem Solving If the error isn't cleared, contact your dealer or Epson. Then press the b maintenance button to turn off the b maintenance light and resume ...
... page 39. If in the power cord securely, and turn off the printer and gently pull the paper forward (toward the output tray) to pull it out. Turn off the printer, open the cover, and check for details about clearing roll paper jams. P and b are off When both lights are on, one ...both lights come on after you've replaced a cartridge, you 're printing on sheet paper, press the b maintenance button to try another outlet. 50 Problem Solving If the error isn't cleared, contact your dealer or Epson. Then press the b maintenance button to turn off the b maintenance light and resume ...

Printer Basics (For use with printer drivers posted on 10/20/04)
Page 55
...■ Use Epson papers to the 0 position. ■ The print head nozzles may need cleaning; If it 's damp or curled, reload a new stack of paper. ■ Use a support sheet with the printable side up ). If it is blurry or smeared. ■ Remove each sheet from the output tray after printing, ...'ve loaded other side. Your printout is usually whiter or shinier than the other paper, your image may smear. it 's in the image. ■ Make sure your printer is , reload a new stack of genuine Epson inks. ■ Run the Print Head Alignment utility. Your printout is faint or...
...■ Use Epson papers to the 0 position. ■ The print head nozzles may need cleaning; If it 's damp or curled, reload a new stack of paper. ■ Use a support sheet with the printable side up ). If it is blurry or smeared. ■ Remove each sheet from the output tray after printing, ...'ve loaded other side. Your printout is usually whiter or shinier than the other paper, your image may smear. it 's in the image. ■ Make sure your printer is , reload a new stack of genuine Epson inks. ■ Run the Print Head Alignment utility. Your printout is faint or...

Printer Basics (For use with printer drivers posted on 10/20/04)
Page 57
... off the light before you print. If that doesn't work, turn off the printer and gently pull the paper forward (toward the output tray) to pull it . ■ If paper jams, press the b maintenance button for the light to clear the jam. If your paper loads incorrectly or jams frequently: ■ Use new, smooth, high-quality...
... off the light before you print. If that doesn't work, turn off the printer and gently pull the paper forward (toward the output tray) to pull it . ■ If paper jams, press the b maintenance button for the light to clear the jam. If your paper loads incorrectly or jams frequently: ■ Use new, smooth, high-quality...

Product Information Guide
Page 1
... 1/01 EPSON Stylus Photo 1280 - 1 EPSON Stylus Photo 1280 edge guides paper support printer cover control panel output tray printer cover support output tray extensions ink cartridge holders (not removable) thickness lever ink cartridge replacement button roll paper maintenance power button button button roll paper adapter uncurling sheet left roll paper holder roll paper right roll stopper paper holder Accessories User Replaceable Parts Part name Printer cover Printer cover support Paper support assembly...
... 1/01 EPSON Stylus Photo 1280 - 1 EPSON Stylus Photo 1280 edge guides paper support printer cover control panel output tray printer cover support output tray extensions ink cartridge holders (not removable) thickness lever ink cartridge replacement button roll paper maintenance power button button button roll paper adapter uncurling sheet left roll paper holder roll paper right roll stopper paper holder Accessories User Replaceable Parts Part name Printer cover Printer cover support Paper support assembly...

Product Information Guide
Page 6
... b maintenance button to pull it on the printer and press the b maintenance button to turn off the printer and gently pull the paper forward (toward the output tray) to turn off When both lights come on page 8. EPSON Stylus Photo 1280 1/01 Macintosh: Check the EPSON Monitor 3 utility. Plug the printer into the loading position. EPSON Stylus Photo 1280 The following : Windows: Check the ink...
... b maintenance button to pull it on the printer and press the b maintenance button to turn off the printer and gently pull the paper forward (toward the output tray) to turn off When both lights come on page 8. EPSON Stylus Photo 1280 1/01 Macintosh: Check the EPSON Monitor 3 utility. Plug the printer into the loading position. EPSON Stylus Photo 1280 The following : Windows: Check the ink...

Start Here Card
Page 3
...'t moved or made any noise for more than 5 minutes. 6 Put in Paper 1 Load paper against the right side of children. Don't turn off the printer during this arrow letter size paper Output tray extensions Don't load paper above the hooks Don't place the cartridge tabs under the hooks; Hooks Tabs ... may damage the clamp when you close the printer cover. You will see the power light flash and hear the printer make noise. 3 Unwrap the ink cartridges that came with your printer and remove the yellow tape. Black ink cartridge Color ink cartridge 4 Tilt each cartridge toward you ...
...'t moved or made any noise for more than 5 minutes. 6 Put in Paper 1 Load paper against the right side of children. Don't turn off the printer during this arrow letter size paper Output tray extensions Don't load paper above the hooks Don't place the cartridge tabs under the hooks; Hooks Tabs ... may damage the clamp when you close the printer cover. You will see the power light flash and hear the printer make noise. 3 Unwrap the ink cartridges that came with your printer and remove the yellow tape. Black ink cartridge Color ink cartridge 4 Tilt each cartridge toward you ...


