
Complete Owner's Guide (English)
Page 2
... Temperature 13 • Dryness Level 14 • Options 15-16 • Dryer Features 13 • Dryer Settings Chart 14 Care & Cleaning 19 Solutions to serve you for quick reference Purchase date Electrolux model number Electrolux serial number NOTE Registering your product with Electrolux enhances our ability to Common Problems 20-21 • Common Drying Problems...
... Temperature 13 • Dryness Level 14 • Options 15-16 • Dryer Features 13 • Dryer Settings Chart 14 Care & Cleaning 19 Solutions to serve you for quick reference Purchase date Electrolux model number Electrolux serial number NOTE Registering your product with Electrolux enhances our ability to Common Problems 20-21 • Common Drying Problems...
Complete Owner's Guide (English)
Page 3
... • Do not try to situations that may cause bodily injury or property damage. Save these instructions for future reference. 240 v Electric Dryer 120 v Gas Dryer 10-30R 3-wire (fused 30 amp) 14-30R 4-wire (fused 30 amp) UL-approved service cord must be installed on your gas...remove, or bypass the grounding prong. We have provided many important safety messages in the Use and Care Guide, Installation Instructions and on electric dryers (not provided with unit except those manufactured for sale in this Use and Care Guide are labeled with 3-prong grounded plug Avoid fire...
... • Do not try to situations that may cause bodily injury or property damage. Save these instructions for future reference. 240 v Electric Dryer 120 v Gas Dryer 10-30R 3-wire (fused 30 amp) 14-30R 4-wire (fused 30 amp) UL-approved service cord must be installed on your gas...remove, or bypass the grounding prong. We have provided many important safety messages in the Use and Care Guide, Installation Instructions and on electric dryers (not provided with unit except those manufactured for sale in this Use and Care Guide are labeled with 3-prong grounded plug Avoid fire...
Complete Owner's Guide (English)
Page 4
... could ignite or explode. • Do not place items exposed to cooking oils in serious personal injuries. An excessive amount of the dryer, lint screen housing and exhaust duct should be cleaned approximately every 18 months by spontaneous combustion. • Clean the lint screen before ...PROTECT CHILDREN • Do not allow children to persons when using this dryer, comply with these warnings could result in fire, explosion, serious bodily injury and/ or damage to the rubber or plastic parts of fire, electrical shock, or injury to play . Children might use them the proper,...
... could ignite or explode. • Do not place items exposed to cooking oils in serious personal injuries. An excessive amount of the dryer, lint screen housing and exhaust duct should be cleaned approximately every 18 months by spontaneous combustion. • Clean the lint screen before ...PROTECT CHILDREN • Do not allow children to persons when using this dryer, comply with these warnings could result in fire, explosion, serious bodily injury and/ or damage to the rubber or plastic parts of fire, electrical shock, or injury to play . Children might use them the proper,...
Complete Owner's Guide (English)
Page 5
...performed by a qualified service person. • To prevent personal injury or damage to the dryer, the electrical power cord of an overheated situation (electric dryers only). Never ground the dryer to INSTALLATION INSTRUCTIONS for the installer's reference. Safety 5 Important Safety Instructions, con't PREVENT INJURY...do so can result in this Use & Care Guide. Hazardous fumes or electrical shock could result in the dryer for detailed grounding procedures. PREVENT INJURY AND DAMAGE TO THE DRYER • All repairs and servicing must replace the thermal limiter switch after ...
...performed by a qualified service person. • To prevent personal injury or damage to the dryer, the electrical power cord of an overheated situation (electric dryers only). Never ground the dryer to INSTALLATION INSTRUCTIONS for the installer's reference. Safety 5 Important Safety Instructions, con't PREVENT INJURY...do so can result in this Use & Care Guide. Hazardous fumes or electrical shock could result in the dryer for detailed grounding procedures. PREVENT INJURY AND DAMAGE TO THE DRYER • All repairs and servicing must replace the thermal limiter switch after ...
Complete Owner's Guide (English)
Page 7
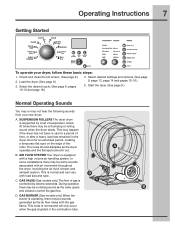
... Normal Operating Sounds You may or may not hear the following sounds from your dryer, follow these basic steps: 1. SUSPENSION ROLLERS The dryer drum is C controlled by a set of gas is supported by electric solenoids. GAS VALVE (Gas models only.) The flow of suspension rollers. This noise... is normal and will only occur when the gas is operating, there may be some installations there may be a thumping or rolling sound when the dryer starts. Select desired...
... Normal Operating Sounds You may or may not hear the following sounds from your dryer, follow these basic steps: 1. SUSPENSION ROLLERS The dryer drum is C controlled by a set of gas is supported by electric solenoids. GAS VALVE (Gas models only.) The flow of suspension rollers. This noise... is normal and will only occur when the gas is operating, there may be some installations there may be a thumping or rolling sound when the dryer starts. Select desired...
Complete Owner's Guide (English)
Page 8
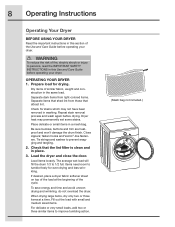
WARNING To reduce the risk of fire, electric shock or injury to persons, read the IMPORTANT SAFETY INSTRUCTIONS in washing. Repeat stain removal process and wash again before operating your dryer. Be sure buckles, buttons and trim are heatproof and won't damage the drum finish. Tie ...Load items loosely. Place delicate or small items in place. 3. Items need room to 1/2 full. 8 Operating Instructions Operating Your Dryer BEFORE USING YOUR DRYER Read the important instructions in the same load. Prepare load for even drying and less wrinkling. Dry items of the Use and Care...
WARNING To reduce the risk of fire, electric shock or injury to persons, read the IMPORTANT SAFETY INSTRUCTIONS in washing. Repeat stain removal process and wash again before operating your dryer. Be sure buckles, buttons and trim are heatproof and won't damage the drum finish. Tie ...Load items loosely. Place delicate or small items in place. 3. Items need room to 1/2 full. 8 Operating Instructions Operating Your Dryer BEFORE USING YOUR DRYER Read the important instructions in the same load. Prepare load for even drying and less wrinkling. Dry items of the Use and Care...
Complete Owner's Guide (English)
Page 9
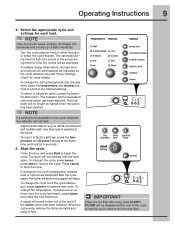
...begun, press pause and make the new selections. CLEAN FILTER will automatically be lighted when the option has been deleted. See the "Dryer Settings Chart" for the cycle selected, the indicator will be remembered and recalled each load. IMPORTANT Clean the lint filter after the ...cycle starts, the lights will blink and a signal will be displayed at the end of static electricity. Turn the cycle selector knob in the future. NOTE Over-drying can cause wrinkles, shrinkage, lint, harshness and a build up of ...
...begun, press pause and make the new selections. CLEAN FILTER will automatically be lighted when the option has been deleted. See the "Dryer Settings Chart" for the cycle selected, the indicator will be remembered and recalled each load. IMPORTANT Clean the lint filter after the ...cycle starts, the lights will blink and a signal will be displayed at the end of static electricity. Turn the cycle selector knob in the future. NOTE Over-drying can cause wrinkles, shrinkage, lint, harshness and a build up of ...
Complete Owner's Guide (English)
Page 10
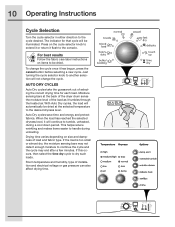
To change the cycle once it will automatically be dried at the back of the dryer drum sense the moisture level of selecting the correct drying time for that cycle will not change the cycle. Moisture sensing bars at the selected ... cycle and the cycle may end after a few minutes. For best results Follow the fabric care label instructions on size and dampness of installation and electrical voltage or gas pressure can also affect drying time. If this occurs, then select the time dry cycle to be illuminated. With Auto Dry cycles...
To change the cycle once it will automatically be dried at the back of the dryer drum sense the moisture level of selecting the correct drying time for that cycle will not change the cycle. Moisture sensing bars at the selected ... cycle and the cycle may end after a few minutes. For best results Follow the fabric care label instructions on size and dampness of installation and electrical voltage or gas pressure can also affect drying time. If this occurs, then select the time dry cycle to be illuminated. With Auto Dry cycles...
Complete Owner's Guide (English)
Page 12
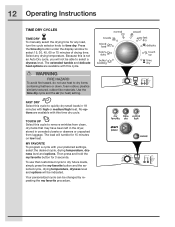
... select the drying time for any drying temperature. WARNING FIRE HAZARD To avoid fire hazard, do not use that may have been left in the dryer, stored in 18 minutes with this cycle to time dry. To use heat to select 15, 30, 45, 60 or 75 minutes of drying time...
... select the drying time for any drying temperature. WARNING FIRE HAZARD To avoid fire hazard, do not use that may have been left in the dryer, stored in 18 minutes with this cycle to time dry. To use heat to select 15, 30, 45, 60 or 75 minutes of drying time...
Complete Owner's Guide (English)
Page 16
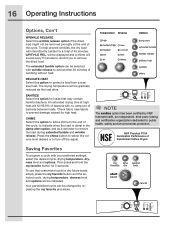
... the volume level desired or to public health, safety and environmental protection. Then press and hold the my favorite button for a total of Residential Clothes Dryers Saving Favorites To program a cycle with your preferred settings, select the desired cycle, drying temperature, dryness level and options. 16 Operating Instructions Options, Con't WRINKLE...
... the volume level desired or to public health, safety and environmental protection. Then press and hold the my favorite button for a total of Residential Clothes Dryers Saving Favorites To program a cycle with your preferred settings, select the desired cycle, drying temperature, dryness level and options. 16 Operating Instructions Options, Con't WRINKLE...
Complete Owner's Guide (English)
Page 17
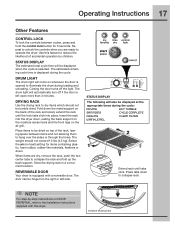
... between items and not allowing them to hang over the sides or through the holes. Use this dryer. Closing the door turns off if the door is opened to illuminate the drum during loading and unloading. REVERSIBLE DOOR Your... dryer is displayed during the cycle: DRYING EXT. Extend rack until the lock tabs click into the dryer drum, resting the back support on the moisture sensor bars and the front... the controls when you are dry, remove the rack, push the two center tabs to operate the dryer.
... between items and not allowing them to hang over the sides or through the holes. Use this dryer. Closing the door turns off if the door is opened to illuminate the drum during loading and unloading. REVERSIBLE DOOR Your... dryer is displayed during the cycle: DRYING EXT. Extend rack until the lock tabs click into the dryer drum, resting the back support on the moisture sensor bars and the front... the controls when you are dry, remove the rack, push the two center tabs to operate the dryer.

Complete Owner's Guide (English)
Page 18
Displayed cycle duration may differ slightly on default dryness level and factory settings for electric dryers. 18 Operating Instructions Dryer Settings Chart These Temperature, Dryness levels and Options are available with the following cycles: bulky/ heavy mixed towels normal casual fast delicate touch time bedding ...
Displayed cycle duration may differ slightly on default dryness level and factory settings for electric dryers. 18 Operating Instructions Dryer Settings Chart These Temperature, Dryness levels and Options are available with the following cycles: bulky/ heavy mixed towels normal casual fast delicate touch time bedding ...
Complete Owner's Guide (English)
Page 19
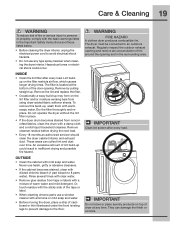
...clean the drum with the basic warnings listed in the Important Safety Instructions and those listed below. • Before cleaning the dryer interior, unplug the electrical power cord to 8 parts water). Remove cleanser residue before drying the next load. • Every 18 months an authorized ... residue from tape or labels with diluted chlorine bleach (1 part bleach to avoid electrical shock hazards. • Do not use any type spray cleanser when cleaning the dryer interior. WARNING FIRE HAZARD A clothes dryer produces combustible lint. To remove this build-up, wash them with mild soap...
...clean the drum with the basic warnings listed in the Important Safety Instructions and those listed below. • Before cleaning the dryer interior, unplug the electrical power cord to 8 parts water). Remove cleanser residue before drying the next load. • Every 18 months an authorized ... residue from tape or labels with diluted chlorine bleach (1 part bleach to avoid electrical shock hazards. • Do not use any type spray cleanser when cleaning the dryer interior. WARNING FIRE HAZARD A clothes dryer produces combustible lint. To remove this build-up, wash them with mild soap...
Complete Owner's Guide (English)
Page 20
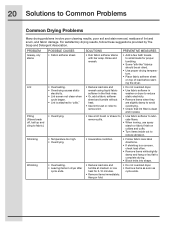
... break off, ball up and cling to fabric.) Shrinking Wrinkling POSSIBLE CAUSES • Fabric softener sheet. • Overloading. • Overdrying causes static electricity. • Lint screen not clean when cycle began. • Lint is a concern, check load often. • Remove items while slightly damp ... and tumble without heat. • Use lint brush or roller to remove lint. • Do not overload dryer. • Use fabric softener in washer or dryer to reduce static electricity. • Remove items when they are slightly damp to avoid overdrying. • Check that lint filter is ...
... break off, ball up and cling to fabric.) Shrinking Wrinkling POSSIBLE CAUSES • Fabric softener sheet. • Overloading. • Overdrying causes static electricity. • Lint screen not clean when cycle began. • Lint is a concern, check load often. • Remove items while slightly damp ... and tumble without heat. • Use lint brush or roller to remove lint. • Do not overload dryer. • Use fabric softener in washer or dryer to reduce static electricity. • Remove items when they are slightly damp to avoid overdrying. • Check that lint filter is ...
Complete Owner's Guide (English)
Page 21
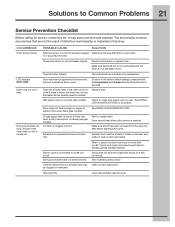
... is blown, the drum may be clogged or restricted. Use a dehumidifier near the dryer. POSSIBLE CAUSE SOLUTION Electrical power cord is restored. See INSTALLATION INSTRUCTIONS. Electric dryer is clogged with lint. Lint filter is connected to the factory default settings, press...in wall outlet. Make sure all lint has been removed from the dryer lint filter before starting each cycle. See "Operating Instructions." Make sure electrical line is not overloaded and the dryer is not open . Call authorized service person for procedure. To return...
... is blown, the drum may be clogged or restricted. Use a dehumidifier near the dryer. POSSIBLE CAUSE SOLUTION Electrical power cord is restored. See INSTALLATION INSTRUCTIONS. Electric dryer is clogged with lint. Lint filter is connected to the factory default settings, press...in wall outlet. Make sure all lint has been removed from the dryer lint filter before starting each cycle. See "Operating Instructions." Make sure electrical line is not overloaded and the dryer is not open . Call authorized service person for procedure. To return...
Complete Owner's Guide (English)
Page 22
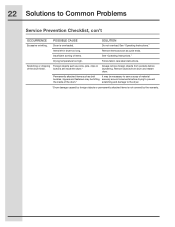
..., clips or of items. See "Operating Instructions." Remove objects from pockets before drying to prevent the inside the dryer.* Always remove foreign objects from drum and restart dryer. 22 Solutions to the dryer. *Drum damage caused by foreign objects or permanently attached items is overloaded. See "Operating Instructions." Follow fabric care... not overload. buttons are inside of the drum.* scratching and damage to Common Problems Service Prevention Checklist, con't OCCURRENCE Excessive wrinkling. POSSIBLE CAUSE Dryer is not covered by the warranty.
..., clips or of items. See "Operating Instructions." Remove objects from pockets before drying to prevent the inside the dryer.* Always remove foreign objects from drum and restart dryer. 22 Solutions to the dryer. *Drum damage caused by foreign objects or permanently attached items is overloaded. See "Operating Instructions." Follow fabric care... not overload. buttons are inside of the drum.* scratching and damage to Common Problems Service Prevention Checklist, con't OCCURRENCE Excessive wrinkling. POSSIBLE CAUSE Dryer is not covered by the warranty.
Wiring Diagram (All Languages)
Page 1
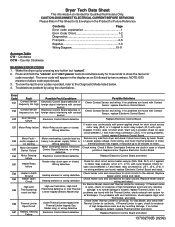
... Heater Open Circuit Check heater coils and connections for open circuit between L1 and motor relay connection (J3-2). If no Limiter tripped (Electric Model only) problems are found , replace Electronic Control Board and retest. If no failure code experienced. 3. E54 Motor Sensing failure ...30 minutes to its Envelope in the display as an E followed by pressing any load from dryer and check if drum turns freely by using the chart below . 4. For Electric Model, check Inlet Thermal Limiter for air blockages. Motor overheating; Check for short circuit across heater...
... Heater Open Circuit Check heater coils and connections for open circuit between L1 and motor relay connection (J3-2). If no Limiter tripped (Electric Model only) problems are found , replace Electronic Control Board and retest. If no failure code experienced. 3. E54 Motor Sensing failure ...30 minutes to its Envelope in the display as an E followed by pressing any load from dryer and check if drum turns freely by using the chart below . 4. For Electric Model, check Inlet Thermal Limiter for air blockages. Motor overheating; Check for short circuit across heater...
Wiring Diagram (All Languages)
Page 2
... hold the "Temperature" and "Dryness" buttons simultaneously for L1-N-L2 wired incorrectly. INSTALLATION CYCLE 1. Within 10 seconds after pressing "cancel", press any load from the dryer and press "start installation cycle. Upon entering Diagnostic Mode, all lights should be between 47K Ohm and 66K Ohm at terminal block for 6 seconds. Resistance...
... hold the "Temperature" and "Dryness" buttons simultaneously for L1-N-L2 wired incorrectly. INSTALLATION CYCLE 1. Within 10 seconds after pressing "cancel", press any load from the dryer and press "start installation cycle. Upon entering Diagnostic Mode, all lights should be between 47K Ohm and 66K Ohm at terminal block for 6 seconds. Resistance...
Product Specifications Sheet (English)
Page 1
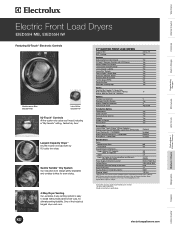
...Ft. Height (Without 15" Pedestal) 38" (With 15" Pedestal) 53" Width 27" Depth (to install without side panel knock-outs, for detailed installation instructions on the web at electroluxappliances.com. Specifications subject to Product Installation Guide for ultimate venting flexibility. Vent Hoods Dishwashers / Kitchen Cleanup Washers / Dryers...Dry Selections End-of the industry's longest dryer vent runs. 27" ELECTRIC FRONT LOAD DRYERS Capacity IEC NSF® Certified 8.0 Cu. Gentle Tumble™ Dry System Our exclusive dryer design gently separates and tumbles clothes for ...
...Ft. Height (Without 15" Pedestal) 38" (With 15" Pedestal) 53" Width 27" Depth (to install without side panel knock-outs, for detailed installation instructions on the web at electroluxappliances.com. Specifications subject to Product Installation Guide for ultimate venting flexibility. Vent Hoods Dishwashers / Kitchen Cleanup Washers / Dryers...Dry Selections End-of the industry's longest dryer vent runs. 27" ELECTRIC FRONT LOAD DRYERS Capacity IEC NSF® Certified 8.0 Cu. Gentle Tumble™ Dry System Our exclusive dryer design gently separates and tumbles clothes for ...
Product Specifications Sheet (English)
Page 2
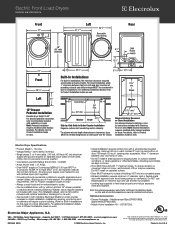
...on web.) • Can be considered in built-in the U.S.A. or 4-wire cable, 240 Volt, 60 Hertz AC only electrical supply with matching Electrolux Washer in specific applications and certain locales, requiring use shortest run possible. • Leveling legs supplied to Built-In Installations ...; 1-800-265-8352 • electroluxappliances.ca EIED55H 08/08 © 2008 Electrolux Home Products, Inc. Do NOT use flexible plastic or metal foil duct and use of door. Stacked Units in . Electric Front Load Dryers EIED55H MB, EIED55H IW Front 27" 31 1/2"* Left 50 5/8"* Reversible Door ...
...on web.) • Can be considered in built-in the U.S.A. or 4-wire cable, 240 Volt, 60 Hertz AC only electrical supply with matching Electrolux Washer in specific applications and certain locales, requiring use shortest run possible. • Leveling legs supplied to Built-In Installations ...; 1-800-265-8352 • electroluxappliances.ca EIED55H 08/08 © 2008 Electrolux Home Products, Inc. Do NOT use flexible plastic or metal foil duct and use of door. Stacked Units in . Electric Front Load Dryers EIED55H MB, EIED55H IW Front 27" 31 1/2"* Left 50 5/8"* Reversible Door ...


