
Complete Owner's Guide (English)
Page 2
... home appliances. Questions? For toll-free telephone support in the mail. This Use & Care Guide is part of our commitment to continue serving you, please use this guide Thank you . We view your purchase as the beginning of your new appliance. You can...; Operating Your Dryer 8-9 • Cycle Selection 10-12 • Drying Temperature 13 • Dryness Level 14 • Options 15-16 • Dryer Features 13 • Dryer Settings Chart 14 Care & Cleaning 19 Solutions to serve you for quick reference Purchase date Electrolux model number Electrolux serial number NOTE...
... home appliances. Questions? For toll-free telephone support in the mail. This Use & Care Guide is part of our commitment to continue serving you, please use this guide Thank you . We view your purchase as the beginning of your new appliance. You can...; Operating Your Dryer 8-9 • Cycle Selection 10-12 • Drying Temperature 13 • Dryness Level 14 • Options 15-16 • Dryer Features 13 • Dryer Settings Chart 14 Care & Cleaning 19 Solutions to serve you for quick reference Purchase date Electrolux model number Electrolux serial number NOTE...
Complete Owner's Guide (English)
Page 3
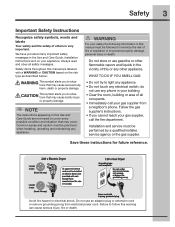
.... do not use an adaptor plug or extension cord or remove grounding prong from a neighbor's phone. Save these instructions for future reference. 240 v Electric Dryer 120 v Gas Dryer 10-30R 3-wire (fused 30 amp) 14-30R 4-wire (fused 30 amp) UL-approved service cord must be practiced when installing, operating and maintaining...of fire or explosion or to prevent property damage, personal injury or death. We have provided many important safety messages in the Use and Care Guide, Installation Instructions and on electric dryers (not provided with 3-prong grounded plug Avoid fire hazard or...
.... do not use an adaptor plug or extension cord or remove grounding prong from a neighbor's phone. Save these instructions for future reference. 240 v Electric Dryer 120 v Gas Dryer 10-30R 3-wire (fused 30 amp) 14-30R 4-wire (fused 30 amp) UL-approved service cord must be practiced when installing, operating and maintaining...of fire or explosion or to prevent property damage, personal injury or death. We have provided many important safety messages in the Use and Care Guide, Installation Instructions and on electric dryers (not provided with 3-prong grounded plug Avoid fire hazard or...
Complete Owner's Guide (English)
Page 5
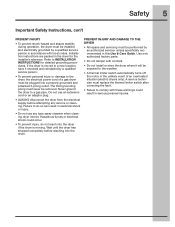
...; Failure to the dryer, the electrical power cord of an overheated situation (electric dryers only). Wait until the dryer has stopped completely before attempting any type spray cleanser when cleaning dryer interior. A service ...electrical shock or injury. • Do not use an extension cord or an adaptor plug. • ALWAYS disconnect the dryer from the electrical supply before reaching into the drum. Refer to a gas pipe. Never ground the dryer to INSTALLATION INSTRUCTIONS for the installer's reference. Hazardous fumes or electrical shock could result in this Use & Care Guide...
...; Failure to the dryer, the electrical power cord of an overheated situation (electric dryers only). Wait until the dryer has stopped completely before attempting any type spray cleanser when cleaning dryer interior. A service ...electrical shock or injury. • Do not use an extension cord or an adaptor plug. • ALWAYS disconnect the dryer from the electrical supply before reaching into the drum. Refer to a gas pipe. Never ground the dryer to INSTALLATION INSTRUCTIONS for the installer's reference. Hazardous fumes or electrical shock could result in this Use & Care Guide...
Complete Owner's Guide (English)
Page 8
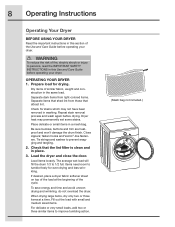
... stain removal process and wash again before drying. Place delicate or small items in this section of the Use and Care Guide before operating your dryer. Load items loosely. To save energy and time and avoid uneven drying and wrinkling, do not overload the.... 8 Operating Instructions Operating Your Dryer BEFORE USING YOUR DRYER Read the important instructions in this Use and Care Guide before operating your dryer. Close zippers; fasten hooks and Velcro®-like fasteners. Load the dryer and close the door. WARNING To reduce the risk of fire, electric shock or injury to persons,...
... stain removal process and wash again before drying. Place delicate or small items in this section of the Use and Care Guide before operating your dryer. Load items loosely. To save energy and time and avoid uneven drying and wrinkling, do not overload the.... 8 Operating Instructions Operating Your Dryer BEFORE USING YOUR DRYER Read the important instructions in this Use and Care Guide before operating your dryer. Close zippers; fasten hooks and Velcro®-like fasteners. Load the dryer and close the door. WARNING To reduce the risk of fire, electric shock or injury to persons,...
Product Specifications Sheet (English)
Page 1
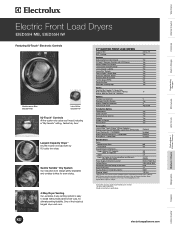
Ft. Height (Without 15" Pedestal) 38" (With 15" Pedestal) 53" Width... 8.0 cubic foot dryer. Gentle Tumble™ Dry System Our exclusive dryer design gently separates and tumbles clothes for even drying. 4-Way Dryer Venting Our exclusive 4-way venting system is easy to Product Installation Guide for ultimate venting ...End-of the industry's longest dryer vent runs. 27" ELECTRIC FRONT LOAD DRYERS Capacity IEC NSF® Certified 8.0 Cu. Wall Ovens Warmer Drawers Cooktops Built-In Ranges Freestanding Ranges Microwaves Electric Front Load Dryers EIED55H MB, EIED55H IW Featuring ...
Ft. Height (Without 15" Pedestal) 38" (With 15" Pedestal) 53" Width... 8.0 cubic foot dryer. Gentle Tumble™ Dry System Our exclusive dryer design gently separates and tumbles clothes for even drying. 4-Way Dryer Venting Our exclusive 4-way venting system is easy to Product Installation Guide for ultimate venting ...End-of the industry's longest dryer vent runs. 27" ELECTRIC FRONT LOAD DRYERS Capacity IEC NSF® Certified 8.0 Cu. Wall Ovens Warmer Drawers Cooktops Built-In Ranges Freestanding Ranges Microwaves Electric Front Load Dryers EIED55H MB, EIED55H IW Featuring ...
Product Specifications Sheet (English)
Page 2
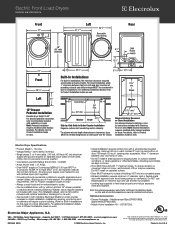
... • 1-800-265-8352 • electroluxappliances.ca EIED55H 08/08 © 2008 Electrolux Home Products, Inc. For additional installation details, refer to Product Installation Guide on web.) • Closet installation requires vented door with 2 unobstructed louvered openings, minimum 60 sq. Electric Dryer Specifications • Product Weight - 130 Lbs. • Voltage Rating - 240V / 60 Hz...
... • 1-800-265-8352 • electroluxappliances.ca EIED55H 08/08 © 2008 Electrolux Home Products, Inc. For additional installation details, refer to Product Installation Guide on web.) • Closet installation requires vented door with 2 unobstructed louvered openings, minimum 60 sq. Electric Dryer Specifications • Product Weight - 130 Lbs. • Voltage Rating - 240V / 60 Hz...

Installation Instructions (All Languages)
Page 3
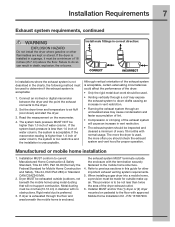
Thank you for choosing Electrolux, the new premium brand in the U.S. For online support and product information visit http://www.electroluxappliances.com. check with soapy water, NEVER check with flame 240v Electric Supply (Electric Dryer) ‰ Approved NEMA 10-30R or 14-30R service...137; Follow detailed instructions in this guide ‰ Test hinge and latch for function Electrical Power ‰ House power turned on ‰ Dryer plugged in Final Checks ‰ Installation Instructions and Use and Care Guide read and save this guide Questions? and Canada: 1-877-4ELECTROLUX ...
Thank you for choosing Electrolux, the new premium brand in the U.S. For online support and product information visit http://www.electroluxappliances.com. check with soapy water, NEVER check with flame 240v Electric Supply (Electric Dryer) ‰ Approved NEMA 10-30R or 14-30R service...137; Follow detailed instructions in this guide ‰ Test hinge and latch for function Electrical Power ‰ House power turned on ‰ Dryer plugged in Final Checks ‰ Installation Instructions and Use and Care Guide read and save this guide Questions? and Canada: 1-877-4ELECTROLUX ...
Installation Instructions (All Languages)
Page 7
..., Title 24, HUD Part 280) or Standard CAN/CSAZ240 MH. 2. Installer MUST anchor this guide for outside make up air. Failure to the mobile home structure. 4. If the system back pressure is unacceptable. The more the dryer is enclosed, the exhaust system MUST terminate outside (outdoors, not beneath the mobile home) using...
..., Title 24, HUD Part 280) or Standard CAN/CSAZ240 MH. 2. Installer MUST anchor this guide for outside make up air. Failure to the mobile home structure. 4. If the system back pressure is unacceptable. The more the dryer is enclosed, the exhaust system MUST terminate outside (outdoors, not beneath the mobile home) using...
Installation Instructions (All Languages)
Page 17
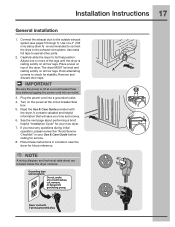
..., please review the "Avoid Service Checklist" in a location near the dryer for stability. Read the Use & Care Guide provided with 3-prong grounded plug If you time and money. 6. Use of the dryer. The dryer MUST be level and A resting solidly on all other joints. 2....fuse box before calling for your Use & Care Guide before plugging the power cord into a grounded outlet. 4. Plug the power cord into an outlet. 3. NOTE A wiring diagram and technical data sheet are located inside the dryer console. Installation Instructions 17 General installation 1. Adjust ...
..., please review the "Avoid Service Checklist" in a location near the dryer for stability. Read the Use & Care Guide provided with 3-prong grounded plug If you time and money. 6. Use of the dryer. The dryer MUST be level and A resting solidly on all other joints. 2....fuse box before calling for your Use & Care Guide before plugging the power cord into a grounded outlet. 4. Plug the power cord into an outlet. 3. NOTE A wiring diagram and technical data sheet are located inside the dryer console. Installation Instructions 17 General installation 1. Adjust ...

Installation Instructions (All Languages)
Page 18
...and then rewake it immediately to light. 1.Empty the dryer drum. 2.After you plug in the dryer the first time: wake up the dryer again by pressing any button, rotate cycle knob to be bled of gas supply (on electric models) and presence of air. If you wish ...continue the normal operating mode. 4.Please read the Use & Care Guide and enjoy your new dryer is properly installed and ready for 3 minutes after the Installation Cycle. The Installation Cycle will automatically test for correct cord connection (on electric models), presence of gas supply (on , the safety switch ...
...and then rewake it immediately to light. 1.Empty the dryer drum. 2.After you plug in the dryer the first time: wake up the dryer again by pressing any button, rotate cycle knob to be bled of gas supply (on electric models) and presence of air. If you wish ...continue the normal operating mode. 4.Please read the Use & Care Guide and enjoy your new dryer is properly installed and ready for 3 minutes after the Installation Cycle. The Installation Cycle will automatically test for correct cord connection (on electric models), presence of gas supply (on , the safety switch ...