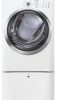

Complete Owner's Guide (English)
Page 2
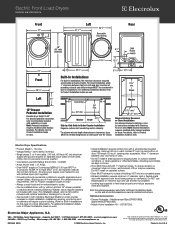
... telephone support in the mail. To ensure our ability to continue serving you for quick reference Purchase date Electrolux model number Electrolux serial number NOTE Registering your product with Electrolux enhances our ability to serve you. We view your purchase as the beginning of your Product Registration Card in...; Cycle Selection 10-12 • Drying Temperature 13 • Dryness Level 14 • Options 15-16 • Dryer Features 13 • Dryer Settings Chart 14 Care & Cleaning 19 Solutions to Common Problems 20-21 • Common Drying Problems 20 • Service...
... telephone support in the mail. To ensure our ability to continue serving you for quick reference Purchase date Electrolux model number Electrolux serial number NOTE Registering your product with Electrolux enhances our ability to serve you. We view your purchase as the beginning of your Product Registration Card in...; Cycle Selection 10-12 • Drying Temperature 13 • Dryness Level 14 • Options 15-16 • Dryer Features 13 • Dryer Settings Chart 14 Care & Cleaning 19 Solutions to Common Problems 20-21 • Common Drying Problems 20 • Service...
Complete Owner's Guide (English)
Page 7
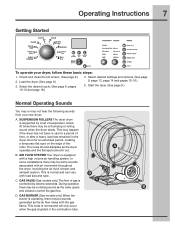
...heavy load has remained in the combustion tube. Check and clean the lint screen. (See page 9.) 2. GAS BURNER (Gas models only.) When the burner is ignited in the dryer drum for an extended period, creating a temporary flat spot on the edge of gas is normal and can vary D with ...may be some installations there may happen if the dryer has not been in use for a period of suspension rollers. This may be a thumping or rolling sound when the dryer starts. AIR FLOW SYSTEM Your dryer is supported by electric solenoids. Start the dryer. (See page 9.) Normal Operating Sounds You may...
...heavy load has remained in the combustion tube. Check and clean the lint screen. (See page 9.) 2. GAS BURNER (Gas models only.) When the burner is ignited in the dryer drum for an extended period, creating a temporary flat spot on the edge of gas is normal and can vary D with ...may be some installations there may happen if the dryer has not been in use for a period of suspension rollers. This may be a thumping or rolling sound when the dryer starts. AIR FLOW SYSTEM Your dryer is supported by electric solenoids. Start the dryer. (See page 9.) Normal Operating Sounds You may...

Complete Owner's Guide (English)
Page 18
Displayed cycle duration may differ slightly on default dryness level and factory settings for electric dryers. 18 Operating Instructions Dryer Settings Chart These Temperature, Dryness levels and Options are available with the following cycles: bulky/ heavy mixed towels normal casual fast delicate touch time bedding ...; chime * Factory presets Available selections **Estimated cycle duration is based on gas models.
Displayed cycle duration may differ slightly on default dryness level and factory settings for electric dryers. 18 Operating Instructions Dryer Settings Chart These Temperature, Dryness levels and Options are available with the following cycles: bulky/ heavy mixed towels normal casual fast delicate touch time bedding ...; chime * Factory presets Available selections **Estimated cycle duration is based on gas models.
Complete Owner's Guide (English)
Page 21
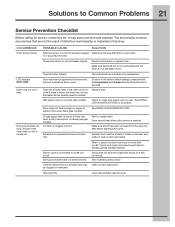
...INSTALLATION INSTRUCTIONS for replacement. Drying time will not operate. (electric models) Gas supply valve is blown, the drum may be clogged or restricted. Clean out any obstruction. Call authorized service person for procedure. Dryer does not have no more than drying on a separate...fuse blown or circuit breaker tripped. High humidity. Make sure electrical line is not overloaded and the dryer is open (gas models). Drying cycle takes too long, outside of natural gas (gas models). To return to Common Problems 21 Service Prevention Checklist Before ...
...INSTALLATION INSTRUCTIONS for replacement. Drying time will not operate. (electric models) Gas supply valve is blown, the drum may be clogged or restricted. Clean out any obstruction. Call authorized service person for procedure. Dryer does not have no more than drying on a separate...fuse blown or circuit breaker tripped. High humidity. Make sure electrical line is not overloaded and the dryer is open (gas models). Drying cycle takes too long, outside of natural gas (gas models). To return to Common Problems 21 Service Prevention Checklist Before ...
Wiring Diagram (All Languages)
Page 1
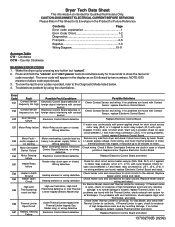
...evidence of high temperature event and any resulting damage. E64 Heater Open Circuit Check heater coils and connections for continuity. For Electric Model, check Inlet Thermal Limiter for open circuit between L1 and motor relay connection (J3-2). Clockwise CCW - Counter Clockwise READING... and retest. If Thermal Limiter High Limit High vent restriction, High Limit is evident, replace Thermal Limiter and retest. Dryer Tech Data Sheet This information is evident, replace Thermal Limiter. If no problems with Contact Sensor, replace Electronic Control Board...
...evidence of high temperature event and any resulting damage. E64 Heater Open Circuit Check heater coils and connections for continuity. For Electric Model, check Inlet Thermal Limiter for open circuit between L1 and motor relay connection (J3-2). Clockwise CCW - Counter Clockwise READING... and retest. If Thermal Limiter High Limit High vent restriction, High Limit is evident, replace Thermal Limiter and retest. Dryer Tech Data Sheet This information is evident, replace Thermal Limiter. If no problems with Contact Sensor, replace Electronic Control Board...
Product Specifications Sheet (English)
Page 2
...electrical supply with clothes dryers (not supplied). • Grounding through neutral link prohibited in specific applications and certain locales, requiring use shortest run possible. • Leveling legs supplied to change specifications or discontinue models without optional 15" drawer pedestal, or stacked above matching Electrolux... Washer, which requires stacking kit included with dryer. (For installation details, refer to instructions ...
...electrical supply with clothes dryers (not supplied). • Grounding through neutral link prohibited in specific applications and certain locales, requiring use shortest run possible. • Leveling legs supplied to change specifications or discontinue models without optional 15" drawer pedestal, or stacked above matching Electrolux... Washer, which requires stacking kit included with dryer. (For installation details, refer to instructions ...
Installation Instructions (All Languages)
Page 9
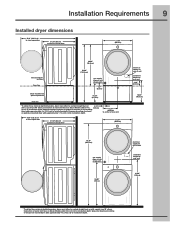
...(192.5cm) gas supply pipe on rear of gas unit 39.00" (99cm) electrical supply on rear of unit centerline height for rear vent 41.00" (104cm) * To obtain these minimal depth dimensions, dryer must either be vented straight back or with a quick-turn 90° elbow. ...Installation Requirements 9 Installed dryer dimensions 50.6" (128.5cm)* to clear open door 31.50" (80cm)* to installation depth. Connection of water inlet hose on Steam Models adds 3/4 in . (9.5cm) (2 cm) to installation depth. Connection of water...
...(192.5cm) gas supply pipe on rear of gas unit 39.00" (99cm) electrical supply on rear of unit centerline height for rear vent 41.00" (104cm) * To obtain these minimal depth dimensions, dryer must either be vented straight back or with a quick-turn 90° elbow. ...Installation Requirements 9 Installed dryer dimensions 50.6" (128.5cm)* to clear open door 31.50" (80cm)* to installation depth. Connection of water inlet hose on Steam Models adds 3/4 in . (9.5cm) (2 cm) to installation depth. Connection of water...
Installation Instructions (All Languages)
Page 15
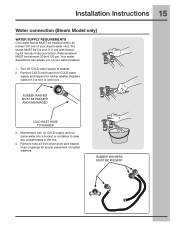
... in the line. 4. Your water department can advise you of rubber washers. Remove COLD inlet hose from dryer drum and inspect hose couplings for proper placement of your dryer's water inlet. Momentarily turn on COLD supply and run some water into a bucket or container to washer,... 2. Remove hose kit from COLD water supply and inspect for laundry hose connection. Installation Instructions 15 Water connection (Steam Model only) WATER SUPPLY ...
... in the line. 4. Your water department can advise you of rubber washers. Remove COLD inlet hose from dryer drum and inspect hose couplings for proper placement of your dryer's water inlet. Momentarily turn on COLD supply and run some water into a bucket or container to washer,... 2. Remove hose kit from COLD water supply and inspect for laundry hose connection. Installation Instructions 15 Water connection (Steam Model only) WATER SUPPLY ...
Installation Instructions (All Languages)
Page 16
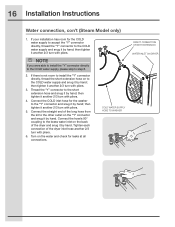
...and snug it by hand. If there is not room to install the "Y" connector directly, thread the short extension hose on the back of the dryer and snug it another 2/3 turn with pliers. 4. Connect the hose's 90° coupling to the brass water inlet on to the short extension hose..., thread the "Y" connector to the other outlet on the water and check for leaks at all connections. 16 Installation Instructions Water connection, con't (Steam Model only) 1. If your installation has room for the washer to step 8. 2. Tighten each connection of the long hose from the kit to the COLD ...
...and snug it by hand. If there is not room to install the "Y" connector directly, thread the short extension hose on the back of the dryer and snug it another 2/3 turn with pliers. 4. Connect the hose's 90° coupling to the brass water inlet on to the short extension hose..., thread the "Y" connector to the other outlet on the water and check for leaks at all connections. 16 Installation Instructions Water connection, con't (Steam Model only) 1. If your installation has room for the washer to step 8. 2. Tighten each connection of the long hose from the kit to the COLD ...

Installation Instructions (All Languages)
Page 18
... making another attempt to sleep and then rewake it up the dryer by pressing any button, then immediately and simultaneously press and hold both the sanitize and my favorite buttons for correct cord connection (on electric models), presence of gas supply (on electric models) and presence of cycle completion. Press the start button and then...
... making another attempt to sleep and then rewake it up the dryer by pressing any button, then immediately and simultaneously press and hold both the sanitize and my favorite buttons for correct cord connection (on electric models), presence of gas supply (on electric models) and presence of cycle completion. Press the start button and then...
Installation Instructions (All Languages)
Page 24
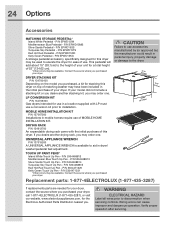
... DRYING RACK P/N 134912700 An expandable drying rack came with LP must use a conversion kit prior to elevate the dryer for this dryer may be available. WARNING ELECTRICAL HAZARD Label all wires prior to aid in mobile homes require use . P/N EPWD15MB Silver Sands Pedestal - This... purchase of this dryer on the model you . Contact the source where you purchased your dryer, call 1-877-4ELECTROLUX (1-877-435-3287), or visit our website, www.electroluxappliances.com, for the Electrolux Authorized Parts Distributor nearest you purchased, a kit for your dryer, contact the source...
... DRYING RACK P/N 134912700 An expandable drying rack came with LP must use a conversion kit prior to elevate the dryer for this dryer may be available. WARNING ELECTRICAL HAZARD Label all wires prior to aid in mobile homes require use . P/N EPWD15MB Silver Sands Pedestal - This... purchase of this dryer on the model you . Contact the source where you purchased your dryer, call 1-877-4ELECTROLUX (1-877-435-3287), or visit our website, www.electroluxappliances.com, for the Electrolux Authorized Parts Distributor nearest you purchased, a kit for your dryer, contact the source...


