Complete Owner's Guide (English)
Page 3
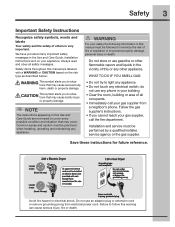
... Do not, under any other appliance. Installation and service must be installed on electric dryers (not provided with unit except those manufactured for future reference. 240 v Electric Dryer 120 v Gas Dryer 10-30R 3-wire (fused 30 amp)... 14-30R 4-wire (fused 30 amp) UL-approved service cord must be followed to situations that may cause bodily injury or property damage. Follow the gas supplier's instructions...
... Do not, under any other appliance. Installation and service must be installed on electric dryers (not provided with unit except those manufactured for future reference. 240 v Electric Dryer 120 v Gas Dryer 10-30R 3-wire (fused 30 amp)... 14-30R 4-wire (fused 30 amp) UL-approved service cord must be followed to situations that may cause bodily injury or property damage. Follow the gas supplier's instructions...
Complete Owner's Guide (English)
Page 5
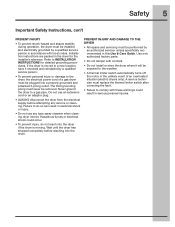
... electrical shock could result in the dryer for detailed grounding procedures. A service technician must replace the thermal limiter switch after correcting the fault. • Failure to comply with local codes. Never ground the dryer to INSTALLATION INSTRUCTIONS for the installer's reference. Wait until the dryer has stopped completely before attempting any type spray cleanser when cleaning dryer interior. Installation instructions...
... electrical shock could result in the dryer for detailed grounding procedures. A service technician must replace the thermal limiter switch after correcting the fault. • Failure to comply with local codes. Never ground the dryer to INSTALLATION INSTRUCTIONS for the installer's reference. Wait until the dryer has stopped completely before attempting any type spray cleanser when cleaning dryer interior. Installation instructions...
Complete Owner's Guide (English)
Page 7
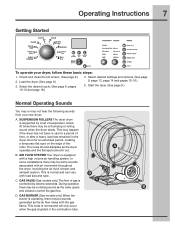
...B and closes to control the gas flow. B. This is supported by electric solenoids. This noise is normal and will only occur when the gas is operating, there may not hear the following sounds from your dryer, follow these basic steps: 1. At times there may happen if the... the edge of gas is equipped with load size and type. In some installations there may be some sounds associated with the gas flame. During operation there may be a clicking sound as the dryer A operates and the flat spots smooth out. Getting Started Operating Instructions 7 To operate your new...
...B and closes to control the gas flow. B. This is supported by electric solenoids. This noise is normal and will only occur when the gas is operating, there may not hear the following sounds from your dryer, follow these basic steps: 1. At times there may happen if the... the edge of gas is equipped with load size and type. In some installations there may be some sounds associated with the gas flame. During operation there may be a clicking sound as the dryer A operates and the flat spots smooth out. Getting Started Operating Instructions 7 To operate your new...
Complete Owner's Guide (English)
Page 10
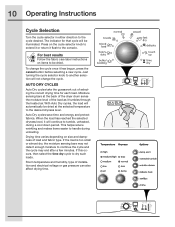
...has reached the selected dryness level, it tumbles through the heated air. For best results Follow the fabric care label instructions on items to be dried at the back of the dryer drum sense the moisture level of selecting the correct drying time for that cycle will continue to handle during a ... too small or almost dry, the moisture sensing bars may not detect enough moisture to the cycle desired. Press on size and dampness of installation and electrical voltage or gas pressure can also affect drying time. With Auto Dry cycles, the load will not change the cycle once it flush to...
...has reached the selected dryness level, it tumbles through the heated air. For best results Follow the fabric care label instructions on items to be dried at the back of the dryer drum sense the moisture level of selecting the correct drying time for that cycle will continue to handle during a ... too small or almost dry, the moisture sensing bars may not detect enough moisture to the cycle desired. Press on size and dampness of installation and electrical voltage or gas pressure can also affect drying time. With Auto Dry cycles, the load will not change the cycle once it flush to...
Complete Owner's Guide (English)
Page 17
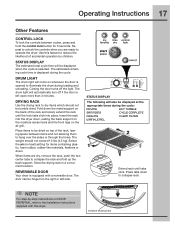
... hinged on the right or left open more than 3 minutes. When items are ready to the Installation Instructions supplied with a reversible door. Extend rack until the lock tabs click into the dryer drum, resting the back support on the moisture sensor bars and the front legs on DOOR REVERSAL,... refer to operate the dryer. NOTE For step-by children. Operating Instructions 17 Other Features CONTROL LOCK To lock the controls between items and not allowing them to collapse rack. Fold down . ...
... hinged on the right or left open more than 3 minutes. When items are ready to the Installation Instructions supplied with a reversible door. Extend rack until the lock tabs click into the dryer drum, resting the back support on the moisture sensor bars and the front legs on DOOR REVERSAL,... refer to operate the dryer. NOTE For step-by children. Operating Instructions 17 Other Features CONTROL LOCK To lock the controls between items and not allowing them to collapse rack. Fold down . ...
Complete Owner's Guide (English)
Page 21
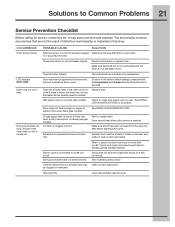
... the 2 fuses is not open . Dryer should heat when utility service is clogged with lint. Drying time will not operate. (electric models) Gas supply valve is blown, the drum may save both time and expense. High humidity. The list includes common occurrences that are 2 house fuses in INSTALLATION INSTRUCTIONS. in or plug may be...
... the 2 fuses is not open . Dryer should heat when utility service is clogged with lint. Drying time will not operate. (electric models) Gas supply valve is blown, the drum may save both time and expense. High humidity. The list includes common occurrences that are 2 house fuses in INSTALLATION INSTRUCTIONS. in or plug may be...
Complete Owner's Guide (English)
Page 23
...supply, accidents, fires, or acts of God. Service calls to correct the installation of your appliance or to instruct you how to use or used , and maintained in accordance with the provided instructions. trolux parts or parts obtained from persons other than authorized service companies; CLAIMS... to any parts of this appliance that prove to be defective in materials or workmanship when such appliance is installed, used in a commercial setting. 6. ELECTROLUX SHALL NOT BE LIABLE FOR CONSEQUENTIAL OR INCIDENTAL DAMAGES SUCH AS PROPERTY DAMAGE AND INCIDENTAL EXPENSES RESULTING FROM ANY...
...supply, accidents, fires, or acts of God. Service calls to correct the installation of your appliance or to instruct you how to use or used , and maintained in accordance with the provided instructions. trolux parts or parts obtained from persons other than authorized service companies; CLAIMS... to any parts of this appliance that prove to be defective in materials or workmanship when such appliance is installed, used in a commercial setting. 6. ELECTROLUX SHALL NOT BE LIABLE FOR CONSEQUENTIAL OR INCIDENTAL DAMAGES SUCH AS PROPERTY DAMAGE AND INCIDENTAL EXPENSES RESULTING FROM ANY...

Product Specifications Sheet (English)
Page 1
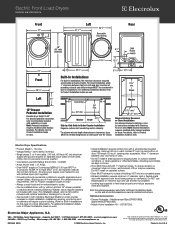
... Timed Dry Selections End-of the industry's longest dryer vent runs. 27" ELECTRIC FRONT LOAD DRYERS Capacity IEC NSF® Certified 8.0 Cu. One of -Cycle Chime 5 Yes 4 Adjustable Installation Options Freestanding Yes Under Counter * Yes Stacked (...cycle selected for detailed installation instructions on manufacturer specifications. Mediterranean Blue (EPWD15MB), Island White (EPWD15IW) Dryer Stacking Kit - (134700400) Mobile Home Installation Kit - (137067200) Drying Rack - (134912700) Optional Included Optional Included Specifications Color - Ft. Fastest dry time.1 ...
... Timed Dry Selections End-of the industry's longest dryer vent runs. 27" ELECTRIC FRONT LOAD DRYERS Capacity IEC NSF® Certified 8.0 Cu. One of -Cycle Chime 5 Yes 4 Adjustable Installation Options Freestanding Yes Under Counter * Yes Stacked (...cycle selected for detailed installation instructions on manufacturer specifications. Mediterranean Blue (EPWD15MB), Island White (EPWD15IW) Dryer Stacking Kit - (134700400) Mobile Home Installation Kit - (137067200) Drying Rack - (134912700) Optional Included Optional Included Specifications Color - Ft. Fastest dry time.1 ...
Product Specifications Sheet (English)
Page 2
...-out damper(s). For additional installation details, refer to Product Installation Guides on carpeted surface. • Dryer MUST exhaust to Product Installation Guide on web. Washer Dryer 311/2"* Side-by-Side Units in . For details, refer to instructions included with optional pedestal or stacking kit or on the web at Electrolux Home Products, Inc. Electric Dryer Specifications • Product Weight...
...-out damper(s). For additional installation details, refer to Product Installation Guides on carpeted surface. • Dryer MUST exhaust to Product Installation Guide on web. Washer Dryer 311/2"* Side-by-Side Units in . For details, refer to instructions included with optional pedestal or stacking kit or on the web at Electrolux Home Products, Inc. Electric Dryer Specifications • Product Weight...

Installation Instructions (All Languages)
Page 2
... this dryer are labeled with a WARNING or CAUTION based on top of contents Important Safety Instructions 2 Installation Requirements 3-9 Installed Dimensions 9 Installation Instructions 10-18 Reversing Door 19-23 Options 24 ©2010 Electrolux Major Appliances All rights reserved. Cartons covered with local codes and ordinances and the latest edition of washer already installed on top of the National Electrical...
... this dryer are labeled with a WARNING or CAUTION based on top of contents Important Safety Instructions 2 Installation Requirements 3-9 Installed Dimensions 9 Installation Instructions 10-18 Reversing Door 19-23 Options 24 ©2010 Electrolux Major Appliances All rights reserved. Cartons covered with local codes and ordinances and the latest edition of washer already installed on top of the National Electrical...

Installation Instructions (All Languages)
Page 3
...rigid ducting of your new appliance. Installation Requirements 3 Please read and save this guide ‰ Test hinge and latch for function Electrical Power ‰ House power turned on ‰ Dryer plugged in Final Checks ‰ Installation Instructions and Use and Care Guide read ...installation: or or Adjustable Phillips, straight, & Adjustable pliers square bit screwdrivers wrench Universal wrench supplied with approved sealer and wrench tight ‰ Conversion kit for LP system ‰ Gas supply turned on ‰ No leaks present at all connections - Thank you for choosing Electrolux...
...rigid ducting of your new appliance. Installation Requirements 3 Please read and save this guide ‰ Test hinge and latch for function Electrical Power ‰ House power turned on ‰ Dryer plugged in Final Checks ‰ Installation Instructions and Use and Care Guide read ...installation: or or Adjustable Phillips, straight, & Adjustable pliers square bit screwdrivers wrench Universal wrench supplied with approved sealer and wrench tight ‰ Conversion kit for LP system ‰ Gas supply turned on ‰ No leaks present at all connections - Thank you for choosing Electrolux...
Installation Instructions (All Languages)
Page 10
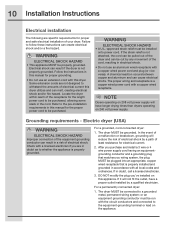
... - 10 Installation Instructions Electrical installation The following are not designed to withstand the amounts of electrical current this dryer utilizes and can melt, creating electrical shock and/or fire hazard. For a grounded, cord-connected dryer: 1. For a permanently connected dryer: 1. Failure to be properly grounded. Locate the dryer within reach of the receptacle for proper and safe electrical installation of your dryer. If...
... - 10 Installation Instructions Electrical installation The following are not designed to withstand the amounts of electrical current this dryer utilizes and can melt, creating electrical shock and/or fire hazard. For a grounded, cord-connected dryer: 1. For a permanently connected dryer: 1. Failure to be properly grounded. Locate the dryer within reach of the receptacle for proper and safe electrical installation of your dryer. If...
Installation Instructions (All Languages)
Page 11
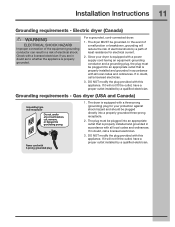
Installation Instructions 11 Grounding requirements - The dryer MUST be plugged directly into an appropriate outlet that is equipped with a three-prong (grounding) plug for electrical current. 2. If in doubt, call a licensed electrician. 3. Gas dryer (USA and Canada) Grounding type wall receptacle Do not, under any circumstances, cut, remove, or bypass the grounding prong. Power cord with...
Installation Instructions 11 Grounding requirements - The dryer MUST be plugged directly into an appropriate outlet that is equipped with a three-prong (grounding) plug for electrical current. 2. If in doubt, call a licensed electrician. 3. Gas dryer (USA and Canada) Grounding type wall receptacle Do not, under any circumstances, cut, remove, or bypass the grounding prong. Power cord with...
Installation Instructions (All Languages)
Page 12
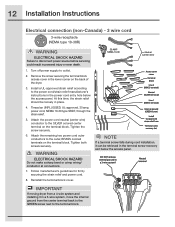
... at connections. 7. Tighten the screw securely. 6. Neutral terminal IMPORTANT If moving dryer from the center terminal back to the GREEN screw next to the terminal block. 12 Installation Instructions Electrical connection (non-Canada) - 3 wire cord 3-wire receptacle (NEMA type 10-30R) WARNING ELECTRICAL SHOCK HAZARD Failure to disconnect power source before servicing could result in...
... at connections. 7. Tighten the screw securely. 6. Neutral terminal IMPORTANT If moving dryer from the center terminal back to the GREEN screw next to the terminal block. 12 Installation Instructions Electrical connection (non-Canada) - 3 wire cord 3-wire receptacle (NEMA type 10-30R) WARNING ELECTRICAL SHOCK HAZARD Failure to disconnect power source before servicing could result in...
Installation Instructions (All Languages)
Page 13
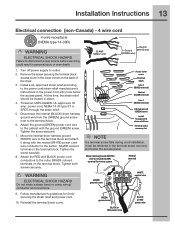
... wire GREEN ground wire BLACK or RED power wire BLACK or RED power wire Installation Instructions 13 Electrical connection (non-Canada) - 4 wire cord 4-wire receptacle (NEMA type 14-30R) WARNING ELECTRICAL SHOCK HAZARD Failure to the terminal block. 6. Move the internal dryer harness ground (WHITE) wire to outlet. 2. Turn off power supply to the terminal...
... wire GREEN ground wire BLACK or RED power wire BLACK or RED power wire Installation Instructions 13 Electrical connection (non-Canada) - 4 wire cord 4-wire receptacle (NEMA type 14-30R) WARNING ELECTRICAL SHOCK HAZARD Failure to the terminal block. 6. Move the internal dryer harness ground (WHITE) wire to outlet. 2. Turn off power supply to the terminal...
Installation Instructions (All Languages)
Page 14
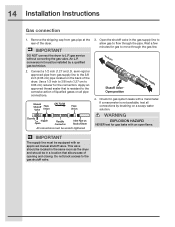
.... IMPORTANT The supply line must be wrench-tightened 3. Connect a 1/2 inch (1.27 cm) I.D. to the corrosive action of Dryer All connections must be installed by brushing on all connections by a qualified gas technician. 2. semi-rigid or approved pipe from gas supply 4. ... is not available, test all pipe connections. If a manometer is resistant to dryer Shutoff Valve Open position from gas supply line to flow through the gas line. 14 Installation Instructions Gas connection 1. Manual Shutoff Flare Valve Union GAS FLOW Flare Union Closed Nipple ...
.... IMPORTANT The supply line must be wrench-tightened 3. Connect a 1/2 inch (1.27 cm) I.D. to the corrosive action of Dryer All connections must be installed by brushing on all connections by a qualified gas technician. 2. semi-rigid or approved pipe from gas supply 4. ... is not available, test all pipe connections. If a manometer is resistant to dryer Shutoff Valve Open position from gas supply line to flow through the gas line. 14 Installation Instructions Gas connection 1. Manual Shutoff Flare Valve Union GAS FLOW Flare Union Closed Nipple ...
Installation Instructions (All Languages)
Page 15
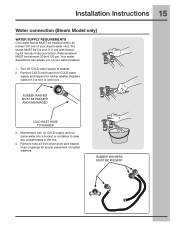
... hose kit from COLD water supply and inspect for rubber washer. Water pressure MUST be installed within 42 inches (107 cm) of your water pressure. 1. Remove COLD inlet hose from dryer drum and inspect hose couplings for laundry hose connection. Turn off COLD water supply to... worn out. The faucet MUST be 3/4 inch (1.9 cm) with threading for proper placement of your dryer's water inlet. Your water department can advise you of rubber washers. Installation Instructions 15 Water connection (Steam Model only) WATER SUPPLY REQUIREMENTS Cold water faucet MUST be between 30 and 120...
... hose kit from COLD water supply and inspect for rubber washer. Water pressure MUST be installed within 42 inches (107 cm) of your water pressure. 1. Remove COLD inlet hose from dryer drum and inspect hose couplings for laundry hose connection. Turn off COLD water supply to... worn out. The faucet MUST be 3/4 inch (1.9 cm) with threading for proper placement of your dryer's water inlet. Your water department can advise you of rubber washers. Installation Instructions 15 Water connection (Steam Model only) WATER SUPPLY REQUIREMENTS Cold water faucet MUST be between 30 and 120...
Installation Instructions (All Languages)
Page 16
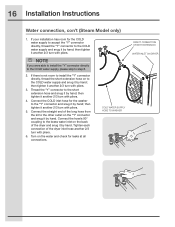
... long hose from the kit to the brass water inlet on the "Y" connector and snug it by hand. Tighten each connection of the dryer and snug it by hand. COLD WATER SUPPLY HOSE TO WASHER DIRECT CONNECTION OR WITH EXTENSION WATER INLET ON... connector and snug it by hand; then tighten it another 2/3 turn with pliers. 6. 16 Installation Instructions Water connection, con't (Steam Model only) 1. then tighten it another 2/3 turn with pliers. 3. If there is not room to install the "Y" connector directly, thread the short extension hose on the water and check for the washer...
... long hose from the kit to the brass water inlet on the "Y" connector and snug it by hand. Tighten each connection of the dryer and snug it by hand. COLD WATER SUPPLY HOSE TO WASHER DIRECT CONNECTION OR WITH EXTENSION WATER INLET ON... connector and snug it by hand; then tighten it another 2/3 turn with pliers. 6. 16 Installation Instructions Water connection, con't (Steam Model only) 1. then tighten it another 2/3 turn with pliers. 3. If there is not room to install the "Y" connector directly, thread the short extension hose on the water and check for the washer...
Installation Instructions (All Languages)
Page 17
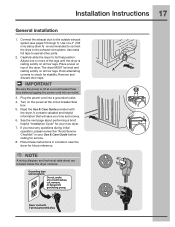
.... 8. Connect the exhaust duct to seal all four legs. Installation Instructions 17 General installation 1. Use of a 4" (102 mm) clamp (item A) is resting solidly on top of the legs until the dryer is recommended to connect the dryer to its final position. Carefully slide the dryer to the exhaust vent system. Rock alternating corners to check...
.... 8. Connect the exhaust duct to seal all four legs. Installation Instructions 17 General installation 1. Use of a 4" (102 mm) clamp (item A) is resting solidly on top of the legs until the dryer is recommended to connect the dryer to its final position. Carefully slide the dryer to the exhaust vent system. Rock alternating corners to check...

Installation Instructions (All Languages)
Page 18
... for correct cord connection (on electric models) and presence of combustion and ventilation air. If your new dryer is properly installed and ready for use . At cycle completion, the LCD user interface may display INSTAL PASS!, meaning your new dryer is properly installed and ready for use . Also...and make the necessary corrections before you wake it is necessary for 3 minutes after the Installation Cycle. 18 Installation Instructions WARNING FIRE HAZARD Before operating the dryer, make sure the dryer area is clear and free of air. If you wake it immediately to sleep and then...
... for correct cord connection (on electric models) and presence of combustion and ventilation air. If your new dryer is properly installed and ready for use . At cycle completion, the LCD user interface may display INSTAL PASS!, meaning your new dryer is properly installed and ready for use . Also...and make the necessary corrections before you wake it is necessary for 3 minutes after the Installation Cycle. 18 Installation Instructions WARNING FIRE HAZARD Before operating the dryer, make sure the dryer area is clear and free of air. If you wake it immediately to sleep and then...


