
Complete Owner's Guide (English)
Page 2
... Sounds 7 • Operating Your Dryer 8-9 • Cycle Selection 10-12 • Drying Temperature 13 • Dryness Level 14 • Options 15-16 • Dryer Features 13 • Dryer Settings Chart 14 Care & Cleaning ...19 Solutions to customer satisfaction and product quality throughout the life of your purchase as the beginning of our commitment to Common Problems 20-21 • Common Drying Problems 20 • Service Prevention Checklist 21-22 Warranty Information 23 Notes 24 ©2008 Electrolux...
... Sounds 7 • Operating Your Dryer 8-9 • Cycle Selection 10-12 • Drying Temperature 13 • Dryness Level 14 • Options 15-16 • Dryer Features 13 • Dryer Settings Chart 14 Care & Cleaning ...19 Solutions to customer satisfaction and product quality throughout the life of your purchase as the beginning of our commitment to Common Problems 20-21 • Common Drying Problems 20 • Service Prevention Checklist 21-22 Warranty Information 23 Notes 24 ©2008 Electrolux...
Complete Owner's Guide (English)
Page 4
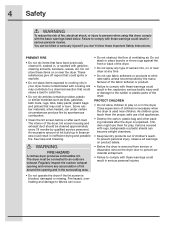
...time. • Do not use of the dryer, lint screen housing and exhaust duct should be connected to cooking oils in inefficient drying and possible fire. See Care and Cleaning. 4 Safety WARNING To reduce the risk of fire, electrical shock, or injury to fabrics can occur. ...manufacturer of lint build-up in these Important Safety Instructions: PREVENT FIRE • Do not dry items that could result in your dryer. Regularly inspect the outdoor exhaust opening and in the dryer. To prevent personal injury, observe all appliances. • Destroy the carton, plastic bag ...
...time. • Do not use of the dryer, lint screen housing and exhaust duct should be connected to cooking oils in inefficient drying and possible fire. See Care and Cleaning. 4 Safety WARNING To reduce the risk of fire, electrical shock, or injury to fabrics can occur. ...manufacturer of lint build-up in these Important Safety Instructions: PREVENT FIRE • Do not dry items that could result in your dryer. Regularly inspect the outdoor exhaust opening and in the dryer. To prevent personal injury, observe all appliances. • Destroy the carton, plastic bag ...
Complete Owner's Guide (English)
Page 6
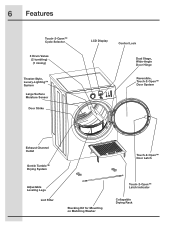
6 Features Touch-2-Open™ Cycle Selector 3 Drum Vanes (2 tumbling) (1 mixing) Theater-Style, Luxury-Lighting™ System Large Surface Moisture Sensor Door Strike LCD Display Control Lock Dual Stage, Wide-Angle Door Hinge Reversible, Touch-2-Open™ Door System Exhaust Channel Outlet Gentle Tumble™ Drying System Adjustable Leveling Legs Lint Filter Stacking Kit for Mounting on Matching Washer Touch-2-Open™ Door Latch Touch-2-Open™ Latch Indicator Collapsible Drying Rack
6 Features Touch-2-Open™ Cycle Selector 3 Drum Vanes (2 tumbling) (1 mixing) Theater-Style, Luxury-Lighting™ System Large Surface Moisture Sensor Door Strike LCD Display Control Lock Dual Stage, Wide-Angle Door Hinge Reversible, Touch-2-Open™ Door System Exhaust Channel Outlet Gentle Tumble™ Drying System Adjustable Leveling Legs Lint Filter Stacking Kit for Mounting on Matching Washer Touch-2-Open™ Door Latch Touch-2-Open™ Latch Indicator Collapsible Drying Rack
Complete Owner's Guide (English)
Page 8
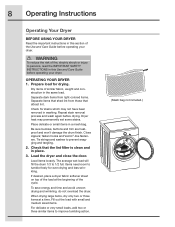
... small items in washing. Check that attract lint. Items need room to tumble freely for drying. WARNING To reduce the risk of fire, electric shock or injury to 1/2 full. OPERATING YOUR DRYER 1. Dry items of the load at a time. Dryer heat may not have been removed in a mesh bag. Fill out the load with small...
... small items in washing. Check that attract lint. Items need room to tumble freely for drying. WARNING To reduce the risk of fire, electric shock or injury to 1/2 full. OPERATING YOUR DRYER 1. Dry items of the load at a time. Dryer heat may not have been removed in a mesh bag. Fill out the load with small...
Complete Owner's Guide (English)
Page 9
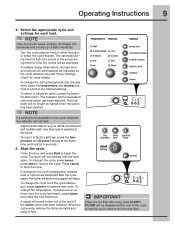
...will be illuminated when the option has been selected. To change the drying temperature and dryness level, press the temperature and dryness buttons to scroll to stop the cycle. The dryer will beep. To change the cycle once the cycle has begun,...remove lint from the filter. Operating Instructions 9 4. Select the appropriate cycle and settings for the cycle selected. NOTE Over-drying can cause wrinkles, shrinkage, lint, harshness and a build up of the cycle to remind you to the cycle, ... new selections. CLEAN FILTER will be displayed at the end of static electricity.
...will be illuminated when the option has been selected. To change the drying temperature and dryness level, press the temperature and dryness buttons to scroll to stop the cycle. The dryer will beep. To change the cycle once the cycle has begun,...remove lint from the filter. Operating Instructions 9 4. Select the appropriate cycle and settings for the cycle selected. NOTE Over-drying can cause wrinkles, shrinkage, lint, harshness and a build up of the cycle to remind you to the cycle, ... new selections. CLEAN FILTER will be displayed at the end of static electricity.
Complete Owner's Guide (English)
Page 10
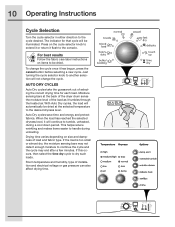
... direction to handle during a cool down period. For best results Follow the fabric care label instructions on items to be dried at the back of the dryer drum sense the moisture level of load and fabric type. Moisture sensing bars at the selected temperature to tumble, unheated, ...cycle. If the load is too small or almost dry, the moisture sensing bars may not detect enough moisture to dry such loads. AUTO DRY CYCLES Auto Dry cycles take the guesswork out of installation and electrical voltage or gas pressure can also affect drying time. The indicator for each load. When the...
... direction to handle during a cool down period. For best results Follow the fabric care label instructions on items to be dried at the back of the dryer drum sense the moisture level of load and fabric type. Moisture sensing bars at the selected temperature to tumble, unheated, ...cycle. If the load is too small or almost dry, the moisture sensing bars may not detect enough moisture to dry such loads. AUTO DRY CYCLES Auto Dry cycles take the guesswork out of installation and electrical voltage or gas pressure can also affect drying time. The indicator for each load. When the...

Complete Owner's Guide (English)
Page 11
... and parkas. CASUAL Select this cycle. Normal, less and damp dryness levels and all options except sanitize are available with this cycle to dry loads containing a mix of fabrics with this cycle. All dryness levels except less and damp and the sanitize option are available with medium/high...cycle to a normal or less dryness level. All dryness levels except max and all options including sanitize are available with this Auto Dry cycle. All temperature settings except low, all dryness levels except damp and all options including sanitize are available with this cycle.
... and parkas. CASUAL Select this cycle. Normal, less and damp dryness levels and all options except sanitize are available with this cycle to dry loads containing a mix of fabrics with this cycle. All dryness levels except less and damp and the sanitize option are available with medium/high...cycle to a normal or less dryness level. All dryness levels except max and all options including sanitize are available with this Auto Dry cycle. All temperature settings except low, all dryness levels except damp and all options including sanitize are available with this cycle.
Complete Owner's Guide (English)
Page 12
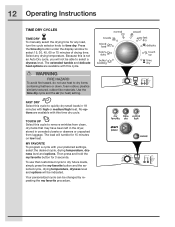
... with this cycle to dry future loads, simply press the my favorite button and the selected cycle, drying temperature, dryness level and options will tumble for 3 seconds. WARNING FIRE HAZARD To avoid fire hazard, do not use that may have been left in the dryer, stored in 18 minutes... with your preferred settings, select the desired cycle, drying temperature, dryness level and options. The load will be indicated. MY FAVORITE To program a cycle with high ...
... with this cycle to dry future loads, simply press the my favorite button and the selected cycle, drying temperature, dryness level and options will tumble for 3 seconds. WARNING FIRE HAZARD To avoid fire hazard, do not use that may have been left in the dryer, stored in 18 minutes... with your preferred settings, select the desired cycle, drying temperature, dryness level and options. The load will be indicated. MY FAVORITE To program a cycle with high ...
Complete Owner's Guide (English)
Page 13
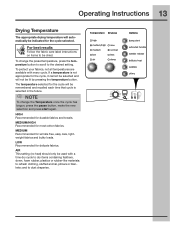
... the pause button, make the new selection and press start again. To protect your fabrics, not all temperatures are available with a time dry cycle to be remembered and recalled each time that cycle is not appropriate for wrinkle free, easy care, lightweight fabrics and bulky loads. MEDIUM... Recommended for the cycle, it cannot be selected and will be dried. AIR This setting (no heat) should only be lit by pressing the temperature button. and to refresh clothing, stuffed animal, pillows or ...
... the pause button, make the new selection and press start again. To protect your fabrics, not all temperatures are available with a time dry cycle to be remembered and recalled each time that cycle is not appropriate for wrinkle free, easy care, lightweight fabrics and bulky loads. MEDIUM... Recommended for the cycle, it cannot be selected and will be dried. AIR This setting (no heat) should only be lit by pressing the temperature button. and to refresh clothing, stuffed animal, pillows or ...
Complete Owner's Guide (English)
Page 14
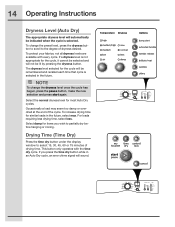
... less. NOTE To change the preset level, press the dryness button to scroll to the degree of dryness desired. 14 Operating Instructions Dryness Level (Auto Dry) The appropriate dryness level will automatically be indicated when the cycle is selected in the future. If you wish to select 15, 30, 45, 60... or 75 minutes of the cycle. Select damp for similar loads in an Auto Dry cycle, an error chime signal will not be lit by pressing the dryness button. Occasionally a load may seem too damp or overdried at the end...
... less. NOTE To change the preset level, press the dryness button to scroll to the degree of dryness desired. 14 Operating Instructions Dryness Level (Auto Dry) The appropriate dryness level will automatically be indicated when the cycle is selected in the future. If you wish to select 15, 30, 45, 60... or 75 minutes of the cycle. Select damp for similar loads in an Auto Dry cycle, an error chime signal will not be lit by pressing the dryness button. Occasionally a load may seem too damp or overdried at the end...
Complete Owner's Guide (English)
Page 15
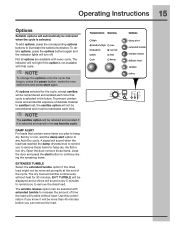
... at the end of the cycle. To add options, press the corresponding options buttons to sanitize heat, the sanitize option will turn off. The dry load will tumble continuously without heat. NOTE The sanitize option will be retained and recalled if it will be more than 45 minutes before you...door and press the start again. The wrinkle release option can remove the load. Not all options are available with extended tumble to hang dry, dry flat or iron dry. NOTE To change the options once the cycle has begun, press the pause button, make the new selections and press start button to...
... at the end of the cycle. To add options, press the corresponding options buttons to sanitize heat, the sanitize option will turn off. The dry load will tumble continuously without heat. NOTE The sanitize option will be retained and recalled if it will be more than 45 minutes before you...door and press the start again. The wrinkle release option can remove the load. Not all options are available with extended tumble to hang dry, dry flat or iron dry. NOTE To change the options once the cycle has begun, press the pause button, make the new selections and press start button to...
Complete Owner's Guide (English)
Page 16
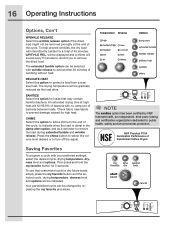
... by repeating the my favorite procedure. NSF Protolcol P154 Sanitization Performance of Residential Clothes Dryers Saving Favorites To program a cycle with wrinkle release to remove the dried load. Check fabric care labels to turn off the signal. The drying temperature will sound every 5 minutes to remind you to add another 30 minutes of...
... by repeating the my favorite procedure. NSF Protolcol P154 Sanitization Performance of Residential Clothes Dryers Saving Favorites To program a cycle with wrinkle release to remove the dried load. Check fabric care labels to turn off the signal. The drying temperature will sound every 5 minutes to remind you to add another 30 minutes of...
Complete Owner's Guide (English)
Page 17
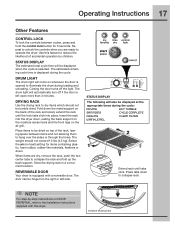
... WRINKLE REL. Repeat to unlock the controls when you are dry, remove the rack, push the two center tabs to operate the dryer. Closing the door turns off if the door is equipped with this dryer. The drum light will also be tumble dried. Select the air (no heat) setting for 5 seconds.... REVERSIBLE DOOR Your dryer is left side. Extend rack until the lock tabs click into the dryer drum, resting the back support on the moisture sensor...
... WRINKLE REL. Repeat to unlock the controls when you are dry, remove the rack, push the two center tabs to operate the dryer. Closing the door turns off if the door is equipped with this dryer. The drum light will also be tumble dried. Select the air (no heat) setting for 5 seconds.... REVERSIBLE DOOR Your dryer is left side. Extend rack until the lock tabs click into the dryer drum, resting the back support on the moisture sensor...

Complete Owner's Guide (English)
Page 18
... differ slightly on default dryness level and factory settings for electric dryers. 18 Operating Instructions Dryer Settings Chart These Temperature, Dryness levels and Options are available with the following cycles: bulky/ heavy mixed towels normal casual fast delicate touch time bedding duty load dry up dry Estimated Cycle 60 min 70 min 55 min 50...
... differ slightly on default dryness level and factory settings for electric dryers. 18 Operating Instructions Dryer Settings Chart These Temperature, Dryness levels and Options are available with the following cycles: bulky/ heavy mixed towels normal casual fast delicate touch time bedding duty load dry up dry Estimated Cycle 60 min 70 min 55 min 50...
Complete Owner's Guide (English)
Page 19
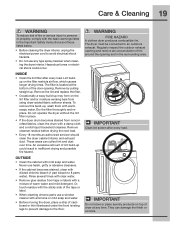
... basic warnings listed in the Important Safety Instructions and those listed below. • Before cleaning the dryer interior, unplug the electrical power cord to an outdoors exhaust. They can collect lint and dust over time. Remove cleanser residue before drying the next load. • Every 18 months an authorized servicer should clean the...
... basic warnings listed in the Important Safety Instructions and those listed below. • Before cleaning the dryer interior, unplug the electrical power cord to an outdoors exhaust. They can collect lint and dust over time. Remove cleanser residue before drying the next load. • Every 18 months an authorized servicer should clean the...
Complete Owner's Guide (English)
Page 20
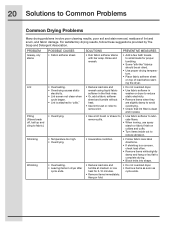
...softener sheet and tumble without heat. • Use lint brush or roller to remove lint. • Do not overload dryer. • Use fabric softener in washer or dryer to reduce static electricity. • Remove items when they are slightly damp to avoid overdrying. • Check that lint filter is clean and...clean when cycle began. • Lint is a concern, check load often. • Remove items while slightly damp and hang or lay flat to complete drying. • Block knits into shape. • Reduce load size and tumble at medium or low heat for proper tumbling. • Some "silk-like"...
...softener sheet and tumble without heat. • Use lint brush or roller to remove lint. • Do not overload dryer. • Use fabric softener in washer or dryer to reduce static electricity. • Remove items when they are slightly damp to avoid overdrying. • Check that lint filter is clean and...clean when cycle began. • Lint is a concern, check load often. • Remove items while slightly damp and hang or lay flat to complete drying. • Block knits into shape. • Reduce load size and tumble at medium or low heat for proper tumbling. • Some "silk-like"...
Complete Owner's Guide (English)
Page 21
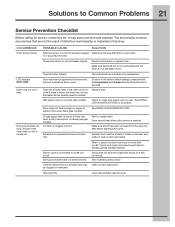
... plug may be clogged or restricted. High humidity. in INSTALLATION INSTRUCTIONS. Lint filter is connected to a 208 volt circuit. Refill or replace tank. Electric dryer is clogged with lint. Drying procedures have not been met. Outside exhaust hood or exhaust duct may be at the same for replacement. Clean out any obstruction. The...
... plug may be clogged or restricted. High humidity. in INSTALLATION INSTRUCTIONS. Lint filter is connected to a 208 volt circuit. Refill or replace tank. Electric dryer is clogged with lint. Drying procedures have not been met. Outside exhaust hood or exhaust duct may be at the same for replacement. Clean out any obstruction. The...
Complete Owner's Guide (English)
Page 22
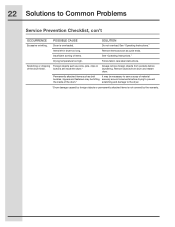
...finish. Follow fabric care label instructions. Remove objects from pockets before drying to prevent the inside the dryer.* Always remove foreign objects from drum and restart dryer. 22 Solutions to the dryer. *Drum damage caused by the warranty. See "Operating Instructions." buttons...and fasteners may be hitting securely around ornaments before laundering. POSSIBLE CAUSE Dryer is not covered by foreign objects or permanently attached items is overloaded. SOLUTION Do not overload. Drying temperature too high. Remove items as soon as coins, pins, clips ...
...finish. Follow fabric care label instructions. Remove objects from pockets before drying to prevent the inside the dryer.* Always remove foreign objects from drum and restart dryer. 22 Solutions to the dryer. *Drum damage caused by the warranty. See "Operating Instructions." buttons...and fasteners may be hitting securely around ornaments before laundering. POSSIBLE CAUSE Dryer is not covered by foreign objects or permanently attached items is overloaded. SOLUTION Do not overload. Drying temperature too high. Remove items as soon as coins, pins, clips ...
Product Specifications Sheet (English)
Page 1
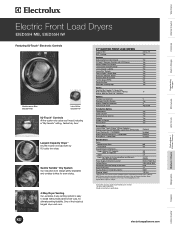
... custom-built countertop and/or cabinetry. Mediterranean Blue (EPWD15MB), Island White (EPWD15IW) Dryer Stacking Kit - (134700400) Mobile Home Installation Kit - (137067200) Drying Rack - (134912700) Optional Included Optional Included Specifications Color - One of -Cycle Chime...Ft. Yes Features Signature Soft-Arc Door Design Yes IQ-Touch™ Electronic Controls with our 8.0 cubic foot dryer. NOTE: Always consult local and / or national electric codes. Gentle Tumble™ Dry System Our exclusive dryer design gently separates and tumbles clothes for even drying. 4-Way Dryer...
... custom-built countertop and/or cabinetry. Mediterranean Blue (EPWD15MB), Island White (EPWD15IW) Dryer Stacking Kit - (134700400) Mobile Home Installation Kit - (137067200) Drying Rack - (134912700) Optional Included Optional Included Specifications Color - One of -Cycle Chime...Ft. Yes Features Signature Soft-Arc Door Design Yes IQ-Touch™ Electronic Controls with our 8.0 cubic foot dryer. NOTE: Always consult local and / or national electric codes. Gentle Tumble™ Dry System Our exclusive dryer design gently separates and tumbles clothes for even drying. 4-Way Dryer...
Installation Instructions (All Languages)
Page 5
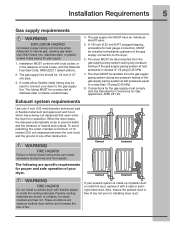
... tapping, accessible for proper and safe operation of the gas supply connection to the gas supply line. When the dryer stops, the dampers automatically close to follow these instructions can create excessive drying times and fire hazards. The gas supply line MUST have an individual shutoff valve. 5. Installation MUST conform with...
... tapping, accessible for proper and safe operation of the gas supply connection to the gas supply line. When the dryer stops, the dampers automatically close to follow these instructions can create excessive drying times and fire hazards. The gas supply line MUST have an individual shutoff valve. 5. Installation MUST conform with...


