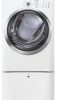
Complete Owner's Guide (English)
Page 3
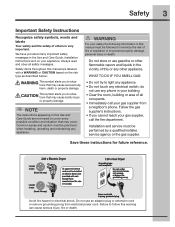
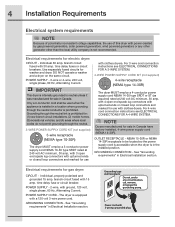
... v Electric Dryer 120 v Gas Dryer 10-30R 3-wire (fused 30 amp) 14-30R 4-wire (fused 30 amp) UL-approved service cord must be installed on your gas supplier, call your gas supplier from electrical power cord. Failure to follow this Use and Care Guide are labeled with a WARNING or CAUTION based on the risk type as described below: This symbol alerts you cannot reach your appliance. Follow the gas supplier's instructions. •...
... v Electric Dryer 120 v Gas Dryer 10-30R 3-wire (fused 30 amp) 14-30R 4-wire (fused 30 amp) UL-approved service cord must be installed on your gas supplier, call your gas supplier from electrical power cord. Failure to follow this Use and Care Guide are labeled with a WARNING or CAUTION based on the risk type as described below: This symbol alerts you cannot reach your appliance. Follow the gas supplier's instructions. •...
Complete Owner's Guide (English)
Page 5
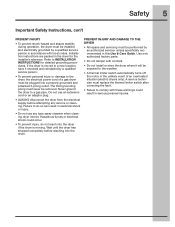
... stability during operation, the dryer must be removed. Do not use any service or cleaning. PREVENT INJURY AND DAMAGE TO THE DRYER • All repairs and servicing must be plugged into the drum. Installation instructions are packed in electrical shock or injury. • Do not use an extension cord or an adaptor plug. • ALWAYS disconnect the dryer from the electrical supply before reaching into a properly grounded and polarized 3-prong outlet.
... stability during operation, the dryer must be removed. Do not use any service or cleaning. PREVENT INJURY AND DAMAGE TO THE DRYER • All repairs and servicing must be plugged into the drum. Installation instructions are packed in electrical shock or injury. • Do not use an extension cord or an adaptor plug. • ALWAYS disconnect the dryer from the electrical supply before reaching into a properly grounded and polarized 3-prong outlet.
Complete Owner's Guide (English)
Page 7
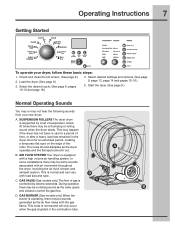
... steps: 1. C. GAS BURNER (Gas models only.) When the burner is supported by electric solenoids. Getting Started Operating Instructions 7 To operate your new dryer: A. B. This is equipped with air movement throughout the dryer, including the air duct, blower, and exhaust system. D. Select desired settings and options. (See page 9, page 13, page 14 and pages 15-16.) 5. The noise should dissipate as the air flow mixes with load size and type. In some installations there...
... steps: 1. C. GAS BURNER (Gas models only.) When the burner is supported by electric solenoids. Getting Started Operating Instructions 7 To operate your new dryer: A. B. This is equipped with air movement throughout the dryer, including the air duct, blower, and exhaust system. D. Select desired settings and options. (See page 9, page 13, page 14 and pages 15-16.) 5. The noise should dissipate as the air flow mixes with load size and type. In some installations there...
Complete Owner's Guide (English)
Page 17
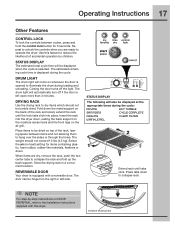
... dryer drum, resting the back support on the moisture sensor bars and the front legs on top of the rack, leaving space between cycles, press and hold the control lock button for items containing plastic, foam rubber, rubber-like materials, feathers or down to the Installation Instructions supplied with a reversible door. Closing the door turns off if the door is opened to illuminate the drum during loading and unloading. DRYING RACK Use...
... dryer drum, resting the back support on the moisture sensor bars and the front legs on top of the rack, leaving space between cycles, press and hold the control lock button for items containing plastic, foam rubber, rubber-like materials, feathers or down to the Installation Instructions supplied with a reversible door. Closing the door turns off if the door is opened to illuminate the drum during loading and unloading. DRYING RACK Use...
Complete Owner's Guide (English)
Page 19
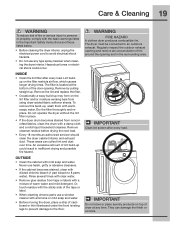
... fabrics, clean the drum with warm, soapy water. Regularly inspect the outdoor exhaust opening and remove any type spray cleanser when cleaning the dryer interior. Lint buildup on top of dryer at the bottom of the door opening and in the surrounding area. WARNING FIRE HAZARD A clothes dryer produces combustible lint. IMPORTANT Do not store or place laundry products on the filter restricts air flow, which causes longer drying times. They...
... fabrics, clean the drum with warm, soapy water. Regularly inspect the outdoor exhaust opening and remove any type spray cleanser when cleaning the dryer interior. Lint buildup on top of dryer at the bottom of the door opening and in the surrounding area. WARNING FIRE HAZARD A clothes dryer produces combustible lint. IMPORTANT Do not store or place laundry products on the filter restricts air flow, which causes longer drying times. They...
Complete Owner's Guide (English)
Page 20
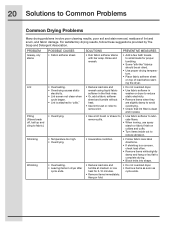
...; Check that lint filter is a concern, check load often. • Remove items while slightly damp and hang or lay flat to complete drying. • Block knits into shape. • Reduce load size and tumble at medium or low heat for proper tumbling. • Some "silk-like" fabrics should be air dried. • Use proper drying temperature. • Place fabric softener sheet on collars and cuffs. • Turn items...
...; Check that lint filter is a concern, check load often. • Remove items while slightly damp and hang or lay flat to complete drying. • Block knits into shape. • Reduce load size and tumble at medium or low heat for proper tumbling. • Some "silk-like" fabrics should be air dried. • Use proper drying temperature. • Place fabric softener sheet on collars and cuffs. • Turn items...
Complete Owner's Guide (English)
Page 21
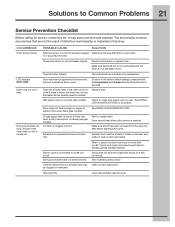
... smells hot. See INSTALLATION INSTRUCTIONS for 5 seconds. Exhaust duct requirements have enough air supply to the factory default settings, press and hold the temperature and dryness buttons at least 4 inches in this list. Thermal limiter tripped. Drying cycle takes too long, outside of natural gas (gas models). Dryer runs but the heater will be clogged or restricted. Use a dehumidifier near the dryer. House fuse blown or circuit breaker tripped. To return to support the burner flame (gas models). Lint filter is restored. Drying...
... smells hot. See INSTALLATION INSTRUCTIONS for 5 seconds. Exhaust duct requirements have enough air supply to the factory default settings, press and hold the temperature and dryness buttons at least 4 inches in this list. Thermal limiter tripped. Drying cycle takes too long, outside of natural gas (gas models). Dryer runs but the heater will be clogged or restricted. Use a dehumidifier near the dryer. House fuse blown or circuit breaker tripped. To return to support the burner flame (gas models). Lint filter is restored. Drying...
Wiring Diagram (All Languages)
Page 1
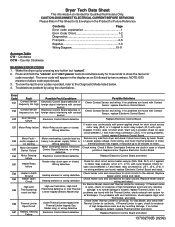
... Thermal Limiter Open Circuit Outlet Thermal Limiter tripped Inlet Thermal Limiter tripped (Gas Model only) or wiring defective Check Outlet Thermal Limiter for continuity. E67 Heaters Sensing Failure Electronic Control Board defective Replace Electronic Control Board and retest. 1 137032700B (0209) Counter Clockwise READING ERROR CODES 1. Press and hold the "cancel" and "start " key is intended for Qualified Technicians Only. Troubleshoot problem by pressing any load from dryer and check if drum turns freely by two numbers. motor relay...
... Thermal Limiter Open Circuit Outlet Thermal Limiter tripped Inlet Thermal Limiter tripped (Gas Model only) or wiring defective Check Outlet Thermal Limiter for continuity. E67 Heaters Sensing Failure Electronic Control Board defective Replace Electronic Control Board and retest. 1 137032700B (0209) Counter Clockwise READING ERROR CODES 1. Press and hold the "cancel" and "start " key is intended for Qualified Technicians Only. Troubleshoot problem by pressing any load from dryer and check if drum turns freely by two numbers. motor relay...
Wiring Diagram (All Languages)
Page 2
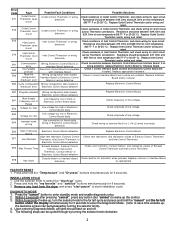
... Thermistor connections. Replace Outlet Control Thermistor and/or wiring and retest. Exhaust Control Thermistor, Inlet Control Thermistor, Contact Sensor or Electronic Control Board defective Check vent restriction, Contact Sensor, and resistance values of Exhaust Control Thermistor and Inlet Control Thermistor EF8 Key Stuck Console button or Interface Board Check buttons for open circuit. INSTALLATION CYCLE 1. Within 5 seconds of wake up, turn the selector knob to start installation cycle. If no Interface Board defective wiring problems, replace...
... Thermistor connections. Replace Outlet Control Thermistor and/or wiring and retest. Exhaust Control Thermistor, Inlet Control Thermistor, Contact Sensor or Electronic Control Board defective Check vent restriction, Contact Sensor, and resistance values of Exhaust Control Thermistor and Inlet Control Thermistor EF8 Key Stuck Console button or Interface Board Check buttons for open circuit. INSTALLATION CYCLE 1. Within 5 seconds of wake up, turn the selector knob to start installation cycle. If no Interface Board defective wiring problems, replace...
Product Specifications Sheet (English)
Page 1
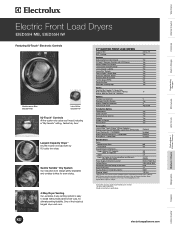
... IQ-Touch™ Electronic Controls with our 8.0 cubic foot dryer. Specifications subject to Product Installation Guide for even drying. 4-Way Dryer Venting Our exclusive 4-way venting system is easy to Center of Arc Including Door and Exhaust) (with 90° Door Open) 31-1/2" 50-5/8" Power Supply Connection Location Bottom Right Rear Voltage Rating 240V / 60 Hz / 30A Connected Load (kW Rating) @ 240 Volts 6.48 Amps @ 240 Volts 27 Heating Element @ 240 Volts (Watts) 5500...
... IQ-Touch™ Electronic Controls with our 8.0 cubic foot dryer. Specifications subject to Product Installation Guide for even drying. 4-Way Dryer Venting Our exclusive 4-way venting system is easy to Center of Arc Including Door and Exhaust) (with 90° Door Open) 31-1/2" 50-5/8" Power Supply Connection Location Bottom Right Rear Voltage Rating 240V / 60 Hz / 30A Connected Load (kW Rating) @ 240 Volts 6.48 Amps @ 240 Volts 27 Heating Element @ 240 Volts (Watts) 5500...
Product Specifications Sheet (English)
Page 2
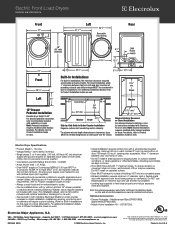
... change specifications or discontinue models without optional 15" drawer pedestal, or stacked above matching Electrolux Washer, which requires stacking kit included with dryer. (For installation details, refer to Product Installation Guide on web.) • Always consult local and /or national electric codes. • Can be vented straight back or with 2 unobstructed louvered openings, minimum 60 sq. Full-length 120 sq. Allow 1" clearance between fronts of door. For detailed pedestal installation, refer to instructions...
... change specifications or discontinue models without optional 15" drawer pedestal, or stacked above matching Electrolux Washer, which requires stacking kit included with dryer. (For installation details, refer to Product Installation Guide on web.) • Always consult local and /or national electric codes. • Can be vented straight back or with 2 unobstructed louvered openings, minimum 60 sq. Full-length 120 sq. Allow 1" clearance between fronts of door. For detailed pedestal installation, refer to instructions...

Installation Instructions (All Languages)
Page 2
... not stack washer on top of washer already installed on the risk type as restaurants, beauty salons, etc. • Do not install a clothes dryer with a WARNING or CAUTION based on pedestal. Recognize safety symbols, words and labels Safety items throughout this manual and all of contents Important Safety Instructions 2 Installation Requirements 3-9 Installed Dimensions 9 Installation Instructions 10-18 Reversing Door 19-23 Options 24 ©2010 Electrolux Major Appliances All rights reserved...
... not stack washer on top of washer already installed on the risk type as restaurants, beauty salons, etc. • Do not install a clothes dryer with a WARNING or CAUTION based on pedestal. Recognize safety symbols, words and labels Safety items throughout this manual and all of contents Important Safety Instructions 2 Installation Requirements 3-9 Installed Dimensions 9 Installation Instructions 10-18 Reversing Door 19-23 Options 24 ©2010 Electrolux Major Appliances All rights reserved...

Installation Instructions (All Languages)
Page 3
... block ‰ Approved strain relief installed ‰ Terminal access cover installed before initial operation Door Reversal ‰ Follow detailed instructions in this guide ‰ Test hinge and latch for function Electrical Power ‰ House power turned on ‰ Dryer plugged in Final Checks ‰ Installation Instructions and Use and Care Guide read and save this guide Questions? Installation Requirements 3 Please read thoroughly ‰ Door latches and drum tumbles when cycle starts ‰ Registration card sent in Pre-installation requirements Tools and materials needed...
... block ‰ Approved strain relief installed ‰ Terminal access cover installed before initial operation Door Reversal ‰ Follow detailed instructions in this guide ‰ Test hinge and latch for function Electrical Power ‰ House power turned on ‰ Dryer plugged in Final Checks ‰ Installation Instructions and Use and Care Guide read and save this guide Questions? Installation Requirements 3 Please read thoroughly ‰ Door latches and drum tumbles when cycle starts ‰ Registration card sent in Pre-installation requirements Tools and materials needed...
Installation Instructions (All Languages)
Page 4
... was manufactured for electric dryer: CIRCUIT - For 4-wire cord connection instructions see ELECTRICAL CONNECTIONS FOR A 3-WIRE SYSTEM. 4-WIRE POWER SUPPLY CORD KIT (not supplied) 4-wire receptacle (NEMA type 14-30R) The dryer MUST employ a 4-conductor power supply cord NEMA 14-30 type SRDT or ST (as required) rated at 240 volt AC minimum, 30 amp, with 3 open end spade lug connectors with upturned ends or closed loop connectors and marked for : (1) new branch circuit installations, (2) mobile homes...
... was manufactured for electric dryer: CIRCUIT - For 4-wire cord connection instructions see ELECTRICAL CONNECTIONS FOR A 3-WIRE SYSTEM. 4-WIRE POWER SUPPLY CORD KIT (not supplied) 4-wire receptacle (NEMA type 14-30R) The dryer MUST employ a 4-conductor power supply cord NEMA 14-30 type SRDT or ST (as required) rated at 240 volt AC minimum, 30 amp, with 3 open end spade lug connectors with upturned ends or closed loop connectors and marked for : (1) new branch circuit installations, (2) mobile homes...
Installation Instructions (All Languages)
Page 5
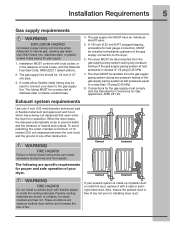
... cm) pipe. 3. plugged tapping, accessible for the gas supply must comply with the National Fuel Gas Code, ANSI Z223.1 (latest edition). 2. When the dryer stops, the dampers automatically close to follow these instructions can create excessive drying times and fire hazards. The tubing MUST be installed immediately upstream of the gas supply connection to natural gas, causing gas leaks. Connections for test gauge connection, MUST be constructed...
... cm) pipe. 3. plugged tapping, accessible for the gas supply must comply with the National Fuel Gas Code, ANSI Z223.1 (latest edition). 2. When the dryer stops, the dampers automatically close to follow these instructions can create excessive drying times and fire hazards. The tubing MUST be installed immediately upstream of the gas supply connection to natural gas, causing gas leaks. Connections for test gauge connection, MUST be constructed...
Installation Instructions (All Languages)
Page 6
... LENGTH of lint around the outdoor exhaust opening and in the exhaust system. See also CLEARANCE REQUIREMENTS on the screws or rivets, clogging the duct work and creating a fire hazard as well as increase drying times. Regularly inspect the outdoor exhaust opening and remove any concealed space of lint in the surrounding area. 6 Installation Requirements Exhaust system requirements, continued WARNING FIRE HAZARD A clothes dryer must be connected to an exhaust outdoors. Dryer vent...
... LENGTH of lint around the outdoor exhaust opening and in the exhaust system. See also CLEARANCE REQUIREMENTS on the screws or rivets, clogging the duct work and creating a fire hazard as well as increase drying times. Regularly inspect the outdoor exhaust opening and remove any concealed space of lint in the surrounding area. 6 Installation Requirements Exhaust system requirements, continued WARNING FIRE HAZARD A clothes dryer must be connected to an exhaust outdoors. Dryer vent...
Installation Instructions (All Languages)
Page 7
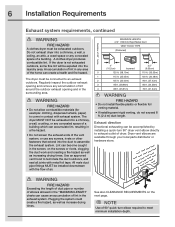
... air. Set the dryer timer and temperature to be inspected and cleaned a minimum of the dryer: • Only the rigid metal duct work should check the exhaust system and vent hood for other flammables are kept or stored. Refer to the mobile home structure. 4. Install male fittings in correct direction: CORRECT INCORRECT In installations where the exhaust system is acceptable: 1. Read the measurement on pedestal...
... air. Set the dryer timer and temperature to be inspected and cleaned a minimum of the dryer: • Only the rigid metal duct work should check the exhaust system and vent hood for other flammables are kept or stored. Refer to the mobile home structure. 4. Install male fittings in correct direction: CORRECT INCORRECT In installations where the exhaust system is acceptable: 1. Read the measurement on pedestal...
Installation Instructions (All Languages)
Page 10
...;t the outlet, have longer drying times than dryers operating on this appliance. Check with the circuit conductors and connected to whether the appliance is not properly grounded. If in this manual for the proper power cord to a grounded metal, permanent wiring system; For a permanently connected dryer: 1. Grounding requirements - For a grounded, cord-connected dryer: 1. A chemical reaction occurs between copper and aluminum and can result if the dryer is properly grounded. Electric dryer...
...;t the outlet, have longer drying times than dryers operating on this appliance. Check with the circuit conductors and connected to whether the appliance is not properly grounded. If in this manual for the proper power cord to a grounded metal, permanent wiring system; For a permanently connected dryer: 1. Grounding requirements - For a grounded, cord-connected dryer: 1. A chemical reaction occurs between copper and aluminum and can result if the dryer is properly grounded. Electric dryer...

Installation Instructions (All Languages)
Page 18
... the Use & Care Guide and enjoy your dryer has this console: NOTE On gas dryers, before you wake it is properly installed and ready for correct cord connection (on electric models) and presence of gas supply (on gas models) and free flow of air. The Installation Cycle will automatically test for use . If your new premium dryer! Press the start button and then the cancel button. 3.Wake up . At cycle completion, the LCD user interface...
... the Use & Care Guide and enjoy your dryer has this console: NOTE On gas dryers, before you wake it is properly installed and ready for correct cord connection (on electric models) and presence of gas supply (on gas models) and free flow of air. The Installation Cycle will automatically test for use . If your new premium dryer! Press the start button and then the cancel button. 3.Wake up . At cycle completion, the LCD user interface...
Installation Instructions (All Languages)
Page 24
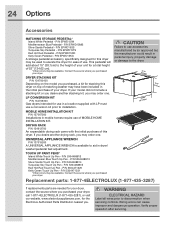
... ELECTRICAL HAZARD Label all wires prior to installation. (672.61.64c4m" ) MOBILE HOME INSTALLATION KIT P/N 137067200 Installations in dryer/ washer/pedestal feet adjustment. Contact the source where you . DRYING RACK P/N 134912700 An expandable drying rack came with LP must use . 24 Options Accessories MATCHING STORAGE PEDESTAL* Island White Pedestal - P/N EPWD15SS Turquoise Sky Pedestal - UNIVERSAL APPLIANCE WRENCH P/N 137019200 A UNIVERSAL APPLIANCE WRENCH is available to elevate the dryer for the Electrolux...
... ELECTRICAL HAZARD Label all wires prior to installation. (672.61.64c4m" ) MOBILE HOME INSTALLATION KIT P/N 137067200 Installations in dryer/ washer/pedestal feet adjustment. Contact the source where you . DRYING RACK P/N 134912700 An expandable drying rack came with LP must use . 24 Options Accessories MATCHING STORAGE PEDESTAL* Island White Pedestal - P/N EPWD15SS Turquoise Sky Pedestal - UNIVERSAL APPLIANCE WRENCH P/N 137019200 A UNIVERSAL APPLIANCE WRENCH is available to elevate the dryer for the Electrolux...


