User Guide
Page 3
... DNS...31 IV-1-4. Date & Time ...33 IV-1-6. Events...42 IV-3-1. FTP...50 II Reset ...4 II. III-1-1. Computer ...29 IV-1-2-3. UPnP...36 IV-1-8. Video Settings ...38 IV-2-2. Product Label ...3 I -2. III-2. Video ...38 IV-2-1. Image Appearance ...40 IV-2-3. Motion Detection...42 IV-3-2. Back Panel...2 I -3. Camera Setup & EdiView Finder 6 III-1. Bonjour ...37 IV-2. Schedule Settings...
... DNS...31 IV-1-4. Date & Time ...33 IV-1-6. Events...42 IV-3-1. FTP...50 II Reset ...4 II. III-1-1. Computer ...29 IV-1-2-3. UPnP...36 IV-1-8. Video Settings ...38 IV-2-2. Product Label ...3 I -2. III-2. Video ...38 IV-2-1. Image Appearance ...40 IV-2-3. Motion Detection...42 IV-3-2. Back Panel...2 I -3. Camera Setup & EdiView Finder 6 III-1. Bonjour ...37 IV-2. Schedule Settings...

User Guide
Page 4
... VI-3-1-1. About ...87 VI-4. Pan & Tilt...93 VI-8. IV-5-2. Full Screen Mode ...91 VI-6. Scan...92 VI-7. IV-5-3. Using the 16 Channel Viewer 69 VI-3. Video Playback...96 VII. Installation ...65 VI-2. Configuring the 16 Channel Viewer 72 VI-3-1. Motion Recording ...79 VI-3-2. General...81 VI-3-2-2. Myedimax.com 61 VI. 16...
... VI-3-1-1. About ...87 VI-4. Pan & Tilt...93 VI-8. IV-5-2. Full Screen Mode ...91 VI-6. Scan...92 VI-7. IV-5-3. Using the 16 Channel Viewer 69 VI-3. Video Playback...96 VII. Installation ...65 VI-2. Configuring the 16 Channel Viewer 72 VI-3-1. Motion Recording ...79 VI-3-2. General...81 VI-3-2-2. Myedimax.com 61 VI. 16...

User Guide
Page 24
... to pan/tilt the camera and adjust the viewing position. Remote Control Preset Snapshot Record Full Screen Use the remote control to stop recording. Record video.
... to pan/tilt the camera and adjust the viewing position. Remote Control Preset Snapshot Record Full Screen Use the remote control to stop recording. Record video.
User Guide
Page 37
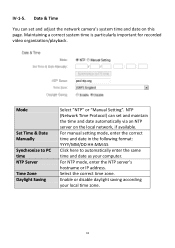
IV-1-5. Maintaining a correct system time is particularly important for recorded video organization/playback. Enable or disable daylight saving according your computer. Mode Set Time & Date Manually Synchronize to automatically enter the same time and date as ...
IV-1-5. Maintaining a correct system time is particularly important for recorded video organization/playback. Enable or disable daylight saving according your computer. Mode Set Time & Date Manually Synchronize to automatically enter the same time and date as ...

User Guide
Page 39
Remove selected user. This function is useful if you want to an existing, selected user. Add a new user. Save the changes to setup a remote video server. 35 Anonymous login allows anyone to login to the network camera and view images. Enable or disable anonymous login. Authority Add Modify Remove Anonymous Login Select the user's authority: Operators can view video and configure all settings, while guests can only view video.
Remove selected user. This function is useful if you want to an existing, selected user. Add a new user. Save the changes to setup a remote video server. 35 Anonymous login allows anyone to login to the network camera and view images. Enable or disable anonymous login. Authority Add Modify Remove Anonymous Login Select the user's authority: Operators can view video and configure all settings, while guests can only view video.
User Guide
Page 42
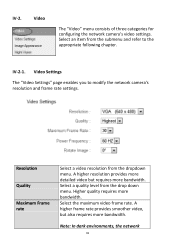
... higher frame rate provides smoother video, but requires more bandwidth. Note: In dark environments, the network 38 Video Settings The "Video Settings" page enables you to the appropriate following chapter. Resolution Quality Maximum Frame rate Select a video resolution from the submenu and refer...Select an item from the dropdown menu. Select the maximum video frame rate. Select a quality level from the drop down menu. Video The "Video" menu consists of three categories for configuring the network camera's video settings. Higher quality requires more bandwidth. IV-2.
... higher frame rate provides smoother video, but requires more bandwidth. Note: In dark environments, the network 38 Video Settings The "Video Settings" page enables you to the appropriate following chapter. Resolution Quality Maximum Frame rate Select a video resolution from the submenu and refer...Select an item from the dropdown menu. Select the maximum video frame rate. Select a quality level from the drop down menu. Video The "Video" menu consists of three categories for configuring the network camera's video settings. Higher quality requires more bandwidth. IV-2.
User Guide
Page 43
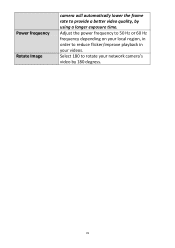
Select 180 to rotate your videos. Power frequency Rotate Image camera will automatically lower the frame rate to provide a better video quality, by 180 degress. 39 Adjust the power frequency to 50 Hz or 60 Hz frequency depending on your local region, in order to reduce flicker/improve playback in your network camera's video by using a longer exposure time.
Select 180 to rotate your videos. Power frequency Rotate Image camera will automatically lower the frame rate to provide a better video quality, by 180 degress. 39 Adjust the power frequency to 50 Hz or 60 Hz frequency depending on your local region, in order to reduce flicker/improve playback in your network camera's video by using a longer exposure time.
User Guide
Page 48
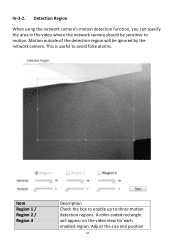
This is useful to avoid false alarms. Item Region 1 / Region 2 / Region 3 Description Check the box to enable up to motion. Adjust the size and position 44 Motion outside of the detection region will appear on the video view for each enabled region. Detection Region When using the network camera's motion detection function, you can specify the area in the video where the network camera should be ignored by the network camera. A color-coded rectangle will be sensitive to three motion detection regions. IV-3-2.
This is useful to avoid false alarms. Item Region 1 / Region 2 / Region 3 Description Check the box to enable up to motion. Adjust the size and position 44 Motion outside of the detection region will appear on the video view for each enabled region. Detection Region When using the network camera's motion detection function, you can specify the area in the video where the network camera should be ignored by the network camera. A color-coded rectangle will be sensitive to three motion detection regions. IV-3-2.
User Guide
Page 49
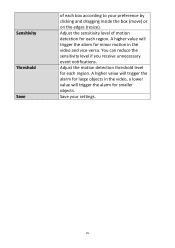
... the alarm for smaller objects. Adjust the motion detection threshold level for each region. A higher value will trigger the alarm for large objects in the video, a lower value will trigger the alarm for minor motion in the video and vice-versa. Sensitivity Threshold Save of motion detection for each region.
... the alarm for smaller objects. Adjust the motion detection threshold level for each region. A higher value will trigger the alarm for large objects in the video, a lower value will trigger the alarm for minor motion in the video and vice-versa. Sensitivity Threshold Save of motion detection for each region.
User Guide
Page 68
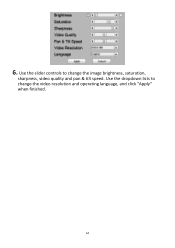
Use the slider controls to change the image brightness, saturation, sharpness, video quality and pan & tilt speed. Use the dropdown lists to change the video resolution and operating language, and click "Apply" when finished. 64 6.
Use the slider controls to change the image brightness, saturation, sharpness, video quality and pan & tilt speed. Use the dropdown lists to change the video resolution and operating language, and click "Apply" when finished. 64 6.
User Guide
Page 73
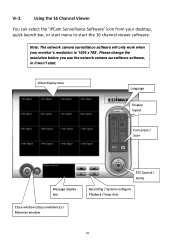
Note: The network camera surveillance software will only work when your desktop, quick launch bar, or start menu to start . Video display area Language Display layout Full screen / Scan Message display box Close window (stop surveillance) / Minimize window PTZ Control / Home Recording / System configure Playback / Snap ...
Note: The network camera surveillance software will only work when your desktop, quick launch bar, or start menu to start . Video display area Language Display layout Full screen / Scan Message display box Close window (stop surveillance) / Minimize window PTZ Control / Home Recording / System configure Playback / Snap ...
User Guide
Page 74
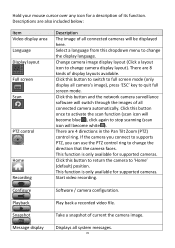
... software will be displayed here. This function is only available for supported cameras. Click this dropdown menu to change the display language. Start video recording. Message display Displays all camera's image), press 'ESC' key to quit full screen mode. There are 4 directions in the Pan...activate the scan function (scan icon will become white ). Snapshot Take a snapshot of its function. Playback Play back a recorded video file. Hold your mouse cursor over any icon for a description of current the camera image. Descriptions are also included below: Item...
... software will be displayed here. This function is only available for supported cameras. Click this dropdown menu to change the display language. Start video recording. Message display Displays all camera's image), press 'ESC' key to quit full screen mode. There are 4 directions in the Pan...activate the scan function (scan icon will become white ). Snapshot Take a snapshot of its function. Playback Play back a recorded video file. Hold your mouse cursor over any icon for a description of current the camera image. Descriptions are also included below: Item...

User Guide
Page 78
Model IP* Username* Web Port* Password Video Format** Reset OK Cancel the camera's location or purpose easily. You should change the entered password if you changed . Save settings in the 'Camera Configuration' ... 'll see the camera's image in the 16 channel viewer's main screen: 74 Default password is '1234'. Input the password of the camera. Select the video encoding format of the selected camera, this camera (MJPEG or MPEG4). Displays the model of this field cannot be changed the password of the camera...
Model IP* Username* Web Port* Password Video Format** Reset OK Cancel the camera's location or purpose easily. You should change the entered password if you changed . Save settings in the 'Camera Configuration' ... 'll see the camera's image in the 16 channel viewer's main screen: 74 Default password is '1234'. Input the password of the camera. Select the video encoding format of the selected camera, this camera (MJPEG or MPEG4). Displays the model of this field cannot be changed the password of the camera...
User Guide
Page 79
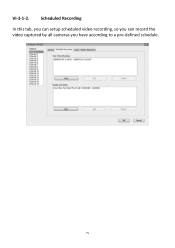
Scheduled Recording In this tab, you can setup scheduled video recording, so you can record the video captured by all cameras you have according to a pre-defined schedule. 75 VI-3-1-2.
Scheduled Recording In this tab, you can setup scheduled video recording, so you can record the video captured by all cameras you have according to a pre-defined schedule. 75 VI-3-1-2.
User Guide
Page 81
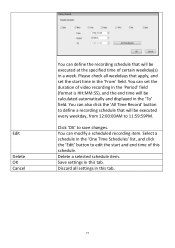
You can set the start and end time of certain weekday(s) in a week. Discard all weekdays that apply, and set the duration of video recording in the 'Period' field (format is HH:MM:SS), and the end time will be calculated automatically and displayed in the 'From' field. Select a ...
You can set the start and end time of certain weekday(s) in a week. Discard all weekdays that apply, and set the duration of video recording in the 'Period' field (format is HH:MM:SS), and the end time will be calculated automatically and displayed in the 'From' field. Select a ...

User Guide
Page 82
... and the network camera surveillance software will not play the audio captured by this tab. 78 VI-3-1-3. Discard all settings: Item Channel Mute Audio Record Video Only OK Cancel Description Select the channel number you wish to set. Check this box and the network camera surveillance software will not record the...
... and the network camera surveillance software will not play the audio captured by this tab. 78 VI-3-1-3. Discard all settings: Item Channel Mute Audio Record Video Only OK Cancel Description Select the channel number you wish to set. Check this box and the network camera surveillance software will not record the...
User Guide
Page 86
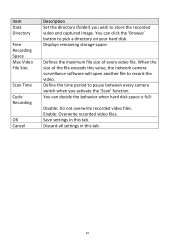
... camera surveillance software will open another file to pick a directory on your hard disk. When the size of every video file. Item Data Directory Free Recording Space Max Video File Size Scan Time Cycle Recording OK Cancel Description Set the directory (folder) you activate the 'Scan' function. ...Define the time period to pause between every camera switch when you wish to store the recorded video and captured image. Enable: Overwrite recorded video files. You can decide the behavior when hard disk space is full: Disable: Do not overwrite recorded...
... camera surveillance software will open another file to pick a directory on your hard disk. When the size of every video file. Item Data Directory Free Recording Space Max Video File Size Scan Time Cycle Recording OK Cancel Description Set the directory (folder) you activate the 'Scan' function. ...Define the time period to pause between every camera switch when you wish to store the recorded video and captured image. Enable: Overwrite recorded video files. You can decide the behavior when hard disk space is full: Disable: Do not overwrite recorded...
User Guide
Page 92
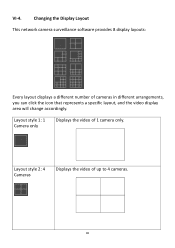
Layout style 1: 1 Camera only Displays the video of cameras in different arrangements, you can click the icon that represents a specific layout, and the video display area will change accordingly. Changing the Display Layout This network camera surveillance software provides 8 display layouts: Every layout displays a different number of 1 camera only. VI-4. Layout style 2: 4 Cameras Displays the video of up to 4 cameras. 88
Layout style 1: 1 Camera only Displays the video of cameras in different arrangements, you can click the icon that represents a specific layout, and the video display area will change accordingly. Changing the Display Layout This network camera surveillance software provides 8 display layouts: Every layout displays a different number of 1 camera only. VI-4. Layout style 2: 4 Cameras Displays the video of up to 4 cameras. 88
User Guide
Page 93
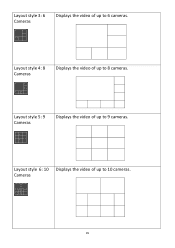
Layout style 5: 9 Cameras Displays the video of up to 10 cameras. Layout style 6: 10 Displays the video of up to 9 cameras. Layout style 4: 8 Cameras Displays the video of up to 6 cameras. Layout style 3: 6 Cameras Displays the video of up to 8 cameras. Cameras 89
Layout style 5: 9 Cameras Displays the video of up to 10 cameras. Layout style 6: 10 Displays the video of up to 9 cameras. Layout style 4: 8 Cameras Displays the video of up to 6 cameras. Layout style 3: 6 Cameras Displays the video of up to 8 cameras. Cameras 89
User Guide
Page 94
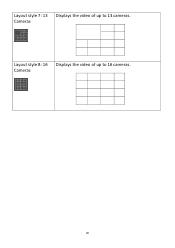
Layout style 7: 13 Displays the video of up to 16 cameras. Cameras Layout style 8: 16 Displays the video of up to 13 cameras. Cameras 90
Layout style 7: 13 Displays the video of up to 16 cameras. Cameras Layout style 8: 16 Displays the video of up to 13 cameras. Cameras 90
