User Guide
Page 2
... slightly different from time to time in this company, its distributor, or its dealer) assumes the entire cost of such revision or changes. Copyright @ Edimax Technology Co., Ltd. You can download the firmware-files at http://www.edimax.com under "Download" page. All brand and product names mentioned in the software. Any software described in this manual are subject to change without the...
... slightly different from time to time in this company, its distributor, or its dealer) assumes the entire cost of such revision or changes. Copyright @ Edimax Technology Co., Ltd. You can download the firmware-files at http://www.edimax.com under "Download" page. All brand and product names mentioned in the software. Any software described in this manual are subject to change without the...
User Guide
Page 3
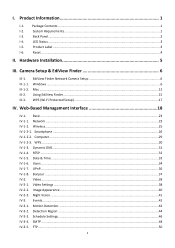
...-1-2-3. Video Settings ...38 IV-2-2. Night Vision...41 IV-3. SMTP ...48 IV-3-5. Camera Setup & EdiView Finder 6 III-1. III-2. Wireless...25 IV-1-2-1. Smartphone ...26 IV-1-2-2. Date & Time ...33 IV-1-6. Motion Detection...42 IV-3-2. I -5. Product Information 1 I -2. Package Contents ...1 I -1. System Requirements...1 I-3. Reset ...4 II. III-3. EdiView Finder Network Camera Setup 6 Windows ...6 Mac ...12 Using EdiView Finder ...15 WPS (Wi-Fi Protected Setup 17 IV. Basic ...23 IV-1-1. Network ...23 IV-1-2. WPS ...30 IV-1-3. RTSP ...32...
...-1-2-3. Video Settings ...38 IV-2-2. Night Vision...41 IV-3. SMTP ...48 IV-3-5. Camera Setup & EdiView Finder 6 III-1. III-2. Wireless...25 IV-1-2-1. Smartphone ...26 IV-1-2-2. Date & Time ...33 IV-1-6. Motion Detection...42 IV-3-2. I -5. Product Information 1 I -2. Package Contents ...1 I -1. System Requirements...1 I-3. Reset ...4 II. III-3. EdiView Finder Network Camera Setup 6 Windows ...6 Mac ...12 Using EdiView Finder ...15 WPS (Wi-Fi Protected Setup 17 IV. Basic ...23 IV-1-1. Network ...23 IV-1-2. WPS ...30 IV-1-3. RTSP ...32...

User Guide
Page 4
... Options...81 VI-3-2-1. Email Setting ...83 VI-3-2-3. About ...87 VI-4. IV-5-1. Installation ...65 VI-2. IV-4. IV-5-2. Pan & Tilt...51 Pan & Tilt Settings...51 Preset ...52 System ...54 Basic ...54 Advanced ...55 Cloud Service...57 Status ...58 System Information ...58 System Log ...60 V. Myedimax.com 61 VI. 16 Channel Viewer for Windows 65 VI-1. Camera Configuration...72 VI-3-1-1. Motion Recording ...79 VI-3-2. Security ...85 VI...
... Options...81 VI-3-2-1. Email Setting ...83 VI-3-2-3. About ...87 VI-4. IV-5-1. Installation ...65 VI-2. IV-4. IV-5-2. Pan & Tilt...51 Pan & Tilt Settings...51 Preset ...52 System ...54 Basic ...54 Advanced ...55 Cloud Service...57 Status ...58 System Information ...58 System Log ...60 V. Myedimax.com 61 VI. 16 Channel Viewer for Windows 65 VI-1. Camera Configuration...72 VI-3-1-1. Motion Recording ...79 VI-3-2. Security ...85 VI...
User Guide
Page 7
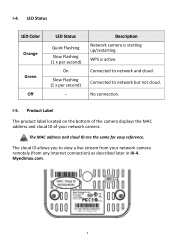
... the camera displays the MAC address and cloud ID of your network camera remotely (from your network camera. I -4. LED Status LED Color Orange Green Off LED Status Quick Flashing Slow Flashing (1 x per second) On Slow Flashing (1 x per second) -- No connection. WPS is starting up/restarting. Connected to network and cloud. The MAC address and cloud ID are the same for easy reference. Myedimax.com. 3 I -5. The cloud ID allows you to view a live stream from any Internet connection...
... the camera displays the MAC address and cloud ID of your network camera remotely (from your network camera. I -4. LED Status LED Color Orange Green Off LED Status Quick Flashing Slow Flashing (1 x per second) On Slow Flashing (1 x per second) -- No connection. WPS is starting up/restarting. Connected to network and cloud. The MAC address and cloud ID are the same for easy reference. Myedimax.com. 3 I -5. The cloud ID allows you to view a live stream from any Internet connection...
User Guide
Page 8
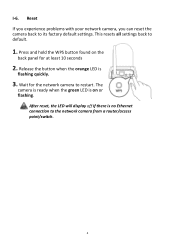
This resets all settings back to its factory default settings. Reset If you experience problems with your network camera, you can reset the camera back to default. 1. Release the button when the orange LED is no Ethernet connection to restart. Press and hold the WPS button found on or flashing. Wait for at least 10 seconds 2. The camera is ready when the green LED is on the back panel for the network camera to the network camera from a router/access point/switch. 4 I-6. After reset, the LED will display off If there is flashing quickly. 3.
This resets all settings back to its factory default settings. Reset If you experience problems with your network camera, you can reset the camera back to default. 1. Release the button when the orange LED is no Ethernet connection to restart. Press and hold the WPS button found on or flashing. Wait for at least 10 seconds 2. The camera is ready when the green LED is on the back panel for the network camera to the network camera from a router/access point/switch. 4 I-6. After reset, the LED will display off If there is flashing quickly. 3.
User Guide
Page 9
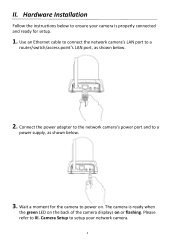
The camera is properly connected and ready for the camera to a power supply, as shown below to III. Please refer to ensure your network camera. 5 Hardware Installation Follow the instructions below . 2. II. Connect the power adapter to the network camera's power port and to power on or flashing. Wait a moment for setup. 1. Camera Setup to a router/switch/access point's LAN port, as shown below. 3. Use an Ethernet cable to connect the network camera's LAN port to setup your camera is ready when the green LED on the back of the camera displays on .
The camera is properly connected and ready for the camera to a power supply, as shown below to III. Please refer to ensure your network camera. 5 Hardware Installation Follow the instructions below . 2. II. Connect the power adapter to the network camera's power port and to power on or flashing. Wait a moment for setup. 1. Camera Setup to a router/switch/access point's LAN port, as shown below. 3. Use an Ethernet cable to connect the network camera's LAN port to setup your camera is ready when the green LED on the back of the camera displays on .

User Guide
Page 10
..." folder. 2. Camera Setup & EdiView Finder Your network camera can use the web based management interface to your CD-ROM drive and if the setup utility does not automatically open, please locate and open the "Autorun.exe" file in just a few minutes. Installing & Using EdiView Finder to install the EdiView Finder software and connect your camera to watch a live stream and further configure the camera if you can follow the instructions below for Windows or Mac in III...
..." folder. 2. Camera Setup & EdiView Finder Your network camera can use the web based management interface to your CD-ROM drive and if the setup utility does not automatically open, please locate and open the "Autorun.exe" file in just a few minutes. Installing & Using EdiView Finder to install the EdiView Finder software and connect your camera to watch a live stream and further configure the camera if you can follow the instructions below for Windows or Mac in III...
User Guide
Page 12
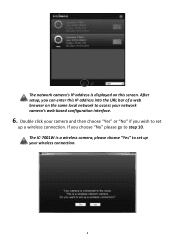
The network camera's IP address is a wireless camera, please choose "Yes" to set up your network camera's web-based configuration interface. 6. After setup, you choose "No" please go to step 10. If you can enter this IP address into the URL bar of a web browser on this screen. Double click your camera and then choose "Yes" or "No" if you wish to access your wireless connection. 8 The IC-7001W is displayed on the same local network to set up a wireless connection.
The network camera's IP address is a wireless camera, please choose "Yes" to set up your network camera's web-based configuration interface. 6. After setup, you choose "No" please go to step 10. If you can enter this IP address into the URL bar of a web browser on this screen. Double click your camera and then choose "Yes" or "No" if you wish to access your wireless connection. 8 The IC-7001W is displayed on the same local network to set up a wireless connection.
User Guide
Page 17
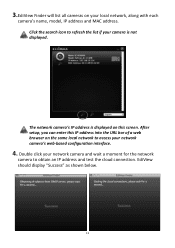
... URL bar of a web browser on your local network, along with each camera's name, model, IP address and MAC address. After setup, you can enter this screen. 3.EdiView Finder will list all cameras on the same local network to obtain an IP address and test the cloud connection. Click the search icon to refresh the list if your network camera and wait a moment for the network camera to access your network camera's web-based configuration...
... URL bar of a web browser on your local network, along with each camera's name, model, IP address and MAC address. After setup, you can enter this screen. 3.EdiView Finder will list all cameras on the same local network to obtain an IP address and test the cloud connection. Click the search icon to refresh the list if your network camera and wait a moment for the network camera to access your network camera's web-based configuration...

User Guide
Page 21
... instructions for your wireless router/access point for how long you need to hold down its WPS. Within two minutes, press the WPS/Reset button on the network camera for the correct length of time to establish a secure wireless connection between your network camera and your network camera (see I-5.) 3. III-3. WPS (Wi-Fi Protected Setup) The WPS button is active. Press and hold the WPS button too long and reset your wireless router/access...
... instructions for your wireless router/access point for how long you need to hold down its WPS. Within two minutes, press the WPS/Reset button on the network camera for the correct length of time to establish a secure wireless connection between your network camera and your network camera (see I-5.) 3. III-3. WPS (Wi-Fi Protected Setup) The WPS button is active. Press and hold the WPS button too long and reset your wireless router/access...
User Guide
Page 23
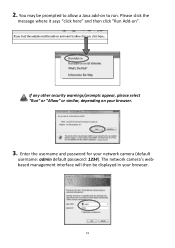
Please click the message where it says "click here" and then click "Run Add-on your browser. 3. The network camera's webbased management interface will then be prompted to allow a Java add-on to run. 2. If any other security warnings/prompts appear, please select "Run" or "Allow" or similar, depending on ". Enter the username and password for your browser. 19 You may be displayed in your network camera (default username: admin default password: 1234).
Please click the message where it says "click here" and then click "Run Add-on your browser. 3. The network camera's webbased management interface will then be prompted to allow a Java add-on to run. 2. If any other security warnings/prompts appear, please select "Run" or "Allow" or similar, depending on ". Enter the username and password for your browser. 19 You may be displayed in your network camera (default username: admin default password: 1234).

User Guide
Page 24
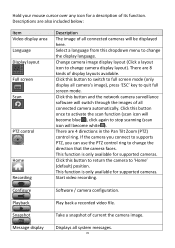
...) Save a snapshot (image) of four preset viewing points. Record video. You will be prompted to select a location to any of the network camera's current view. Expand the live stream from your camera and utilize various camera control using the icons down the left side. Adjust the camera's viewing position to save the recording. For computer users, the "Live View" screen will be configured in Pan & Tilt Preset (refer to save the image. Remote Control Preset Snapshot Record Full Screen Use the remote control to stop recording. On the live view screen...
...) Save a snapshot (image) of four preset viewing points. Record video. You will be prompted to select a location to any of the network camera's current view. Expand the live stream from your camera and utilize various camera control using the icons down the left side. Adjust the camera's viewing position to save the recording. For computer users, the "Live View" screen will be configured in Pan & Tilt Preset (refer to save the image. Remote Control Preset Snapshot Record Full Screen Use the remote control to stop recording. On the live view screen...
User Guide
Page 25
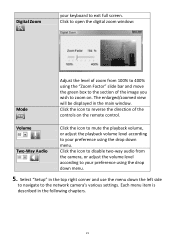
Digital Zoom your keyboard to zoom on the remote control. Click to open the digital zoom window: Mode Adjust the level of zoom from the camera, or adjust the volume level according to your preference using the "Zoom Factor" slide bar and move the green box to the network camera's various settings. Select "Setup" in the following chapters. 21 Click the icon to disable two-way audio from 100% to...
Digital Zoom your keyboard to zoom on the remote control. Click to open the digital zoom window: Mode Adjust the level of zoom from the camera, or adjust the volume level according to your preference using the "Zoom Factor" slide bar and move the green box to the network camera's various settings. Select "Setup" in the following chapters. 21 Click the icon to disable two-way audio from 100% to...
User Guide
Page 28
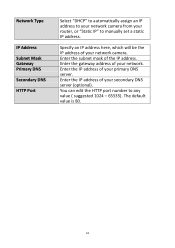
... your network camera from your router, or "Static IP" to any value ( suggested 1024 - 65535). Enter the subnet mask of your network. Enter the IP address of your network camera. The default value is 80. 24 Enter the gateway address of your primary DNS server. Specify an IP address here, which will be the IP address of the IP address. You can edit the HTTP port number to manually set...
... your network camera from your router, or "Static IP" to any value ( suggested 1024 - 65535). Enter the subnet mask of your network. Enter the IP address of your network camera. The default value is 80. 24 Enter the gateway address of your primary DNS server. Specify an IP address here, which will be the IP address of the IP address. You can edit the HTTP port number to manually set...
User Guide
Page 29
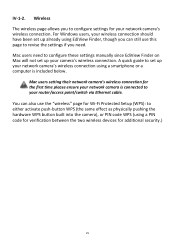
... network camera's wireless connection for the first time please ensure your network camera is included below. IV-1-2. For Windows users, your wireless connection should have been set up already using EdiView Finder, though you need to set up your camera's wireless connection. A quick guide to configure these settings manually since EdiView Finder on Mac will not set up your network camera's wireless connection using a PIN code for verification between the two wireless devices for Wi-Fi Protected Setup (WPS): to either activate push-button...
... network camera's wireless connection for the first time please ensure your network camera is included below. IV-1-2. For Windows users, your wireless connection should have been set up already using EdiView Finder, though you need to set up your camera's wireless connection. A quick guide to configure these settings manually since EdiView Finder on Mac will not set up your network camera's wireless connection using a PIN code for verification between the two wireless devices for Wi-Fi Protected Setup (WPS): to either activate push-button...

User Guide
Page 39
Add a new user. Save the changes to setup a remote video server. 35 This function is useful if you want to an existing, selected user. Remove selected user. Authority Add Modify Remove Anonymous Login Select the user's authority: Operators can view video and configure all settings, while guests can only view video. Anonymous login allows anyone to login to the network camera and view images. Enable or disable anonymous login.
Add a new user. Save the changes to setup a remote video server. 35 This function is useful if you want to an existing, selected user. Remove selected user. Authority Add Modify Remove Anonymous Login Select the user's authority: Operators can view video and configure all settings, while guests can only view video. Anonymous login allows anyone to login to the network camera and view images. Enable or disable anonymous login.
User Guide
Page 52
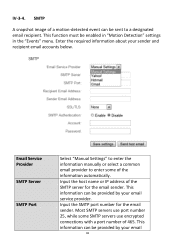
... your email service provider. Email Service Provider SMTP Server SMTP Port Select "Manual Settings" to enter the information manually or select a common email provider to a designated email recipient. This function must be sent to enter some SMTP servers use port number 25, while some of 465. Input the host name or IP address of a motion-detected event can be enabled in "Motion Detection" settings in the "Events" menu. Input the SMTP port number for the email sender. Most SMTP servers use encrypted connections with a port number of...
... your email service provider. Email Service Provider SMTP Server SMTP Port Select "Manual Settings" to enter the information manually or select a common email provider to a designated email recipient. This function must be sent to enter some SMTP servers use port number 25, while some of 465. Input the host name or IP address of a motion-detected event can be enabled in "Motion Detection" settings in the "Events" menu. Input the SMTP port number for the email sender. Most SMTP servers use encrypted connections with a port number of...

User Guide
Page 59
....bin file. Firmware Filename Upgrade Firmware Backup Settings Restore Settings Restart Click "Browse" to locate the firmware file on your computer as this could damage the device. Click to upgrade the firmware to replace your network camera. Please wait a couple of minutes for your current settings. Restarting will not affect the camera's current configuration. 55 Click "Restart Network Camera" to save the current settings on your selected file. Please check the Edimax website...
....bin file. Firmware Filename Upgrade Firmware Backup Settings Restore Settings Restart Click "Browse" to locate the firmware file on your computer as this could damage the device. Click to upgrade the firmware to replace your network camera. Please wait a couple of minutes for your current settings. Restarting will not affect the camera's current configuration. 55 Click "Restart Network Camera" to save the current settings on your selected file. Please check the Edimax website...
User Guide
Page 74
... become blue ), click again to change camera display layout). Click this button and the network camera surveillance software will switch through the images of all system messages. 70 This function is only available for supported cameras. Playback Play back a recorded video file. Click this button to return the camera to change the display language. Start video recording. If the camera you connect to supports PTZ, you can use the PTZ control ring to stop scanning (scan...
... become blue ), click again to change camera display layout). Click this button and the network camera surveillance software will switch through the images of all system messages. 70 This function is only available for supported cameras. Playback Play back a recorded video file. Click this button to return the camera to change the display language. Start video recording. If the camera you connect to supports PTZ, you can use the PTZ control ring to stop scanning (scan...

User Guide
Page 78
Input the user name of this function. Select the video encoding format of the camera. Discard all fields in this tab. *: It's recommended to use 'Select' button to save settings, and if everything's correct, you changed . Model IP* Username* Web Port* Password Video Format** Reset OK Cancel the camera's location or purpose easily. Input the password of the camera. Clear all settings in the 'Camera Configuration' section. Save settings in the 16 channel viewer's main screen: 74...
Input the user name of this function. Select the video encoding format of the camera. Discard all fields in this tab. *: It's recommended to use 'Select' button to save settings, and if everything's correct, you changed . Model IP* Username* Web Port* Password Video Format** Reset OK Cancel the camera's location or purpose easily. Input the password of the camera. Clear all settings in the 'Camera Configuration' section. Save settings in the 16 channel viewer's main screen: 74...


