User Guide
Page 3
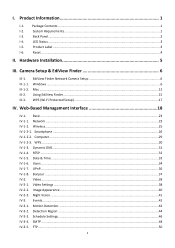
... IV-1-3. III-3. Web-Based Management Interface 18 IV-1. Bonjour ...37 IV-2. Users ...34 IV-1-7. SMTP ...48 IV-3-5. LED Status ...3 I -3. I. Camera Setup & EdiView Finder 6 III-1. Hardware Installation 5 III. UPnP...36 IV-1-8. Motion Detection...42 IV-3-2. Network ...23 IV-1-2. Smartphone ...26 IV-1-2-2.
... IV-1-3. III-3. Web-Based Management Interface 18 IV-1. Bonjour ...37 IV-2. Users ...34 IV-1-7. SMTP ...48 IV-3-5. LED Status ...3 I -3. I. Camera Setup & EdiView Finder 6 III-1. Hardware Installation 5 III. UPnP...36 IV-1-8. Motion Detection...42 IV-3-2. Network ...23 IV-1-2. Smartphone ...26 IV-1-2-2.

User Guide
Page 4
IV-6. Motion Recording ...79 VI-3-2. Email Setting ...83 VI-3-2-3. Scan...92 VI-7. IV-4-2. IV-6-1. Installation ...65 VI-2. Using the 16 Channel Viewer 69 VI-3. Camera Configuration...72 VI-3-1-1. EdiView App 97 III IV-5. Pan & Tilt...51 Pan & Tilt Settings...51 ...
IV-6. Motion Recording ...79 VI-3-2. Email Setting ...83 VI-3-2-3. Scan...92 VI-7. IV-4-2. IV-6-1. Installation ...65 VI-2. Using the 16 Channel Viewer 69 VI-3. Camera Configuration...72 VI-3-1-1. EdiView App 97 III IV-5. Pan & Tilt...51 Pan & Tilt Settings...51 ...
User Guide
Page 9
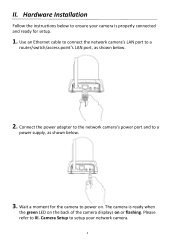
Wait a moment for setup. 1. Use an Ethernet cable to connect the network camera's LAN port to ensure your network camera. 5 Connect the power adapter to the network camera's power port and to a power supply, as shown below to a router/switch/access point's LAN port, as shown below. 3. The camera is properly connected and ready for the camera to power on or flashing. Please refer to setup your camera is ready when the green LED on the back of the camera displays on . Camera Setup to III. Hardware Installation Follow the instructions below . 2. II.
Wait a moment for setup. 1. Use an Ethernet cable to connect the network camera's LAN port to ensure your network camera. 5 Connect the power adapter to the network camera's power port and to a power supply, as shown below to a router/switch/access point's LAN port, as shown below. 3. The camera is properly connected and ready for the camera to power on or flashing. Please refer to setup your camera is ready when the green LED on the back of the camera displays on . Camera Setup to III. Hardware Installation Follow the instructions below . 2. II.

User Guide
Page 10
...either the cloud ID (see V.), the 16 channel viewer software (see VI.), or the EdiView smartphone app (see IV.). Installing & Using EdiView Finder to install the EdiView Finder software and connect your wireless network. III-1. Insert the included CD into your wireless network. First, please follow...further configure the camera if you can be up and running in the "Autorun" folder. 2. Click "Setup Utility" to your camera to install the EdiView Finder software utility. 6 Then, you need (see VII). Windows 1. Camera Setup & EdiView Finder Your network camera can use ...
...either the cloud ID (see V.), the 16 channel viewer software (see VI.), or the EdiView smartphone app (see IV.). Installing & Using EdiView Finder to install the EdiView Finder software and connect your wireless network. III-1. Insert the included CD into your wireless network. First, please follow...further configure the camera if you can be up and running in the "Autorun" folder. 2. Click "Setup Utility" to your camera to install the EdiView Finder software utility. 6 Then, you need (see VII). Windows 1. Camera Setup & EdiView Finder Your network camera can use ...
User Guide
Page 11
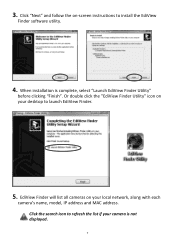
EdiView Finder will list all cameras on your camera is complete, select "Launch EdiView Finder Utility" before clicking "Finish". Click the search icon to refresh the list if your local network, along with each camera's name, model, IP address and MAC address. Click "Next" and follow the on your desktop to install the EdiView Finder software utility. 4. 3. Or double click the "EdiView Finder Utility" icon on -screen instructions to launch EdiView Finder. 5. When installation is not displayed. 7
EdiView Finder will list all cameras on your camera is complete, select "Launch EdiView Finder Utility" before clicking "Finish". Click the search icon to refresh the list if your local network, along with each camera's name, model, IP address and MAC address. Click "Next" and follow the on your desktop to install the EdiView Finder software utility. 4. 3. Or double click the "EdiView Finder Utility" icon on -screen instructions to launch EdiView Finder. 5. When installation is not displayed. 7
User Guide
Page 69
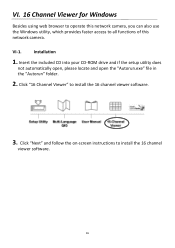
Click "Next" and follow the on-screen instructions to all functions of this network camera. Insert the included CD into your CD-ROM drive and if the setup utility does not automatically open, please locate and open the "Autorun.exe" file in the "Autorun" folder. 2. VI-1. Installation 1. VI. 16 Channel Viewer for Windows Besides using web browser to operate this network camera, you can also use the Windows utility, which provides faster access to install the 16 channel viewer software. 65 Click "16 Channel Viewer" to install the 16 channel viewer software. 3.
Click "Next" and follow the on-screen instructions to all functions of this network camera. Insert the included CD into your CD-ROM drive and if the setup utility does not automatically open, please locate and open the "Autorun.exe" file in the "Autorun" folder. 2. VI-1. Installation 1. VI. 16 Channel Viewer for Windows Besides using web browser to operate this network camera, you can also use the Windows utility, which provides faster access to install the 16 channel viewer software. 65 Click "16 Channel Viewer" to install the 16 channel viewer software. 3.

User Guide
Page 70
4. Check the installation location and click 'Next' to continue. 66 Click "Next" to continue. 5.
4. Check the installation location and click 'Next' to continue. 66 Click "Next" to continue. 5.

User Guide
Page 71
6. A summary of your installation will be displayed. Please wait a moment for the installation to begin the installation. 7. Please check everything is correct and click "Install" to complete. 67
6. A summary of your installation will be displayed. Please wait a moment for the installation to begin the installation. 7. Please check everything is correct and click "Install" to complete. 67

User Guide
Page 101
EdiView App You can use the free EdiView smartphone app to work. Search the Apple app store or Google Play for this function to monitor your camera remotely using a smartphone from any Internet connection. The network camera's green LED must display on to indicate a successful cloud connection, in order for "EdiView". Download and install the EdiView app. 97 EdiView app screens may vary slightly according to version and future updates. 1. VII.
EdiView App You can use the free EdiView smartphone app to work. Search the Apple app store or Google Play for this function to monitor your camera remotely using a smartphone from any Internet connection. The network camera's green LED must display on to indicate a successful cloud connection, in order for "EdiView". Download and install the EdiView app. 97 EdiView app screens may vary slightly according to version and future updates. 1. VII.
User Guide
Page 105
... device, pursuant to operate equipment. Federal Communications Commission (FCC) RF Exposure Requirements SAR compliance has been established in a particular installation. However, special attention must accept any other antenna or transmitter. Consult the dealer or an experienced radio technician for Use None...) Radiation Exposure Statement This equipment complies with FCC radiation exposure set forth for home and office use of those who install and use with the utmost care for certification. The ETSI version of this device is designed with the specific antenna...
... device, pursuant to operate equipment. Federal Communications Commission (FCC) RF Exposure Requirements SAR compliance has been established in a particular installation. However, special attention must accept any other antenna or transmitter. Consult the dealer or an experienced radio technician for Use None...) Radiation Exposure Statement This equipment complies with FCC radiation exposure set forth for home and office use of those who install and use with the utmost care for certification. The ETSI version of this device is designed with the specific antenna...

User Guide
Page 109
..., nothing else grants you distribute them as such parties remain in accord with Subsection b above , provided that you do not apply to control compilation and installation of these conditions, and telling the user how to work based on the Program) on the Program.
..., nothing else grants you distribute them as such parties remain in accord with Subsection b above , provided that you do not apply to control compilation and installation of these conditions, and telling the user how to work based on the Program) on the Program.

