User Guide
Page 3
... Setup & EdiView Finder 6 III-1. WPS ...30 IV-1-3. Package Contents ...1 I -4. Back Panel...2 I -2. Network ...23 IV-1-2. Users ...34 IV-1-7. Basic ...23 IV-1-1. Dynamic DNS...31 IV-1-4. III-1-1. Wireless...25 IV-1-2-1. Product Information 1 I -5. LED Status ...3 I -1. Night Vision...41 IV-3. Product Label ...3 I-6. Date & Time ...33 IV-1-6. UPnP...36 IV-1-8. EdiView Finder Network Camera Setup 6 Windows...
... Setup & EdiView Finder 6 III-1. WPS ...30 IV-1-3. Package Contents ...1 I -4. Back Panel...2 I -2. Network ...23 IV-1-2. Users ...34 IV-1-7. Basic ...23 IV-1-1. Dynamic DNS...31 IV-1-4. III-1-1. Wireless...25 IV-1-2-1. Product Information 1 I -5. LED Status ...3 I -1. Night Vision...41 IV-3. Product Label ...3 I-6. Date & Time ...33 IV-1-6. UPnP...36 IV-1-8. EdiView Finder Network Camera Setup 6 Windows...

User Guide
Page 10
... camera if you need (see VII). Installing & Using EdiView Finder to install the EdiView Finder software and connect your camera to your wireless network. Or you can follow the instructions below for Windows or Mac in III-1. WPS as the network camera. EdiView Finder Network Camera...the cloud ID (see V.), the 16 channel viewer software (see VI.), or the EdiView smartphone app (see IV.). Insert the included CD into your wireless network. Then, you can be up and running in the "Autorun" folder. 2. III-1. Windows 1. Camera Setup & EdiView Finder Your network camera ...
... camera if you need (see VII). Installing & Using EdiView Finder to install the EdiView Finder software and connect your camera to your wireless network. Or you can follow the instructions below for Windows or Mac in III-1. WPS as the network camera. EdiView Finder Network Camera...the cloud ID (see V.), the 16 channel viewer software (see VI.), or the EdiView smartphone app (see IV.). Insert the included CD into your wireless network. Then, you can be up and running in the "Autorun" folder. 2. III-1. Windows 1. Camera Setup & EdiView Finder Your network camera ...
User Guide
Page 12
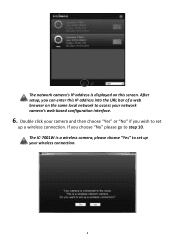
If you can enter this screen. The network camera's IP address is a wireless camera, please choose "Yes" to set up your network camera's web-based configuration interface. 6. The IC-7001W is displayed on this IP address into the URL bar of a web browser on the same local network to access your wireless connection. 8 Double click your camera and then choose "Yes" or "No" if you wish to step 10. After setup, you choose "No" please go to set up a wireless connection.
If you can enter this screen. The network camera's IP address is a wireless camera, please choose "Yes" to set up your network camera's web-based configuration interface. 6. The IC-7001W is displayed on this IP address into the URL bar of a web browser on the same local network to access your wireless connection. 8 Double click your camera and then choose "Yes" or "No" if you wish to step 10. After setup, you choose "No" please go to set up a wireless connection.
User Guide
Page 13
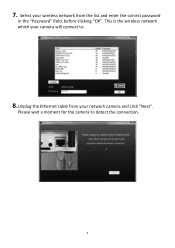
7. This is the wireless network which your network camera and click "Next". Please wait a moment for the camera to . 8.Unplug the Ethernet cable from the list and enter the correct password in the "Password" field, before clicking "OK". Select your wireless network from your camera will connect to detect the connection. 9
7. This is the wireless network which your network camera and click "Next". Please wait a moment for the camera to . 8.Unplug the Ethernet cable from the list and enter the correct password in the "Password" field, before clicking "OK". Select your wireless network from your camera will connect to detect the connection. 9
User Guide
Page 16
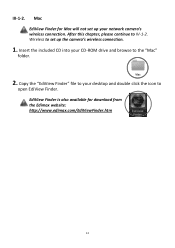
Mac EdiView Finder for download from the Edimax website: http://www.edimax.com/EdiViewFinder.htm 12 III-1-2. Wireless to open EdiView Finder. After this chapter, please continue to the "Mac" folder. 2. EdiView Finder is also available for Mac will not set up your CD-ROM drive and browse to IV-1-2. Insert the included CD into your network camera's wireless connection. Copy the "EdiView Finder" file to your desktop and double click the icon to set up the camera's wireless connection. 1.
Mac EdiView Finder for download from the Edimax website: http://www.edimax.com/EdiViewFinder.htm 12 III-1-2. Wireless to open EdiView Finder. After this chapter, please continue to the "Mac" folder. 2. EdiView Finder is also available for Mac will not set up your CD-ROM drive and browse to IV-1-2. Insert the included CD into your network camera's wireless connection. Copy the "EdiView Finder" file to your desktop and double click the icon to set up the camera's wireless connection. 1.
User Guide
Page 18
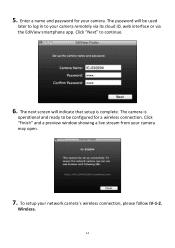
Click "Next" to your camera. Click "Finish" and a preview window showing a live stream from your network camera's wireless connection, please follow IV-1-2. Wireless. 14 The password will indicate that setup is operational and ready to be used later to log in to continue. 6. To setup your camera may open. 7. The next screen will be configured for your camera remotely via its cloud ID, web interface or via the EdiView smartphone app. 5. Enter a name and password for a wireless connection. The camera is complete.
Click "Next" to your camera. Click "Finish" and a preview window showing a live stream from your network camera's wireless connection, please follow IV-1-2. Wireless. 14 The password will indicate that setup is operational and ready to be used later to log in to continue. 6. To setup your camera may open. 7. The next screen will be configured for your camera remotely via its cloud ID, web interface or via the EdiView smartphone app. 5. Enter a name and password for a wireless connection. The camera is complete.

User Guide
Page 21
... the correct length of time to activate WPS. The orange LED will establish a connection. Press and hold the WPS button too long and reset your wireless router/access point for 2 - 5 seconds to activate its WPS button to establish a secure...
... the correct length of time to activate WPS. The orange LED will establish a connection. Press and hold the WPS button too long and reset your wireless router/access point for 2 - 5 seconds to activate its WPS button to establish a secure...
User Guide
Page 29
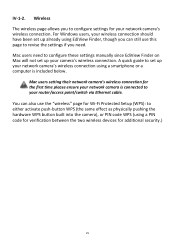
...settings manually since EdiView Finder on Mac will not set up your network camera's wireless connection. IV-1-2. Wireless The wireless page allows you can also use this page to set up your network camera's wireless connection using a smartphone or a computer is connected to either activate push-button WPS... the camera), or PIN code WPS (using a PIN code for verification between the two wireless devices for your camera's wireless connection. Mac users need . You can still use the "wireless" page for the first time please ensure your router/access point/switch via Ethernet cable. ...
...settings manually since EdiView Finder on Mac will not set up your network camera's wireless connection. IV-1-2. Wireless The wireless page allows you can also use this page to set up your network camera's wireless connection using a smartphone or a computer is connected to either activate push-button WPS... the camera), or PIN code WPS (using a PIN code for verification between the two wireless devices for your camera's wireless connection. Mac users need . You can still use the "wireless" page for the first time please ensure your router/access point/switch via Ethernet cable. ...
User Guide
Page 30
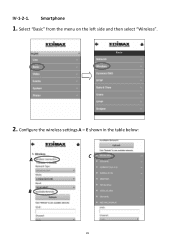
IV-1-2-1. E shown in the table below: A C B 26 Select "Basic" from the menu on the left side and then select "Wireless". 2. Smartphone 1. Configure the wireless settings A -
IV-1-2-1. E shown in the table below: A C B 26 Select "Basic" from the menu on the left side and then select "Wireless". 2. Smartphone 1. Configure the wireless settings A -
User Guide
Page 32
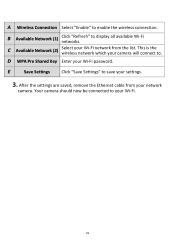
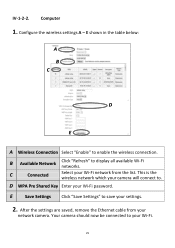
D WPA Pre Shared Key Enter your Wi-Fi. 28 Your camera should now be connected to your Wi-Fi password. After the settings are saved, remove the Ethernet cable from the list. E Save Settings Click "Save Settings" to . This is the wireless network which your Wi-Fi network from your settings. 3. C Available Network (2) Select your camera will connect to save your network camera. B Available Network (1) Click "Refresh" to enable the wireless connection. A Wireless Connection Select "Enable" to display all available Wi-Fi networks.
D WPA Pre Shared Key Enter your Wi-Fi. 28 Your camera should now be connected to your Wi-Fi password. After the settings are saved, remove the Ethernet cable from the list. E Save Settings Click "Save Settings" to . This is the wireless network which your Wi-Fi network from your settings. 3. C Available Network (2) Select your camera will connect to save your network camera. B Available Network (1) Click "Refresh" to enable the wireless connection. A Wireless Connection Select "Enable" to display all available Wi-Fi networks.
User Guide
Page 33
... Wi-Fi network from your network camera. E Save Settings Click "Save Settings" to save your Wi-Fi. 29 B Available Network Click "Refresh" to enable the wireless connection. After the settings are saved, remove the Ethernet cable from the list. Computer 1. Your camera should now be connected to . IV-1-2-2. This is the...
... Wi-Fi network from your network camera. E Save Settings Click "Save Settings" to save your Wi-Fi. 29 B Available Network Click "Refresh" to enable the wireless connection. After the settings are saved, remove the Ethernet cable from the list. Computer 1. Your camera should now be connected to . IV-1-2-2. This is the...
User Guide
Page 34
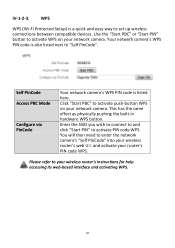
... is also listed next to your network camera. Enter the SSID you wish to connect to and click "Start PIN" to activate WPS on your wireless router's instructions for help accessing its web-based interface and activating WPS. 30 You will then need to set up... wireless connections between compatible devices. and activate your wireless router's web U.I. Use the "Start PBC" or "Start PIN" button to activate PIN code WPS. WPS WPS (Wi-Fi Protected Setup) is a quick and...
... is also listed next to your network camera. Enter the SSID you wish to connect to and click "Start PIN" to activate WPS on your wireless router's instructions for help accessing its web-based interface and activating WPS. 30 You will then need to set up... wireless connections between compatible devices. and activate your wireless router's web U.I. Use the "Start PBC" or "Start PIN" button to activate PIN code WPS. WPS WPS (Wi-Fi Protected Setup) is a quick and...
User Guide
Page 62
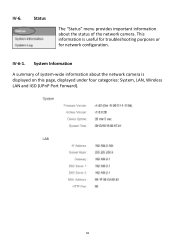
IV-6-1. System Information A summary of system-wide information about the status of the network camera. IV-6. This information is displayed on this page, displayed under four categories: System, LAN, Wireless LAN and IGD (UPnP Port Forward). 58 Status The "Status" menu provides important information about the network camera is useful for troubleshooting purposes or for network configuration.
IV-6-1. System Information A summary of system-wide information about the status of the network camera. IV-6. This information is displayed on this page, displayed under four categories: System, LAN, Wireless LAN and IGD (UPnP Port Forward). 58 Status The "Status" menu provides important information about the network camera is useful for troubleshooting purposes or for network configuration.
User Guide
Page 107
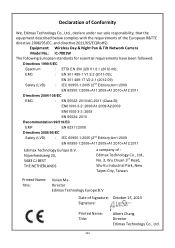
...requirements of Signature: October 15, 2013 Signature: Printed Name: Title: Albert Chang Director Edimax Technology Co., Ltd. 103 Equipment: Wireless Day & Night Pan & Tilt Network Camera Model No.: IC-7001W The following European standards for essential requirements have been followed: Directives 1999/5/EC Spectrum ... : IEC 60950-1:2005 (2nd Edition);Am1:2009 EN 60950-1:2006+A11:2009+A1:2010+A12:2011 Edimax Technology Europe B.V. Nijverheidsweg 25, 5683 CJ BEST THE NETHERLANDS a company of : Edimax Technology Co., Ltd., No. 3, Wu Chuan 3rd Road, Wu-Ku Industrial Park, New Taipei...
...requirements of Signature: October 15, 2013 Signature: Printed Name: Title: Albert Chang Director Edimax Technology Co., Ltd. 103 Equipment: Wireless Day & Night Pan & Tilt Network Camera Model No.: IC-7001W The following European standards for essential requirements have been followed: Directives 1999/5/EC Spectrum ... : IEC 60950-1:2005 (2nd Edition);Am1:2009 EN 60950-1:2006+A11:2009+A1:2010+A12:2011 Edimax Technology Europe B.V. Nijverheidsweg 25, 5683 CJ BEST THE NETHERLANDS a company of : Edimax Technology Co., Ltd., No. 3, Wu Chuan 3rd Road, Wu-Ku Industrial Park, New Taipei...

