User Guide
Page 11
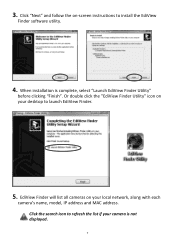
3. Click the search icon to launch EdiView Finder. 5. When installation is not displayed. 7 Or double click the "EdiView Finder Utility" icon on your desktop to refresh the list if your local network, along with each camera's name, model, IP address and MAC address. EdiView Finder will list all cameras on -screen instructions to install the EdiView Finder software utility. 4. Click "Next" and follow the on your camera is complete, select "Launch EdiView Finder Utility" before clicking "Finish".
3. Click the search icon to launch EdiView Finder. 5. When installation is not displayed. 7 Or double click the "EdiView Finder Utility" icon on your desktop to refresh the list if your local network, along with each camera's name, model, IP address and MAC address. EdiView Finder will list all cameras on -screen instructions to install the EdiView Finder software utility. 4. Click "Next" and follow the on your camera is complete, select "Launch EdiView Finder Utility" before clicking "Finish".
User Guide
Page 12
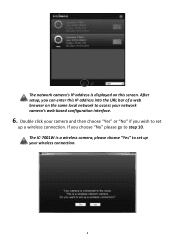
The IC-7001W is displayed on this IP address into the URL bar of a web browser on the same local network to access your network camera's web-based configuration interface. 6. After setup, you can enter this screen. If you wish to set up a wireless connection. The network camera's IP address is a wireless camera, please choose "Yes" to set up your wireless connection. 8 Double click your camera and then choose "Yes" or "No" if you choose "No" please go to step 10.
The IC-7001W is displayed on this IP address into the URL bar of a web browser on the same local network to access your network camera's web-based configuration interface. 6. After setup, you can enter this screen. If you wish to set up a wireless connection. The network camera's IP address is a wireless camera, please choose "Yes" to set up your wireless connection. 8 Double click your camera and then choose "Yes" or "No" if you choose "No" please go to step 10.
User Guide
Page 17
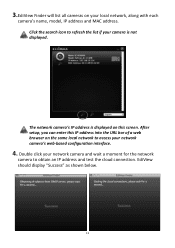
Double click your network camera and wait a moment for the network camera to refresh the list if your camera is displayed on this IP address into the URL bar of a web browser on your network camera's web-based configuration interface. 4. EdiView should display "Success" as shown below. 13...cameras on the same local network to access your local network, along with each camera's name, model, IP address and MAC address. The network camera's IP address is not displayed. Click the search icon to obtain an IP address and test the cloud connection. After setup, you can enter this screen.
Double click your network camera and wait a moment for the network camera to refresh the list if your camera is displayed on this IP address into the URL bar of a web browser on your network camera's web-based configuration interface. 4. EdiView should display "Success" as shown below. 13...cameras on the same local network to access your local network, along with each camera's name, model, IP address and MAC address. The network camera's IP address is not displayed. Click the search icon to obtain an IP address and test the cloud connection. After setup, you can enter this screen.

User Guide
Page 19
III-2. Double click the TV icon on the right side to open a new window with the network camera's IP address settings: 15 Using EdiView Finder You can also use EdiView Finder to find your network camera's IP address, view a live stream in a pop-up window, or click the wrench icon to view a live stream, or modify the network camera's IP address.
III-2. Double click the TV icon on the right side to open a new window with the network camera's IP address settings: 15 Using EdiView Finder You can also use EdiView Finder to find your network camera's IP address, view a live stream in a pop-up window, or click the wrench icon to view a live stream, or modify the network camera's IP address.
User Guide
Page 20
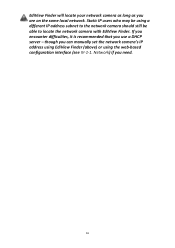
If you encounter difficulties, it is recommended that you are on the same local network. EdiView Finder will locate your network camera as long as you use a DHCP server - Network) if you can manually set the network camera's IP address using EdiView Finder (above) or using a different IP address subnet to the network camera should still be able to locate the network camera with EdiView Finder. Static IP users who may be using the web-based configuration interface (see IV-1-1. though you need. 16
If you encounter difficulties, it is recommended that you are on the same local network. EdiView Finder will locate your network camera as long as you use a DHCP server - Network) if you can manually set the network camera's IP address using EdiView Finder (above) or using a different IP address subnet to the network camera should still be able to locate the network camera with EdiView Finder. Static IP users who may be using the web-based configuration interface (see IV-1-1. though you need. 16
User Guide
Page 22
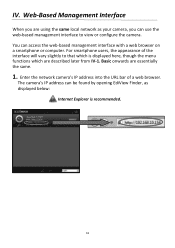
Basic onwards are described later from IV-1. The camera's IP address can access the web-based management interface with a web browser on a smartphone or computer. You can be found by opening EdiView Finder, as your ... the same local network as displayed below: Internet Explorer is displayed here, though the menu functions which are essentially the same. 1. Enter the network camera's IP address into the URL bar of the interface will vary slightly to view or configure the camera.
Basic onwards are described later from IV-1. The camera's IP address can access the web-based management interface with a web browser on a smartphone or computer. You can be found by opening EdiView Finder, as your ... the same local network as displayed below: Internet Explorer is displayed here, though the menu functions which are essentially the same. 1. Enter the network camera's IP address into the URL bar of the interface will vary slightly to view or configure the camera.
User Guide
Page 28
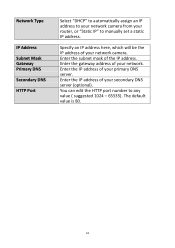
...Enter the subnet mask of your network camera. Enter the IP address of your primary DNS server. Enter the IP address of your secondary DNS server (optional). Enter the gateway address of your network. Network Type IP Address Subnet Mask Gateway Primary DNS Secondary DNS HTTP Port ...Select "DHCP" to automatically assign an IP address to your network camera from your router, or "Static IP" to any value ( suggested 1024 - 65535). The default...
...Enter the subnet mask of your network camera. Enter the IP address of your primary DNS server. Enter the IP address of your secondary DNS server (optional). Enter the gateway address of your network. Network Type IP Address Subnet Mask Gateway Primary DNS Secondary DNS HTTP Port ...Select "DHCP" to automatically assign an IP address to your network camera from your router, or "Static IP" to any value ( suggested 1024 - 65535). The default...
User Guide
Page 35
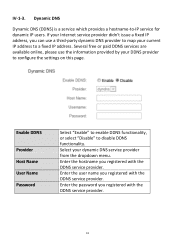
...online, please use a third-party dynamic DNS provider to map your dynamic DNS service provider from the dropdown menu. Select your current IP address to configure the settings on this page. Enter the user name you registered with the DDNS service provider. 31 Enable DDNS ...Provider Host Name User Name Password Select "Enable" to enable DDNS functionality, or select "Disable" to -IP service for dynamic IP users. Dynamic DNS Dynamic DNS (DDNS) is a service which provides a hostname-to disable DDNS functionality. Enter the password you registered with...
...online, please use a third-party dynamic DNS provider to map your dynamic DNS service provider from the dropdown menu. Select your current IP address to configure the settings on this page. Enter the user name you registered with the DDNS service provider. 31 Enable DDNS ...Provider Host Name User Name Password Select "Enable" to enable DDNS functionality, or select "Disable" to -IP service for dynamic IP users. Dynamic DNS Dynamic DNS (DDNS) is a service which provides a hostname-to disable DDNS functionality. Enter the password you registered with...
User Guide
Page 37
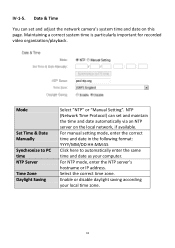
... set and adjust the network camera's system time and date on the local network, if available. For NTP mode, enter the NTP server's hostname or IP address. Enable or disable daylight saving according your computer. NTP (Network Time Protocol) can set and maintain the time and date automatically via an NTP...
... set and adjust the network camera's system time and date on the local network, if available. For NTP mode, enter the NTP server's hostname or IP address. Enable or disable daylight saving according your computer. NTP (Network Time Protocol) can set and maintain the time and date automatically via an NTP...
User Guide
Page 52
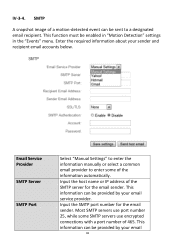
Input the host name or IP address of the information automatically. SMTP A snapshot image of 465. Most SMTP servers use port number 25, while some of the SMTP server for the ...
Input the host name or IP address of the information automatically. SMTP A snapshot image of 465. Most SMTP servers use port number 25, while some of the SMTP server for the ...
User Guide
Page 54
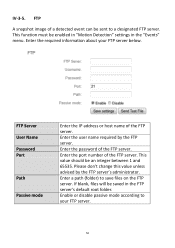
FTP Server User Name Password Port Path Passive mode Enter the IP address or host name of the FTP server. Enter the password of the FTP server. If blank, files will be enabled in "Motion Detection" settings ...
FTP Server User Name Password Port Path Passive mode Enter the IP address or host name of the FTP server. Enter the password of the FTP server. If blank, files will be enabled in "Motion Detection" settings ...
User Guide
Page 60
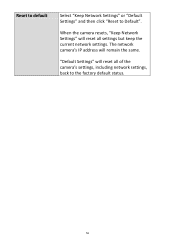
Reset to default Select "Keep Network Settings" or "Default Settings" and then click "Reset to the factory default status. 56 "Default Settings" will reset all of the camera's settings, including network settings, back to Default". When the camera resets, "Keep Network Settings" will reset all settings but keep the current network settings. The network camera's IP address will remain the same.
Reset to default Select "Keep Network Settings" or "Default Settings" and then click "Reset to the factory default status. 56 "Default Settings" will reset all of the camera's settings, including network settings, back to Default". When the camera resets, "Keep Network Settings" will reset all settings but keep the current network settings. The network camera's IP address will remain the same.

User Guide
Page 64
... use. 60 The network camera supports syslog log servers. System Log A system log provides information about the network camera's usage and actions. IV-6-2. Enter the IP address or host name of detail for archiving.
... use. 60 The network camera supports syslog log servers. System Log A system log provides information about the network camera's usage and actions. IV-6-2. Enter the IP address or host name of detail for archiving.

User Guide
Page 78
..., you changed . You should change the entered password if you 'll see the camera's image in the 16 channel viewer's main screen: 74 Input the IP address of the selected camera, this field cannot be changed the password of this function. Displays the model of the camera. Input the user name... of this field. **: Only available for cameras support this camera (MJPEG or MPEG4). Model IP* Username* Web Port* Password Video Format** Reset OK Cancel the camera's location or purpose easily.
..., you changed . You should change the entered password if you 'll see the camera's image in the 16 channel viewer's main screen: 74 Input the IP address of the selected camera, this field cannot be changed the password of this function. Displays the model of the camera. Input the user name... of this field. **: Only available for cameras support this camera (MJPEG or MPEG4). Model IP* Username* Web Port* Password Video Format** Reset OK Cancel the camera's location or purpose easily.

User Guide
Page 88
... administrator. Save settings in this tab. Discard all settings in this tab. 84 Input the SMTP password of most cases, it 's not required. Specify the IP address or host name of the SMTP server you wish to edit the email address. Please refer to use here. Specify the port number of...
... administrator. Save settings in this tab. Discard all settings in this tab. 84 Input the SMTP password of most cases, it 's not required. Specify the IP address or host name of the SMTP server you wish to edit the email address. Please refer to use here. Specify the port number of...
