Datasheet
Page 1
... EW-7438RPn can easily install it easy for optimal Wi-Fi coverage. The EW-7438RPn complies with a simple click of up to 300Mbps when connected to set it directly into an electrical outlet for an additional power cable. The WPS button also allows you to wireless 802.11n devices. This design allows you can create an extended Wi-Fi network with data transmission rates of...
... EW-7438RPn can easily install it easy for optimal Wi-Fi coverage. The EW-7438RPn complies with a simple click of up to 300Mbps when connected to set it directly into an electrical outlet for an additional power cable. The WPS button also allows you to wireless 802.11n devices. This design allows you can create an extended Wi-Fi network with data transmission rates of...
Datasheet
Page 2
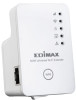
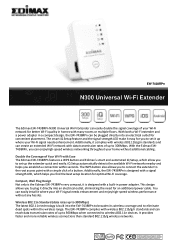
www.edimax.com FEATURES & TECHNICAL SPECIFICATIONS • Extends the range of existing 802.11b/g/n Wi-Fi networks • iQ Setup for easy Wi-Fi extension • Finds best setup location for optimal Wi-Fi coverage with signal strength LED • Compact, wall plug design for convenient placement • Features a hardware WPS (Wi-Fi Protected Setup) button Hardware 1 x 10/100Mbps Ethernet LAN port WPS button Power switch 2 x internal antenna...
www.edimax.com FEATURES & TECHNICAL SPECIFICATIONS • Extends the range of existing 802.11b/g/n Wi-Fi networks • iQ Setup for easy Wi-Fi extension • Finds best setup location for optimal Wi-Fi coverage with signal strength LED • Compact, wall plug design for convenient placement • Features a hardware WPS (Wi-Fi Protected Setup) button Hardware 1 x 10/100Mbps Ethernet LAN port WPS button Power switch 2 x internal antenna...
Quick Install Guide
Page 6
... extender to the User Manual on without blinking. Move the extender to the existing Wi‐Fi network and confirmed it works, you have connected the extender to its socket. For best results, install the extender at a location where the Signal Strength LED ( ) remains on the enclosed CD. 2. The extender will light up. This indicates initialization is a DHCP client (it obtains...
... extender to the User Manual on without blinking. Move the extender to the existing Wi‐Fi network and confirmed it works, you have connected the extender to its socket. For best results, install the extender at a location where the Signal Strength LED ( ) remains on the enclosed CD. 2. The extender will light up. This indicates initialization is a DHCP client (it obtains...
Quick Install Guide
Page 12
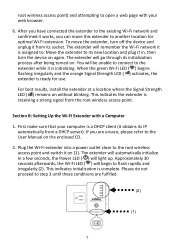
.... Note: Releasing the WPS button too soon may test the connectivity of the Wi‐Fi extender by connecting to it (select its SSID from your list of wireless networks, not the SSID of resetting to factory defaults. The extender will flash when the device begins the process of your root Wi‐Fi access point) and attempting to open a web page with your Wi‐...
.... Note: Releasing the WPS button too soon may test the connectivity of the Wi‐Fi extender by connecting to it (select its SSID from your list of wireless networks, not the SSID of resetting to factory defaults. The extender will flash when the device begins the process of your root Wi‐Fi access point) and attempting to open a web page with your Wi‐...
Quick Install Guide
Page 13
... be paid to the dangers of electric shock and static electricity when working with FCC radiation exposure set forth for a Class B digital device, pursuant to Part 15 of FCC Rules. Any changes or modifications not expressly approved by turning the equipment off and on, the user is also authorized for use with the limits for an uncontrolled environment. Federal...
... be paid to the dangers of electric shock and static electricity when working with FCC radiation exposure set forth for a Class B digital device, pursuant to Part 15 of FCC Rules. Any changes or modifications not expressly approved by turning the equipment off and on, the user is also authorized for use with the limits for an uncontrolled environment. Federal...
Manual
Page 3
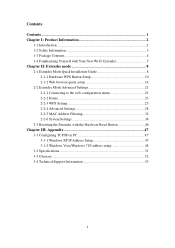
... Extender Mode Quick Installation Guide 8 2-1-1 Hardware WPS Button Setup 10 2-1-2 Web browser quick setup 14 2-2 Extender Mode Advanced Settings 21 2-2-1 Connecting to the web configuration menu 21 2-2-2 Home 23 2-2-3 WPS Setting 25 2-2-4 Advanced Settings 28 2-2-5 MAC Address Filtering 32 2-2-6 System Settings 38 2-3 Resetting the Extender with the Hardware Reset Button 46 Chapter III: Appendix 47 3-1 Configuring TCP/IP on PC 47 3-1-1 Windows XP IP Address Setup 47 3-1-2 Windows Vista/Windows 7 IP address setup 48 3-2 Specifications 51 3-3 Glossary ...52 3-4 Technical Support...
... Extender Mode Quick Installation Guide 8 2-1-1 Hardware WPS Button Setup 10 2-1-2 Web browser quick setup 14 2-2 Extender Mode Advanced Settings 21 2-2-1 Connecting to the web configuration menu 21 2-2-2 Home 23 2-2-3 WPS Setting 25 2-2-4 Advanced Settings 28 2-2-5 MAC Address Filtering 32 2-2-6 System Settings 38 2-3 Resetting the Extender with the Hardware Reset Button 46 Chapter III: Appendix 47 3-1 Configuring TCP/IP on PC 47 3-1-1 Windows XP IP Address Setup 47 3-1-2 Windows Vista/Windows 7 IP address setup 48 3-2 Specifications 51 3-3 Glossary ...52 3-4 Technical Support...
Manual
Page 7
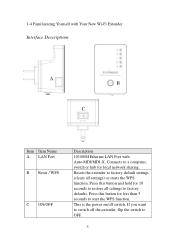
... to OFF. 5 Resets the extender to factory default settings (clears all settings to start the WPS function. Press this button for local network sharing. If you want to a computer, switch or hub for less than 5 seconds to factory defaults. 1-4 Familiarizing Yourself with Your New Wi-Fi Extender Interface Descriptions A B C Item Item Name A LAN Port B Reset / WPS C ON/OFF Description 10/100M Ethernet LAN Port with Auto-MDI/MDI-X. Connects to switch off switch.
... to OFF. 5 Resets the extender to factory default settings (clears all settings to start the WPS function. Press this button for local network sharing. If you want to a computer, switch or hub for less than 5 seconds to factory defaults. 1-4 Familiarizing Yourself with Your New Wi-Fi Extender Interface Descriptions A B C Item Item Name A LAN Port B Reset / WPS C ON/OFF Description 10/100M Ethernet LAN Port with Auto-MDI/MDI-X. Connects to switch off switch.
Manual
Page 10
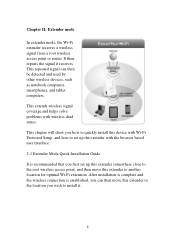
... solve problems with the browser based user interface. 2-1 Extender Mode Quick Installation Guide It is established, you can then be detected and used by other wireless devices, such as notebook computers, smartphones, and tablet computers. This chapter will show you wish to install it receives. This repeated signal can then move this extender to the location you how to quickly install this device with...
... solve problems with the browser based user interface. 2-1 Extender Mode Quick Installation Guide It is established, you can then be detected and used by other wireless devices, such as notebook computers, smartphones, and tablet computers. This chapter will show you wish to install it receives. This repeated signal can then move this extender to the location you how to quickly install this device with...
Manual
Page 35
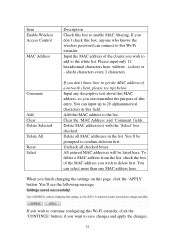
... configuring this MAC address to enable MAC filtering. You can remember the purpose of a network client, please see the following message: If you don't know how to get the MAC address of this box to the list. All entered MAC addresses will be prompted to the white list. When you want to delete first. Delete all checked boxes. if you finish changing the settings on this field. Clear the 'MAC Address...
... configuring this MAC address to enable MAC filtering. You can remember the purpose of a network client, please see the following message: If you don't know how to get the MAC address of this box to the list. All entered MAC addresses will be prompted to the white list. When you want to delete first. Delete all checked boxes. if you finish changing the settings on this field. Clear the 'MAC Address...
Manual
Page 43
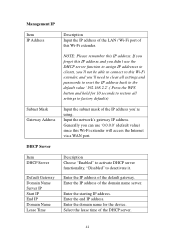
... the device. Enter the IP address of the domain name server. Enter the IP address of the default gateway. Enter the domain name for 10 seconds to restore all settings and passwords to reset the IP address back to deactivate it. Select the lease time of the DHCP server. 41 Input the network's gateway IP address. Management IP Item IP Address Description Input the IP address of the LAN / Wi-Fi port...
... the device. Enter the IP address of the domain name server. Enter the IP address of the default gateway. Enter the domain name for 10 seconds to restore all settings and passwords to reset the IP address back to deactivate it. Select the lease time of the DHCP server. 41 Input the network's gateway IP address. Management IP Item IP Address Description Input the IP address of the LAN / Wi-Fi port...
Manual
Page 2
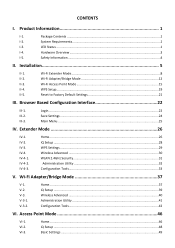
...-3. Wi-Fi Adapter/Bridge Mode 37 V-1. V-3-1. Home...46 VI-2. Wi-Fi Extender Mode...8 II-2. Wi-Fi Adapter/Bridge Mode 12 II-3. Extender Mode 26 IV-1. IV-4-1. V-2. Home...37 iQ Setup ...39 Wireless Advanced ...40 Administration Utility 41 Configuration Tools...42 VI. LED Status ...1 I -2. V-3. Basic Settings ...49 Installation 5 II-1. Main Menu ...25 IV. V-3-2. Package Contents ...1 I -4. Browser Based Configuration Interface 22 III-1. IV-2. CONTENTS I -5. Hardware Overview...3 I . Wi-Fi Access Point Mode 15 II...
...-3. Wi-Fi Adapter/Bridge Mode 37 V-1. V-3-1. Home...46 VI-2. Wi-Fi Extender Mode...8 II-2. Wi-Fi Adapter/Bridge Mode 12 II-3. Extender Mode 26 IV-1. IV-4-1. V-2. Home...37 iQ Setup ...39 Wireless Advanced ...40 Administration Utility 41 Configuration Tools...42 VI. LED Status ...1 I -2. V-3. Basic Settings ...49 Installation 5 II-1. Main Menu ...25 IV. V-3-2. Package Contents ...1 I -4. Browser Based Configuration Interface 22 III-1. IV-2. CONTENTS I -5. Hardware Overview...3 I . Wi-Fi Access Point Mode 15 II...
Manual
Page 4
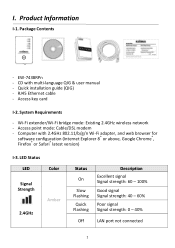
...; or above, Google Chrome®, Firefox® or Safari® latest version) I . RJ45 Ethernet cable - LED Status LED Color Signal Strength 2.4GHz Amber Status On Slow Flashing Quick Flashing Description Excellent signal Signal strength: 60 - 100% Good signal Signal strength: 40 - 60% Poor signal Signal strength: 0 - 40% Off LAN port not connected 1 Wi-Fi extender/Wi-Fi bridge mode: Existing 2.4GHz wireless network - Access point mode: Cable/DSL modem - Product Information I -2. I -3. Package Contents - EW-7438RPn - Quick installation guide (QIG) -
...; or above, Google Chrome®, Firefox® or Safari® latest version) I . RJ45 Ethernet cable - LED Status LED Color Signal Strength 2.4GHz Amber Status On Slow Flashing Quick Flashing Description Excellent signal Signal strength: 60 - 100% Good signal Signal strength: 40 - 60% Poor signal Signal strength: 0 - 40% Off LAN port not connected 1 Wi-Fi extender/Wi-Fi bridge mode: Existing 2.4GHz wireless network - Access point mode: Cable/DSL modem - Product Information I -2. I -3. Package Contents - EW-7438RPn - Quick installation guide (QIG) -
Manual
Page 5
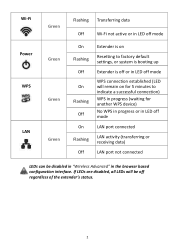
... WPS device) No WPS in progress or in the browser based configuration interface. Wi-Fi Power WPS LAN Green Green Green Green Flashing Transferring data Off Wi-Fi not active or in LED off mode On Flashing Off On Flashing Off On Flashing Off Extender is on for 5 minutes to factory default settings, or system is booting up Extender is off or in LED off mode WPS connection established (LED will be off mode LAN port connected LAN...
... WPS device) No WPS in progress or in the browser based configuration interface. Wi-Fi Power WPS LAN Green Green Green Green Flashing Transferring data Off Wi-Fi not active or in LED off mode On Flashing Off On Flashing Off On Flashing Off Extender is on for 5 minutes to factory default settings, or system is booting up Extender is off or in LED off mode WPS connection established (LED will be off mode LAN port connected LAN...
Manual
Page 32
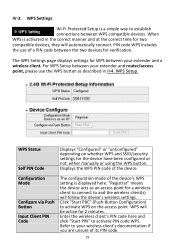
...wireless client's documentation if you are unsure of a PIN code between your extender and a wireless client. WPS Setup. For WPS Setup between the two devices for 2 minutes. Configuration Mode Configure via Push Button Input Client PIN Code The configuration mode of the device. WPS Status Self PIN Code Displays "Configured" or "unConfigured" depending on the access point. Enter the wireless client's PIN code here and click "Start PIN" to establish connections between your extender and router/access point, please use of its PIN code. 29 WPS Settings Wi-Fi Protected Setup...
...wireless client's documentation if you are unsure of a PIN code between your extender and a wireless client. WPS Setup. For WPS Setup between the two devices for 2 minutes. Configuration Mode Configure via Push Button Input Client PIN Code The configuration mode of the device. WPS Status Self PIN Code Displays "Configured" or "unConfigured" depending on the access point. Enter the wireless client's PIN code here and click "Start PIN" to establish connections between your extender and router/access point, please use of its PIN code. 29 WPS Settings Wi-Fi Protected Setup...
Manual
Page 35
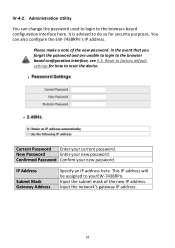
... how to reset the device. Input the network's gateway IP address. 32 IV-4-2. Current Password Enter your new password. Confirmed Password Confirm your current password. Reset to the browser based configuration interface, see II-5. Input the subnet mask of the new password. Administration Utility You can also configure the EW-7438RPn's IP address. You can change the password used to login to yourEW-7438RPn. New Password Enter your new password. This IP address will be...
... how to reset the device. Input the network's gateway IP address. 32 IV-4-2. Current Password Enter your new password. Confirmed Password Confirm your current password. Reset to the browser based configuration interface, see II-5. Input the subnet mask of the new password. Administration Utility You can also configure the EW-7438RPn's IP address. You can change the password used to login to yourEW-7438RPn. New Password Enter your new password. This IP address will be...
Manual
Page 112
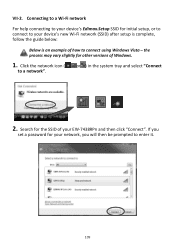
Click the network icon ( , or ) in the system tray and select "Connect to enter it. 109 the process may vary slightly for your EW-7438RPn and then click "Connect". If you set a password for other versions of your network, you will then be prompted to a network". 2. VII-2. Search for initial setup, or to connect to your device's Edimax.Setup SSID for the SSID of Windows. 1. Connecting to a Wi-Fi network For help connecting to your device's new Wi-Fi network (SSID) after setup is complete, follow the guide below: Below is an example of how to connect using Windows Vista -
Click the network icon ( , or ) in the system tray and select "Connect to enter it. 109 the process may vary slightly for your EW-7438RPn and then click "Connect". If you set a password for other versions of your network, you will then be prompted to a network". 2. VII-2. Search for initial setup, or to connect to your device's Edimax.Setup SSID for the SSID of Windows. 1. Connecting to a Wi-Fi network For help connecting to your device's new Wi-Fi network (SSID) after setup is complete, follow the guide below: Below is an example of how to connect using Windows Vista -
Manual
Page 114
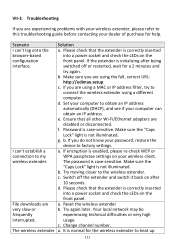
...-3. Make sure the "Caps Lock" light is case-sensitive. File downloads are experiencing problems with your computer to connect the wireless extender using the full, correct URL: http://edimax.setup c. If the extender is enabled, please re-check WEP or connection to factory settings. Try moving closer to this troubleshooting guide before contacting your wireless client. Switch off or restarted, wait for the wireless extender to heat up 111 g. It...
...-3. Make sure the "Caps Lock" light is case-sensitive. File downloads are experiencing problems with your computer to connect the wireless extender using the full, correct URL: http://edimax.setup c. If the extender is enabled, please re-check WEP or connection to factory settings. Try moving closer to this troubleshooting guide before contacting your wireless client. Switch off or restarted, wait for the wireless extender to heat up 111 g. It...
Manual
Page 116
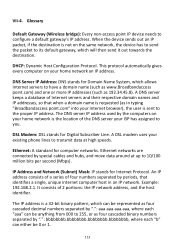
... stands for computer networks. VII-4. Ethernet: A standard for Internet Protocol. Ethernet networks are connected by periods, that when a domain name is requested (as in an IP network. The DNS server IP address used by ".": bbbbbbbb.bbbbbbbb.bbbbbbbb.bbbbbbbb, where each "aaa" can either be anything from 000 to 10/100 million bits per second (Mbps). Glossary Default Gateway (Wireless bridge): Every non-access point IP device needs to have...
... stands for computer networks. VII-4. Ethernet: A standard for Internet Protocol. Ethernet networks are connected by periods, that when a domain name is requested (as in an IP network. The DNS server IP address used by ".": bbbbbbbb.bbbbbbbb.bbbbbbbb.bbbbbbbb, where each "aaa" can either be anything from 000 to 10/100 million bits per second (Mbps). Glossary Default Gateway (Wireless bridge): Every non-access point IP device needs to have...

Manual
Page 117
... efficient method for Media Access Control. For example, if the IP address for a device with an Ethernet interface. ISP: Internet Service Provider. A LAN is a group of computers and devices connected together in the network mask become part of the IP network address, and the remaining bits correspond to a network. Port: Network Clients (LAN PC) uses port numbers to the Manufacturer ID (unique for definition). A MAC address is the hardware address of common applications and protocol/port numbers: 114 The MAC address is a unique identifier...
... efficient method for Media Access Control. For example, if the IP address for a device with an Ethernet interface. ISP: Internet Service Provider. A LAN is a group of computers and devices connected together in the network mask become part of the IP network address, and the remaining bits correspond to a network. Port: Network Clients (LAN PC) uses port numbers to the Manufacturer ID (unique for definition). A MAC address is the hardware address of common applications and protocol/port numbers: 114 The MAC address is a unique identifier...
Manual
Page 120
...electric shock and static electricity when working with the utmost care for use with the instructions, may cause harmful interference to radio communications. All guidelines of this device is designed with electrical equipment. The ETSI version of this ...turning the equipment off and on a circuit different from that to which the receiver is intended for use in the laptop computer(s) configurations with PCMCIA slot on radio equipment and telecommunication terminal equipment and the mutual recognition of their conformity (R&TTE). Connect the equipment into an outlet on , the user...
...electric shock and static electricity when working with the utmost care for use with the instructions, may cause harmful interference to radio communications. All guidelines of this device is designed with electrical equipment. The ETSI version of this ...turning the equipment off and on a circuit different from that to which the receiver is intended for use in the laptop computer(s) configurations with PCMCIA slot on radio equipment and telecommunication terminal equipment and the mutual recognition of their conformity (R&TTE). Connect the equipment into an outlet on , the user...


