Datasheet
Page 1
... dead spots within seconds. Double the Coverage of up to 300Mbps) The latest 802.11n technology is designed with Ease The Edimax EW-7438RPn features a WPS button and Edimax's smart and automated iQ Setup, which helps you to wireless 802.11n devices. It provides faster and more reliable wireless connections than standard 802.11b/g wireless...
... dead spots within seconds. Double the Coverage of up to 300Mbps) The latest 802.11n technology is designed with Ease The Edimax EW-7438RPn features a WPS button and Edimax's smart and automated iQ Setup, which helps you to wireless 802.11n devices. It provides faster and more reliable wireless connections than standard 802.11b/g wireless...
Datasheet
Page 2
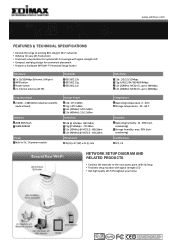
...edimax.com FEATURES & TECHNICAL SPECIFICATIONS • Extends the range of existing 802.11b/g/n Wi-Fi networks • iQ Setup for easy Wi-Fi extension • Finds best setup location for optimal Wi-Fi coverage with signal strength LED • Compact, wall plug design for convenient placement • Features a hardware WPS (Wi-Fi Protected Setup...: max. 95% (noncondensing) Certifications FCC, CE NETWORK SETUP DIAGRAM AND RELATED PRODUCTS • Connect the extender to the root access point with iQ Setup • Find best setup location with signal strength LED • Get high quality ...
...edimax.com FEATURES & TECHNICAL SPECIFICATIONS • Extends the range of existing 802.11b/g/n Wi-Fi networks • iQ Setup for easy Wi-Fi extension • Finds best setup location for optimal Wi-Fi coverage with signal strength LED • Compact, wall plug design for convenient placement • Features a hardware WPS (Wi-Fi Protected Setup...: max. 95% (noncondensing) Certifications FCC, CE NETWORK SETUP DIAGRAM AND RELATED PRODUCTS • Connect the extender to the root access point with iQ Setup • Find best setup location with signal strength LED • Get high quality ...
Quick Install Guide
Page 10
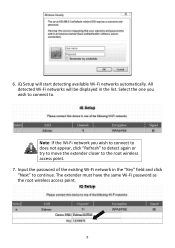
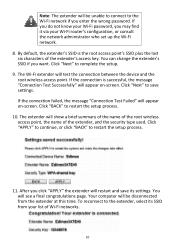
iQ Setup will be displayed in the "Key" field and click "Next" to continue. Select the one you wish to connect to does not appear, click "Refresh" to detect again or try to move the extender closer to . Input the password of the existing Wi‐Fi network in the list. All detected Wi‐Fi networks will start detecting available Wi‐Fi networks automatically. Note: If the Wi‐Fi network you wish to connect to the root wireless access point. 7. 6. The extender must have the same Wi‐Fi password as the root wireless access point. 9
iQ Setup will be displayed in the "Key" field and click "Next" to continue. Select the one you wish to connect to does not appear, click "Refresh" to detect again or try to move the extender closer to . Input the password of the existing Wi‐Fi network in the list. All detected Wi‐Fi networks will start detecting available Wi‐Fi networks automatically. Note: If the Wi‐Fi network you wish to connect to the root wireless access point. 7. 6. The extender must have the same Wi‐Fi password as the root wireless access point. 9
Quick Install Guide
Page 11
...click "APPLY" the extender will be unable to connect to the extender, select its settings. Click "Next" to restart the setup process. 10. Click "BACK" to complete the setup. 9. After you may find it via your list of Wi‐Fi networks. 10 Your computer will restart and save settings... a brief summary of the name of the root wireless access point, the name of the extender's access key. Click "Next" to restart the setup process. 11. The extender will appear on ‐screen. You can change the extender's SSID if you enter the wrong password. If the connection...
...click "APPLY" the extender will be unable to connect to the extender, select its settings. Click "Next" to restart the setup process. 10. Click "BACK" to complete the setup. 9. After you may find it via your list of Wi‐Fi networks. 10 Your computer will restart and save settings... a brief summary of the name of the root wireless access point, the name of the extender's access key. Click "Next" to restart the setup process. 11. The extender will appear on ‐screen. You can change the extender's SSID if you enter the wrong password. If the connection...
Quick Install Guide
Page 12
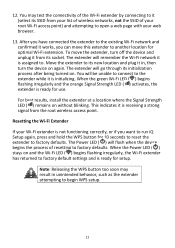
... flashing irregularly, the Wi‐Fi extender has returned to factory defaults. This indicates it works, you want to run iQ Setup again, press and hold the WPS button for setup. Resetting the Wi‐Fi Extender If your web browser. 13. When the Power LED ( ) stays on again. The extender will.... Move the extender to open a web page with your Wi‐Fi extender is ready for 10 seconds to reset the extender to begin WPS setup. 11 After you have connected the extender to the existing Wi‐Fi network and confirmed it is ready for optimal Wi‐Fi extension...
... flashing irregularly, the Wi‐Fi extender has returned to factory defaults. This indicates it works, you want to run iQ Setup again, press and hold the WPS button for setup. Resetting the Wi‐Fi Extender If your web browser. 13. When the Power LED ( ) stays on again. The extender will.... Move the extender to open a web page with your Wi‐Fi extender is ready for 10 seconds to reset the extender to begin WPS setup. 11 After you have connected the extender to the existing Wi‐Fi network and confirmed it is ready for optimal Wi‐Fi extension...
Manual
Page 2
...specifically disclaims any warranties, merchantability, or fitness for updates. makes no more information about this publication may appear slightly different from Edimax Technology Co., Ltd. Should the programs prove defective following their respective holders. For more than the costs of physically performing source ...by any warranty of all rights reserved. We offer, valid for at least three years, to give you have purchased and the setup screen may be reproduced, transmitted, transcribed, stored in a retrieval system, or translated into any language or computer language, in ...
...specifically disclaims any warranties, merchantability, or fitness for updates. makes no more information about this publication may appear slightly different from Edimax Technology Co., Ltd. Should the programs prove defective following their respective holders. For more than the costs of physically performing source ...by any warranty of all rights reserved. We offer, valid for at least three years, to give you have purchased and the setup screen may be reproduced, transmitted, transcribed, stored in a retrieval system, or translated into any language or computer language, in ...
Manual
Page 3
... Familiarizing Yourself with Your New Wi-Fi Extender 5 Chapter II: Extender mode 8 2-1 Extender Mode Quick Installation Guide 8 2-1-1 Hardware WPS Button Setup 10 2-1-2 Web browser quick setup 14 2-2 Extender Mode Advanced Settings 21 2-2-1 Connecting to the web configuration menu 21 2-2-2 Home 23 2-2-3 WPS Setting 25 2-2-4 Advanced Settings 28 ... Button 46 Chapter III: Appendix 47 3-1 Configuring TCP/IP on PC 47 3-1-1 Windows XP IP Address Setup 47 3-1-2 Windows Vista/Windows 7 IP address setup 48 3-2 Specifications 51 3-3 Glossary ...52 3-4 Technical Support Information 55 1
... Familiarizing Yourself with Your New Wi-Fi Extender 5 Chapter II: Extender mode 8 2-1 Extender Mode Quick Installation Guide 8 2-1-1 Hardware WPS Button Setup 10 2-1-2 Web browser quick setup 14 2-2 Extender Mode Advanced Settings 21 2-2-1 Connecting to the web configuration menu 21 2-2-2 Home 23 2-2-3 WPS Setting 25 2-2-4 Advanced Settings 28 ... Button 46 Chapter III: Appendix 47 3-1 Configuring TCP/IP on PC 47 3-1-1 Windows XP IP Address Setup 47 3-1-2 Windows Vista/Windows 7 IP address setup 48 3-2 Specifications 51 3-3 Glossary ...52 3-4 Technical Support Information 55 1
Manual
Page 4
... 1-1 Introduction Thank you to easily find the best location placement for Wi-Fi signal extension and optimal wireless performance. „ Hardware WPS (Wi-Fi Protected Setup) button for purchasing this extender anywhere, and receive excellent network performance in extending Wi-Fi signals and wireless coverage. The ultra-compact design with built...
... 1-1 Introduction Thank you to easily find the best location placement for Wi-Fi signal extension and optimal wireless performance. „ Hardware WPS (Wi-Fi Protected Setup) button for purchasing this extender anywhere, and receive excellent network performance in extending Wi-Fi signals and wireless coverage. The ultra-compact design with built...
Manual
Page 10
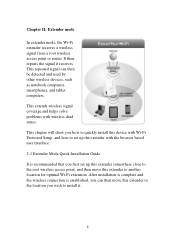
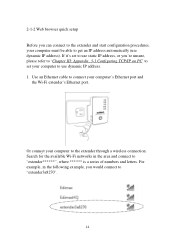
This chapter will show you how to quickly install this device with Wi-Fi Protected Setup, and how to set up the extender with wireless dead zones. After installation is complete and the wireless connection is recommended that you first set ...
This chapter will show you how to quickly install this device with Wi-Fi Protected Setup, and how to set up the extender with wireless dead zones. After installation is complete and the wireless connection is recommended that you first set ...
Manual
Page 12
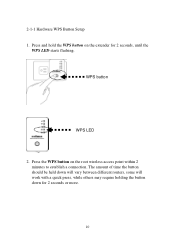
WPS button WPS LED 2. The amount of time the button should be held down will vary between different routers, some will work with a quick press, while others may require holding the button down for 2 seconds, until the WPS LED starts flashing. Press and hold the WPS button on the root wireless access point within 2 minutes to establish a connection. Press the WPS button on the extender for 2 seconds or more. 10 2-1-1 Hardware WPS Button Setup 1.
WPS button WPS LED 2. The amount of time the button should be held down will vary between different routers, some will work with a quick press, while others may require holding the button down for 2 seconds, until the WPS LED starts flashing. Press and hold the WPS button on the root wireless access point within 2 minutes to establish a connection. Press the WPS button on the extender for 2 seconds or more. 10 2-1-1 Hardware WPS Button Setup 1.
Manual
Page 13
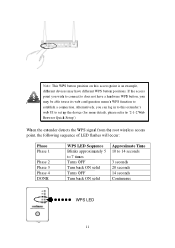
... 11 Note: This WPS button position on this extender's web UI to set up the device (for more details, please refer to '2-1-2 Web Browser Quick Setup') When the extender detects the WPS signal from the root wireless access point, the following sequence of LED flashes will occur: Phase Phase 1 Phase 2 Phase...
... 11 Note: This WPS button position on this extender's web UI to set up the device (for more details, please refer to '2-1-2 Web Browser Quick Setup') When the extender detects the WPS signal from the root wireless access point, the following sequence of LED flashes will occur: Phase Phase 1 Phase 2 Phase...

Manual
Page 15
The quick installation setup is now done, you can refer to '2-2 Extender mode Advanced Settings' to login to the web UI for other advanced settings. 13
The quick installation setup is now done, you can refer to '2-2 Extender mode Advanced Settings' to login to the web UI for other advanced settings. 13
Manual
Page 16
... example, you 're unsure, please refer to 'Chapter III: Appendix, 3-1 Configuring TCP/IP on PC' to set to use dynamic IP address. 1. 2-1-2 Web browser quick setup Before you can connect to the extender and start configuration procedures, your computer's Ethernet port and the Wi-Fi extender's Ethernet port. If it's set...
... example, you 're unsure, please refer to 'Chapter III: Appendix, 3-1 Configuring TCP/IP on PC' to set to use dynamic IP address. 1. 2-1-2 Web browser quick setup Before you can connect to the extender and start configuration procedures, your computer's Ethernet port and the Wi-Fi extender's Ethernet port. If it's set...
Manual
Page 19
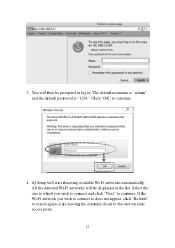
All the detected Wi-Fi networks will start detecting available Wi-Fi networks automatically. iQ Setup will be prompted to continue. You will then be displayed in . If the Wi-Fi network you wish to connect and click "Next" to log in the list. The default username is "admin" and the default password is "1234". Click "OK" to the root wireless access point. 17 Select the one to which you wish to connect to does not appear, click "Refresh" to search again or try moving the extender closer to continue. 4. 3.
All the detected Wi-Fi networks will start detecting available Wi-Fi networks automatically. iQ Setup will be prompted to continue. You will then be displayed in . If the Wi-Fi network you wish to connect and click "Next" to log in the list. The default username is "admin" and the default password is "1234". Click "OK" to the root wireless access point. 17 Select the one to which you wish to connect to does not appear, click "Refresh" to search again or try moving the extender closer to continue. 4. 3.
Manual
Page 20
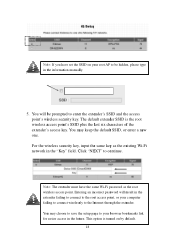
...This option is the root wireless access point's SSID plus the last six characters of the extender's access key. You may choose to save the setup page to enter the extender's SSID and the access point's wireless security key. For the wireless security key, input the same key as the...in the future. Entering an incorrect password will be hidden, please type in the "Key" field. Click "NEXT" to the Internet through the extender. Setup extender manually 5. The default extender SSID is turned on your root AP to be prompted to your computer failing to connect wirelessly to continue. Note...
...This option is the root wireless access point's SSID plus the last six characters of the extender's access key. You may choose to save the setup page to enter the extender's SSID and the access point's wireless security key. For the wireless security key, input the same key as the...in the future. Entering an incorrect password will be hidden, please type in the "Key" field. Click "NEXT" to the Internet through the extender. Setup extender manually 5. The default extender SSID is turned on your root AP to be prompted to your computer failing to connect wirelessly to continue. Note...
Manual
Page 21
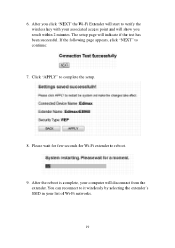
The setup page will disconnect from the extender. Click "APPLY" to reboot. 9. You can reconnect to it wirelessly by selecting the extender's SSID in your associated access point and will show you result within 2 minutes. Please wait for few seconds for Wi-Fi extender to complete the setup. 8. If the following page appears, click "NEXT" to verify the wireless key with your list of Wi-Fi networks. 19 6. After the reboot is complete, your computer will indicate if the test has been successful. After you click "NEXT' the Wi-Fi Extender will start to continue: 7.
The setup page will disconnect from the extender. Click "APPLY" to reboot. 9. You can reconnect to it wirelessly by selecting the extender's SSID in your associated access point and will show you result within 2 minutes. Please wait for few seconds for Wi-Fi extender to complete the setup. 8. If the following page appears, click "NEXT" to verify the wireless key with your list of Wi-Fi networks. 19 6. After the reboot is complete, your computer will indicate if the test has been successful. After you click "NEXT' the Wi-Fi Extender will start to continue: 7.
Manual
Page 27
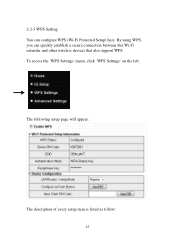
To access the 'WPS Settings' menu, click 'WPS Settings' on the left. 2-2-3 WPS Setting You can quickly establish a secure connection between this Wi-Fi extender and other wireless devices that also support WPS. The following setup page will appear: The description of every setup item is listed as follow: 25 By using WPS, you can configure WPS (Wi-Fi Protected Setup) here.
To access the 'WPS Settings' menu, click 'WPS Settings' on the left. 2-2-3 WPS Setting You can quickly establish a secure connection between this Wi-Fi extender and other wireless devices that also support WPS. The following setup page will appear: The description of every setup item is listed as follow: 25 By using WPS, you can configure WPS (Wi-Fi Protected Setup) here.
Manual
Page 28
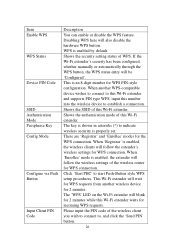
... for 2 minutes. Shows the SSID of WPS. Shows the authentication mode of the wireless client you wish to connect to start Push-Button style WPS setup procedures. Item Enable WPS WPS Status Device PIN Code SSID Authentication Mode Passphrase Key Config Mode Configure via Push Button Input Client PIN Code Description...
... for 2 minutes. Shows the SSID of WPS. Shows the authentication mode of the wireless client you wish to connect to start Push-Button style WPS setup procedures. Item Enable WPS WPS Status Device PIN Code SSID Authentication Mode Passphrase Key Config Mode Configure via Push Button Input Client PIN Code Description...
Manual
Page 30
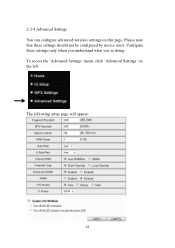
Configure these settings should not be configured by novice users. To access the 'Advanced Settings' menu, click 'Advanced Settings' on this page. Please note that these settings only when you understand what you're doing. The following setup page will appear: 28 2-2-4 Advanced Settings You can configure advanced wireless settings on the left.
Configure these settings should not be configured by novice users. To access the 'Advanced Settings' menu, click 'Advanced Settings' on this page. Please note that these settings only when you understand what you're doing. The following setup page will appear: 28 2-2-4 Advanced Settings You can configure advanced wireless settings on the left.
Manual
Page 34
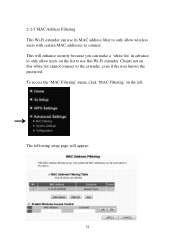
To access the 'MAC Filtering' menu, click 'MAC Filtering' on this Wi-Fi extender. This will appear: 32 2-2-5 MAC Address Filtering This Wi-Fi extender can make a 'white list' in advance, to only allow wireless users with certain MAC addresses to connect. The following setup page will enhance security because you can use its MAC address filter to only allow users on the list to use this white list cannot connect to the extender, even if the user knows the password. Clients not on the left.
To access the 'MAC Filtering' menu, click 'MAC Filtering' on this Wi-Fi extender. This will appear: 32 2-2-5 MAC Address Filtering This Wi-Fi extender can make a 'white list' in advance, to only allow wireless users with certain MAC addresses to connect. The following setup page will enhance security because you can use its MAC address filter to only allow users on the list to use this white list cannot connect to the extender, even if the user knows the password. Clients not on the left.

