
User Manual (English)
Page 1
37" and 42" LCD TVs DX-L37-10A/DX-L42-10A USER GUIDE
37" and 42" LCD TVs DX-L37-10A/DX-L42-10A USER GUIDE
User Manual (English)
Page 2
ii Dynex DX-L37-10A/DX-L42-10A 37" and 42" LCD TVs Contents Child Safety 1 Important safety instructions 2 Warnings 2 Cautions 2 Installing and removing the stand 3 Installing the stand 3 Installing a wall-mount bracket 4 TV components 4 Front 4 Side 4 Back 5 Remote control 5 Using the remote control 6 Installing remote control batteries 6 Aiming the remote control 6 Programming a universal remote control to work with...
ii Dynex DX-L37-10A/DX-L42-10A 37" and 42" LCD TVs Contents Child Safety 1 Important safety instructions 2 Warnings 2 Cautions 2 Installing and removing the stand 3 Installing the stand 3 Installing a wall-mount bracket 4 TV components 4 Front 4 Side 4 Back 5 Remote control 5 Using the remote control 6 Installing remote control batteries 6 Aiming the remote control 6 Programming a universal remote control to work with...
User Manual (English)
Page 4
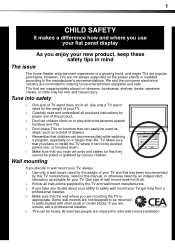
... product. • Don't let children climb on or play with steel studs or cinder blocks. If you are mounting the TV is a growing trend, and larger TVs are popular purchases. However, TVs are inappropriately placed on the proper stands or installed according to walls backed with entertainment system furniture and...chests, or carts may fall over , or knocked down. • Make sure that you route all . Make sure that you place or install the TV where it cannot be pushed, pulled over and cause injury. 1 CHILD SAFETY It makes a difference how and where you use of this manual, or ...
... product. • Don't let children climb on or play with steel studs or cinder blocks. If you are mounting the TV is a growing trend, and larger TVs are popular purchases. However, TVs are inappropriately placed on the proper stands or installed according to walls backed with entertainment system furniture and...chests, or carts may fall over , or knocked down. • Make sure that you route all . Make sure that you place or install the TV where it cannot be pushed, pulled over and cause injury. 1 CHILD SAFETY It makes a difference how and where you use of this manual, or ...

User Manual (English)
Page 5
... damage and personal injury from touching such power lines or circuits as vases, shall be fatal. Handling the LCD panel • Your TV's screen is damaged or frayed. • If liquid has been spilled or objects have fallen into such power lines or circuits. Cautions...characteristics as power-supply cord or plug is damaged, liquid has been spilled or objects have fallen into your outlet, consult an electrician for your TV. 1 Read these instructions. 2 Keep these instructions. 3 Heed all warnings. 4 Follow all servicing to keep from lightning and power line surges....
... damage and personal injury from touching such power lines or circuits as vases, shall be fatal. Handling the LCD panel • Your TV's screen is damaged or frayed. • If liquid has been spilled or objects have fallen into such power lines or circuits. Cautions...characteristics as power-supply cord or plug is damaged, liquid has been spilled or objects have fallen into your outlet, consult an electrician for your TV. 1 Read these instructions. 2 Keep these instructions. 3 Heed all warnings. 4 Follow all servicing to keep from lightning and power line surges....
User Manual (English)
Page 6
... point of the National Electrical Code, ANSI/NFPA No. 40 provides guidance for it to stand upright on the screen as practical. Your TV also contains material that are not considered defects. The speaker is grounded to find a recycler in damage and will form on , or...the stand for correct grounding. Mobile telephone warning To avoid interference with the holes in performance. For disposal or recycling information, contact your TV very carefully when attempting assembly or removal of a table or bench. Do not move or handle your cordless and cellular telephones away from...
... point of the National Electrical Code, ANSI/NFPA No. 40 provides guidance for it to stand upright on the screen as practical. Your TV also contains material that are not considered defects. The speaker is grounded to find a recycler in damage and will form on , or...the stand for correct grounding. Mobile telephone warning To avoid interference with the holes in performance. For disposal or recycling information, contact your TV very carefully when attempting assembly or removal of a table or bench. Do not move or handle your cordless and cellular telephones away from...
User Manual (English)
Page 7
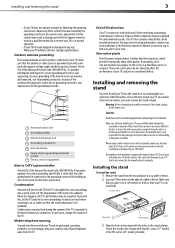
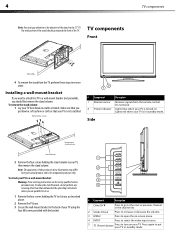
... unless you are for comparative purposes only. Side Remove the stand column Stand column 2 Remove the four screws holding the TV to its base, as described above. 2 Remove the TV base. 3 Secure the wall-mount bracket to the back of this product in these steps in the channel list. Press...M6 screws provided with the bracket. # Component Description 1 CH /CH 2 VOL /VOL Press to go towards the front of the stand on the 37" TV. TV components Front Table edge 4 To remove the stand from the remote control. Press to increase or decrease the volume. 3 MENU Press to open the on...
... unless you are for comparative purposes only. Side Remove the stand column Stand column 2 Remove the four screws holding the TV to its base, as described above. 2 Remove the TV base. 3 Secure the wall-mount bracket to the back of this product in these steps in the channel list. Press...M6 screws provided with the bracket. # Component Description 1 CH /CH 2 VOL /VOL Press to go towards the front of the stand on the 37" TV. TV components Front Table edge 4 To remove the stand from the remote control. Press to increase or decrease the volume. 3 MENU Press to open the on...

User Manual (English)
Page 8
...Headphone jack Description Connect an HDMI device, such as a cable box or DVD player, to this jack to a digital sound system jack to put your TV's audio through the sound system. For more information, see "Connecting a digital sound system" on page 7. 9 S-VIDEO 1 IN jack Connect an S-Video... VGA AUDIO/ VGA PIC jacks Connect an HDMI device, such as a cable box or DVD player, to these jacks. Press again to play your TV in Standby mode. Remote control # Component Description 1 Service port For software update only. Connect a computer to the AV1 IN AUDIO-L and AUDIO-R ...
...Headphone jack Description Connect an HDMI device, such as a cable box or DVD player, to this jack to a digital sound system jack to put your TV's audio through the sound system. For more information, see "Connecting a digital sound system" on page 7. 9 S-VIDEO 1 IN jack Connect an S-Video... VGA AUDIO/ VGA PIC jacks Connect an HDMI device, such as a cable box or DVD player, to these jacks. Press again to play your TV in Standby mode. Remote control # Component Description 1 Service port For software update only. Connect a computer to the AV1 IN AUDIO-L and AUDIO-R ...

User Manual (English)
Page 9
... into the battery compartment. For more information, see "Selecting a channel" on page 12. 20 PICTURE Press to select the video input source. You can select TV, AV1, AV2, S-VIDEO1, S-VIDEO2, Component1, Component2, HDMI1, HDMI2, HDMI3, or VGA (PC). 5 RECALL Press to go to set the sleep timer. For more .... Do not place the remote control in the channel list. Press to go to shock or liquids. Notes: Do not mix different types of your TV. 16.4 ft (5m) Notes: Do not expose the remote control to the last viewed channel. 6 VOL+/VOL- Chemicals may leak into the battery ...
... into the battery compartment. For more information, see "Selecting a channel" on page 12. 20 PICTURE Press to select the video input source. You can select TV, AV1, AV2, S-VIDEO1, S-VIDEO2, Component1, Component2, HDMI1, HDMI2, HDMI3, or VGA (PC). 5 RECALL Press to go to set the sleep timer. For more .... Do not place the remote control in the channel list. Press to go to shock or liquids. Notes: Do not mix different types of your TV. 16.4 ft (5m) Notes: Do not expose the remote control to the last viewed channel. 6 VOL+/VOL- Chemicals may leak into the battery ...
User Manual (English)
Page 10
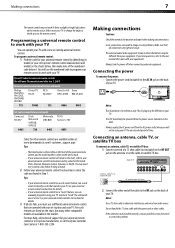
...the 75 ohm cable with your universal remote control's instructions to enter the code you use a different universal remote control that all Dynex TVs manufactured after Jan. 1, 2007) Universal remote control manufacturer and model Philips PHDVD5, PH5DSS, PMDVR8, PDVR8 DirectTV RC23 RCA RCU807 One... refer to correct the problem. Always unplug the AC power cord from the power source indicated on the back of time. Dynex TV codes for universal remote controls (for the brands Orion, Emerson, Memorex, Sansui, Sylvania, or Zenith. Making connections Cautions: Check the terminals ...
...the 75 ohm cable with your universal remote control's instructions to enter the code you use a different universal remote control that all Dynex TVs manufactured after Jan. 1, 2007) Universal remote control manufacturer and model Philips PHDVD5, PH5DSS, PMDVR8, PDVR8 DirectTV RC23 RCA RCU807 One... refer to correct the problem. Always unplug the AC power cord from the power source indicated on the back of time. Dynex TV codes for universal remote controls (for the brands Orion, Emerson, Memorex, Sansui, Sylvania, or Zenith. Making connections Cautions: Check the terminals ...
User Manual (English)
Page 11
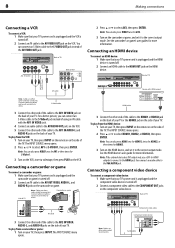
... white to select AV1 or S-VIDEO1, then press ENTER. Connecting a camcorder or game To connect a camcorder or game: 1 Make sure that your TV's power cord is unplugged and the component video device is turned off. 2 Connect a component video cable to the COMPONENT OUT jacks on the component ...with HDMI output Note: Cables are often color-coded to connectors. 8 Making connections Connecting a VCR To connect a VCR: 1 Make sure that your TV's power cord is unplugged and the HDMI device is turned off. 2 Connect an HDMI cable to the HDMI OUT jack on the HDMI device. Connecting...
... white to select AV1 or S-VIDEO1, then press ENTER. Connecting a camcorder or game To connect a camcorder or game: 1 Make sure that your TV's power cord is unplugged and the component video device is turned off. 2 Connect a component video cable to the COMPONENT OUT jacks on the component ...with HDMI output Note: Cables are often color-coded to connectors. 8 Making connections Connecting a VCR To connect a VCR: 1 Make sure that your TV's power cord is unplugged and the HDMI device is turned off. 2 Connect an HDMI cable to the HDMI OUT jack on the HDMI device. Connecting...
User Manual (English)
Page 12
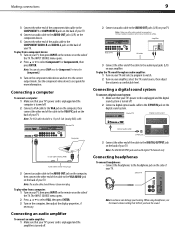
... the display properties, if necessary. Connecting headphones To connect headphones: • Connect the headphones to the audio input jacks (L/R) on the side of the TV. Connecting a computer To connect a computer: 1 Make sure that still lets you hear the sound. Note: The audio cable should be a 15-pin... D-Sub (analog RGB) cable. When using headphones, use the lowest volume setting that your TV's power cord is unplugged and the computer is turned off . 2 Connect a VGA cable to the VGA jack on the computer, then connect the...
... the display properties, if necessary. Connecting headphones To connect headphones: • Connect the headphones to the audio input jacks (L/R) on the side of the TV. Connecting a computer To connect a computer: 1 Make sure that still lets you hear the sound. Note: The audio cable should be a 15-pin... D-Sub (analog RGB) cable. When using headphones, use the lowest volume setting that your TV's power cord is unplugged and the computer is turned off . 2 Connect a VGA cable to the VGA jack on the computer, then connect the...
User Manual (English)
Page 13
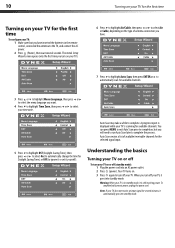
... Menu Language, then press or to select the menu language you turn off your TV, it yourself ). To completely disconnect power, unplug the power cord. Your TV turns on or off your TV. Warning: When your TV is scanning for available channels. The initial Setup Wizard screen opens (only the first... time you will need to run Auto Scan later to complete the process. 10 Turning on your TV for the first time Turning on the type of available/receivable channels for the selected signal input. 5 Press to highlight DST (Daylight Saving ...
... Menu Language, then press or to select the menu language you turn off your TV, it yourself ). To completely disconnect power, unplug the power cord. Your TV turns on or off your TV. Warning: When your TV is scanning for available channels. The initial Setup Wizard screen opens (only the first... time you will need to run Auto Scan later to complete the process. 10 Turning on your TV for the first time Turning on the type of available/receivable channels for the selected signal input. 5 Press to highlight DST (Daylight Saving ...

User Manual (English)
Page 14
...Notes: Depending on the signal source selected, you may vary from the actual screens on your screen. Menus in this manual are shown in TV mode, unless otherwise indicated. You can also select the input source using the following remote control buttons: • COMP- Press once to...Press or to select HDMI3. • VIDEO - Press once to select TV. Press to select AV1. Press three times to select S-Video2. • TV- Press four times to select S-Video1. The above menus are described in TV mode. The illustrations and screens shown in the manual are grayed out. ...
...Notes: Depending on the signal source selected, you may vary from the actual screens on your screen. Menus in this manual are shown in TV mode, unless otherwise indicated. You can also select the input source using the following remote control buttons: • COMP- Press once to...Press or to select HDMI3. • VIDEO - Press once to select TV. Press to select AV1. Press three times to select S-Video2. • TV- Press four times to select S-Video1. The above menus are described in TV mode. The illustrations and screens shown in the manual are grayed out. ...
User Manual (English)
Page 15
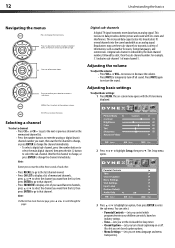
... right. Press to select menu items, to display the main menu. Press to select menu items. Press to restore the sound. Digital sub-channels A digital TV signal transmits more than an analog signal. The increased data capacity also lets broadcasters fit several channels into the same bandwidth as weather forecasts, foreign...
... right. Press to select menu items, to display the main menu. Press to select menu items. Press to restore the sound. Digital sub-channels A digital TV signal transmits more than an analog signal. The increased data capacity also lets broadcasters fit several channels into the same bandwidth as weather forecasts, foreign...

User Manual (English)
Page 16
...picture settings to optimize a computer display. • Input Label-Lets you label a device connected to your TV's input jacks. • Restore Default-Lets you reset most TV settings for the current source to factory default values. • Audio Only-Lets you turn Noise Reduction, ... video input source, and resolution. • Digital mode information-Displays channel number, station name, channel label (if preset), broadcast program name, TV rating, signal type, audio information, resolution, CC mode, current time, and current program start and end times. • Analog mode information-...
...picture settings to optimize a computer display. • Input Label-Lets you label a device connected to your TV's input jacks. • Restore Default-Lets you reset most TV settings for the current source to factory default values. • Audio Only-Lets you turn Noise Reduction, ... video input source, and resolution. • Digital mode information-Displays channel number, station name, channel label (if preset), broadcast program name, TV rating, signal type, audio information, resolution, CC mode, current time, and current program start and end times. • Analog mode information-...

User Manual (English)
Page 17
...Music (for musical programs), Movie (for movies), or Custom (for all channels. Adjusting the computer image To adjust the computer image: 1 Make sure that your TV is in VGA mode. The Setup menu opens. The VGA settings menu opens. H-Position V-Position 5 Press or to highlight Audio, then press . Parental Controls.... • AVC-(Auto volume control) Equalizes the overall volume levels for a customized sound mode). For more vivid image. • Auto Zoom-In TV mode, setting Auto Zoom to On lets you set the Zoom Mode to Auto. 4 Press MENU to return to the previous menu, or press EXIT...
...Music (for musical programs), Movie (for movies), or Custom (for all channels. Adjusting the computer image To adjust the computer image: 1 Make sure that your TV is in VGA mode. The Setup menu opens. The VGA settings menu opens. H-Position V-Position 5 Press or to highlight Audio, then press . Parental Controls.... • AVC-(Auto volume control) Equalizes the overall volume levels for a customized sound mode). For more vivid image. • Auto Zoom-In TV mode, setting Auto Zoom to On lets you set the Zoom Mode to Auto. 4 Press MENU to return to the previous menu, or press EXIT...
User Manual (English)
Page 18
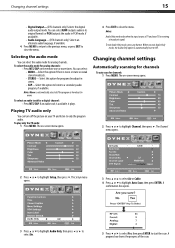
...audio track is broadcast in mono. Notes: Audio Only works only when the input source is TV and your TV and listen to only the program audio. To exit Audio Only mode, press any button. ... mode You can select: • MONO-Select this option if there is noise or static on your TV is automatically reset to close the menu. To select an audio track for channels: 1 Press MENU. ...Controls 3 Press or to select Air or Cable. 4 Press or to start the scan. To play only the TV audio: 1 Press MENU. You can select the audio mode for programs broadcast in PCM mode, if available). ...
...audio track is broadcast in mono. Notes: Audio Only works only when the input source is TV and your TV and listen to only the program audio. To exit Audio Only mode, press any button. ... mode You can select: • MONO-Select this option if there is noise or static on your TV is automatically reset to close the menu. To select an audio track for channels: 1 Press MENU. ...Controls 3 Press or to select Air or Cable. 4 Press or to start the scan. To play only the TV audio: 1 Press MENU. You can select the audio mode for programs broadcast in PCM mode, if available). ...

User Manual (English)
Page 19
... channel. You can create a favorite channel list so you press CH /CH . Hiding channels You can delete channels from the channel list so that your TV skips the channels when you can quickly browse through the pages. 5 Press EXIT to close the menu. Setting up the favorite channel list: 1 Press MENU...
... channel. You can create a favorite channel list so you press CH /CH . Hiding channels You can delete channels from the channel list so that your TV skips the channels when you can quickly browse through the pages. 5 Press EXIT to close the menu. Setting up the favorite channel list: 1 Press MENU...
User Manual (English)
Page 21
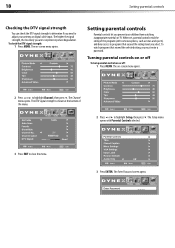
... close the menu. 2 Press or to adjust your children from watching inappropriate material on -screen menu opens. 2 Press or to experience picture degradation. The on TV. The higher the signal strength, the less likely you select. The Channel menu opens. 18 Setting parental controls Checking the DTV signal strength You can...
... close the menu. 2 Press or to adjust your children from watching inappropriate material on -screen menu opens. 2 Press or to experience picture degradation. The on TV. The higher the signal strength, the less likely you select. The Channel menu opens. 18 Setting parental controls Checking the DTV signal strength You can...
User Manual (English)
Page 23
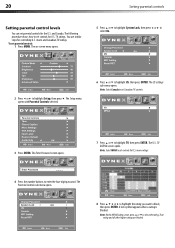
...Controls 3 Press ENTER. The Enter Password screen opens. 7 Press or to highlight US, then press ENTER. TV RATING screen opens. The Setup menu opens with Parental Controls selected. 6 Press or to highlight TV, then press ENTER. and Canada. The on-screen menu opens. 5 Press or to highlight System Lock, ...then press or to select the rating. movie and Canadian TV ratings. A lock symbol appears when a rating is blocked. Note: On the MPAA Rating screen, press or to select On. That rating and all...
...Controls 3 Press ENTER. The Enter Password screen opens. 7 Press or to highlight US, then press ENTER. TV RATING screen opens. The Setup menu opens with Parental Controls selected. 6 Press or to highlight TV, then press ENTER. and Canada. The on-screen menu opens. 5 Press or to highlight System Lock, ...then press or to select the rating. movie and Canadian TV ratings. A lock symbol appears when a rating is blocked. Note: On the MPAA Rating screen, press or to select On. That rating and all...


