User Manual (English)
Page 2
ii Dynex DX-L37-10A/DX-L42-10A 37" and 42" LCD TVs Contents Child Safety 1 Important safety instructions 2 Warnings 2 Cautions 2 Installing and removing the stand 3 Installing the stand 3 Installing a wall-mount bracket 4 TV components 4 Front 4 Side 4 Back 5 Remote control 5 Using the remote control 6 Installing remote control batteries 6 Aiming the remote control 6 Programming a universal ...
ii Dynex DX-L37-10A/DX-L42-10A 37" and 42" LCD TVs Contents Child Safety 1 Important safety instructions 2 Warnings 2 Cautions 2 Installing and removing the stand 3 Installing the stand 3 Installing a wall-mount bracket 4 TV components 4 Front 4 Side 4 Back 5 Remote control 5 Using the remote control 6 Installing remote control batteries 6 Aiming the remote control 6 Programming a universal ...
User Manual (English)
Page 4
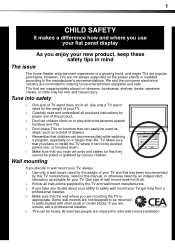
...-than-life" TV. However, TVs are unsure, ask a professional installer. • TVs can become excited while watching a program, especially on the proper stands or installed according to the manufacturer's recommendations. One size of wall mount does not fit all. • Follow all . Tune into safety • One... size of TV stand does not fit all instructions supplied by curious children. 1 CHILD SAFETY It makes a difference how and where you use of this manual, or...
...-than-life" TV. However, TVs are unsure, ask a professional installer. • TVs can become excited while watching a program, especially on the proper stands or installed according to the manufacturer's recommendations. One size of wall mount does not fit all. • Follow all . Tune into safety • One... size of TV stand does not fit all instructions supplied by curious children. 1 CHILD SAFETY It makes a difference how and where you use of this manual, or...

User Manual (English)
Page 5
... must remain readily operable. 16 The apparatus with grounding-type plug is used, use attachments/accessories specified by the manufacturer. 12 Use only with a cart, stand, tripod, bracket, or table specified by the manufacturer that dangerous voltage constituting a risk of fire or electric shock, do not touch the liquid in accordance...
... must remain readily operable. 16 The apparatus with grounding-type plug is used, use attachments/accessories specified by the manufacturer. 12 Use only with a cart, stand, tripod, bracket, or table specified by the manufacturer that dangerous voltage constituting a risk of fire or electric shock, do not touch the liquid in accordance...
User Manual (English)
Page 6
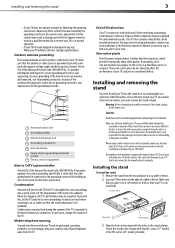
... of the building as practical. End of life directives Your TV contains tin-lead solder and a fluorescent lamp containing a small amount of the stand, unplug the AC power cord. Disposal of these instructions thoroughly before switching it on a table or bench. 2 Lay your TV exhibits a distinct... you are not sure of your ability to its new surroundings for any way. • When your TV face down ) Table edge Stand column Stand 3 Align the holes in any damages or injuries that are not considered defects. Cautions: Read these materials may result in performance. The ...
... of the building as practical. End of life directives Your TV contains tin-lead solder and a fluorescent lamp containing a small amount of the stand, unplug the AC power cord. Disposal of these instructions thoroughly before switching it on a table or bench. 2 Lay your TV exhibits a distinct... you are not sure of your ability to its new surroundings for any way. • When your TV face down ) Table edge Stand column Stand 3 Align the holes in any damages or injuries that are not considered defects. Cautions: Read these materials may result in performance. The ...
User Manual (English)
Page 7
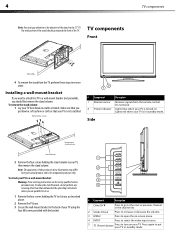
...not block. 2 Power indicator Lights blue when your TV is in these steps in the channel list. TV components Front Table edge 4 To remove the stand from the TV, perform these illustrations may differ from the remote control. To reduce the risk of hazards, do so. 1 Remove the four screws ...TV to put down on your TV in standby mode. Press again to a wall-mount bracket (not provided), you put your TV. Side Remove the stand column Stand column 2 Remove the four screws holding the TV to its base, as described above. 2 Remove the TV base. 3 Secure the wall-mount bracket to...
...not block. 2 Power indicator Lights blue when your TV is in these steps in the channel list. TV components Front Table edge 4 To remove the stand from the TV, perform these illustrations may differ from the remote control. To reduce the risk of hazards, do so. 1 Remove the four screws ...TV to put down on your TV in standby mode. Press again to a wall-mount bracket (not provided), you put your TV. Side Remove the stand column Stand column 2 Remove the four screws holding the TV to its base, as described above. 2 Remove the TV base. 3 Secure the wall-mount bracket to...
FAQs (English)
Page 1
... is often visible on the back. FAQs Dynex LCD TVs (DX-L15-10A, DX-L19-10A, DX-L22-10A, DX-L26-10A, DX-L32-10A, DX-L42-10A) March 23, 2010 Setup ...1 Image Issues...4 Channel Issues...5 Audio Issues...7 Hardware Issues...7 General ...8 Stand/Wall Mounting...9 Computer/VGA Connection...10 Setup 1. Dynex TV codes for universal remote controls (for all Dynex TVs manufactured after Jan. 1, 2007) Universal remote...
... is often visible on the back. FAQs Dynex LCD TVs (DX-L15-10A, DX-L19-10A, DX-L22-10A, DX-L26-10A, DX-L32-10A, DX-L42-10A) March 23, 2010 Setup ...1 Image Issues...4 Channel Issues...5 Audio Issues...7 Hardware Issues...7 General ...8 Stand/Wall Mounting...9 Computer/VGA Connection...10 Setup 1. Dynex TV codes for universal remote controls (for all Dynex TVs manufactured after Jan. 1, 2007) Universal remote...
FAQs (English)
Page 9
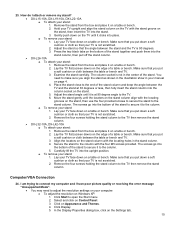
... backward up to remove the base before you may have to do is currently instock. - Stand/Wall Mounting 22. The "Click to Talk" button will need to call you to assist...be accessed by clicking the "Click to adjust the viewing angle backward or forward. • DX-L26-10A, DX-L32-10A, DX-L42-10A o The viewing angle of the monitor to Talk" button on page 29. A sales expert...-mount bracket to your TV. o The warranty can be found on the Dynex website: http://www.dynexproducts.com/skins/skin_1/Topics/Documents/DX-L4210A%20Warranty.pdf 21. o Four M4*10 screws are needed to attach ...
... backward up to remove the base before you may have to do is currently instock. - Stand/Wall Mounting 22. The "Click to Talk" button will need to call you to assist...be accessed by clicking the "Click to adjust the viewing angle backward or forward. • DX-L26-10A, DX-L32-10A, DX-L42-10A o The viewing angle of the monitor to Talk" button on page 29. A sales expert...-mount bracket to your TV. o The warranty can be found on the Dynex website: http://www.dynexproducts.com/skins/skin_1/Topics/Documents/DX-L4210A%20Warranty.pdf 21. o Four M4*10 screws are needed to attach ...
FAQs (English)
Page 10
... it clicks into the stand. 3. Lay your stand: 1. Make sure that you put down on the stand, then insert the TV into place. The screws go into the bottom of the stand to connect my computer and I attach or remove my stand? • DX-L15-10A, DX-L19-10A, DX-L22-10A o To attach your ...TV is 90 degrees. 3. Remove the four screws holding the stand column to the column. Align the locators on the stand column with the stand groove on the ...
... it clicks into the stand. 3. Lay your stand: 1. Make sure that you put down on the stand, then insert the TV into place. The screws go into the bottom of the stand to connect my computer and I attach or remove my stand? • DX-L15-10A, DX-L19-10A, DX-L22-10A o To attach your ...TV is 90 degrees. 3. Remove the four screws holding the stand column to the column. Align the locators on the stand column with the stand groove on the ...


