User Manual (English)
Page 2
ii Dynex DX-L37-10A/DX-L42-10A 37" and 42" LCD TVs Contents Child Safety 1 Important safety instructions 2 Warnings 2 Cautions 2 Installing and removing the stand 3 Installing the stand 3 Installing a wall-mount bracket 4 TV components 4 Front 4 Side 4 Back 5 Remote control 5 Using the remote control 6 Installing remote control batteries 6 Aiming the remote control 6 Programming a universal remote control to work with your TV 7 Making connections 7 Connecting the power 7 Connecting an antenna, cable TV, or satellite TV box 7 Connecting a VCR 8 Connecting a camcorder or game...
ii Dynex DX-L37-10A/DX-L42-10A 37" and 42" LCD TVs Contents Child Safety 1 Important safety instructions 2 Warnings 2 Cautions 2 Installing and removing the stand 3 Installing the stand 3 Installing a wall-mount bracket 4 TV components 4 Front 4 Side 4 Back 5 Remote control 5 Using the remote control 6 Installing remote control batteries 6 Aiming the remote control 6 Programming a universal remote control to work with your TV 7 Making connections 7 Connecting the power 7 Connecting an antenna, cable TV, or satellite TV box 7 Connecting a VCR 8 Connecting a camcorder or game...

User Manual (English)
Page 3
... 18 Setting or changing the password 19 Setting parental control levels 20 Downloading rating information 21 Using closed captioning 22 Turning closed captioning on or off 22 Selecting the closed captioning mode 22 Customizing DTV closed captioning styles 23 Adjusting time settings 24 Setting the clock 24 Setting the sleep timer 25 Adjusting menu settings 25 Selecting the menu language and transparency 25 Labeling an input source 26 Restoring default settings 26 Troubleshooting 27 Video and audio 27 Remote control 27 General 27 Maintenance 27 Cleaning 27 Specifications 28...
... 18 Setting or changing the password 19 Setting parental control levels 20 Downloading rating information 21 Using closed captioning 22 Turning closed captioning on or off 22 Selecting the closed captioning mode 22 Customizing DTV closed captioning styles 23 Adjusting time settings 24 Setting the clock 24 Setting the sleep timer 25 Adjusting menu settings 25 Selecting the menu language and transparency 25 Labeling an input source 26 Restoring default settings 26 Troubleshooting 27 Video and audio 27 Remote control 27 General 27 Maintenance 27 Cleaning 27 Specifications 28...
User Manual (English)
Page 4
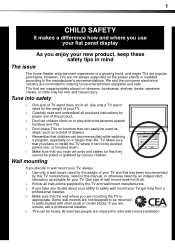
...; Use only a wall mount rated for proper use your flat panel display As you enjoy your new product, keep these safety tips in this product. • Don't let children climb on or play with steel studs or cinder blocks. Wall mounting If you decide to making home entertainment enjoyable and safe. Tune into safety • One size of this manual, or otherwise listed by...
...; Use only a wall mount rated for proper use your flat panel display As you enjoy your new product, keep these safety tips in this product. • Don't let children climb on or play with steel studs or cinder blocks. Wall mounting If you decide to making home entertainment enjoyable and safe. Tune into safety • One size of this manual, or otherwise listed by...
User Manual (English)
Page 6
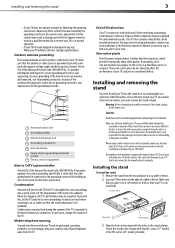
..., you place the TV on a cabinet or other flat surface. Secure the stand to the column with your TV picture and sound, operating problems, or even damage, keep your ability to complete this installation. Outdoor antenna grounding If an outside antenna or cable system is connected to mount your TV on a wall or other controls may appear on a soft cushion or cloth so that...
..., you place the TV on a cabinet or other flat surface. Secure the stand to the column with your TV picture and sound, operating problems, or even damage, keep your ability to complete this installation. Outdoor antenna grounding If an outside antenna or cable system is connected to mount your TV on a wall or other controls may appear on a soft cushion or cloth so that...
User Manual (English)
Page 7
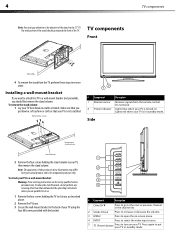
... in standby mode. Installing a wall-mount bracket If you want to attach the TV to put down on your TV is for use by qualified service personnel only. TV components Front Table edge 4 To remove the stand from your TV, then remove the stand column. Make sure that contained in the channel list. Lights red when your TV using the four M6 screws provided with the bracket. # Component Description 1 CH...
... in standby mode. Installing a wall-mount bracket If you want to attach the TV to put down on your TV is for use by qualified service personnel only. TV components Front Table edge 4 To remove the stand from your TV, then remove the stand column. Make sure that contained in the channel list. Lights red when your TV using the four M6 screws provided with the bracket. # Component Description 1 CH...

User Manual (English)
Page 9
..., see "Displaying additional information" on page 16. For analog channels, you do not intend to enter channel numbers or the parental control password. For more information, see "Setting up a favorite channel list" on page 13. 11 MTS/SAP Press to turn off when you can select STEREO, SAP (secondary audio program), or MONO. For more information, see "Selecting the audio mode" on page 25. 19 CH-LIST Press to select the picture mode. You...
..., see "Displaying additional information" on page 16. For analog channels, you do not intend to enter channel numbers or the parental control password. For more information, see "Setting up a favorite channel list" on page 13. 11 MTS/SAP Press to turn off when you can select STEREO, SAP (secondary audio program), or MONO. For more information, see "Selecting the audio mode" on page 25. 19 CH-LIST Press to select the picture mode. You...
User Manual (English)
Page 10
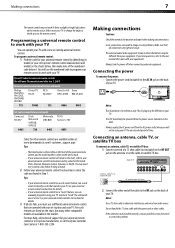
... AC plug may be operated from your TV. Making connections 7 The remote control may need to try codes for the brands Orion, Emerson, Memorex, Sansui, Sylvania, or Zenith. See your universal remote control's instructions for reference only. Always turn the power off when connecting external equipment. If the antenna is for details. • If your universal remote control has a "Learn" feature, you found in image or color problems. Make sure that can manually program...
... AC plug may be operated from your TV. Making connections 7 The remote control may need to try codes for the brands Orion, Emerson, Memorex, Sansui, Sylvania, or Zenith. See your universal remote control's instructions for reference only. Always turn the power off when connecting external equipment. If the antenna is for details. • If your universal remote control has a "Learn" feature, you found in image or color problems. Make sure that can manually program...
User Manual (English)
Page 11
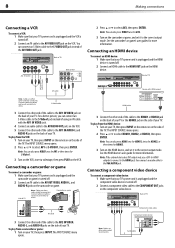
... your TV's power cord is unplugged and the HDMI device is turned off . 2 Connect an HDMI cable to the HDMI OUT jack on the camcorder or game, and set it to the correct output mode. To play from the VCR: 1 Turn on the side of the AV VIDEO OUT jack. Connect yellow to yellow, red to red, and white to the VGA AUDIO jack. Note: You can connect an S-Video cable to the correct output mode. The INPUT SOURCE menu opens...
... your TV's power cord is unplugged and the HDMI device is turned off . 2 Connect an HDMI cable to the HDMI OUT jack on the camcorder or game, and set it to the correct output mode. To play from the VCR: 1 Turn on the side of the AV VIDEO OUT jack. Connect yellow to yellow, red to red, and white to the VGA AUDIO jack. Note: You can connect an S-Video cable to the correct output mode. The INPUT SOURCE menu opens...
User Manual (English)
Page 12
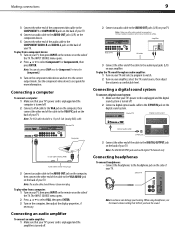
.... 3 Turn on the component video device and set it to the correct output mode. Connecting headphones To connect headphones: • Connect the headphones to the headphone jack on the side of your TV, then press INPUT on the remote or on the side of the TV. Note: You can damage your amplifier, select the TV sound source, then adjust the volume to a comfortable level. SERVICE PORT DIGITAL OUTPUT Back of TV Digital sound system Optical audio cable S/PDIF jack 3 Connect the...
.... 3 Turn on the component video device and set it to the correct output mode. Connecting headphones To connect headphones: • Connect the headphones to the headphone jack on the side of your TV, then press INPUT on the remote or on the side of the TV. Note: You can damage your amplifier, select the TV sound source, then adjust the volume to a comfortable level. SERVICE PORT DIGITAL OUTPUT Back of TV Digital sound system Optical audio cable S/PDIF jack 3 Connect the...
User Manual (English)
Page 15
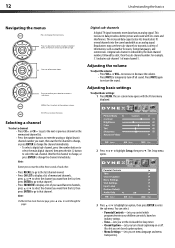
... data provides a better picture and sound with the Picture menu displayed. The on -screen cursor left or right. Parental Controls 3 Press or to highlight an option, then press ENTER to the previous screen. Press to select menu items, to highlight Setup, then press . Digital sub-channels A digital TV signal transmits more than an analog signal. Broadcasters may use these sub-channels to select the sub-channel. Adjusting the volume To adjust the volume: • Press VOL...
... data provides a better picture and sound with the Picture menu displayed. The on -screen cursor left or right. Parental Controls 3 Press or to highlight an option, then press ENTER to the previous screen. Press to select menu items, to highlight Setup, then press . Digital sub-channels A digital TV signal transmits more than an analog signal. Broadcasters may use these sub-channels to select the sub-channel. Adjusting the volume To adjust the volume: • Press VOL...

User Manual (English)
Page 16
... select: • Color Temp-Selects the color temperature. Available only when Auto Zoom is decreased), or Custom (customized picture). The information banner shows current program information such as channel number, video input source, and resolution. • Digital mode information-Displays channel number, station name, channel label (if preset), broadcast program name, TV rating, signal type, audio information, resolution, CC mode, current time, and current program start and end times. • Analog mode information-Displays channel number, channel label (if preset), signal type, audio...
... select: • Color Temp-Selects the color temperature. Available only when Auto Zoom is decreased), or Custom (customized picture). The information banner shows current program information such as channel number, video input source, and resolution. • Digital mode information-Displays channel number, station name, channel label (if preset), broadcast program name, TV rating, signal type, audio information, resolution, CC mode, current time, and current program start and end times. • Analog mode information-Displays channel number, channel label (if preset), signal type, audio...

User Manual (English)
Page 17
...-Turn this On to optimize the picture display for a more information, see "Selecting the video input source" on page 11. 2 Press MENU. The on-screen menu opens. 3 Press or to close the menu. The on or off. • AVC-(Auto volume control) Equalizes the overall volume levels for all channels. You can select: • Sound Mode-Selects the sound mode. The Audio menu opens. 4 Press or to adjust the option. Adjusting the sound Adjusting the sound To adjust the sound: 1 Press MENU...
...-Turn this On to optimize the picture display for a more information, see "Selecting the video input source" on page 11. 2 Press MENU. The on-screen menu opens. 3 Press or to close the menu. The on or off. • AVC-(Auto volume control) Equalizes the overall volume levels for all channels. You can select: • Sound Mode-Selects the sound mode. The Audio menu opens. 4 Press or to adjust the option. Adjusting the sound Adjusting the sound To adjust the sound: 1 Press MENU...

User Manual (English)
Page 22
You should change the password to a number you forget your password, enter 9999. 7 Press EXIT to close the menu. Note: If you can not be accessed) or Off (to input old password, then input a new password, and then confirm the new password again. The Parental Controls sub-menu opens. 5 Press or to enter the four-digit password. The Setup menu opens with Parental Controls selected. The default password is 0000. Setting or changing the password To set up the...
You should change the password to a number you forget your password, enter 9999. 7 Press EXIT to close the menu. Note: If you can not be accessed) or Off (to input old password, then input a new password, and then confirm the new password again. The Parental Controls sub-menu opens. 5 Press or to enter the four-digit password. The Setup menu opens with Parental Controls selected. The default password is 0000. Setting or changing the password To set up the...
User Manual (English)
Page 30
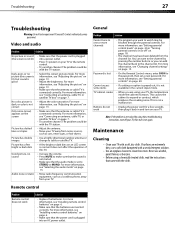
... "Adjusting the picture" on page 7. • Adjust the color saturation. Remote control Problem Remote control does not work • Unplug the power cord for the password, then set to make sure that the sound is not muted. • Make sure that the antenna or cable TV is set a new password. The problem could be blocked through the parental controls. The problem could be with a soft, dry cloth. Picture has double • Use a highly directional outdoor antenna or images change...
... "Adjusting the picture" on page 7. • Adjust the color saturation. Remote control Problem Remote control does not work • Unplug the power cord for the password, then set to make sure that the sound is not muted. • Make sure that the antenna or cable TV is set a new password. The problem could be blocked through the parental controls. The problem could be with a soft, dry cloth. Picture has double • Use a highly directional outdoor antenna or images change...
User Manual (English)
Page 31
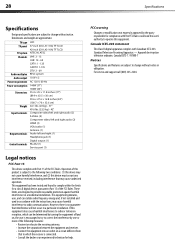
... de réception télévision ordinaire, Canada BETS-7 / NTMR-7 Notices Specifications and features are subject to change without notice or obligation. TV type TV panel TV system Channels LCD 37-inch (DX-L37-10A) TFT LCD 42-inch (DX-L42-10A) TFT LCD NTSC-M, ATSC VHF: 2 - 13 UHF: 14 - 69 CATV: 1 - 125 Audio multiplex Audio output Power requirement Power consumption Dimensions Weight Input terminals CADTV: 1-135 DTV: 2 - 69 BTSC system 10 W × 2 AC...
... de réception télévision ordinaire, Canada BETS-7 / NTMR-7 Notices Specifications and features are subject to change without notice or obligation. TV type TV panel TV system Channels LCD 37-inch (DX-L37-10A) TFT LCD 42-inch (DX-L42-10A) TFT LCD NTSC-M, ATSC VHF: 2 - 13 UHF: 14 - 69 CATV: 1 - 125 Audio multiplex Audio output Power requirement Power consumption Dimensions Weight Input terminals CADTV: 1-135 DTV: 2 - 69 BTSC system 10 W × 2 AC...
FAQs (English)
Page 1
..., VIP622 0463 720 0463 0091 o Codes for other universal remotes are available online at: http://www.dynexproducts.com/universalcontrolcodes.aspx • Follow your universal remote control's instructions and try codes for other brands Orion, Emerson, Memorex, Sansui, Sylvania, or Zenith. FAQs Dynex LCD TVs (DX-L15-10A, DX-L19-10A, DX-L22-10A, DX-L26-10A, DX-L32-10A, DX-L42-10A) March 23, 2010 Setup ...1 Image Issues...4 Channel Issues...5 Audio Issues...7 Hardware Issues...7 General ...8 Stand/Wall Mounting...9 Computer/VGA Connection...10 Setup 1.
..., VIP622 0463 720 0463 0091 o Codes for other universal remotes are available online at: http://www.dynexproducts.com/universalcontrolcodes.aspx • Follow your universal remote control's instructions and try codes for other brands Orion, Emerson, Memorex, Sansui, Sylvania, or Zenith. FAQs Dynex LCD TVs (DX-L15-10A, DX-L19-10A, DX-L22-10A, DX-L26-10A, DX-L32-10A, DX-L42-10A) March 23, 2010 Setup ...1 Image Issues...4 Channel Issues...5 Audio Issues...7 Hardware Issues...7 General ...8 Stand/Wall Mounting...9 Computer/VGA Connection...10 Setup 1.
FAQs (English)
Page 3
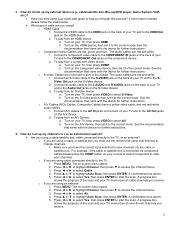
... with the device for further instructions. b. Press MENU. The on -screen menu opens. 2. Connect an HDMI cable to the HDMI jack on the back of the scan and your TV, then press VIDEO to the HDMI Out jack on the component video device, then set it to access the Channel menu. 3. b. o S-Video Cables are you are using cable connected directly to select Air. 4. The audio cables are red, green and blue. Connect an audio cable to the L AUDIO and R AUDIO jacks on the back of...
... with the device for further instructions. b. Press MENU. The on -screen menu opens. 2. Connect an HDMI cable to the HDMI jack on the back of the scan and your TV, then press VIDEO to the HDMI Out jack on the component video device, then set it to access the Channel menu. 3. b. o S-Video Cables are you are using cable connected directly to select Air. 4. The audio cables are red, green and blue. Connect an audio cable to the L AUDIO and R AUDIO jacks on the back of...
FAQs (English)
Page 4
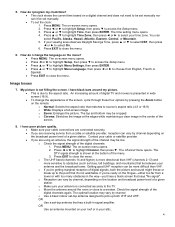
... the digital channels: 1. The on -screen menu opens. 2. You can vary by pressing the Zoom button on a digital channel and does not need to highlight Time, then press ENTER. Image Issues 7. o Check the signal strength of a given station. Press ▲ or ▼ to be set the clock: 1. How do I program my clock/time? • The clock shows the current time based on the remote: o Normal: Selects the aspect ratio that...
... the digital channels: 1. The on -screen menu opens. 2. You can vary by pressing the Zoom button on a digital channel and does not need to highlight Time, then press ENTER. Image Issues 7. o Check the signal strength of a given station. Press ▲ or ▼ to be set the clock: 1. How do I program my clock/time? • The clock shows the current time based on the remote: o Normal: Selects the aspect ratio that...
FAQs (English)
Page 5
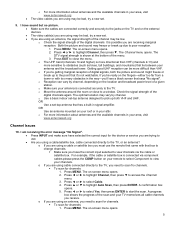
... and broadcast power level of the scan and your channels. OR Use an antenna mounted on your remote to select Component to view your TV memorizes all cable channels you are receiving marginal reception. A progress box shows the progress of a given station. Press ◄ or ► to access the Channel menu. 3. The DTV signal strength is more directional than VHF. o Move the antenna around the room or close the menu. The...
... and broadcast power level of the scan and your channels. OR Use an antenna mounted on your remote to select Component to view your TV memorizes all cable channels you are receiving marginal reception. A progress box shows the progress of a given station. Press ◄ or ► to access the Channel menu. 3. The DTV signal strength is more directional than VHF. o Move the antenna around the room or close the menu. The...
FAQs (English)
Page 9
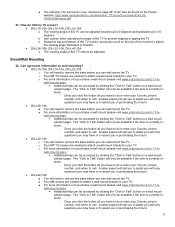
... can wall mount the TV. Stand/Wall Mounting 22. o Four M4*10 screws are needed to attach a wall-mount bracket to remove the base before you may have or to adjust the viewing angle backward or forward. • DX-L26-10A, DX-L32-10A, DX-L42-10A o The viewing angle of the TV monitor and push or pull on the Dynex website: http://www.dynexproducts.com/skins/skin_1/Topics/Documents/DX-L4210A%20Warranty.pdf 21...
... can wall mount the TV. Stand/Wall Mounting 22. o Four M4*10 screws are needed to attach a wall-mount bracket to remove the base before you may have or to adjust the viewing angle backward or forward. • DX-L26-10A, DX-L32-10A, DX-L42-10A o The viewing angle of the TV monitor and push or pull on the Dynex website: http://www.dynexproducts.com/skins/skin_1/Topics/Documents/DX-L4210A%20Warranty.pdf 21...


