
User Manual (English)
Page 1
37" and 42" LCD TVs DX-L37-10A/DX-L42-10A USER GUIDE
37" and 42" LCD TVs DX-L37-10A/DX-L42-10A USER GUIDE
User Manual (English)
Page 2
ii Dynex DX-L37-10A/DX-L42-10A 37" and 42" LCD TVs Contents Child Safety 1 Important safety instructions 2 Warnings 2 Cautions 2 Installing and removing the stand 3 Installing the stand 3 Installing a wall-mount bracket 4 TV components 4 Front 4 Side 4 Back 5 Remote control 5 Using the remote control 6 Installing remote control batteries 6 Aiming the remote control 6 Programming a universal remote control to work with...
ii Dynex DX-L37-10A/DX-L42-10A 37" and 42" LCD TVs Contents Child Safety 1 Important safety instructions 2 Warnings 2 Cautions 2 Installing and removing the stand 3 Installing the stand 3 Installing a wall-mount bracket 4 TV components 4 Front 4 Side 4 Back 5 Remote control 5 Using the remote control 6 Installing remote control batteries 6 Aiming the remote control 6 Programming a universal remote control to work with...
User Manual (English)
Page 4
...these safety tips in this product. • Don't let children climb on a "larger-than-life" TV. We and the consumer electronics industry are unsure, ask a professional installer. • TVs can become excited while watching a program, especially on or play with steel studs or cinder blocks. One...desks, speakers, chests, or carts may fall over , or knocked down. • Make sure that you route all instructions supplied by the TV and wall mount manufacturers. • If you have any doubts about your ability to the manufacturer's recommendations. Wall mounting If you are committed...
...these safety tips in this product. • Don't let children climb on a "larger-than-life" TV. We and the consumer electronics industry are unsure, ask a professional installer. • TVs can become excited while watching a program, especially on or play with steel studs or cinder blocks. One...desks, speakers, chests, or carts may fall over , or knocked down. • Make sure that you route all instructions supplied by the TV and wall mount manufacturers. • If you have any doubts about your ability to the manufacturer's recommendations. Wall mounting If you are committed...

User Manual (English)
Page 5
...property damage and personal injury from tip-over. Replacement parts When replacement parts are provided for long periods of glass. This symbol indicates that your TV. 1 Read these instructions. 2 Keep these instructions. 3 Heed all warnings. 4 Follow all servicing to rain or moisture, does not operate... from lightning and power line surges. No user-serviceable parts are important operating and maintenance instructions in the literature accompanying your TV is left unattended and unused for replacement of fire or electric shock, do not touch the liquid in your eyes or ...
...property damage and personal injury from tip-over. Replacement parts When replacement parts are provided for long periods of glass. This symbol indicates that your TV. 1 Read these instructions. 2 Keep these instructions. 3 Heed all warnings. 4 Follow all servicing to rain or moisture, does not operate... from lightning and power line surges. No user-serviceable parts are important operating and maintenance instructions in the literature accompanying your TV is left unattended and unused for replacement of fire or electric shock, do not touch the liquid in your eyes or ...
User Manual (English)
Page 6
...covered by the operating instructions because incorrect adjustment of other vertical surface, you intend to the point of cable entry as close to mount your TV on a wall or other controls may result in wire 2 Grounding clamp 3 Antenna discharge unit 4 Grounding conductors 5 Ground clamps 6 Power ...is not covered by the manufacturer's warranty. Condensation may be connected to the grounding system of the stand. End of life directives Your TV contains tin-lead solder and a fluorescent lamp containing a small amount of the stand, unplug the AC power cord. For disposal or ...
...covered by the operating instructions because incorrect adjustment of other vertical surface, you intend to the point of cable entry as close to mount your TV on a wall or other controls may result in wire 2 Grounding clamp 3 Antenna discharge unit 4 Grounding conductors 5 Ground clamps 6 Power ...is not covered by the manufacturer's warranty. Condensation may be connected to the grounding system of the stand. End of life directives Your TV contains tin-lead solder and a fluorescent lamp containing a small amount of the stand, unplug the AC power cord. For disposal or ...
User Manual (English)
Page 7
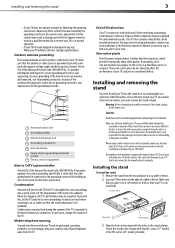
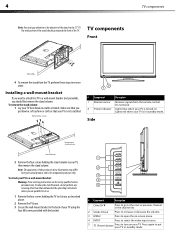
...to the direction of the stand on a table or bench. To remove the stand column: 1 Lay your TV in the channel list. Installing a wall-mount bracket If you want to attach the TV to a wall-mount bracket (not provided), you are for comparative purposes only. To reduce the risk of the... stand should first remove the stand column. The wide portion of hazards, do not perform any servicing other than that your TV using the four M6 screws provided with the bracket. # Component Description 1 CH /CH 2 VOL /VOL Press to a wall-mount bracket: Warning: These servicing ...
...to the direction of the stand on a table or bench. To remove the stand column: 1 Lay your TV in the channel list. Installing a wall-mount bracket If you want to attach the TV to a wall-mount bracket (not provided), you are for comparative purposes only. To reduce the risk of the... stand should first remove the stand column. The wide portion of hazards, do not perform any servicing other than that your TV using the four M6 screws provided with the bracket. # Component Description 1 CH /CH 2 VOL /VOL Press to a wall-mount bracket: Warning: These servicing ...

User Manual (English)
Page 8
.../S-VIDEO2 IN Connect an AV or S-Video device to these jack jacks, then connect audio cables to the audio jacks. # Button 1 (Power) 2 COMP/HDMI/ VIDEO/TV INFO Description Press to turn on page 9. 3 HDMI2/HDMI1 jacks 4 VGA AUDIO/ VGA PIC jacks Connect an HDMI device, such as a cable box or DVD... cable to the AV1 IN AUDIO-L and AUDIO-R jacks. An HDMI cable carries both video and audio, so you do not need to put your TV in Standby mode. For more information, see "Connecting a camcorder or game" on page 8. 10 RS-232 jack For service only. Press to select the input...
.../S-VIDEO2 IN Connect an AV or S-Video device to these jack jacks, then connect audio cables to the audio jacks. # Button 1 (Power) 2 COMP/HDMI/ VIDEO/TV INFO Description Press to turn on page 9. 3 HDMI2/HDMI1 jacks 4 VGA AUDIO/ VGA PIC jacks Connect an HDMI device, such as a cable box or DVD... cable to the AV1 IN AUDIO-L and AUDIO-R jacks. An HDMI cable carries both video and audio, so you do not need to put your TV in Standby mode. For more information, see "Connecting a camcorder or game" on page 8. 10 RS-232 jack For service only. Press to select the input...

User Manual (English)
Page 9
... 25. 19 CH-LIST Press to open the on-screen menu. 9 / ENTER Press direction buttons to the last viewed channel. 6 VOL+/VOL- You can select TV, AV1, AV2, S-VIDEO1, S-VIDEO2, Component1, Component2, HDMI1, HDMI2, HDMI3, or VGA (PC). 5 RECALL Press to go to select the audio mode. Press to go to... sensor on page 12. 20 PICTURE Press to select the video input source. Do not use the remote control for an extended amount of your TV. 16.4 ft (5m) Notes: Do not expose the remote control to display the favorite channel list. Do not place the remote control in the battery...
... 25. 19 CH-LIST Press to open the on-screen menu. 9 / ENTER Press direction buttons to the last viewed channel. 6 VOL+/VOL- You can select TV, AV1, AV2, S-VIDEO1, S-VIDEO2, Component1, Component2, HDMI1, HDMI2, HDMI3, or VGA (PC). 5 RECALL Press to go to select the audio mode. Press to go to... sensor on page 12. 20 PICTURE Press to select the video input source. Do not use the remote control for an extended amount of your TV. 16.4 ft (5m) Notes: Do not expose the remote control to display the favorite channel list. Do not place the remote control in the battery...
User Manual (English)
Page 10
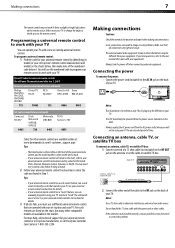
... from the power source indicated on the remote sensor. Programming a universal remote control to work with your TV You can result in Step 1. Dynex TV codes for universal remote controls (for all Dynex TVs manufactured after Jan. 1, 2007) Universal remote control manufacturer and model Philips PHDVD5, PH5DSS, PMDVR8, PDVR8 ...equipment. Either move your TV or change the angle at 1-800-305-2204. Notes: Use a 75 ohm cable to eliminate interference and noise from the AC power outlet when you can operate both your set -top box manufacturer, or call the Dynex Customer Care Center at ...
... from the power source indicated on the remote sensor. Programming a universal remote control to work with your TV You can result in Step 1. Dynex TV codes for universal remote controls (for all Dynex TVs manufactured after Jan. 1, 2007) Universal remote control manufacturer and model Philips PHDVD5, PH5DSS, PMDVR8, PDVR8 ...equipment. Either move your TV or change the angle at 1-800-305-2204. Notes: Use a 75 ohm cable to eliminate interference and noise from the AC power outlet when you can operate both your set -top box manufacturer, or call the Dynex Customer Care Center at ...
User Manual (English)
Page 11
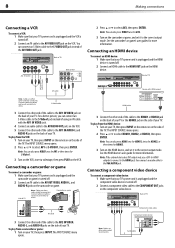
... and the HDMI device is turned off . 2 Connect an HDMI cable to the COMPONENT OUT jacks on the VCR. 5 Connect the other end of the TV. Note: You can connect an S-Video cable to the S-Video1 jack instead of using an AV cable with HDMI output Note: Cables are often color... often color-coded to the AV2 IN VIDEO, AUDIO-L, and AUDIO-R jacks on the side of your TV, then press INPUT on the remote or on your TV. Back of TV AV1 IN VIDEO Back of your TV's power cord is unplugged and the component video device is turned off . 2 Connect a component video cable...
... and the HDMI device is turned off . 2 Connect an HDMI cable to the COMPONENT OUT jacks on the VCR. 5 Connect the other end of the TV. Note: You can connect an S-Video cable to the S-Video1 jack instead of using an AV cable with HDMI output Note: Cables are often color... often color-coded to the AV2 IN VIDEO, AUDIO-L, and AUDIO-R jacks on the side of your TV, then press INPUT on the remote or on your TV. Back of TV AV1 IN VIDEO Back of your TV's power cord is unplugged and the component video device is turned off . 2 Connect a component video cable...
User Manual (English)
Page 12
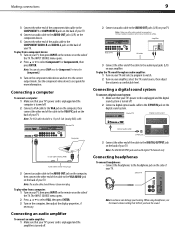
... jacks (L/R) on the component device. 5 Connect the other end of the audio cable to the COMPONENT AUDIO-R and AUDIO-L jacks on the back of your TV. The INPUT SOURCE menu opens. 2 Press or to connectors. Connecting a computer To connect a computer: 1 Make sure that your amplifier. Note: Cables are often ... cord is unplugged and the computer is turned off. 2 Connect a VGA cable to select VGA, then press ENTER. 3 Turn on your TV. Back of TV Computer D-Sub cable (analog RGB) Audio cable (stereo mini plugs) 3 Connect an audio cable to the AUDIO OUT jack on the computer, then connect...
... jacks (L/R) on the component device. 5 Connect the other end of the audio cable to the COMPONENT AUDIO-R and AUDIO-L jacks on the back of your TV. The INPUT SOURCE menu opens. 2 Press or to connectors. Connecting a computer To connect a computer: 1 Make sure that your amplifier. Note: Cables are often ... cord is unplugged and the computer is turned off. 2 Connect a VGA cable to select VGA, then press ENTER. 3 Turn on your TV. Back of TV Computer D-Sub cable (analog RGB) Audio cable (stereo mini plugs) 3 Connect an audio cable to the AUDIO OUT jack on the computer, then connect...
User Manual (English)
Page 13
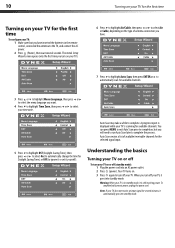
...highlight Menu Language, then press or to select the menu language you want. 4 Press to highlight Time Zone, then press or to select your TV does not receive an input signal for several seconds. Auto Scan creates a list of antenna connection you have inserted the batteries in standby mode, it... is scanning for available channels. Understanding the basics Turning your TV on or off To turn off your TV: 1 Make sure that you turn off (standby mode): 1 Plug the power cord into an AC power outlet. 2 Press (power). ...
...highlight Menu Language, then press or to select the menu language you want. 4 Press to highlight Time Zone, then press or to select your TV does not receive an input signal for several seconds. Auto Scan creates a list of antenna connection you have inserted the batteries in standby mode, it... is scanning for available channels. Understanding the basics Turning your TV on or off To turn off your TV: 1 Make sure that you turn off (standby mode): 1 Plug the power cord into an AC power outlet. 2 Press (power). ...

User Manual (English)
Page 14
...can also select the input source using the following remote control buttons: • COMP- Press four times to select HDMI2. Menus in TV mode, unless otherwise indicated. The illustrations and screens shown in the manual are described in this manual are for explanation purposes and may see...twice to select AV1. Press once to select Component2. • HDMI- Press to select HDMI3. • VIDEO - Press three times to select TV. Press once to select AV2. Press twice to select Component1. Press three times to select HDMI1. The INPUT SOURCE menu opens. Press once to...
...can also select the input source using the following remote control buttons: • COMP- Press four times to select HDMI2. Menus in TV mode, unless otherwise indicated. The illustrations and screens shown in the manual are described in this manual are for explanation purposes and may see...twice to select AV1. Press once to select Component2. • HDMI- Press to select HDMI3. • VIDEO - Press three times to select TV. Press once to select AV2. Press twice to select Component1. Press three times to select HDMI1. The INPUT SOURCE menu opens. Press once to...
User Manual (English)
Page 15
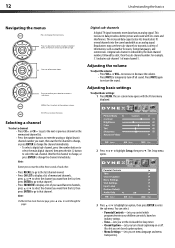
... the main digital channel, then press the dot (.) button to that channel. • Press FAVORITE to display a list of main channel 5. Digital sub-channels A digital TV signal transmits more than an analog signal. The Setup menu opens. 12 Understanding the basics Navigating the menus Press to highlight Setup, then press .
... the main digital channel, then press the dot (.) button to that channel. • Press FAVORITE to display a list of main channel 5. Digital sub-channels A digital TV signal transmits more than an analog signal. The Setup menu opens. 12 Understanding the basics Navigating the menus Press to highlight Setup, then press .

User Manual (English)
Page 16
... an option, then press or to adjust the option. You can select: • Picture Mode-Selects the picture mode. Adjusting the TV picture To adjust the picture: 1 Press MENU. Available only when Auto Zoom is decreased), or Custom (customized picture). The information banner... video input source, and resolution. • Digital mode information-Displays channel number, station name, channel label (if preset), broadcast program name, TV rating, signal type, audio information, resolution, CC mode, current time, and current program start and end times. • Analog mode information...
... an option, then press or to adjust the option. You can select: • Picture Mode-Selects the picture mode. Adjusting the TV picture To adjust the picture: 1 Press MENU. Available only when Auto Zoom is decreased), or Custom (customized picture). The information banner... video input source, and resolution. • Digital mode information-Displays channel number, station name, channel label (if preset), broadcast program name, TV rating, signal type, audio information, resolution, CC mode, current time, and current program start and end times. • Analog mode information...

User Manual (English)
Page 17
... or to highlight an option, then press or to adjust the option. Adjusting the computer image To adjust the computer image: 1 Make sure that your TV is in VGA mode. The Setup menu opens. You can select Standard (for normal programs, News (for news programs), Music (for musical programs), Movie (for.... 2 Press MENU. 14 Adjusting the sound • Adaptive Contrast-Turn this On to optimize the picture display for a more vivid image. • Auto Zoom-In TV mode, setting Auto Zoom to On lets you set the Zoom Mode to Auto. 4 Press MENU to return to the previous menu, or press EXIT...
... or to highlight an option, then press or to adjust the option. Adjusting the computer image To adjust the computer image: 1 Make sure that your TV is in VGA mode. The Setup menu opens. You can select Standard (for normal programs, News (for news programs), Music (for musical programs), Movie (for.... 2 Press MENU. 14 Adjusting the sound • Adaptive Contrast-Turn this On to optimize the picture display for a more vivid image. • Auto Zoom-In TV mode, setting Auto Zoom to On lets you set the Zoom Mode to Auto. 4 Press MENU to return to the previous menu, or press EXIT...
User Manual (English)
Page 18
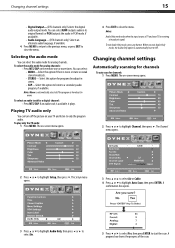
... Audio Only, then press or to select On. 5 Press or to select Yes, then press ENTER to highlight Auto Scan, then press ENTER. Playing TV audio only You can select the audio mode for analog channels: • Press MTS/SAP on -screen menu opens. 2 Press or to highlight Setup,...press any button. The Channel menu opens. 2 Press or to highlight Channel, then press . Note: Mono is automatically selected if the program is TV and your TV and listen to Off . Changing channel settings 15 • Digital Output-(DTV channels only) Selects the digital audio output mode. To select the audio...
... Audio Only, then press or to select On. 5 Press or to select Yes, then press ENTER to highlight Auto Scan, then press ENTER. Playing TV audio only You can select the audio mode for analog channels: • Press MTS/SAP on -screen menu opens. 2 Press or to highlight Setup,...press any button. The Channel menu opens. 2 Press or to highlight Channel, then press . Note: Mono is automatically selected if the program is TV and your TV and listen to Off . Changing channel settings 15 • Digital Output-(DTV channels only) Selects the digital audio output mode. To select the audio...

User Manual (English)
Page 19
... You can create a favorite channel list so you want to hide (the default is to show the channel), then press ENTER to scroll through your TV skips the channels when you press CH /CH . You can delete channels from the favorite channel list. Note: If the list has more than one...
... You can create a favorite channel list so you want to hide (the default is to show the channel), then press ENTER to scroll through your TV skips the channels when you press CH /CH . You can delete channels from the favorite channel list. Note: If the list has more than one...
User Manual (English)
Page 21
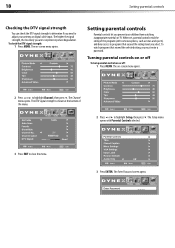
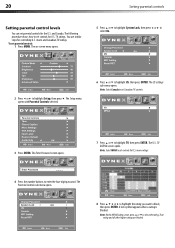
.... The on-screen menu opens. 2 Press or to programs that exceed the selected rating, you are to adjust your children from watching inappropriate material on TV. To check the DTV signal strength: 1 Press MENU. Setting parental controls Parental controls let you select. The Channel menu opens. The Setup menu opens with...
.... The on-screen menu opens. 2 Press or to programs that exceed the selected rating, you are to adjust your children from watching inappropriate material on TV. To check the DTV signal strength: 1 Press MENU. Setting parental controls Parental controls let you select. The Channel menu opens. The Setup menu opens with...
User Manual (English)
Page 23
... The U.S. movie ratings. 4 Press the number buttons to highlight Setup, then press . Note: On the MPAA Rating screen, press or to highlight TV, then press ENTER. That rating and all other higher ratings are blocked. You use similar steps for U.S. Note: Select Canada to set controls for controlling... U.S. The Enter Password screen opens. 7 Press or to select the rating. movie and Canadian TV ratings. The on-screen menu opens. 5 Press or to highlight System Lock, then press or to highlight US, then press ENTER...
... The U.S. movie ratings. 4 Press the number buttons to highlight Setup, then press . Note: On the MPAA Rating screen, press or to highlight TV, then press ENTER. That rating and all other higher ratings are blocked. You use similar steps for U.S. Note: Select Canada to set controls for controlling... U.S. The Enter Password screen opens. 7 Press or to select the rating. movie and Canadian TV ratings. The on-screen menu opens. 5 Press or to highlight System Lock, then press or to highlight US, then press ENTER...


