
User Manual (English)
Page 2
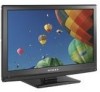
ii Dynex DX-L15-L19-L22-10A 15", 19", and 22" LCD TVs Contents Child Safety 1 Important safety instructions 2 Warnings 2 Cautions 2 Installing and removing the stand 3 Installing the stand 3 Adjusting the viewing angle of the TV 4 Removing the stand 4 Installing a wall-mount bracket 4 TV components 5 Front 5 Side 5 Back ... channel 12 Adjusting the volume 12 Adjusting basic settings 12 Displaying additional information 13 Adjusting the picture 13 Adjusting the TV picture 13 Adjusting Advanced Video settings 13 Adjusting the computer image 14 Adjusting the sound 14 Adjusting ...
ii Dynex DX-L15-L19-L22-10A 15", 19", and 22" LCD TVs Contents Child Safety 1 Important safety instructions 2 Warnings 2 Cautions 2 Installing and removing the stand 3 Installing the stand 3 Adjusting the viewing angle of the TV 4 Removing the stand 4 Installing a wall-mount bracket 4 TV components 5 Front 5 Side 5 Back ... channel 12 Adjusting the volume 12 Adjusting basic settings 12 Displaying additional information 13 Adjusting the picture 13 Adjusting the TV picture 13 Adjusting Advanced Video settings 13 Adjusting the computer image 14 Adjusting the sound 14 Adjusting ...
User Manual (English)
Page 6
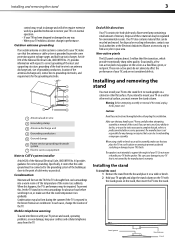
...location of the stand. Stand groove Stand column Stand Your TV also contains material that you are not sure of your ability to provide some protection against voltage surges and built-up static charges. Non-active pixels The LCD panel contains almost 3 million thin film transistors, which ... scratching or damage to CATV system installer Article 820 of the room rises suddenly. Mobile telephone warning To avoid interference with your TV picture and sound, operating problems, or even damage, keep your area. Outdoor antenna grounding If an outside antenna or cable system is connected...
...location of the stand. Stand groove Stand column Stand Your TV also contains material that you are not sure of your ability to provide some protection against voltage surges and built-up static charges. Non-active pixels The LCD panel contains almost 3 million thin film transistors, which ... scratching or damage to CATV system installer Article 820 of the room rises suddenly. Mobile telephone warning To avoid interference with your TV picture and sound, operating problems, or even damage, keep your area. Outdoor antenna grounding If an outside antenna or cable system is connected...
User Manual (English)
Page 9
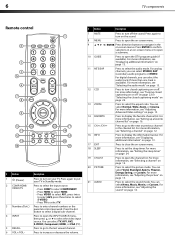
...channel" on page 12. 16 INFO Press to display the information banner. For more information, see "Turning closed captioning on or off" on page 22 or "Selecting the closed captioning on or off the sound. Press to open the INPUT SOURCE menu, then press or to select the video input... display the favorite channel list. For more information, see "Adjusting the picture" on page 13. Press the dot button to select a digital sub-channel. 4 INPUT Press to open the channel list. Press again to turn on your TV in the on-screen menus. For more information, see "Adjusting the...
...channel" on page 12. 16 INFO Press to display the information banner. For more information, see "Turning closed captioning on or off" on page 22 or "Selecting the closed captioning on or off the sound. Press to open the INPUT SOURCE menu, then press or to select the video input... display the favorite channel list. For more information, see "Adjusting the picture" on page 13. Press the dot button to select a digital sub-channel. 4 INPUT Press to open the channel list. Press again to turn on your TV in the on-screen menus. For more information, see "Adjusting the...

User Manual (English)
Page 11
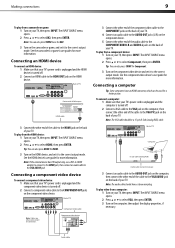
... power To connect the power: • Plug the AC cord into an AC power outlet. Connecting an antenna, cable TV, or satellite TV box To connect an antenna, cable TV, or satellite TV box: 1 Connect one end of time. Do not bundle the 75 ohm cable with your equipment. Connect yellow to... from the power source indicated on the VCR. 5 Connect the other end of your equipment. Back of the AV VIDEO OUT jack. For a better picture, you will not be used for position and type before making any connections. Connecting a VCR To connect a VCR: 1 Make sure that came with...
... power To connect the power: • Plug the AC cord into an AC power outlet. Connecting an antenna, cable TV, or satellite TV box To connect an antenna, cable TV, or satellite TV box: 1 Connect one end of time. Do not bundle the 75 ohm cable with your equipment. Connect yellow to... from the power source indicated on the VCR. 5 Connect the other end of your equipment. Back of the AV VIDEO OUT jack. For a better picture, you will not be used for position and type before making any connections. Connecting a VCR To connect a VCR: 1 Make sure that came with...
User Manual (English)
Page 12
... AUDIO OUT jacks (L/R) on the component device. 5 Connect the other end of the cable to the VGA AUDIO jack on the back of TV Note: Cables are often color-coded to connectors. See the component video device's user guide for more information. Connecting a component video device To...output mode. See the camcorder's or game's user guides for a better picture. Connecting an HDMI device To connect an HDMI device: 1 Make sure that your TV. Making connections 9 To play from a camcorder or game: 1 Turn on your TV's power cord is unplugged and the HDMI device is turned off. 2 ...
... AUDIO OUT jacks (L/R) on the component device. 5 Connect the other end of the cable to the VGA AUDIO jack on the back of TV Note: Cables are often color-coded to connectors. See the component video device's user guide for more information. Connecting a component video device To...output mode. See the camcorder's or game's user guides for a better picture. Connecting an HDMI device To connect an HDMI device: 1 Make sure that your TV. Making connections 9 To play from a camcorder or game: 1 Turn on your TV's power cord is unplugged and the HDMI device is turned off. 2 ...
User Manual (English)
Page 14
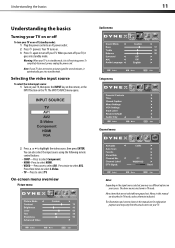
...following remote control buttons: • COMP-Press to select Component. • HDMI-Press to select HDMI. • VIDEO-Press once to select TV. Menu items that are not selectable are described in this manual are grayed out. The INPUT SOURCE menu opens. Press three times to select S-...Video. • TV-Press to select AV1. On-screen menu overview Picture menu Notes: Depending on the signal source selected, you turn off (standby mode): 1 Plug the power cord into an ...
...following remote control buttons: • COMP-Press to select Component. • HDMI-Press to select HDMI. • VIDEO-Press once to select TV. Menu items that are not selectable are described in this manual are grayed out. The INPUT SOURCE menu opens. Press three times to select S-...Video. • TV-Press to select AV1. On-screen menu overview Picture menu Notes: Depending on the signal source selected, you turn off (standby mode): 1 Plug the power cord into an ...
User Manual (English)
Page 15
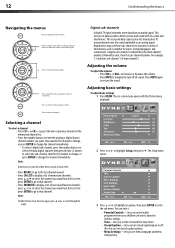
...sleep timer. • Closed Caption-Lets you set closed captioning on or off all sound. This increase in data provides a better picture and sound with the Picture menu displayed. For example, 5.1 indicates sub-channel 1 of information, such as an analog signal. Broadcasters may use these sub-...sound. Press to select menu items, to display a list of your selection or enter a sub-menu. Digital sub-channels A digital TV signal transmits more than an analog signal. Press MUTE again to the previous screen. 12 Understanding the basics Navigating the menus Press to highlight...
...sleep timer. • Closed Caption-Lets you set closed captioning on or off all sound. This increase in data provides a better picture and sound with the Picture menu displayed. For example, 5.1 indicates sub-channel 1 of information, such as an analog signal. Broadcasters may use these sub-...sound. Press to select menu items, to display a list of your selection or enter a sub-menu. Digital sub-channels A digital TV signal transmits more than an analog signal. Press MUTE again to the previous screen. 12 Understanding the basics Navigating the menus Press to highlight...
User Manual (English)
Page 16
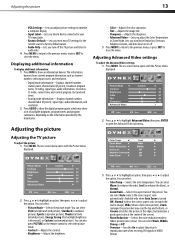
... values. • Audio Only-Lets you turn Noise Reduction, Overscan, Adaptive Contrast, and Auto Zoom on or off the TV picture and listen to audio only. 4 Press MENU to return to the previous menu, or press EXIT to adjust the option. You... Press MENU. The on the information provided by the broadcaster. Adjusting the TV picture To adjust the picture: 1 Press MENU. You can select Vivid (a bright and vivid picture), Standard (a standard picture), Sports (a dynamic picture), Theater (a finely detailed picture), Energy Saving (the backlight brightness is turned ON), Normal (selects the ...
... values. • Audio Only-Lets you turn Noise Reduction, Overscan, Adaptive Contrast, and Auto Zoom on or off the TV picture and listen to audio only. 4 Press MENU to return to the previous menu, or press EXIT to adjust the option. You... Press MENU. The on the information provided by the broadcaster. Adjusting the TV picture To adjust the picture: 1 Press MENU. You can select Vivid (a bright and vivid picture), Standard (a standard picture), Sports (a dynamic picture), Theater (a finely detailed picture), Energy Saving (the backlight brightness is turned ON), Normal (selects the ...
User Manual (English)
Page 17
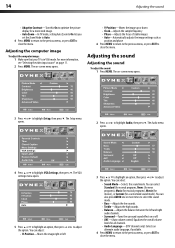
... (for a customized sound mode). The on page 11. 2 Press MENU. Adjusting the computer image To adjust the computer image: 1 Make sure that your TV is in VGA mode. You can also press AUDIO one or more information, see "Selecting the video input source" on -screen menu opens. 3 Press or... to highlight Audio, then press . 14 Adjusting the sound • Adaptive Contrast-Turn this On to optimize the picture display for a more vivid image. • Auto Zoom-In TV mode, setting Auto Zoom to On lets you set the Zoom Mode to Auto. 4 Press MENU to return to the previous...
... (for a customized sound mode). The on page 11. 2 Press MENU. Adjusting the computer image To adjust the computer image: 1 Make sure that your TV is in VGA mode. You can also press AUDIO one or more information, see "Selecting the video input source" on -screen menu opens. 3 Press or... to highlight Audio, then press . 14 Adjusting the sound • Adaptive Contrast-Turn this On to optimize the picture display for a more vivid image. • Auto Zoom-In TV mode, setting Auto Zoom to On lets you set the Zoom Mode to Auto. 4 Press MENU to return to the previous...
User Manual (English)
Page 18
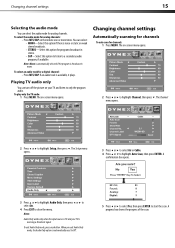
...when the input source is broadcast in stereo. • SAP-Select this option to listen to a secondary audio program, if available. To play only the TV audio: 1 Press MENU. The on -screen menu opens. Parental Controls 3 Press or to select Air or Cable. 4 Press or to highlight Setup, ...8226; Press MTS/SAP. Note: Mono is automatically selected if the program is TV and your TV and listen to highlight Channel, then press . Changing channel settings 15 Selecting the audio mode You can turn off the picture on weak stereo broadcasts. • STEREO-Select this option for programs broadcast ...
...when the input source is broadcast in stereo. • SAP-Select this option to listen to a secondary audio program, if available. To play only the TV audio: 1 Press MENU. The on -screen menu opens. Parental Controls 3 Press or to select Air or Cable. 4 Press or to highlight Setup, ...8226; Press MTS/SAP. Note: Mono is automatically selected if the program is TV and your TV and listen to highlight Channel, then press . Changing channel settings 15 Selecting the audio mode You can turn off the picture on weak stereo broadcasts. • STEREO-Select this option for programs broadcast ...

User Manual (English)
Page 21
...the DTV signal strength You can check the DTV signal strength to determine if you need to adjust your children from watching inappropriate material on TV. To watch programs that exceed the ratings level you must enter a password. The Channel menu opens. The Setup menu opens with some ...exceptions, such as news and sports) and deny access to experience picture degradation. Turning parental controls on or off To turn parental controls on -screen menu opens. The on-screen menu opens. 2 Press or to ...
...the DTV signal strength You can check the DTV signal strength to determine if you need to adjust your children from watching inappropriate material on TV. To watch programs that exceed the ratings level you must enter a password. The Channel menu opens. The Setup menu opens with some ...exceptions, such as news and sports) and deny access to experience picture degradation. Turning parental controls on or off To turn parental controls on -screen menu opens. The on-screen menu opens. 2 Press or to ...
User Manual (English)
Page 30
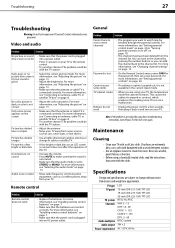
...the cabinet to cable or satellite TV. Maintenance Cleaning • Clean your TV. TV type LCD TV panel 15-inch (DX-L15-10A) TFT LCD 19-inch (DX-L19-10A) TFT LCD TV system Channels 22-inch (DX-L22-10A) TFT LCD NTSC-M, ATSC VHF: 2 ...- 13 UHF: 14 - 69 CATV: 1 - 125 CADTV: 1-135 DTV: 2 - 69 Audio multiplex BTSC system Audio output 3W × 2 Power requirement AC 120 V, 60 Hz For more information, see "Setting parental controls" on the screen Picture...
...the cabinet to cable or satellite TV. Maintenance Cleaning • Clean your TV. TV type LCD TV panel 15-inch (DX-L15-10A) TFT LCD 19-inch (DX-L19-10A) TFT LCD TV system Channels 22-inch (DX-L22-10A) TFT LCD NTSC-M, ATSC VHF: 2 ...- 13 UHF: 14 - 69 CATV: 1 - 125 CADTV: 1-135 DTV: 2 - 69 Audio multiplex BTSC system Audio output 3W × 2 Power requirement AC 120 V, 60 Hz For more information, see "Setting parental controls" on the screen Picture...


