Dynex DX-L26-10A Support Question
Dynex DX-L26-10A Support Question
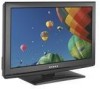
Find answers below for this question about Dynex DX-L26-10A - 26" LCD TV.Need a Dynex DX-L26-10A manual? We have 5 online manuals for this item!
Question posted by jprivett3 on July 5th, 2010
Why No Picture?
After moving set. TV makes humming sound. Has audio but no picture.
Current Answers
Related Dynex DX-L26-10A Manual Pages
Warranty (English) - Page 1
...Period").
This warranty is determined to be defective by static (non-moving) images applied for a television with this warranty become the property of Dynex and are required ...Set up adjustments • Cosmetic damage • Damage due to your purchase of products and parts are not returned to you. Make sure that provides the same amount of the product • Plasma display panel...
User Manual (English) - Page 2
... 15 Adjusting the volume 16 Adjusting basic settings 16 Displaying additional information 16
Adjusting the picture 16
Adjusting the TV picture 16 Adjusting Advanced Video settings 17 Adjusting the computer image 17
Adjusting the sound 18
Adjusting the sound 18 Selecting the audio mode 18 Playing TV audio only 18
Changing channel settings 19
Automatically scanning for channels 19...
User Manual (English) - Page 3
... 25 Selecting the closed captioning mode 26 Customizing DTV closed captioning styles 27
Adjusting time settings 28
Setting the clock 28 Setting the sleep timer 28
Adjusting menu settings 29
Selecting the menu language and transparency 29 Labeling an input source 29 Restoring default settings 30
Troubleshooting 30
Video and audio 30 Remote control 31 General 31...
User Manual (English) - Page 5
... backed with entertainment system furniture and TVs.
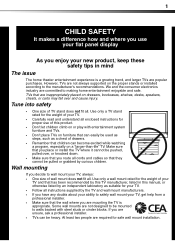
• Don't place TVs on furniture that can easily be used as steps, such as suitable for proper use your flat panel display
As you enjoy your new ...of drawers.
• Remember that the wall where you are popular purchases.
Make sure that you place or install the TV where it cannot be pushed, pulled over and cause injury. Some wall ...
User Manual (English) - Page 6
...your skin, consult with liquids, such as the original part.
If you are required, make absolutely sure that you connect the
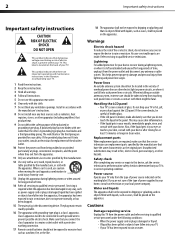
class I apparatus. Water and liquids The apparatus shall not...outlet and refer servicing to rain or moisture.
Handling the LCD panel • Your TV's screen is used, use caution
when moving the cart/apparatus combination to
avoid injury from the apparatus....
User Manual (English) - Page 7
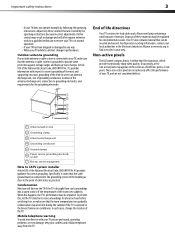
...National Electrical Code, ANSI/NFPA No. 70, provides information with your TV picture and sound, operating problems, or even damage, keep your area. Occasionally, a few non-... Non-active pixels
The LCD panel contains almost 3 million thin film transistors, which provide exceptionally sharp video quality. Important safety instructions
3
• If your TV, make sure that the room ...
User Manual (English) - Page 8
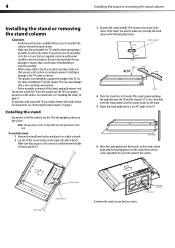
... upright position on the edge of the stand. Table edge
6 Move the stand gently until it on a table or bench.
2 Lay the TV flat (screen down) on a flat surface. You need to install the stand to make sure that is not intended to use the TV in this task. Installing the stand
You need to install...
User Manual (English) - Page 9
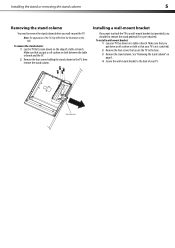
...mount bracket
If you want to attach the TV to a wall-mount bracket (not provided), you wall-mount the TV.
To remove the stand column: 1 Lay the TV flat (screen down on a table or bench....mount bracket:
1 Lay your TV face down ) on
page 5. 4 Secure the wall-mount bracket to the TV, then remove the stand column.
Note: The appearance of a table or bench. Make sure that you put down a...
User Manual (English) - Page 11
...TV to this jack. For service only.
For more information, see "Connecting an HDMI device" on page 12.
For more information, see "Connecting a component video device" on page 12. Connect an external sound...more information, see "Connecting an audio amplifier" on page 13.
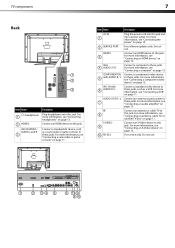
TV components
7
Back
1 2
3
Item Name
(headphone) 1
2 HDMI 2 AV2 IN VIDEO / AUDIO L and R
3
Description
Plug...
User Manual (English) - Page 13

... identifying its model (or your TV.
For more information, see "Adjusting the TV picture" on page 16.
Press to set -top box's remote control manufacturer and model) on the charts below, then make note of different types. • Do not mix old and new batteries. Press to select the audio mode.
Make sure that the lock snaps...
User Manual (English) - Page 14
... Center at a time. See your universal remote control's instructions for your universal remote control or set -top box and your universal remote control's instructions to a power outlet. Five such remotes are listed on the TV. • Make sure that the power cords are securely inserting into jacks on the chart, but many other...
User Manual (English) - Page 16
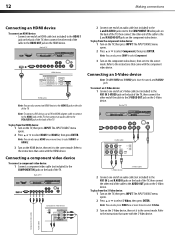
... HDMI 2. 3 Turn on the HDMI device, then set it to the correct mode. To play from the component video device: 1 Turn on the TV, then press INPUT. Connecting an S-Video device
Note: The AV1 VIDEO and S-VIDEO jacks share the same L and R AUDIO jacks.
12
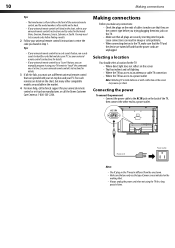
Making connections
Connecting an HDMI device
To connect an...
User Manual (English) - Page 19
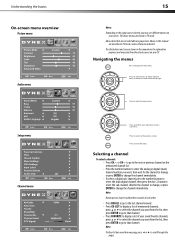
... the channel to change the channel immediately. Understanding the basics
On-screen menu overview
Picture menu
Audio menu
Setup menu
Parental Controls
Channel menu
15
Notes: Depending on the signal source... and screens shown in TV mode, unless otherwise indicated. Press to the previous screen. Press to select the menu items.
Press to adjust selected items, or move on your selection or ...
User Manual (English) - Page 20
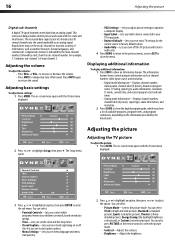
... to show the digital program guide, which programs/movies your TV's input jacks.
• Restore Default-Lets you reset most TV settings for the current source to factory default values.
• Audio Only-Lets you turn off all sound.
Press MUTE again to select the picture mode.
• Contrast-Adjusts the contrast. • Brightness-Adjusts the...
User Manual (English) - Page 21
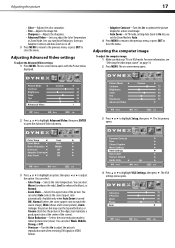
... Auto Zoom-In TV mode, setting Auto Zoom to ...settings menu opens. Adjusting the picture
17
• Color-Adjusts the color saturation. • Tint-Adjusts the image tint. • Sharpness-Adjusts the sharpness. • Advanced Video-Lets you adjust the Color Temperature
or Zoom Mode.
The Setup menu opens. Adjusting the computer image
To adjust the computer image: 1 Make sure that your TV...
User Manual (English) - Page 22

.... To play only the TV audio:
1 Press MENU. You can select the audio mode for a customized sound mode). You can also press AUDIO one or more times to select the sound mode.
• Bass-Adjusts the low sounds. • Treble-Adjusts the high sounds. • Balance-Adjusts the balance between the left • V-Position-Moves the image up or...
User Manual (English) - Page 25

...the channel to make it easier to...to move to highlight Channel, then press . Changing channel settings
21...
6 Press EXIT to close the menu. The Channel menu opens.
Adding or changing a channel label
If a channel is already labeled.
The higher the signal strength, the less likely you can also relabel a channel that is not already labeled, you are to experience picture...
User Manual (English) - Page 34
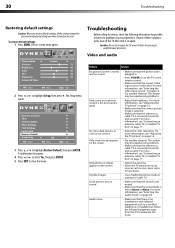
... the settings (except the password and parental rating) you may be experiencing problems.
• Make sure that the sound mode is selected. Problem
Solution
No picture (screen is not lit) and no sound.
• Make sure that the sound is not muted.
• Make sure that the antenna or cable TV is good. For more information, see "Selecting the audio...
User Manual (English) - Page 35
... then set a new password. Type Panel TV system Receiving channels
Audio multiples Audio out
Power requirement Power consumption
Dimensions (W × H × D with stand)
Weight Input ports
Output ports Control ports
LCD TV 26-inch TFT LCD NTSC...front of the TV.
• Make sure that the channels are installed correctly.
For more information, see "Hiding channels" on the TV. This is not...
User Manual (English) - Page 37

...MAKES...Set up adjustments • Cosmetic damage • Damage due to obtain warranty service?
The Warranty Period lasts for a television... panel...moving) images applied for a period of one year (365 days) from an authorized dealer of Dynex brand Products and packaged with this warranty that the Product shall be purchased from the date you , the original purchaser of this new DX-L26-10A...
Similar Questions

What Receiver Can I Hook Up To My New 32 Lcd Tv For Surround Sound
(Posted by jmsmive 9 years ago)

How Do I Change The Tv Source On My Dynex 19' Lcd Tv From Antenna To Cable Box?
(Posted by caroltiff1 11 years ago)

How Do I Hook Up My Logitech Wireless Keyboard To My Dynex Lcd Tv?
How do i hook up my logitech wireless keyboard to my dynex lcd tv? or is that not possible?
How do i hook up my logitech wireless keyboard to my dynex lcd tv? or is that not possible?
(Posted by kayannalee97 11 years ago)

36in Dynex
My TV has no sound, picture is perfect. How big of a problem is this to fix?
My TV has no sound, picture is perfect. How big of a problem is this to fix?
(Posted by teewrd 11 years ago)
Dynex Lcd Tv Dx-l26-10a
turn tv on says please wait then screen goes to a black screen. what can be the problem?
turn tv on says please wait then screen goes to a black screen. what can be the problem?
(Posted by jjhh 12 years ago)