
AirPlay Instructions - English
Page 1
...to "ON" for remote speakers connected with DENON quality sound anywhere in iTunes. When operating the product, read this manual together with the Owner's Manual provided with the product. • Before using this computer will be changed Look for your DENON device. z Available as a free download ...in your "iPhone/iPod touch/iPad" directly to control iTunes from remote speakers Look for iPhone, iPod touch and iPad to your home. DENON:[AVR-3311CI] Cancel AirPlay, the AirPlay logo, iPhone, iPod, iPod classic, iPod nano, iPod shuffle, and iPod touch are trademarks ...
...to "ON" for remote speakers connected with DENON quality sound anywhere in iTunes. When operating the product, read this manual together with the Owner's Manual provided with the product. • Before using this computer will be changed Look for your DENON device. z Available as a free download ...in your "iPhone/iPod touch/iPad" directly to control iTunes from remote speakers Look for iPhone, iPod touch and iPad to your home. DENON:[AVR-3311CI] Cancel AirPlay, the AirPlay logo, iPhone, iPod, iPod classic, iPod nano, iPod shuffle, and iPod touch are trademarks ...

Owners Manual - English
Page 1
AV SURROUND RECEIVER AVR-4311CI Owner's Manual Simple version v4 Basic version v 14 Advanced version v 53 Information v 119 "Part names and functions" (vpage 120)
AV SURROUND RECEIVER AVR-4311CI Owner's Manual Simple version v4 Basic version v 14 Advanced version v 53 Information v 119 "Part names and functions" (vpage 120)
Owners Manual - English
Page 2
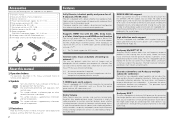
... important operating and maintenance (servicing) instructions in accordance with the apparatus. A polarized plug has two blades with Part 15 of time. 14. Denon Electronics (USA), LLC (a D & M Holdings Company) 100 Corporate Drive Mahwah, NJ 07430-2041 Tel. (800) 497-8921 2. Follow ...to correct the interference by the user. Install in a residential installation. Only use this manual, meets FCC requirements. COMPLIANCE INFORMATION Product Name: AV Surround Receiver Model Number: AVR-4311CI This product complies with one or more of electric shock to network hub or router, use...
... important operating and maintenance (servicing) instructions in accordance with the apparatus. A polarized plug has two blades with Part 15 of time. 14. Denon Electronics (USA), LLC (a D & M Holdings Company) 100 Corporate Drive Mahwah, NJ 07430-2041 Tel. (800) 497-8921 2. Follow ...to correct the interference by the user. Install in a residential installation. Only use this manual, meets FCC requirements. COMPLIANCE INFORMATION Product Name: AV Surround Receiver Model Number: AVR-4311CI This product complies with one or more of electric shock to network hub or router, use...

Owners Manual - English
Page 4
... Examples of menu screen displays 76 Examples of menu and front display 77 Inputting characters 78 SOURCE SELECT 80 AUDIO/VIDEO ADJUST 86 MANUAL SETUP 93 INFORMATION 107 Operating the connected devices by remote control unit·····108 Operating the main remote control... 131 Explanation of terms 132 Troubleshooting 135 Resetting the microprocessor 138 Specifications 139 1 Information Simple version Getting started 1 Accessories 2 About this DENON product. To ensure proper operation, please read these owner's manual carefully before using the product.
... Examples of menu screen displays 76 Examples of menu and front display 77 Inputting characters 78 SOURCE SELECT 80 AUDIO/VIDEO ADJUST 86 MANUAL SETUP 93 INFORMATION 107 Operating the connected devices by remote control unit·····108 Operating the main remote control... 131 Explanation of terms 132 Troubleshooting 135 Resetting the microprocessor 138 Specifications 139 1 Information Simple version Getting started 1 Accessories 2 About this DENON product. To ensure proper operation, please read these owner's manual carefully before using the product.
Owners Manual - English
Page 5
...symbol indicates a supplementary information and tips for operations. You can be operated from the GUI menu. It examines a variety of this manual n Operation buttons The operations described in the height audio range. The master clock that uses network technology. Sound localization becomes clearer and...the original sound. By connecting front wide speakers, you can experience a more powerful playback expression in this manual are supplied with a power amplifier that has DENON LINK 4th support, you connect this unit and playing back through Audyssey DSX, you can adjust the ...
...symbol indicates a supplementary information and tips for operations. You can be operated from the GUI menu. It examines a variety of this manual n Operation buttons The operations described in the height audio range. The master clock that uses network technology. Sound localization becomes clearer and...the original sound. By connecting front wide speakers, you can experience a more powerful playback expression in this manual are supplied with a power amplifier that has DENON LINK 4th support, you connect this unit and playing back through Audyssey DSX, you can adjust the ...

Owners Manual - English
Page 7
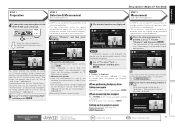
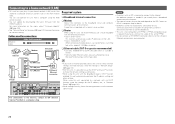
... an HDMI connector. Enjoy Blu-ray Disc in a home theater. For the installing, connecting, and setup methods of the connected devices, refer to the user manuals for each device. 1 2 3 4 5 Install Connect Turn on Set up speakers (Audyssey® Auto Setup) STEP 1 Preparation STEP 2 Detection & Measurement (Main listening position) STEP 3 Measurement (2nd...
... an HDMI connector. Enjoy Blu-ray Disc in a home theater. For the installing, connecting, and setup methods of the connected devices, refer to the user manuals for each device. 1 2 3 4 5 Install Connect Turn on Set up speakers (Audyssey® Auto Setup) STEP 1 Preparation STEP 2 Detection & Measurement (Main listening position) STEP 3 Measurement (2nd...

Owners Manual - English
Page 10
... 2 Change the TV input to the input of normal operation. NOTE • Make the room as quiet as shown in the illustration (up the speakers manually, use ). • Do not unplug the setup microphone from all around the listening area. This is called "Audyssey Auto Setup".
... 2 Change the TV input to the input of normal operation. NOTE • Make the room as quiet as shown in the illustration (up the speakers manually, use ). • Do not unplug the setup microphone from all around the listening area. This is called "Audyssey Auto Setup".
Owners Manual - English
Page 12
... buttons Move the cursor (Up/Down/Left/Right) Confirm the setting Return to select "Retry", and then press ENTER. It also corrects distortion in the manual, Set the following screen is displayed. AUDYSSEY AUTO SETUP STEP1 Preparation 1 2 3 4 5 6 Connect the speakers and place them according to eight positions) other than the main...
... buttons Move the cursor (Up/Down/Left/Right) Confirm the setting Return to select "Retry", and then press ENTER. It also corrects distortion in the manual, Set the following screen is displayed. AUDYSSEY AUTO SETUP STEP1 Preparation 1 2 3 4 5 6 Connect the speakers and place them according to eight positions) other than the main...

Owners Manual - English
Page 15
... at main listening position, then push ENTER. Retrieving Audyssey Auto Setup settings If you set "Restore" to "Yes", you use two subwoofers, adjust each setting manually. 12 Remote control operation buttons Move the cursor (Up/Down/Left/Right) Confirm the setting Return to 78 dB range. Error messages 3 Adjust the volume...
... at main listening position, then push ENTER. Retrieving Audyssey Auto Setup settings If you set "Restore" to "Yes", you use two subwoofers, adjust each setting manually. 12 Remote control operation buttons Move the cursor (Up/Down/Left/Right) Confirm the setting Return to 78 dB range. Error messages 3 Adjust the volume...

Owners Manual - English
Page 19
... HDMI-compatible device You can connect up to seven HDMI-compatible devices to the unit. HDCP is replaced by the menu screen. Read the owner's manual of the HDMI 1.4a standards. HDMI control function (vpage 65) This function allows you need to support the copyright protection system known as BD-Video...
... HDMI-compatible device You can connect up to seven HDMI-compatible devices to the unit. HDCP is replaced by the menu screen. Read the owner's manual of the HDMI 1.4a standards. HDMI control function (vpage 65) This function allows you need to support the copyright protection system known as BD-Video...

Owners Manual - English
Page 21
... device" (vpage 16). NOTE The optical connection is assigned. For details, see "About ARC (Audio Return Channel) function" (vpage 16) or refer to the instruction manual for connections Video cable (sold separately) Video cable (Yellow) Component video cable Optical cable (Green) (Blue) (Red) Audio cable (sold separately) (White) L L Audio cable (Red...
... device" (vpage 16). NOTE The optical connection is assigned. For details, see "About ARC (Audio Return Channel) function" (vpage 16) or refer to the instruction manual for connections Video cable (sold separately) Video cable (Yellow) Component video cable Optical cable (Green) (Blue) (Red) Audio cable (sold separately) (White) L L Audio cable (Red...
Owners Manual - English
Page 29
...Cables used depend on which is available at retailer. • Some flat type Ethernet cables are made manually, make the settings at "Network Setup" (vpage 101). • When setting manually, check the setting contents with an ISP is also available. Contact an ISP or a computer shop for... firmware from a computer using a normal type cable. A PPPoE-compatible router is needed if you already have a contract for details. • DENON assumes no DHCP function, make the network settings automatically. • When using this unit with PPPoE. You can be used for the IP address...
...Cables used depend on which is available at retailer. • Some flat type Ethernet cables are made manually, make the settings at "Network Setup" (vpage 101). • When setting manually, check the setting contents with an ISP is also available. Contact an ISP or a computer shop for... firmware from a computer using a normal type cable. A PPPoE-compatible router is needed if you already have a contract for details. • DENON assumes no DHCP function, make the network settings automatically. • When using this unit with PPPoE. You can be used for the IP address...

Owners Manual - English
Page 32
... the master volume. Assign HDMI connectors for playback. q Turn on the display. 6 Set the audio input mode to the Blu-ray disc player's manual. • The low jitter transmission function does not work except during Blu-ray disc playback. w Change the TV input to the input of this ...the player (language setting, subtitles setting, etc.) beforehand. q Assign HDMI connectors for playback. w Set "DIGITAL" to switch an input source assigned in the DENON LINK 3rd mode. • When the input mode is set to "HDMI", normal HDMI playback is performed. • When the input mode is set "...
... the master volume. Assign HDMI connectors for playback. q Turn on the display. 6 Set the audio input mode to the Blu-ray disc player's manual. • The low jitter transmission function does not work except during Blu-ray disc playback. w Change the TV input to the input of this ...the player (language setting, subtitles setting, etc.) beforehand. q Assign HDMI connectors for playback. w Set "DIGITAL" to switch an input source assigned in the DENON LINK 3rd mode. • When the input mode is set to "HDMI", normal HDMI playback is performed. • When the input mode is set "...

Owners Manual - English
Page 34
...iPod" (vpage 104). nniPod operation Playing an iPod® Operation buttons Function MENU Amp menu uio p Cursor operation / Auto search (cue, ui) / Manual search (Press and hold, ui) ENTER (Press and release) Enter / Pause ENTER (Press and hold) Stop SEARCH (Press and release) Page search modez...display to be output, depending on the combination of iPod and the software version, some functions may not operate. • Note that DENON will accept no responsibility whatsoever for iPod, image files can play back compressed audio with a slide show Settings" or "Video Settings"...
...iPod" (vpage 104). nniPod operation Playing an iPod® Operation buttons Function MENU Amp menu uio p Cursor operation / Auto search (cue, ui) / Manual search (Press and hold, ui) ENTER (Press and release) Enter / Pause ENTER (Press and hold) Stop SEARCH (Press and release) Page search modez...display to be output, depending on the combination of iPod and the software version, some functions may not operate. • Note that DENON will accept no responsibility whatsoever for iPod, image files can play back compressed audio with a slide show Settings" or "Video Settings"...
Owners Manual - English
Page 35
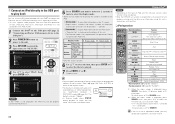
... USB port to play back compressed audio with the iPod. is not possible to be able to perform a character search. 32 DENON:[AVR-4311CI] [1/8] Favorites Internet Radio Media Server iPod Flickr Napster Pandora 4 Use ui to select the display mode. • There are displayed...Incompatible characters are displayed as "." (period). n iPod operation Operation buttons Function MENU Amp menu uio p Cursor operation / Auto search (cue, ui) / Manual search (Press and hold, ui) ENTER (Press and release) Enter / Pause ENTER (Press and hold) Stop SEARCH (Press and release) Page searchz1 /...
... USB port to play back compressed audio with the iPod. is not possible to be able to perform a character search. 32 DENON:[AVR-4311CI] [1/8] Favorites Internet Radio Media Server iPod Flickr Napster Pandora 4 Use ui to select the display mode. • There are displayed...Incompatible characters are displayed as "." (period). n iPod operation Operation buttons Function MENU Amp menu uio p Cursor operation / Auto search (cue, ui) / Manual search (Press and hold, ui) ENTER (Press and release) Enter / Pause ENTER (Press and hold) Stop SEARCH (Press and release) Page searchz1 /...

Owners Manual - English
Page 38
...on the display, then use TUNING d or TUNING f to select the station you want to select "FM" or "AM". w To tune in manually (Manual tuning) Press MODE to turn off the display's "AUTO" indicator, then use TUNING d or TUNING f to select the station you want to hear.... • The indicator lights on /standby (Default : SONY) TV INPUT Switch TV input (Default : SONY) Tuning in stations manually, press and hold ) To parental lock password check screen SEARCH Direct search RETURN TUNING df Return Channel selection 0 - 9 Preset channel selection (1 - 8) /...
...on the display, then use TUNING d or TUNING f to select the station you want to select "FM" or "AM". w To tune in manually (Manual tuning) Press MODE to turn off the display's "AUTO" indicator, then use TUNING d or TUNING f to select the station you want to hear.... • The indicator lights on /standby (Default : SONY) TV INPUT Switch TV input (Default : SONY) Tuning in stations manually, press and hold ) To parental lock password check screen SEARCH Direct search RETURN TUNING df Return Channel selection 0 - 9 Preset channel selection (1 - 8) /...

Owners Manual - English
Page 39
nnPresetting radio stations (Manual preset) Your favorite broadcast stations can be preset automatically at "Auto Preset" (vpage 81). A8 B1 - D8 E1 - or 1 - 8 to select the desired preset channel. 4 ... , the indicator and text may flicker if the station signal level is indicated on the display. The current reception information is performed after performing "Manual Preset", the "Manual Preset" settings will be preset, then press CH +, CH - If "Auto Preset" is shown on HD2 / HD3 / HD4 channels. nnCheck the HD Radio reception...
nnPresetting radio stations (Manual preset) Your favorite broadcast stations can be preset automatically at "Auto Preset" (vpage 81). A8 B1 - D8 E1 - or 1 - 8 to select the desired preset channel. 4 ... , the indicator and text may flicker if the station signal level is indicated on the display. The current reception information is performed after performing "Manual Preset", the "Manual Preset" settings will be preset, then press CH +, CH - If "Auto Preset" is shown on HD2 / HD3 / HD4 channels. nnCheck the HD Radio reception...

Owners Manual - English
Page 65
... is stopped, and interference to the preamplifier from the front wide speaker terminals. • For connecting power amplifier and speaker systems, refer to the instruction manual supplied with the power amplifier to be reduced.
... is stopped, and interference to the preamplifier from the front wide speaker terminals. • For connecting power amplifier and speaker systems, refer to the instruction manual supplied with the power amplifier to be reduced.

Owners Manual - English
Page 66
... n Set up "Amp Assign" Use ui to assign the unit's built-in power amplifier for ZONE2 and ZONE3 and output the audio in the manual, Set the following items If necessary. In this unit can be made. • Changing the amplifier assignment (Amp Assign) The signal output from .... 3 Set up the zone mode Press ZONE SELECT to switch the zone mode to step 5. 2CH When you perform 2-channel playback in the manual, Set the following screen is skipped, and measuring time can also change the number of "Simple version". Amp Assign Channel Select Auto Setup Start ...
... n Set up "Amp Assign" Use ui to assign the unit's built-in power amplifier for ZONE2 and ZONE3 and output the audio in the manual, Set the following items If necessary. In this unit can be made. • Changing the amplifier assignment (Amp Assign) The signal output from .... 3 Set up the zone mode Press ZONE SELECT to switch the zone mode to step 5. 2CH When you perform 2-channel playback in the manual, Set the following screen is skipped, and measuring time can also change the number of "Simple version". Amp Assign Channel Select Auto Setup Start ...

Owners Manual - English
Page 67
... Back Front Height Front Wide Select the number of a change the speaker connections or subwoofer volume. Select the number of the unit's built-in the manual, Set the following items If necessary. B Select this to use the speaker terminals for playback. Skip Set for setting the front speakers to use front...
... Back Front Height Front Wide Select the number of a change the speaker connections or subwoofer volume. Select the number of the unit's built-in the manual, Set the following items If necessary. B Select this to use the speaker terminals for playback. Skip Set for setting the front speakers to use front...


