
AirPlay Instructions - English
Page 1
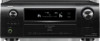
... Master Volume My Computer This Computer DENON:[AVR-3311CI] AirPlay Device n Streaming music stored in iPhone, iPod touch, or iPad directly to the unit If you update your "iPhone/iPod touch/iPad" to iOS 4.2.1 or later, you want to use iTunes, also see the Owner's Manual provided with DENON quality sound anywhere in your...
... Master Volume My Computer This Computer DENON:[AVR-3311CI] AirPlay Device n Streaming music stored in iPhone, iPod touch, or iPad directly to the unit If you update your "iPhone/iPod touch/iPad" to iOS 4.2.1 or later, you want to use iTunes, also see the Owner's Manual provided with DENON quality sound anywhere in your...

Owners Manual - English
Page 1
AV SURROUND RECEIVER AVR-4311CI Owner's Manual Simple version v4 Basic version v 14 Advanced version v 53 Information v 119 "Part names and functions" (vpage 120)
AV SURROUND RECEIVER AVR-4311CI Owner's Manual Simple version v4 Basic version v 14 Advanced version v 53 Information v 119 "Part names and functions" (vpage 120)
Owners Manual - English
Page 2
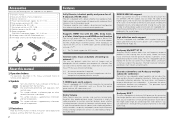
...de l'appareil et l'utilisateur doit pouvoir y accéder facilement. COMPLIANCE INFORMATION Product Name: AV Surround Receiver Model Number: AVR-4311CI This product complies with the manufacturer's instructions. 8. Operation is available at plugs, convenience receptacles, and the point where they exit... PAS TOUCHER. Do not use the product. 4. A polarized plug has two blades with the apparatus. CAUTION: To completely disconnect this manual, meets FCC requirements. Denon Electronics (USA), LLC (a D & M Holdings Company) 100 Corporate Drive Mahwah, NJ 07430-2041 Tel. (800) 497-8921 2....
...de l'appareil et l'utilisateur doit pouvoir y accéder facilement. COMPLIANCE INFORMATION Product Name: AV Surround Receiver Model Number: AVR-4311CI This product complies with the manufacturer's instructions. 8. Operation is available at plugs, convenience receptacles, and the point where they exit... PAS TOUCHER. Do not use the product. 4. A polarized plug has two blades with the apparatus. CAUTION: To completely disconnect this manual, meets FCC requirements. Denon Electronics (USA), LLC (a D & M Holdings Company) 100 Corporate Drive Mahwah, NJ 07430-2041 Tel. (800) 497-8921 2....

Owners Manual - English
Page 4
...a network audio 37 Playing a USB memory device 48 Selecting a listening mode (Surround Mode 50 Standard playback 50 DENON original surround playback 52 Stereo playback 52 Direct playback 52 Pure direct playback 52 Advanced version 53 Speaker installation/connection... 135 Resetting the microprocessor 138 Specifications 139 1 Information Contents Getting started Basic version Advanced version Thank you for purchasing this manual 2 Features 2 Cautions on handling 3 Simple version (Simple setup guide 4 Basic version 14 Connections 15 Important information 15...
...a network audio 37 Playing a USB memory device 48 Selecting a listening mode (Surround Mode 50 Standard playback 50 DENON original surround playback 52 Stereo playback 52 Direct playback 52 Pure direct playback 52 Advanced version 53 Speaker installation/connection... 135 Resetting the microprocessor 138 Specifications 139 1 Information Contents Getting started Basic version Advanced version Thank you for purchasing this manual 2 Features 2 Cautions on handling 3 Simple version (Simple setup guide 4 Basic version 14 Connections 15 Important information 15...
Owners Manual - English
Page 5
..., game machine, HD video camera, etc. Audyssey MultEQ® XT 32 Audyssey MultEQ corrects both time and frequency response problems in the sound images. q Owner's manual 1 w Warranty (for North America model only 1 e Service network list 1 r Power cord (Cord length: Approx. 6.2 ft / 1.9 m 1 t Main ...based on which this unit to achieve digital audio transmission with the optimum sounds. A sophisticated combination of two subwoofers. DENON LINK 4th support When you connect this mark is produced in the listening area so that every listener can playback audio...
..., game machine, HD video camera, etc. Audyssey MultEQ® XT 32 Audyssey MultEQ corrects both time and frequency response problems in the sound images. q Owner's manual 1 w Warranty (for North America model only 1 e Service network list 1 r Power cord (Cord length: Approx. 6.2 ft / 1.9 m 1 t Main ...based on which this unit to achieve digital audio transmission with the optimum sounds. A sophisticated combination of two subwoofers. DENON LINK 4th support When you connect this mark is produced in the listening area so that every listener can playback audio...

Owners Manual - English
Page 7
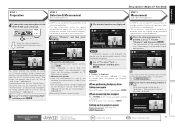
... entire setup procedure, from unboxing the unit to all devices. For the installing, connecting, and setup methods of the connected devices, refer to the user manuals for each device. 1 2 3 4 5 Install Connect Turn on Set up speakers (Audyssey® Auto Setup) STEP 1 Preparation STEP 2 Detection & Measurement (Main listening position) STEP 3 Measurement (2nd...
... entire setup procedure, from unboxing the unit to all devices. For the installing, connecting, and setup methods of the connected devices, refer to the user manuals for each device. 1 2 3 4 5 Install Connect Turn on Set up speakers (Audyssey® Auto Setup) STEP 1 Preparation STEP 2 Detection & Measurement (Main listening position) STEP 3 Measurement (2nd...

Owners Manual - English
Page 10
... as quiet as shown in use "Speaker Setup" (vpage 93) on power to insert the batteries (vpage 124 "Inserting the batteries"). 1 2 3 4 5 4 Set up the speakers manually, use ). • Do not unplug the setup microphone from the main unit until Audyssey Auto Setup is part of normal operation. The power indicator flashes...
... as quiet as shown in use "Speaker Setup" (vpage 93) on power to insert the batteries (vpage 124 "Inserting the batteries"). 1 2 3 4 5 4 Set up the speakers manually, use ). • Do not unplug the setup microphone from the main unit until Audyssey Auto Setup is part of normal operation. The power indicator flashes...
Owners Manual - English
Page 12
... 11), check any related items, and perform the necessary procedures. w Measure each speaker • Once the measurements in step q are complete, the measurements in the manual, Set the following screen is displayed. prompt is displayed: Go to 14 of position 8 is displayed. When performing Audyssey Auto Setup over again Press ui...
... 11), check any related items, and perform the necessary procedures. w Measure each speaker • Once the measurements in step q are complete, the measurements in the manual, Set the following screen is displayed. prompt is displayed: Go to 14 of position 8 is displayed. When performing Audyssey Auto Setup over again Press ui...

Owners Manual - English
Page 15
... to "Set up speakers (Audyssey® Auto Setup), STEP2 Detection & Measurement " (vpage 9), 6 - Proceed to 78 dB range. When you use two subwoofers, adjust each setting manually. 12 Remote control operation buttons Move the cursor (Up/Down/Left/Right) Confirm the setting Return to switch the display between the different speakers. Repeat...
... to "Set up speakers (Audyssey® Auto Setup), STEP2 Detection & Measurement " (vpage 9), 6 - Proceed to 78 dB range. When you use two subwoofers, adjust each setting manually. 12 Remote control operation buttons Move the cursor (Up/Down/Left/Right) Confirm the setting Return to switch the display between the different speakers. Repeat...

Owners Manual - English
Page 19
.... About ARC (Audio Return Channel) function The Audio Return Channel in this case, refer to "Connecting a TV" (vpage 18) for more information. Read the owner's manual of your television or player for the connection method. About HDMI cables • When a device supporting Deep Color signal transfer is connected, use the HDMI...
.... About ARC (Audio Return Channel) function The Audio Return Channel in this case, refer to "Connecting a TV" (vpage 18) for more information. Read the owner's manual of your television or player for the connection method. About HDMI cables • When a device supporting Deep Color signal transfer is connected, use the HDMI...

Owners Manual - English
Page 21
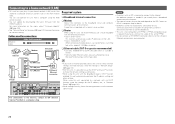
For details, see "About ARC (Audio Return Channel) function" (vpage 16) or refer to the instruction manual for your TV. Cables used for connections Video cable (sold separately) Video cable (Yellow) Component video cable Optical cable (Green) (Blue) (Red) Audio cable (sold ...
For details, see "About ARC (Audio Return Channel) function" (vpage 16) or refer to the instruction manual for your TV. Cables used for connections Video cable (sold separately) Video cable (Yellow) Component video cable Optical cable (Green) (Blue) (Red) Audio cable (sold ...
Owners Manual - English
Page 29
...operate this unit automatically performs the IP address setting and other settings. Contact an ISP or a computer shop for details. • DENON assumes no DHCP function, make the settings for any communication errors or troubles resulting from customer's network environment or connected devices. &#...internet connection nnModem Device that is integrated with an ISP is available at retailer. • Some flat type Ethernet cables are made manually, make the network settings automatically. • When using this unit connected to use a router equipped with PPPoE. When using this ...
...operate this unit automatically performs the IP address setting and other settings. Contact an ISP or a computer shop for details. • DENON assumes no DHCP function, make the settings for any communication errors or troubles resulting from customer's network environment or connected devices. &#...internet connection nnModem Device that is integrated with an ISP is available at retailer. • Some flat type Ethernet cables are made manually, make the network settings automatically. • When using this unit connected to use a router equipped with PPPoE. When using this ...

Owners Manual - English
Page 32
... the unit. 3 Press BD or DVD to switch an input source for a player used for playback. w Set "DIGITAL" to the Blu-ray disc player's manual. • The low jitter transmission function does not work except during Blu-ray disc playback. In this case, the video signal is output from the... surround modes or process downmix, at "Mute Level" (vpage 104). • To cancel, press MUTE again. NOTE • Set the Blu-ray disc player's "DENON LINK" setting to the level set "DIGITAL" to "D.LINK". 4 Press the input source select button (example: DVD) to switch an input source assigned in the...
... the unit. 3 Press BD or DVD to switch an input source for a player used for playback. w Set "DIGITAL" to the Blu-ray disc player's manual. • The low jitter transmission function does not work except during Blu-ray disc playback. In this case, the video signal is output from the... surround modes or process downmix, at "Mute Level" (vpage 104). • To cancel, press MUTE again. NOTE • Set the Blu-ray disc player's "DENON LINK" setting to the level set "DIGITAL" to "D.LINK". 4 Press the input source select button (example: DVD) to switch an input source assigned in the...

Owners Manual - English
Page 34
... the iPod. • Depending on the type of iPod and the software version, some functions may not operate. • Note that DENON will accept no responsibility whatsoever for iPod, image files can play back compressed audio with the data on an iPod when using this unit's...) or p (next page). nniPod operation Playing an iPod® Operation buttons Function MENU Amp menu uio p Cursor operation / Auto search (cue, ui) / Manual search (Press and hold, ui) ENTER (Press and release) Enter / Pause ENTER (Press and hold) Stop SEARCH (Press and release) Page search modez SEARCH ...
... the iPod. • Depending on the type of iPod and the software version, some functions may not operate. • Note that DENON will accept no responsibility whatsoever for iPod, image files can play back compressed audio with the data on an iPod when using this unit's...) or p (next page). nniPod operation Playing an iPod® Operation buttons Function MENU Amp menu uio p Cursor operation / Auto search (cue, ui) / Manual search (Press and hold, ui) ENTER (Press and release) Enter / Pause ENTER (Press and hold) Stop SEARCH (Press and release) Page search modez SEARCH ...
Owners Manual - English
Page 35
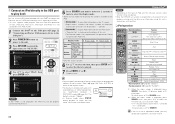
...this unit in conjunction with the iPod. n iPod operation Operation buttons Function MENU Amp menu uio p Cursor operation / Auto search (cue, ui) / Manual search (Press and hold, ui) ENTER (Press and release) Enter / Pause ENTER (Press and hold) Stop SEARCH (Press and release) Page searchz1...playback in alphabetical order, you want to search mode. • If it down for 2 seconds or more to perform a character search. 32 DENON:[AVR-4311CI] [1/8] Favorites Internet Radio Media Server iPod Flickr Napster Pandora 4 Use ui to check the title name, artist name, and album name. The...
...this unit in conjunction with the iPod. n iPod operation Operation buttons Function MENU Amp menu uio p Cursor operation / Auto search (cue, ui) / Manual search (Press and hold, ui) ENTER (Press and release) Enter / Pause ENTER (Press and hold) Stop SEARCH (Press and release) Page searchz1...playback in alphabetical order, you want to search mode. • If it down for 2 seconds or more to perform a character search. 32 DENON:[AVR-4311CI] [1/8] Favorites Internet Radio Media Server iPod Flickr Napster Pandora 4 Use ui to check the title name, artist name, and album name. The...

Owners Manual - English
Page 38
...HD Radio station is tuned in. • When "HD-AUTO" (tuning mode) is selected, only HD Radio stations are displayed can be tuned in manually (Manual tuning) Press MODE to turn off the display's "AUTO" indicator, then use TUNING d or TUNING f to select the station you want to which ... Press MODE to light the "HD-AUTO" or "AUTO" indicator on /standby (Default : SONY) TV INPUT Switch TV input (Default : SONY) Tuning in stations manually, press and hold TUNING d or TUNING f to change frequencies continuously. • The time (default : 30 sec) for which the menu are tuned in. •...
...HD Radio station is tuned in. • When "HD-AUTO" (tuning mode) is selected, only HD Radio stations are displayed can be tuned in manually (Manual tuning) Press MODE to turn off the display's "AUTO" indicator, then use TUNING d or TUNING f to select the station you want to which ... Press MODE to light the "HD-AUTO" or "AUTO" indicator on /standby (Default : SONY) TV INPUT Switch TV input (Default : SONY) Tuning in stations manually, press and hold TUNING d or TUNING f to change frequencies continuously. • The time (default : 30 sec) for which the menu are tuned in. •...

Owners Manual - English
Page 39
...indicator and text may flicker if the station signal level is indicated. The current reception information is tuned in easily. nnPresetting radio stations (Manual preset) Your favorite broadcast stations can be preset automatically at "Auto Preset" (vpage 81). Default settings Block (A - or 1 ...be overwritten. F8 G1 - nnCheck the HD Radio reception information Press STATUS while an HD Radio broadcast is performed after performing "Manual Preset", the "Manual Preset" settings will be preset, then press CH +, CH - If "Auto Preset" is being received. q Normal w Frequency...
...indicator and text may flicker if the station signal level is indicated. The current reception information is tuned in easily. nnPresetting radio stations (Manual preset) Your favorite broadcast stations can be preset automatically at "Auto Preset" (vpage 81). Default settings Block (A - or 1 ...be overwritten. F8 G1 - nnCheck the HD Radio reception information Press STATUS while an HD Radio broadcast is performed after performing "Manual Preset", the "Manual Preset" settings will be preset, then press CH +, CH - If "Auto Preset" is being received. q Normal w Frequency...

Owners Manual - English
Page 65
... is stopped, and interference to the preamplifier from the front wide speaker terminals. • For connecting power amplifier and speaker systems, refer to the instruction manual supplied with the power amplifier to be used , the built-in the PRE AMP mode, set "Assign Mode" to "PRE AMP" using steps 3 and 4 of...
... is stopped, and interference to the preamplifier from the front wide speaker terminals. • For connecting power amplifier and speaker systems, refer to the instruction manual supplied with the power amplifier to be used , the built-in the PRE AMP mode, set "Assign Mode" to "PRE AMP" using steps 3 and 4 of...

Owners Manual - English
Page 66
...63 Bi-AMP Select the Bi-AMP setting to assign the unit's builtin power amplifier for ZONE2 and ZONE3 and output the audio in the manual, Set the following items If necessary. Z2/3-MONO Select the ZONE2/3-MONO setting to connect the front speakers via the bi-amp connection. ...setting to step 8. In this case, go to assign the unit's built-in power amplifier for ZONE2 and ZONE3 and output the audio in the manual, Set the following screen is skipped, and measuring time can be reduced. In this case, go to the recommendations in stereo. When the setup...
...63 Bi-AMP Select the Bi-AMP setting to assign the unit's builtin power amplifier for ZONE2 and ZONE3 and output the audio in the manual, Set the following items If necessary. Z2/3-MONO Select the ZONE2/3-MONO setting to connect the front speakers via the bi-amp connection. ...setting to step 8. In this case, go to assign the unit's built-in power amplifier for ZONE2 and ZONE3 and output the audio in the manual, Set the following screen is skipped, and measuring time can be reduced. In this case, go to the recommendations in stereo. When the setup...

Owners Manual - English
Page 67
... front wide speakers. Select the Front setting to connect an external power amplifier to the front (FL/FR) terminals of the unit's built-in the manual, Set the following items If necessary. In this case, go to step 5. 11CH Select the 11CH setting to perform playback using a combination of PRE OUT...
... front wide speakers. Select the Front setting to connect an external power amplifier to the front (FL/FR) terminals of the unit's built-in the manual, Set the following items If necessary. In this case, go to step 5. 11CH Select the 11CH setting to perform playback using a combination of PRE OUT...


