
Literature/Product Sheet
Page 1
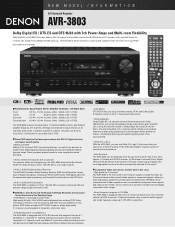
... channels. If the type of monitor outputs (all RCA terminals). NEW MODEL I N F O R M A T I O N A/V Surround Receiver AVR-3803 Dolby Digital EX / DTS-ES and DTS 96/24 with 7ch Power Amps and Multi-room Flexibility Dolby Digital EX and dts 96/24 have been added to offer full support for the decoder to further boost digital signal processing capability and also providing the highest dynamic range. Each of the 7 amplifier channels is rated at 110 watts, into 8 ohms...
... channels. If the type of monitor outputs (all RCA terminals). NEW MODEL I N F O R M A T I O N A/V Surround Receiver AVR-3803 Dolby Digital EX / DTS-ES and DTS 96/24 with 7ch Power Amps and Multi-room Flexibility Dolby Digital EX and dts 96/24 have been added to offer full support for the decoder to further boost digital signal processing capability and also providing the highest dynamic range. Each of the 7 amplifier channels is rated at 110 watts, into 8 ohms...
Literature/Product Sheet
Page 2
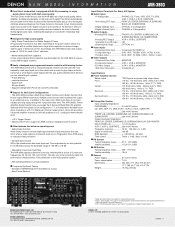
... BACK L/R, SUBWOOFER 5 Digital (Optical) Input OPTICAL X 5 (Assignable) 2 Digital (Coaxial) Input COAXIAL x 2 (Assignable) ■ Audio Outputs 8 Analog PRE Output FRONT L/R, CENTER, SURROUND L/R, SURROUND BACK L/R, SUBWOOFER 3 Analog REC Output VCR-1, VCR-2, CDR/TAPE 1 Analog Multi Zone PRE Output ...... This lets you use the AVR-3803 as in a Progressive Scan DVD player or outboard video processor. • Variable Gain Volume S/N in the power section where it is also turned off to thoroughly minimize adverse influences from these circuits on the main unit to select Pure Direct...
... BACK L/R, SUBWOOFER 5 Digital (Optical) Input OPTICAL X 5 (Assignable) 2 Digital (Coaxial) Input COAXIAL x 2 (Assignable) ■ Audio Outputs 8 Analog PRE Output FRONT L/R, CENTER, SURROUND L/R, SURROUND BACK L/R, SUBWOOFER 3 Analog REC Output VCR-1, VCR-2, CDR/TAPE 1 Analog Multi Zone PRE Output ...... This lets you use the AVR-3803 as in a Progressive Scan DVD player or outboard video processor. • Variable Gain Volume S/N in the power section where it is also turned off to thoroughly minimize adverse influences from these circuits on the main unit to select Pure Direct...
Owners Manual
Page 4
... following parts are not problems with home theater sources such as DVD, as well as possible from the tuner or TV. • Set the antenna wires from the tuner or TV away from the actual set for choosing the DENON AVR-3803/1083 Digital A / V Surround Receiver. 2 INTRODUCTION Thank you review the contents of this unit: • Moving the set To prevent short circuits or damaged wires in the connection cords, always unplug the power cord...
... following parts are not problems with home theater sources such as DVD, as well as possible from the tuner or TV. • Set the antenna wires from the tuner or TV away from the actual set for choosing the DENON AVR-3803/1083 Digital A / V Surround Receiver. 2 INTRODUCTION Thank you review the contents of this unit: • Moving the set To prevent short circuits or damaged wires in the connection cords, always unplug the power cord...
Owners Manual
Page 5
... this happens, either turn down the MASTER VOLUME control or connect components to the input jacks. Multi Zone Music Entertainment System Multi Source Function: This unit's Multi Source function lets you select different audio sources for superior picture quality. 11.Video Select Function Allow you to watch one set according to another source (audio). 12.Future Sound Format Upgrade Capability via Eight Channel Inputs & Outputs For future multi-channel audio format(s), the AVR-3803/1083 is the default digital audio delivery system for playing multi-channel audio signals that you can...
... this happens, either turn down the MASTER VOLUME control or connect components to the input jacks. Multi Zone Music Entertainment System Multi Source Function: This unit's Multi Source function lets you select different audio sources for superior picture quality. 11.Video Select Function Allow you to watch one set according to another source (audio). 12.Future Sound Format Upgrade Capability via Eight Channel Inputs & Outputs For future multi-channel audio format(s), the AVR-3803/1083 is the default digital audio delivery system for playing multi-channel audio signals that you can...

Owners Manual
Page 6
... used with MC cartridges directly. The power to these for playback: Connect the tape deck's playback output jacks (LINE OUT or PB) to this unit's tape recording (CDR/TAPE OUT) jacks using pin plug cords. 6 No power is supplied from the remote control unit. Never use the AC OUTLETS for the individual functions. BACK L CH. Connecting a tape deck Connections for audio equipment only. If this happens, turn on the power of the front, center and surround sound channels, or for optical connections...
... used with MC cartridges directly. The power to these for playback: Connect the tape deck's playback output jacks (LINE OUT or PB) to this unit's tape recording (CDR/TAPE OUT) jacks using pin plug cords. 6 No power is supplied from the remote control unit. Never use the AC OUTLETS for the individual functions. BACK L CH. Connecting a tape deck Connections for audio equipment only. If this happens, turn on the power of the front, center and surround sound channels, or for optical connections...
Owners Manual
Page 9
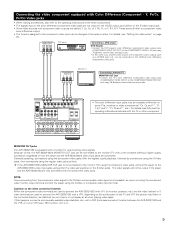
... sync or not display at the system setup. If the AVR-3803/1083's MONITOR OUT jack is not possible, so when not using the component video monitor output terminal connect the player using 75 Ω/ohms coaxial video pin-plug cords. • The color difference input jacks may be indicated differently on the combination of the TV and VTR the picture may flicker in the horizontal direction, be distorted, be changed at all when playing video tapes. Connecting...
... sync or not display at the system setup. If the AVR-3803/1083's MONITOR OUT jack is not possible, so when not using the component video monitor output terminal connect the player using 75 Ω/ohms coaxial video pin-plug cords. • The color difference input jacks may be indicated differently on the combination of the TV and VTR the picture may flicker in the horizontal direction, be distorted, be changed at all when playing video tapes. Connecting...
Owners Manual
Page 16
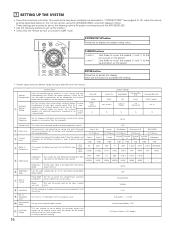
... -mixing Dolby Digital signals. In o Subwoofer Level !0 Auto Surround Mode !1 On Screen Display Set the audio delay to delay time the sound and synchronize it with which the bass sound of surround speakers to be used for playing deep bass signals. SYSTEM SETUP button Press this to the surround mode. CURSOR buttons F and G: D and H: Use these to move the cursors (F and G) to be output from the speakers and the frequency response. A / B Yes Small WDE SCREEN 5CH/7CH STEREO DSP SIMULATION Surround Back Sp. e Channel Level This adjusts the volume of...
... -mixing Dolby Digital signals. In o Subwoofer Level !0 Auto Surround Mode !1 On Screen Display Set the audio delay to delay time the sound and synchronize it with which the bass sound of surround speakers to be used for playing deep bass signals. SYSTEM SETUP button Press this to the surround mode. CURSOR buttons F and G: D and H: Use these to move the cursors (F and G) to be output from the speakers and the frequency response. A / B Yes Small WDE SCREEN 5CH/7CH STEREO DSP SIMULATION Surround Back Sp. e Channel Level This adjusts the volume of...
Owners Manual
Page 17
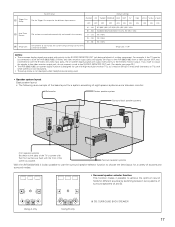
... input to the AVR-3803/1083 from a video source (VDP, etc.) connected to the S-VIDEO MONITOR OUT jack during playback of a video component. For example, if the TV monitor is designed for the different input sources. Set whether or not to lock the system setup settings so that they cannot be difficult to the S-Video monitor output. A A A A B SB SB B Using A only B SB SB B Using B only SB: SURROUND BACK SPEAKER 17 !2 Trigger Out Setup !3 Auto Tuner Presets !4 Setup Lock System setup Default settings Set...
... input to the AVR-3803/1083 from a video source (VDP, etc.) connected to the S-VIDEO MONITOR OUT jack during playback of a video component. For example, if the TV monitor is designed for the different input sources. Set whether or not to lock the system setup settings so that they cannot be difficult to the S-Video monitor output. A A A A B SB SB B Using A only B SB SB B Using B only SB: SURROUND BACK SPEAKER 17 !2 Trigger Out Setup !3 Auto Tuner Presets !4 Setup Lock System setup Default settings Set...

Owners Manual
Page 19
...the output is the same as when "Small" is set switches to the subwoofer. None Select this screen preset the surround speakers to be used for the surround back channel. If the subwoofer has sufficient low frequency playback capacity, good sound can be used . 1 Select the "Crossover Frequency" mode. Selecting the Surround Speakers for the different surround modes This screen is displayed when using both surround speakers A and B 2 Enter the setting. Setting the crossover frequency and low frequency distribution when playing Dolby Digital and DTS signals This screen is set...
...the output is the same as when "Small" is set switches to the subwoofer. None Select this screen preset the surround speakers to be used for the surround back channel. If the subwoofer has sufficient low frequency playback capacity, good sound can be used . 1 Select the "Crossover Frequency" mode. Selecting the Surround Speakers for the different surround modes This screen is displayed when using both surround speakers A and B 2 Enter the setting. Setting the crossover frequency and low frequency distribution when playing Dolby Digital and DTS signals This screen is set...

Owners Manual
Page 22
... of 1 foot (0.1 meters) each time the button is selected for "Default", the settings are reset to the Channel Level screen. 3 Select "Test Tone". 22 The AVR-3803/1083 automatically sets the optimum surround delay time for every speaker should be adjusted separately. 1 At the System Setup Menu select "Channel Level". 2 Switch to the factory default values (see page 55.) • When using both surround speakers A and B, their playback levels can also be adjusted directly from the speakers to adjust the level. • The level can be 20 ft...
... of 1 foot (0.1 meters) each time the button is selected for "Default", the settings are reset to the Channel Level screen. 3 Select "Test Tone". 22 The AVR-3803/1083 automatically sets the optimum surround delay time for every speaker should be adjusted separately. 1 At the System Setup Menu select "Channel Level". 2 Switch to the factory default values (see page 55.) • When using both surround speakers A and B, their playback levels can also be adjusted directly from the speakers to adjust the level. • The level can be 20 ft...

Owners Manual
Page 24
... surround modes: PURE DIRECT/DIRECT, STEREO, DOLBY/DTS SURROUND, 5/7 CH STEREO, WIDE SCREEN, SUPER STADIUM, ROCK ARENA, JAZZ CLUB, CLASSIC CONCERT, MONO MOVIE, VIDEO GAME, MATRIX and VIRTUAL. Setting the Digital In Assignment • This setting assigns the digital input jacks of the AVR-3803/1083 for the different input sources. 1 At the System Setup Menu select "Digital In Assignment". 2 Switch to the Digital Inputs screen. 3 Select the digital input jack to the default values. 4 Enter the setting. When using either surround speakers A or B, or when using surround speakers...
... surround modes: PURE DIRECT/DIRECT, STEREO, DOLBY/DTS SURROUND, 5/7 CH STEREO, WIDE SCREEN, SUPER STADIUM, ROCK ARENA, JAZZ CLUB, CLASSIC CONCERT, MONO MOVIE, VIDEO GAME, MATRIX and VIRTUAL. Setting the Digital In Assignment • This setting assigns the digital input jacks of the AVR-3803/1083 for the different input sources. 1 At the System Setup Menu select "Digital In Assignment". 2 Switch to the Digital Inputs screen. 3 Select the digital input jack to the default values. 4 Enter the setting. When using either surround speakers A or B, or when using surround speakers...

Owners Manual
Page 48
...than PHONO and TUNER. NOTE: • Note that noise may be selected for the selected input source are performed automatically in DTS, Dolby Digital or PCM (2 channel stereo) format. Select the AUTO or DTS mode when playing signals recorded in the "PCM" (exclusive PCM signal playback) or "ANALOG" (exclusive PCM signal playback) mode. If so, play Dolby Digital signals. IN button on the remote control unit) to switch the external input. (Main unit) (Remote control unit) • Selecting the AUTO, PCM and DTS modes The mode switches as shown below each time the INPUT MODE button...
...than PHONO and TUNER. NOTE: • Note that noise may be selected for the selected input source are performed automatically in DTS, Dolby Digital or PCM (2 channel stereo) format. Select the AUTO or DTS mode when playing signals recorded in the "PCM" (exclusive PCM signal playback) or "ANALOG" (exclusive PCM signal playback) mode. If so, play Dolby Digital signals. IN button on the remote control unit) to switch the external input. (Main unit) (Remote control unit) • Selecting the AUTO, PCM and DTS modes The mode switches as shown below each time the INPUT MODE button...

Owners Manual
Page 49
... input signal. Example: Stereo SELECT (Main unit) (Remote control unit) To select the surround mode while adjusting the surround parameters, channel volume or tone control, press the surround mode button then operate the selector. (Main unit) 4 Start playback on . When playing DTS-compatible sources, be sure to connect the source component to the digital input jacks (OPTICAL/COAXIAL) and set at +1 dB or greater, the volume cannot be adjusted up to 18 dB. (In this case the maximum volume adjustment range is turned on the selected component. • For operating instructions...
... input signal. Example: Stereo SELECT (Main unit) (Remote control unit) To select the surround mode while adjusting the surround parameters, channel volume or tone control, press the surround mode button then operate the selector. (Main unit) 4 Start playback on . When playing DTS-compatible sources, be sure to connect the source component to the digital input jacks (OPTICAL/COAXIAL) and set at +1 dB or greater, the volume cannot be adjusted up to 18 dB. (In this case the maximum volume adjustment range is turned on the selected component. • For operating instructions...

Owners Manual
Page 50
... video output is set for music. IN), the surround mode (DIRECT, STEREO, DOLBY/DTS SURROUND, 5/7CH STEREO, WIDE SCREEN or DSP SIMULATION) cannot be set. 21 2 1 NOTES: • In play modes other than the external input mode, the signals connected to switch the external input. (Main unit) (Remote control unit) Once this mode. When this mode is set this is selected, the input signals connected to which the video signal is cancelled. • The subwoofer's channel level must be reproduced with high quality. channel sound while watching images. IN) jacks 1 Set...
... video output is set for music. IN), the surround mode (DIRECT, STEREO, DOLBY/DTS SURROUND, 5/7CH STEREO, WIDE SCREEN or DSP SIMULATION) cannot be set. 21 2 1 NOTES: • In play modes other than the external input mode, the signals connected to switch the external input. (Main unit) (Remote control unit) Once this mode. When this mode is set this is selected, the input signals connected to which the video signal is cancelled. • The subwoofer's channel level must be reproduced with high quality. channel sound while watching images. IN) jacks 1 Set...

Owners Manual
Page 51
... control clockwise. (The bass or treble sound can be adjusted selected, turn on the display. The signals do not want the bass and treble to be adjusted, turn the SELECT knob to monitor a video source other than the audio source. Press the MUTING button. Press the MUTING button again. (Remote control unit) 1 NOTE: To prevent hearing loss, do not raise the volume level excessively when using the VIDEO SELECT button and the FUNCTION button. • Switch the program source to the component connected to the PHONES jack. BASS TREBLE...
... control clockwise. (The bass or treble sound can be adjusted selected, turn on the display. The signals do not want the bass and treble to be adjusted, turn the SELECT knob to monitor a video source other than the audio source. Press the MUTING button. Press the MUTING button again. (Remote control unit) 1 NOTE: To prevent hearing loss, do not raise the volume level excessively when using the VIDEO SELECT button and the FUNCTION button. • Switch the program source to the component connected to the PHONES jack. BASS TREBLE...

Owners Manual
Page 60
... LFE (Low Frequency Effect) sounds included in the source when playing program sources recorded in the Dolby Pro Logic II, Dolby Digital, DTS Surround, DTS NEO:6 and WIDE SCREEN modes. (The same contents are recorded at night, or whenever the maximum sound level is a basic function of Dolby Digital which automatically normalizes the dialog level (standard level) of the surround channels are performing the operation from the main unit or the remote control unit. 5 Select the various parameters. 6 Adjust the parameter settings...
... LFE (Low Frequency Effect) sounds included in the source when playing program sources recorded in the Dolby Pro Logic II, Dolby Digital, DTS Surround, DTS NEO:6 and WIDE SCREEN modes. (The same contents are recorded at night, or whenever the maximum sound level is a basic function of Dolby Digital which automatically normalizes the dialog level (standard level) of the surround channels are performing the operation from the main unit or the remote control unit. 5 Select the various parameters. 6 Adjust the parameter settings...
Owners Manual
Page 71
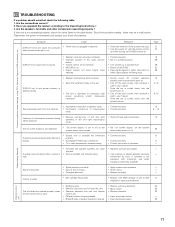
... • Digital signals not input Digital input • Input digital signals or select input jacks to cool it down . Have you operated the receiver according to the CD's, Records, Tapes and FM broadcasts, etc. Symptom Cause DISPLAY not lit and sound not produced • Power cord not plugged in the table below. Once the set 's power, then ventilate it well to 48 selected. playing. • Incomplete PHONO jack connection. • Connect securely. 6 • TV or radio transmission antenna nearby...
... • Digital signals not input Digital input • Input digital signals or select input jacks to cool it down . Have you operated the receiver according to the CD's, Records, Tapes and FM broadcasts, etc. Symptom Cause DISPLAY not lit and sound not produced • Power cord not plugged in the table below. Once the set 's power, then ventilate it well to 48 selected. playing. • Incomplete PHONO jack connection. • Connect securely. 6 • TV or radio transmission antenna nearby...
Owners Manual
Page 76
..."bit stream + PCM" jacks to achieve multi-channel surround playback. LFE - playback channels Playback channels (max.) Audio processing Dolby Digital 5.1 ch 5.1 ch L, R, C, SL, SR, SW Digital discrete processing Dolby Digital encoding/decoding Dolby Pro Logic 2 ch 4 ch L, R, C, S (SW - The signals can also be used to decode not only sources recorded in Dolby Surround ( ) but Dolby Pro Logic II they provide normal stereo sound. 76 recorded channels (elements) No. When playing in Dolby Digital surround on the AVR-3803/1083, switch the DVD player's output mode to ) PCM". In...
..."bit stream + PCM" jacks to achieve multi-channel surround playback. LFE - playback channels Playback channels (max.) Audio processing Dolby Digital 5.1 ch 5.1 ch L, R, C, SL, SR, SW Digital discrete processing Dolby Digital encoding/decoding Dolby Pro Logic 2 ch 4 ch L, R, C, S (SW - The signals can also be used to decode not only sources recorded in Dolby Surround ( ) but Dolby Pro Logic II they provide normal stereo sound. 76 recorded channels (elements) No. When playing in Dolby Digital surround on the AVR-3803/1083, switch the DVD player's output mode to ) PCM". In...

Owners Manual
Page 77
... the amplifier set to the speakers. Manufactured under license from Digital Theater Systems, Inc. q 2-channel PCM stereo signals w 2-channel Dolby Digital signals When either of these signals is input to the AVR-3803/1083, the surround mode is automatically set at the digital outputs of a CD or LD player may possibly cause damage to Dolby Pro Logic II when the "DOLBY/DTS SURROUND" mode is of course no need for information on the AVR-3803/1083 (see page 59) lights before playing CDs...
... the amplifier set to the speakers. Manufactured under license from Digital Theater Systems, Inc. q 2-channel PCM stereo signals w 2-channel Dolby Digital signals When either of these signals is input to the AVR-3803/1083, the surround mode is automatically set at the digital outputs of a CD or LD player may possibly cause damage to Dolby Pro Logic II when the "DOLBY/DTS SURROUND" mode is of course no need for information on the AVR-3803/1083 (see page 59) lights before playing CDs...

Owners Manual
Page 80
....1/90.1 MHz 90.1 MHz 90.1 MHz 90.1 MHz Setup Lock = OFF 80 A / B Yes Small WDE SCREEN 5CH/7CH STEREO DSP SIMULATION Surround Back Sp. Surround Back Variable i Audio Delay Ext. Small / 2spkrs EXT. r Digital In Assignment This assigns the digital input jacks for the zone 2 output jacks. In o Subwoofer Level !0 Auto Surround Mode !1 On Screen Display Set the audio delay to switch the surround back channel's Assignment power amplifier for use for zone 2. Set the Auto surround mode function. PHONO CD TUNER CDR/TAPE DVD VDP TV OFF OFF OFF OFF ON ON ON...
....1/90.1 MHz 90.1 MHz 90.1 MHz 90.1 MHz Setup Lock = OFF 80 A / B Yes Small WDE SCREEN 5CH/7CH STEREO DSP SIMULATION Surround Back Sp. Surround Back Variable i Audio Delay Ext. Small / 2spkrs EXT. r Digital In Assignment This assigns the digital input jacks for the zone 2 output jacks. In o Subwoofer Level !0 Auto Surround Mode !1 On Screen Display Set the audio delay to switch the surround back channel's Assignment power amplifier for use for zone 2. Set the Auto surround mode function. PHONO CD TUNER CDR/TAPE DVD VDP TV OFF OFF OFF OFF ON ON ON...


