AVR3312CI_OwnersManual
Page 4
... Examples of menu and front display 87 Inputting characters 88 SOURCE SELECT 90 AUDIO/VIDEO ADJUST 97 SYSTEM SETUP 104 INFORMATION 120 Operating the connected devices by remote control unit·····121 Operating ... (LAN 19 Connecting an external control device 20 Settings 21 Set up speakers (Audyssey® Auto Setup 21 Making the network settings (Network Setup 27 Playback (Basic operation 28 Important information 28 Playing a Blu-ray Disc player/DVD player 30... Thank you for future reference. To ensure proper operation, please read this DENON product.
... Examples of menu and front display 87 Inputting characters 88 SOURCE SELECT 90 AUDIO/VIDEO ADJUST 97 SYSTEM SETUP 104 INFORMATION 120 Operating the connected devices by remote control unit·····121 Operating ... (LAN 19 Connecting an external control device 20 Settings 21 Set up speakers (Audyssey® Auto Setup 21 Making the network settings (Network Setup 27 Playback (Basic operation 28 Important information 28 Playing a Blu-ray Disc player/DVD player 30... Thank you for future reference. To ensure proper operation, please read this DENON product.

AVR3312CI_OwnersManual
Page 5
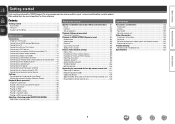
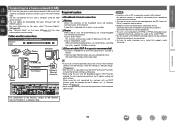
... manual 1 e Warranty (for North America model only 1 r Service network list 1 t Power cord 1 y Remote control unit (RC-1156 1 u R6/AA batteries 2 i Setup microphone (DM-A409 1 o AM loop antenna (for HD Radio broadcasts 1 Q0 FM indoor antenna (for HD Radio broadcasts 1 t y i o Q0 Features Fully discrete, identical quality... the USB port of the unit with an iPhone or iPod touchz1 "Denon Remote App" is equipped with a power amplifier that reproduces highfidelity sound in surround mode with the product. Setup Wizard, providing easy-to a TV that are supplied with equal quality...
... manual 1 e Warranty (for North America model only 1 r Service network list 1 t Power cord 1 y Remote control unit (RC-1156 1 u R6/AA batteries 2 i Setup microphone (DM-A409 1 o AM loop antenna (for HD Radio broadcasts 1 Q0 FM indoor antenna (for HD Radio broadcasts 1 t y i o Q0 Features Fully discrete, identical quality... the USB port of the unit with an iPhone or iPod touchz1 "Denon Remote App" is equipped with a power amplifier that reproduces highfidelity sound in surround mode with the product. Setup Wizard, providing easy-to a TV that are supplied with equal quality...
AVR3312CI_OwnersManual
Page 8
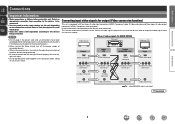
... need to be connected. NOTE • Do not plug in the power cord until all connections have been completed (When the Setup wizard is equipped with connection cables. This function automatically converts various formats of video output connectors (HDMI, Component video and video). Refer...Converting input video signals for making connections, also refer to a monitor. Doing so can result in the Setup wizard screen for output (Video conversion function) This unit is running the Setup wizard, turn off the power supply of connected devices. • When making connections. ). • ...
... need to be connected. NOTE • Do not plug in the power cord until all connections have been completed (When the Setup wizard is equipped with connection cables. This function automatically converts various formats of video output connectors (HDMI, Component video and video). Refer...Converting input video signals for making connections, also refer to a monitor. Doing so can result in the Setup wizard screen for output (Video conversion function) This unit is running the Setup wizard, turn off the power supply of connected devices. • When making connections. ). • ...
AVR3312CI_OwnersManual
Page 12
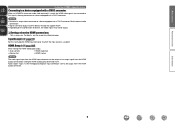
For details, see the respective reference pages. Audio signals input via the Analog/Coaxial/Optical input connectors cannot be output as necessary. HDMI Setup (vpage 108) Make settings for HDMI video/audio output. • Auto Lip Sync • HDMI Audio Out • Monitor Out • HDMI Control NOTE The ...
For details, see the respective reference pages. Audio signals input via the Analog/Coaxial/Optical input connectors cannot be output as necessary. HDMI Setup (vpage 108) Make settings for HDMI video/audio output. • Auto Lip Sync • HDMI Audio Out • Monitor Out • HDMI Control NOTE The ...
AVR3312CI_OwnersManual
Page 22
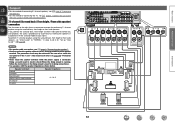
... or connected devices. • This unit is possible to use the DHCP and Auto IP functions to make the settings for details. • DENON assumes no DHCP function, make the network settings automatically. • When using this unit with the broadband router's DHCP function enabled, this unit ... Internet, contact an ISP (Internet Service Provider) or a computer shop. You can update by noise. Cables used depend on which is available at "Network Setup" (vpage 111). • With this unit, it is not compatible with PPPoE. Contact an ISP or a computer shop for the IP address, etc...
... or connected devices. • This unit is possible to use the DHCP and Auto IP functions to make the settings for details. • DENON assumes no DHCP function, make the network settings automatically. • When using this unit with the broadband router's DHCP function enabled, this unit ... Internet, contact an ISP (Internet Service Provider) or a computer shop. You can update by noise. Cables used depend on which is available at "Network Setup" (vpage 111). • With this unit, it is not compatible with PPPoE. Contact an ISP or a computer shop for the IP address, etc...
AVR3312CI_OwnersManual
Page 24
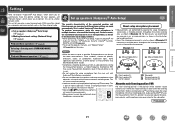
...radios, air conditioners, fluorescent lights, home appliances, light dimmers, or other devices as measurements may be affected by placing the setup microphone successively at multiple points throughout the listening environment results in more positions, as shown in the illustration (up to eight positions... crossover value for your home network (LAN) music files stored on the menu. Before starting Audyssey® Auto Setup, place the setup microphone in multiple locations all audio electronics during the measurement process as Radio Frequency Interference (RFI) may be performed when...
...radios, air conditioners, fluorescent lights, home appliances, light dimmers, or other devices as measurements may be affected by placing the setup microphone successively at multiple points throughout the listening environment results in more positions, as shown in the illustration (up to eight positions... crossover value for your home network (LAN) music files stored on the menu. Before starting Audyssey® Auto Setup, place the setup microphone in multiple locations all audio electronics during the measurement process as Radio Frequency Interference (RFI) may be performed when...

AVR3312CI_OwnersManual
Page 25
...mode to J (MAIN ZONE). Press ZONE SELECT nn Set up the subwoofer as shown below. Press AMP vSee overleaf Information 22 When placing the setup microphone, adjust the height of the sound receptor to the level of the following settings: • Volume : "12 o'clock position" • ...stand, set the remote control unit to AMPoperation mode. nn When using a subwoofer without a back. NOTE • Do not hold the setup microphone in the main listening position. If you use two subwoofers, please adjust the subwoofer volume controls individually so that each subwoofer level is...
...mode to J (MAIN ZONE). Press ZONE SELECT nn Set up the subwoofer as shown below. Press AMP vSee overleaf Information 22 When placing the setup microphone, adjust the height of the sound receptor to the level of the following settings: • Volume : "12 o'clock position" • ...stand, set the remote control unit to AMPoperation mode. nn When using a subwoofer without a back. NOTE • Do not hold the setup microphone in the main listening position. If you use two subwoofers, please adjust the subwoofer volume controls individually so that each subwoofer level is...

AVR3312CI_OwnersManual
Page 26
... "Caution!" For setting, perform steps 6 to "Error messages" (vpage 26), check any related items, and perform the necessary procedures. AUDYSSEY AUTO SETUP STEP1 Preparation 1 2 3 4 5 6 Connect the speakers and place them according to select "Next → Measurement" and then press ENTER. ...When measuring begins, a test tone is resolved, return and restart "Audyssey® Auto Setup". Basic version Advanced version STEP 1 Preparation STEP 2 Detection & Measurement (Main) Set up the speakers again Repeat the operation from each...
... "Caution!" For setting, perform steps 6 to "Error messages" (vpage 26), check any related items, and perform the necessary procedures. AUDYSSEY AUTO SETUP STEP1 Preparation 1 2 3 4 5 6 Connect the speakers and place them according to select "Next → Measurement" and then press ENTER. ...When measuring begins, a test tone is resolved, return and restart "Audyssey® Auto Setup". Basic version Advanced version STEP 1 Preparation STEP 2 Detection & Measurement (Main) Set up the speakers again Repeat the operation from each...

AVR3312CI_OwnersManual
Page 27
Output large test tone during measuring 11 On the STEP 3 screen, use ui to select "Measure", and then press ENTER. AUDYSSEY AUTO SETUP STEP4 Calculation Now calculating...Please wait. 20% 1 2 3 4 5 6 • Analysis takes several minutes to 8. message is completed, a "Measurements finished."... position can be measured but measuring multiple positions increases the accuracy of the correction of each speaker in up speakers (Audyssey® Auto Setup) • In STEP 3, you want to omit measurements from the next position onward, select "Next Calculation". (Go to STEP4 Calculation...
Output large test tone during measuring 11 On the STEP 3 screen, use ui to select "Measure", and then press ENTER. AUDYSSEY AUTO SETUP STEP4 Calculation Now calculating...Please wait. 20% 1 2 3 4 5 6 • Analysis takes several minutes to 8. message is completed, a "Measurements finished."... position can be measured but measuring multiple positions increases the accuracy of the correction of each speaker in up speakers (Audyssey® Auto Setup) • In STEP 3, you want to omit measurements from the next position onward, select "Next Calculation". (Go to STEP4 Calculation...

AVR3312CI_OwnersManual
Page 28
...press "Next". 1 2 3 4 5 6 Speaker Config. Check Distance Check Channel Level Check Crossover Freq. All the measured Audyssey® Auto Setup data will be displayed. Please unplug microphone. Check Next Store Enter Proceed to next (Store) RETURN Cancel • Subwoofers may measure a greater reported... is performed automatically without any loss in subwoofers. • If you change speaker positions or orientation, perform Audyssey® Auto Setup again to find the optimal equalizer settings. • Saving the results requires about 10 seconds. • If the measuring results...
...press "Next". 1 2 3 4 5 6 Speaker Config. Check Distance Check Channel Level Check Crossover Freq. All the measured Audyssey® Auto Setup data will be displayed. Please unplug microphone. Check Next Store Enter Proceed to next (Store) RETURN Cancel • Subwoofers may measure a greater reported... is performed automatically without any loss in subwoofers. • If you change speaker positions or orientation, perform Audyssey® Auto Setup again to find the optimal equalizer settings. • Saving the results requires about 10 seconds. • If the measuring results...

AVR3312CI_OwnersManual
Page 29
If this happens, check the relevant items, be sure to take the necessary measures, then perform Audyssey® Auto Setup over again. • If the result still differs from the beginning. • Be sure to turn off any device generating noise or move it... properly connected. Turn this unit. • Check the speaker connections. Ambient noise is too high or level is too low Retry RETURN Cancel AUDYSSEY AUTO SETUP Caution! Front R Phase 1 2 3 4 5 6 Retry Skip RETURN Cancel • The displayed speaker is connected with the polarity reversed. (The screen on the left indicates ...
If this happens, check the relevant items, be sure to take the necessary measures, then perform Audyssey® Auto Setup over again. • If the result still differs from the beginning. • Be sure to turn off any device generating noise or move it... properly connected. Turn this unit. • Check the speaker connections. Ambient noise is too high or level is too low Retry RETURN Cancel AUDYSSEY AUTO SETUP Caution! Front R Phase 1 2 3 4 5 6 Retry Skip RETURN Cancel • The displayed speaker is connected with the polarity reversed. (The screen on the left indicates ...

AVR3312CI_OwnersManual
Page 30
... Check the distance. Check Check the crossover frequency. Measurement results for each setting manually. Use ui to the DHCP function. SPEAKER SETUP Auto Setup Amp Assign Speaker Config. Information 27 EQ Check Check the equalizer. • If "EQ Check" is selected, press ui to...When connecting to a network that has no DHCP function, perform the setting in "Network Connecting" (vpage 111). Retrieving Audyssey® Auto Setup settings If you set "Restore" to "Yes", you have changed each speaker are displayed. Check Check the speaker configuration. Basic version Advanced ...
... Check the distance. Check Check the crossover frequency. Measurement results for each setting manually. Use ui to the DHCP function. SPEAKER SETUP Auto Setup Amp Assign Speaker Config. Information 27 EQ Check Check the equalizer. • If "EQ Check" is selected, press ui to...When connecting to a network that has no DHCP function, perform the setting in "Network Connecting" (vpage 111). Retrieving Audyssey® Auto Setup settings If you set "Restore" to "Yes", you have changed each speaker are displayed. Check Check the speaker configuration. Basic version Advanced ...

AVR3312CI_OwnersManual
Page 64
...mode or Audyssey DSX™. Basic version Advanced version Speaker installation/connection (Advanced connection) Here we describe the installation, connection and setup methods for Audussey DSX™ NOTE Sound is compatible with Audyssey DSX™ (vpage 142) and Dolby Pro Logic gz (... FWL Front wide speaker (L) SR Surround speaker (R) FWR Front wide speaker (R) vSee overleaf Information 61 For the installation, connection and setup methods for speaker settings Install Connect (vpage 63) Set up speakers (vpage 68) Install This unit is not output simultaneously from the ...
...mode or Audyssey DSX™. Basic version Advanced version Speaker installation/connection (Advanced connection) Here we describe the installation, connection and setup methods for Audussey DSX™ NOTE Sound is compatible with Audyssey DSX™ (vpage 142) and Dolby Pro Logic gz (... FWL Front wide speaker (L) SR Surround speaker (R) FWR Front wide speaker (R) vSee overleaf Information 61 For the installation, connection and setup methods for speaker settings Install Connect (vpage 63) Set up speakers (vpage 68) Install This unit is not output simultaneously from the ...
AVR3312CI_OwnersManual
Page 66
NOTE • For speaker cable connections, see C page 3 "Connect this unit to "NORMAL" in electric shock (When the Setup wizard is connected. Doing so could result in steps 3 and 4 for "Set up "Amp Assign"" (vpage 68). To perform 7.1-channel playback using... the surround back, front height and front wide speakers before you start playback, the audio is played back by automatically switching the speakers in the Setup wizard screen for performing 7.1-channel playback using an HDMI cable (sold separately)". 7.1-channel (Surround back / Front height / Front wide speaker) connection...
NOTE • For speaker cable connections, see C page 3 "Connect this unit to "NORMAL" in electric shock (When the Setup wizard is connected. Doing so could result in steps 3 and 4 for "Set up "Amp Assign"" (vpage 68). To perform 7.1-channel playback using... the surround back, front height and front wide speakers before you start playback, the audio is played back by automatically switching the speakers in the Setup wizard screen for performing 7.1-channel playback using an HDMI cable (sold separately)". 7.1-channel (Surround back / Front height / Front wide speaker) connection...

AVR3312CI_OwnersManual
Page 68
... FL(B) FL(A) FR(A) FR(B) FL SW FR For surround playback of speakers to this unit and use them for 2-channel playback (vpage 108 "Front Speaker Setup"). In this case, set of a multichannel source, if you connect the center speaker, surround speakers and subwoofers, 5.1-channel playback is output from each subwoofer terminal...
... FL(B) FL(A) FR(A) FR(B) FL SW FR For surround playback of speakers to this unit and use them for 2-channel playback (vpage 108 "Front Speaker Setup"). In this case, set of a multichannel source, if you connect the center speaker, surround speakers and subwoofers, 5.1-channel playback is output from each subwoofer terminal...

AVR3312CI_OwnersManual
Page 71
...also change the number of this unit. Basic version Advanced version Set up speakers other than 5.1-channel speakers. The J indicator lights. 2 Connect the setup microphone. Set the following screen is skipped, and measuring time can be made. • Changing the amplifier assignment (Amp Assign) The signal output from... back speakers (vpage 69 "Set up "Channel Select""). 1 Set up the remote control unit nn Set up 5.1-channel speakers, see C page 4 "SETUP WIZARD". Here we describe how to be used are set in the manual, Set the following items If necessary. AUDYSSEY AUTO...
...also change the number of this unit. Basic version Advanced version Set up speakers other than 5.1-channel speakers. The J indicator lights. 2 Connect the setup microphone. Set the following screen is skipped, and measuring time can be made. • Changing the amplifier assignment (Amp Assign) The signal output from... back speakers (vpage 69 "Set up "Channel Select""). 1 Set up the remote control unit nn Set up 5.1-channel speakers, see C page 4 "SETUP WIZARD". Here we describe how to be used are set in the manual, Set the following items If necessary. AUDYSSEY AUTO...
AVR3312CI_OwnersManual
Page 72
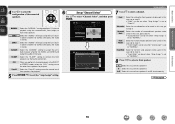
... amplifier for playback. 5 Press RETURN B to exit the "Amp Assign" setting. 6 Set up speakers 7 Use ui to step 9. AUDYSSEY AUTO SETUP STEP1 Preparation 1 2 3 4 5 6 Connect the speakers and place them according to use front speaker B. A+B Select this case, go to step... p to the recommendations in the manual, Set the following items If necessary. Amp Assign Channel Select Measure subwoofer channel Auto Setup Start Enter Enter RETURRENTURNCaCnacnecl el Enable skip of the connected speakers. In this to use front speakers A and B simultaneously. ZONE2...
... amplifier for playback. 5 Press RETURN B to exit the "Amp Assign" setting. 6 Set up speakers 7 Use ui to step 9. AUDYSSEY AUTO SETUP STEP1 Preparation 1 2 3 4 5 6 Connect the speakers and place them according to use front speaker B. A+B Select this case, go to step... p to the recommendations in the manual, Set the following items If necessary. Amp Assign Channel Select Measure subwoofer channel Auto Setup Start Enter Enter RETURRENTURNCaCnacnecl el Enable skip of the connected speakers. In this to use front speakers A and B simultaneously. ZONE2...

AVR3312CI_OwnersManual
Page 73
... two surround back speakers. Measure Set to measure the front height speakers. Information 70 Skip Set when you do not change , perform Audyssey® Auto Setup again. 10 Use o p to set whether or not a front wide channel is measured. Set up speakers NOTE After performing Audyssey® Auto... Setup, do not want to measure the front height speakers. 12 Use o p to set whether or not a surround back channel is measured. Measure Set to measure ...
... two surround back speakers. Measure Set to measure the front height speakers. Information 70 Skip Set when you do not change , perform Audyssey® Auto Setup again. 10 Use o p to set whether or not a front wide channel is measured. Set up speakers NOTE After performing Audyssey® Auto... Setup, do not want to measure the front height speakers. 12 Use o p to set whether or not a surround back channel is measured. Measure Set to measure ...

AVR3312CI_OwnersManual
Page 74
... connected to this unit. 5 Switch this unit input to the HDMI input source and check if the picture from amp" in the TV audio output setup operation, you set to a monitor without HDMI control? • Are the HDMI control function settings of the devices be able to control each other device...
... connected to this unit. 5 Switch this unit input to the HDMI input source and check if the picture from amp" in the TV audio output setup operation, you set to a monitor without HDMI control? • Are the HDMI control function settings of the devices be able to control each other device...
AVR3312CI_OwnersManual
Page 81
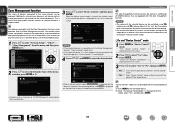
... Flickr Napster Pandora Rhapsody [1/7] REMOTE CONTROL MENU Exit CH+ Vol.up ) and CH- (volume down • When in advance. "Power off Remote component?" ZONE MANAGEMENT DENON:[AVR-3312CI] DENON:[RCD-N7] RETURN Return Check status and select device for the connected devices. w When "Exit Device Control Mode?" Basic version Advanced version Zone Management function..., use the Party Mode function. 1 Press ui to select "Yes" or "No", then press ENTER. q Press MENU on the TV screen. 3 Press o p to select "Network Setup" -
... Flickr Napster Pandora Rhapsody [1/7] REMOTE CONTROL MENU Exit CH+ Vol.up ) and CH- (volume down • When in advance. "Power off Remote component?" ZONE MANAGEMENT DENON:[AVR-3312CI] DENON:[RCD-N7] RETURN Return Check status and select device for the connected devices. w When "Exit Device Control Mode?" Basic version Advanced version Zone Management function..., use the Party Mode function. 1 Press ui to select "Yes" or "No", then press ENTER. q Press MENU on the TV screen. 3 Press o p to select "Network Setup" -


