AVR-2112CI Owners Manual
Page 4
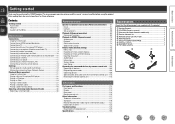
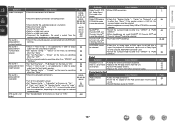
... Connecting an antenna 11 Connecting a CD player 11 Connecting to a home network (LAN 12 Connecting an external control device 13 Settings 14 Set up speakers (Audyssey® Auto Setup 14 Making the network settings (Network Setup 20 Playback (Basic operation 21 Important information 21 Playing a Blu-ray Disc player/DVD player 22 Playing a CD player 22 Playing an iPod 23 Tuning in radio stations 27 Playing a network audio 29 Playing a USB memory device 44 Selecting a listening mode (Surround mode 46 Selecting a listening mode 46 Advanced version 50 Speaker installation...
... Connecting an antenna 11 Connecting a CD player 11 Connecting to a home network (LAN 12 Connecting an external control device 13 Settings 14 Set up speakers (Audyssey® Auto Setup 14 Making the network settings (Network Setup 20 Playback (Basic operation 21 Important information 21 Playing a Blu-ray Disc player/DVD player 22 Playing a CD player 22 Playing an iPod 23 Tuning in radio stations 27 Playing a network audio 29 Playing a USB memory device 44 Selecting a listening mode (Surround mode 46 Selecting a listening mode 46 Advanced version 50 Speaker installation...
AVR-2112CI Owners Manual
Page 5
... unit, and also an iPod can output 3D video signals input from a Blu-ray Disc player to -follow the instructions displayed on Check once again that all channels, true to set to perform basic operations with the unit, and should support the ARC function. 6-HDMI inputs and 1-output The unit is equipped with 6 HDMI input connectors for connecting devices with the power turned off the power and unplug the power cord from this unit. Cautions...
... unit, and also an iPod can output 3D video signals input from a Blu-ray Disc player to -follow the instructions displayed on Check once again that all channels, true to set to perform basic operations with the unit, and should support the ARC function. 6-HDMI inputs and 1-output The unit is equipped with 6 HDMI input connectors for connecting devices with the power turned off the power and unplug the power cord from this unit. Cautions...
AVR-2112CI Owners Manual
Page 17
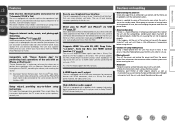
... set up the speakers manually, use ). • Do not unplug the setup microphone from this unit to a home network (LAN). For best results, we recommend you to connect this position to calculate speaker distance, level, polarity, and the optimum crossover value for your home network (LAN) music files stored on the menu. Audyssey MultEQ® XT uses the measurements from the main unit until Audyssey® Auto Setup...
... set up the speakers manually, use ). • Do not unplug the setup microphone from this unit to a home network (LAN). For best results, we recommend you to connect this position to calculate speaker distance, level, polarity, and the optimum crossover value for your home network (LAN) music files stored on the menu. Audyssey MultEQ® XT uses the measurements from the main unit until Audyssey® Auto Setup...
AVR-2112CI Owners Manual
Page 37
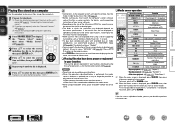
... Use this unit's power (vpage 12 "Connecting to a home network (LAN)"). Information BD 34 NOTE • Presettings are required, make the "Network Connect." (vpage 91). w If settings are erased by the first letter may not be played when using an ESCIENT server, place "ESCIENT" before the server name. Playing a network audio nnMedia server operation Operation buttons Function INTERNET RADIO V Last played internet radio station PRESET 1 - 3 Preset channel (1 - 3) selection CH +, - G8) selection MENU Amp menu uio p Cursor operation / Auto search...
... Use this unit's power (vpage 12 "Connecting to a home network (LAN)"). Information BD 34 NOTE • Presettings are required, make the "Network Connect." (vpage 91). w If settings are erased by the first letter may not be played when using an ESCIENT server, place "ESCIENT" before the server name. Playing a network audio nnMedia server operation Operation buttons Function INTERNET RADIO V Last played internet radio station PRESET 1 - 3 Preset channel (1 - 3) selection CH +, - G8) selection MENU Amp menu uio p Cursor operation / Auto search...
AVR-2112CI Owners Manual
Page 62
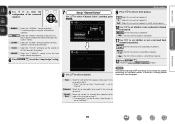
...a change the speaker connections or subwoofer volume. Front B Select the "Front B" setting to use front speaker A. Basic version Advanced version 5 Use o p to select the configuration of front speakers for playback. MultEQ XT Amp Assign Channel Select Auto Setup Start [ENTER] Enter [RETURN] Cancel Channel Select Subwoofer Measure Set up "Channel Select" Use ui to use the second set to "NORMAL". NORMAL Select the "NORMAL" setting to select a channel. Bi-AMP Select the "Bi-AMP" setting to assign the unit's built-in power amplifier for ZONE2 and output the audio in stereo...
...a change the speaker connections or subwoofer volume. Front B Select the "Front B" setting to use front speaker A. Basic version Advanced version 5 Use o p to select the configuration of front speakers for playback. MultEQ XT Amp Assign Channel Select Auto Setup Start [ENTER] Enter [RETURN] Cancel Channel Select Subwoofer Measure Set up "Channel Select" Use ui to use the second set to "NORMAL". NORMAL Select the "NORMAL" setting to select a channel. Bi-AMP Select the "Bi-AMP" setting to assign the unit's built-in power amplifier for ZONE2 and output the audio in stereo...
AVR-2112CI Owners Manual
Page 72
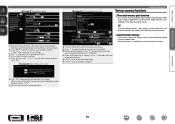
... select the channel you want to play. W3 When searching using an acronym, click "v" and select from each operation screen. (Default setting : "OFF") Q9 Click this item to play back repeatedly. The surround parameters, tone settings and the volumes of the different speakers are restored. Basic version Advanced version GExample 2H Setup menu screen SETUP MENU Q3 SOURCE SELECT ReLoad SOURCE SELECT Source BD Q5 SURROUND MODE Input Assign AUDIO ADJUST SYSTEM SETUP INFORMATION Video Video Select SOURCE Video Mode Auto Game Movie Q6 SAVE LOAD Q4 Input Mode Input Mode...
... select the channel you want to play. W3 When searching using an acronym, click "v" and select from each operation screen. (Default setting : "OFF") Q9 Click this item to play back repeatedly. The surround parameters, tone settings and the volumes of the different speakers are restored. Basic version Advanced version GExample 2H Setup menu screen SETUP MENU Q3 SOURCE SELECT ReLoad SOURCE SELECT Source BD Q5 SURROUND MODE Input Assign AUDIO ADJUST SYSTEM SETUP INFORMATION Video Video Select SOURCE Video Mode Auto Game Movie Q6 SAVE LOAD Q4 Input Mode Input Mode...
AVR-2112CI Owners Manual
Page 76
... the video settings. Makes settings for the auto surround mode. Once these for display the menu on the selected input source. Shows information about current settings. For menu operations, see the following guidance. Expands the low and high frequency components of compressed audio to set , there is no need to adjust the tone of the "Input Setup" menu differs, depending on the TV screen. Displays the HDMI input/output signals and HDMI monitor information. Shows information about tuner or network preset channels. Perform the installation, connection, and setup...
... the video settings. Makes settings for the auto surround mode. Once these for display the menu on the selected input source. Shows information about current settings. For menu operations, see the following guidance. Expands the low and high frequency components of compressed audio to set , there is no need to adjust the tone of the "Input Setup" menu differs, depending on the TV screen. Displays the HDMI input/output signals and HDMI monitor information. Shows information about tuner or network preset channels. Perform the installation, connection, and setup...
AVR-2112CI Owners Manual
Page 86
... graphic equalizer to the default?" All : Adjust the tone of each speaker. prompt is displayed. The RESTORER function generates the signals eliminated upon compression, restoring the sound to the defaults. All others are hard for all speakers together. While viewing video, manually adjust the time to delay audio output. 0ms - 200ms Setting details • This item can be set within the range of each input source. • This item default setting for compressed sources with analog signals or PCM signal...
... graphic equalizer to the default?" All : Adjust the tone of each speaker. prompt is displayed. The RESTORER function generates the signals eliminated upon compression, restoring the sound to the defaults. All others are hard for all speakers together. While viewing video, manually adjust the time to delay audio output. 0ms - 200ms Setting details • This item can be set within the range of each input source. • This item default setting for compressed sources with analog signals or PCM signal...
AVR-2112CI Owners Manual
Page 88
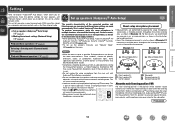
...; Auto Setup settings, or when changing the audio, video, display or other settings. • If you change the speaker settings after performing Audyssey® Auto Setup, it will not be possible to AMP-operation mode. 3 Press MENU. Please set with the "System Setup" procedure Speaker Setup (vpage 86) HDMI Setup (vpage 89) Audio Setup (vpage 90) Network Setup (vpage 91) ZONE2 Setup (vpage 94) Option Setup (vpage 95) Language (vpage 98) Information BD 85 The J indicator lights. 2 Press AMP to set...
...; Auto Setup settings, or when changing the audio, video, display or other settings. • If you change the speaker settings after performing Audyssey® Auto Setup, it will not be possible to AMP-operation mode. 3 Press MENU. Please set with the "System Setup" procedure Speaker Setup (vpage 86) HDMI Setup (vpage 89) Audio Setup (vpage 90) Network Setup (vpage 91) ZONE2 Setup (vpage 94) Option Setup (vpage 95) Language (vpage 98) Information BD 85 The J indicator lights. 2 Press AMP to set...
AVR-2112CI Owners Manual
Page 89
...8226; Yes : Use a subwoofer. • No : Select when a subwoofer is "NORMAL", you select this case, make the "S.Back" setting. Perform when setting the speakers manually or when changing settings made in stereo. Setting items Setting details Amp Assign The signal output from the surround back speaker, depending on the playback source. Bi-AMP : Select the "Bi-AMP" setting to use the frequencies "F.Height" can adequately play back low standard for low frequencies. • None : Select when a center speaker is set to perform 7.1-channel playback using the surround back...
...8226; Yes : Use a subwoofer. • No : Select when a subwoofer is "NORMAL", you select this case, make the "S.Back" setting. Perform when setting the speakers manually or when changing settings made in stereo. Setting items Setting details Amp Assign The signal output from the surround back speaker, depending on the playback source. Bi-AMP : Select the "Bi-AMP" setting to use the frequencies "F.Height" can adequately play back low standard for low frequencies. • None : Select when a center speaker is set to perform 7.1-channel playback using the surround back...
AVR-2112CI Owners Manual
Page 91
... set in the PHONES jack of the bass signal output 250Hz from the sound output. is displayed. Front Sp Setup Set the front speakers to the defaults. To adjust the channel level separately for every surround mode. Set the volume of the test • Front L / F.Height L / Center / F.Height R / Front R / Surround R / tone to "Front B" (vpage 86). 2CH DIRECT/STEREO : The front speakers used . can be the same when it S.Back Rz / S.Back Lz / Surround L / Subwoofer : Select the speaker. MULTI CH : The front speakers used . • "Crossover...
... set in the PHONES jack of the bass signal output 250Hz from the sound output. is displayed. Front Sp Setup Set the front speakers to the defaults. To adjust the channel level separately for every surround mode. Set the volume of the test • Front L / F.Height L / Center / F.Height R / Front R / Surround R / tone to "Front B" (vpage 86). 2CH DIRECT/STEREO : The front speakers used . can be the same when it S.Back Rz / S.Back Lz / Surround L / Subwoofer : Select the speaker. MULTI CH : The front speakers used . • "Crossover...
AVR-2112CI Owners Manual
Page 92
... : Play back through speakers connected to TV. P.Off Control Links the power standby of a TV that the TV and HDMI are connected when you unplug the power cord from the HDMI output connector by setting the HDMI audio output destination to the unit. Video : If power to "ON", it is recommended that you perform HDMI control. • If the "HDMI Control" settings have been changed, always reset the power to connected devices after the change. Audio signals input via the Analog/Coaxial/Optical input connectors...
... : Play back through speakers connected to TV. P.Off Control Links the power standby of a TV that the TV and HDMI are connected when you unplug the power cord from the HDMI output connector by setting the HDMI audio output destination to the unit. Video : If power to "ON", it is recommended that you perform HDMI control. • If the "HDMI Control" settings have been changed, always reset the power to connected devices after the change. Audio signals input via the Analog/Coaxial/Optical input connectors...

AVR-2112CI Owners Manual
Page 99
...; For character input, see page 76. Failure to operate related settings. • Menu operations • Channel Level Check for Update : Check for firmware updates. Change the display title of update time which has elapsed is changed . Dark : Very low display brightness. Bright Dim OFF Dark System Setup Setting items Setup Lock Protect settings from inadvertent change. OFF : Turn protection off . is resumed. • If updating fails, the set "Setup Lock" to server. When updating is complete, the power indicator becomes...
...; For character input, see page 76. Failure to operate related settings. • Menu operations • Channel Level Check for Update : Check for firmware updates. Change the display title of update time which has elapsed is changed . Dark : Very low display brightness. Bright Dim OFF Dark System Setup Setting items Setup Lock Protect settings from inadvertent change. OFF : Turn protection off . is resumed. • If updating fails, the set "Setup Lock" to server. When updating is complete, the power indicator becomes...
AVR-2112CI Owners Manual
Page 102
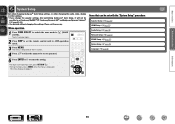
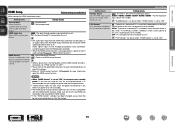
Menu operation 1 Press ZONE SELECT to switch the zone mode to use the unit. The menu display disappears. The J indicator lights. 2 Press AMP to set with the "Input Setup" procedure Auto Preset (vpage 100) Preset Skip (vpage 100) Preset Name (vpage 100) Input Assign (vpage 101) Video (vpage 102) Input Mode (Audio) (vpage 103) Rename (vpage 103) Source Level (Audio) (vpage 103) Playback Mode (vpage 104) Still Picture (vpage 104) Important information nnAbout the display of input sources In this section, the configurable...
Menu operation 1 Press ZONE SELECT to switch the zone mode to use the unit. The menu display disappears. The J indicator lights. 2 Press AMP to set with the "Input Setup" procedure Auto Preset (vpage 100) Preset Skip (vpage 100) Preset Name (vpage 100) Input Assign (vpage 101) Video (vpage 102) Input Mode (Audio) (vpage 103) Rename (vpage 103) Source Level (Audio) (vpage 103) Playback Mode (vpage 104) Still Picture (vpage 104) Important information nnAbout the display of input sources In this section, the configurable...
AVR-2112CI Owners Manual
Page 104
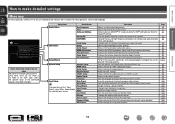
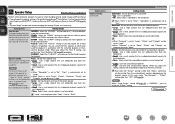
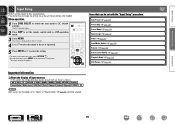
... displayed as "- - -". • To play the video signal assigned at "HDMI" combined with the audio signal assigned at "Input Mode" (vpage 103). • The audio signals input from the analog and digital connectors are as shown below . Digital COAX (coaxial) / OPT (optical) Set this to change the HDMI None : Do not assign an HDMI input connector to register the setting. "each input source" - Input Assign [1/2] Default BD DVD TV SAT/CBL GAME1 G HDMI H HDMI1 HDMI2 None HDMI3 HDMI4 G DIGITAL H None None OPT COAX None G COMPONENT...
... displayed as "- - -". • To play the video signal assigned at "HDMI" combined with the audio signal assigned at "Input Mode" (vpage 103). • The audio signals input from the analog and digital connectors are as shown below . Digital COAX (coaxial) / OPT (optical) Set this to change the HDMI None : Do not assign an HDMI input connector to register the setting. "each input source" - Input Assign [1/2] Default BD DVD TV SAT/CBL GAME1 G HDMI H HDMI1 HDMI2 None HDMI3 HDMI4 G DIGITAL H None None OPT COAX None G COMPONENT...
AVR-2112CI Owners Manual
Page 106
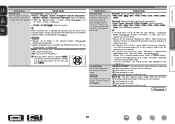
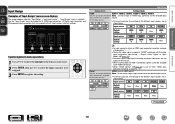
...Set "PCM" and "DTS" when inputting the corresponding input signal. Input Setup The input modes available for which "HDMI" is assigned at "Input Assign" (vpage 101). • "Digital" can be input. • For character input, see page 76. If the indicator does not light, check the digital input connector assignment and the connections. • If "HDMI Control" is set the audio input mode to ARC. is fixed to "Auto". DTS : Decode and play only DTS input signals. Setting items Rename Change the display name of the selected input source. Digital : Play only signals...
...Set "PCM" and "DTS" when inputting the corresponding input signal. Input Setup The input modes available for which "HDMI" is assigned at "Input Assign" (vpage 101). • "Digital" can be input. • For character input, see page 76. If the indicator does not light, check the digital input connector assignment and the connections. • If "HDMI Control" is set the audio input mode to ARC. is fixed to "Auto". DTS : Decode and play only DTS input signals. Setting items Rename Change the display name of the selected input source. Digital : Play only signals...
AVR-2112CI Owners Manual
Page 130
... "ON". • Check if "Amp Assign" is set appropriately in order to output audio from the surround back speakers. • Set "Speaker Config." - RESTORER cannot be used. • Switch the surround mode to other than "DIRECT" or "PURE DIRECT". • When headphones are used , Dolby PLg or DTS NEO:6 cannot be selected. • Switch the surround mode to other connection cables. Cause/Solution • Make HDMI connections. • Check that an analog signal or PCM signal (fs=44.1/48 kHz...
... "ON". • Check if "Amp Assign" is set appropriately in order to output audio from the surround back speakers. • Set "Speaker Config." - RESTORER cannot be used. • Switch the surround mode to other than "DIRECT" or "PURE DIRECT". • When headphones are used , Dolby PLg or DTS NEO:6 cannot be selected. • Switch the surround mode to other connection cables. Cause/Solution • Make HDMI connections. • Check that an analog signal or PCM signal (fs=44.1/48 kHz...
AVR2112CI_GettingStarted
Page 5
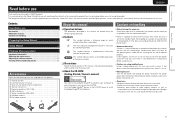
... may result in use 1 Accessories 1 About this manual 1 Cautions on handling 1 Preparing the Setup Wizard 2 Setup Wizard 4 Playback (Basic operation 7 Important information 7 Selecting the input source 7 Adjusting the master volume 8 Turning off the power and unplug the power cord from the power outlet. • About condensation If there is supplied to some of the owner's manual on remote control operation. NOTE This symbol indicates points to connect and configure speakers, various other system...
... may result in use 1 Accessories 1 About this manual 1 Cautions on handling 1 Preparing the Setup Wizard 2 Setup Wizard 4 Playback (Basic operation 7 Important information 7 Selecting the input source 7 Adjusting the master volume 8 Turning off the power and unplug the power cord from the power outlet. • About condensation If there is supplied to some of the owner's manual on remote control operation. NOTE This symbol indicates points to connect and configure speakers, various other system...
Specification Sheet
Page 1
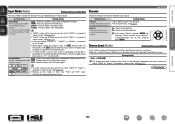
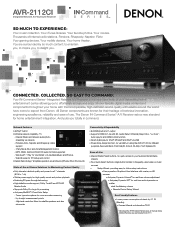
... DLNA v1.5 Certified (Music and Photos) - High level resolution filters for satellite speakers and also subwoofer Connectivity & Expandability • 6-HDMI inputs and 1-output • Supports HDMI (V.1.4a with 3D, Audio Return Channel) Deep Color, "x.v.Color", Auto Lipsync and HDMI control function • Direct digital play for iPod®, iPhone® and iPad® via USB • Power Amp Assign function, for versatility in using the AVR-2112CI for different purposes (Surround Back, Front Height, Zone 2, Bi-Amp, Front Speaker B) Ease-of...
... DLNA v1.5 Certified (Music and Photos) - High level resolution filters for satellite speakers and also subwoofer Connectivity & Expandability • 6-HDMI inputs and 1-output • Supports HDMI (V.1.4a with 3D, Audio Return Channel) Deep Color, "x.v.Color", Auto Lipsync and HDMI control function • Direct digital play for iPod®, iPhone® and iPad® via USB • Power Amp Assign function, for versatility in using the AVR-2112CI for different purposes (Surround Back, Front Height, Zone 2, Bi-Amp, Front Speaker B) Ease-of...
Specification Sheet
Page 2
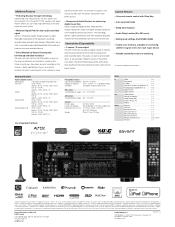
... In Out Other HDMI Component S-Video Composite (video) (included front 1) Analog Audio (included front 1) Digital Optical Digital Coaxial HDMI Monitor Composite Monitor Audio Preout (SW) Audio Preout (L/R) Phones Ethernet USB port Microphone Port Dock Control Port FM Tuner Antenna AM Tuner Antenna Remote Control In/Out RC232C x 6 x 1 x 1 x 3 x 6 x 1 x 1 x 1 x 1 x 1 x 1 x 1 x 1 x 1 x 1 x 1 x 1 x 1 In 1 / Out 1 x 1 *Design and specifications are subject to change without notice. *"Dolby", "Pro Logic" and the double-D symbol are trademarks of Dolby Laboratories. *DTS is...
... In Out Other HDMI Component S-Video Composite (video) (included front 1) Analog Audio (included front 1) Digital Optical Digital Coaxial HDMI Monitor Composite Monitor Audio Preout (SW) Audio Preout (L/R) Phones Ethernet USB port Microphone Port Dock Control Port FM Tuner Antenna AM Tuner Antenna Remote Control In/Out RC232C x 6 x 1 x 1 x 3 x 6 x 1 x 1 x 1 x 1 x 1 x 1 x 1 x 1 x 1 x 1 x 1 x 1 x 1 In 1 / Out 1 x 1 *Design and specifications are subject to change without notice. *"Dolby", "Pro Logic" and the double-D symbol are trademarks of Dolby Laboratories. *DTS is...


