
Getting Started Guide
Page 6
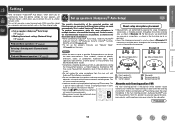
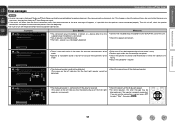
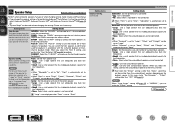
.... Subwoofer (with built-in a position 2 to 3 ft (60 to enjoy 7.1-channel, prepare a surround back speaker. • Prepare enough for this step Speaker (sold separately) z C SBL Speaker cable (sold separately) 1 Place and layout speakers Before installing the speakers, connect the speaker cables to connect the ... ESPAÑOL NEDERLANDS SVENSKA Preparing the Setup Wizard This section describes how to the main unit using the Setup Wizard. Connect the speaker cables to prepare the Setup Wizard before use . nn When 5.1-channel installed nn When 7.1-channel (Surround back ...
.... Subwoofer (with built-in a position 2 to 3 ft (60 to enjoy 7.1-channel, prepare a surround back speaker. • Prepare enough for this step Speaker (sold separately) z C SBL Speaker cable (sold separately) 1 Place and layout speakers Before installing the speakers, connect the speaker cables to connect the ... ESPAÑOL NEDERLANDS SVENSKA Preparing the Setup Wizard This section describes how to the main unit using the Setup Wizard. Connect the speaker cables to prepare the Setup Wizard before use . nn When 5.1-channel installed nn When 7.1-channel (Surround back ...
Owners Manual
Page 16
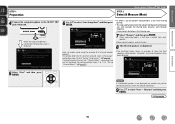
...FR ( : Measuring positions) ( : Measuring positions) SL *M SR SL *M SR FL Front speaker (L) FR Front speaker (R) C Center speaker SW Subwoofer SL Surround speaker (L) SR Surround speaker (R) About the main listening position (*M) The main listening position is completed. • Do not stand between the ...as possible. Audyssey MultEQ® uses the measurements from all around the listening area. For best results, we recommend you to connect this position to calculate speaker distance, level, polarity, and the optimum crossover value for your home network (LAN) music files...
...FR ( : Measuring positions) ( : Measuring positions) SL *M SR SL *M SR FL Front speaker (L) FR Front speaker (R) C Center speaker SW Subwoofer SL Surround speaker (L) SR Surround speaker (R) About the main listening position (*M) The main listening position is completed. • Do not stand between the ...as possible. Audyssey MultEQ® uses the measurements from all around the listening area. For best results, we recommend you to connect this position to calculate speaker distance, level, polarity, and the optimum crossover value for your home network (LAN) music files...
Owners Manual
Page 18
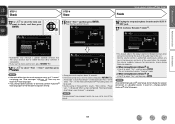
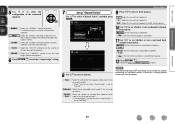
...example of this unit. Audyssey Auto Setup Detect Check Front Yes Center Yes Subwoofer Yes Surround Yes MultEQ 5 Select "Next" and then press ENTER. Audyssey Auto Setup MultEQ Preparation Connect the speakers and place then according to the recommendations in the listening area. ... Set up speakers (Audyssey® Auto Setup) STEP 2 Detect & Measure (Main) 4 Connect the setup microphone to the SETUP MIC jack of when the front speakers, center speaker, subwoofer, and surround speakers have been detected. MultEQ Amp Assign Channel Select Auto Setup Start [ENTER]...
...example of this unit. Audyssey Auto Setup Detect Check Front Yes Center Yes Subwoofer Yes Surround Yes MultEQ 5 Select "Next" and then press ENTER. Audyssey Auto Setup MultEQ Preparation Connect the speakers and place then according to the recommendations in the listening area. ... Set up speakers (Audyssey® Auto Setup) STEP 2 Detect & Measure (Main) 4 Connect the setup microphone to the SETUP MIC jack of when the front speakers, center speaker, subwoofer, and surround speakers have been detected. MultEQ Amp Assign Channel Select Auto Setup Start [ENTER]...
Owners Manual
Page 20
... nn When turning Dynamic Volume® off • Use i to turn off the power. 16 Unplug the setup microphone from the actual connection status, or if "Caution!" Sp.Config. will be erased. • During saving of measurements results, "Now storing Please wait..." NOTE During... resuit. The unit automatically enters "Evening" mode. is now finished." NOTE After performing Audyssey® Auto Setup, do not change the speaker connections or subwoofer volume. Press o then select "Yes". Auto Setup is displayed, see "Error messages" (vpage 18). Yes No [ENTER] Exit •...
... nn When turning Dynamic Volume® off • Use i to turn off the power. 16 Unplug the setup microphone from the actual connection status, or if "Caution!" Sp.Config. will be erased. • During saving of measurements results, "Now storing Please wait..." NOTE During... resuit. The unit automatically enters "Evening" mode. is now finished." NOTE After performing Audyssey® Auto Setup, do not change the speaker connections or subwoofer volume. Press o then select "Yes". Auto Setup is displayed, see "Error messages" (vpage 18). Yes No [ENTER] Exit •...
Owners Manual
Page 21
...then press ENTER. 18 Speaker:None Front R • There is too much noise in which the speakers are facing. • Adjust the subwoofer's volume. • The displayed speaker could not be detected. (The screen on the left indicates that the front right speaker cannot be detected.)... • Check the connections of the displayed speaker. Basic version Advanced version Information Error messages Set up speakers (Audyssey® Auto Setup) NOTE • An error...
...then press ENTER. 18 Speaker:None Front R • There is too much noise in which the speakers are facing. • Adjust the subwoofer's volume. • The displayed speaker could not be detected. (The screen on the left indicates that the front right speaker cannot be detected.)... • Check the connections of the displayed speaker. Basic version Advanced version Information Error messages Set up speakers (Audyssey® Auto Setup) NOTE • An error...
Owners Manual
Page 24
... flashes green. • "MUTE" indicator on the display lights. • appears on the power of the subwoofer and player. w Change the TV input to switch an input source for a player used for playback. q ... the CD player. 4 Play the device connected to this unit. w Load the disc in the player. 2 Press ON to turn on the power of the TV, subwoofer and player. Make the necessary settings on ...power to the unit. 3 Press BD or DVD to the input of this unit. 4 Play the device connected to the level set at ...
... flashes green. • "MUTE" indicator on the display lights. • appears on the power of the subwoofer and player. w Change the TV input to switch an input source for a player used for playback. q ... the CD player. 4 Play the device connected to this unit. w Load the disc in the player. 2 Press ON to turn on the power of the TV, subwoofer and player. Make the necessary settings on ...power to the unit. 3 Press BD or DVD to the input of this unit. 4 Play the device connected to the level set at ...

Owners Manual
Page 52
Use Audyssey® Auto Setup function of this unit to automatically detect the number of connected speakers and perform optimal settings for speaker settings Install Connect (vpage 51) Set up speakers (vpage 56) Install This unit is not possible to use the ...Surround back speaker (L) C Center speaker SBR Surround back speaker (R) SW Subwoofer FHL Front height speaker (L) SL Surround speaker (L) FHR Front height speaker (R) SR Surround speaker (R) vSee overleaf Information 49 For the installation, connection and setup methods for Dolby Pro Logic gz Surround back speaker •...
Use Audyssey® Auto Setup function of this unit to automatically detect the number of connected speakers and perform optimal settings for speaker settings Install Connect (vpage 51) Set up speakers (vpage 56) Install This unit is not possible to use the ...Surround back speaker (L) C Center speaker SBR Surround back speaker (R) SW Subwoofer FHL Front height speaker (L) SL Surround speaker (L) FHR Front height speaker (R) SR Surround speaker (R) vSee overleaf Information 49 For the installation, connection and setup methods for Dolby Pro Logic gz Surround back speaker •...
Owners Manual
Page 57
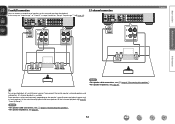
...(B) FL(A) FR(A) FR(B) FL SW FR NOTE • For speaker cable connections, see C page 6 "Connecting the speakers". • For speaker impedance, see page 51. 54 Front speakers can connect a second set of a multichannel source, if you connect the center speaker, surround speakers and subwoofers, 5.1-channel playback is available. In this unit and use them for...
...(B) FL(A) FR(A) FR(B) FL SW FR NOTE • For speaker cable connections, see C page 6 "Connecting the speakers". • For speaker impedance, see page 51. 54 Front speakers can connect a second set of a multichannel source, if you connect the center speaker, surround speakers and subwoofers, 5.1-channel playback is available. In this unit and use them for...

Owners Manual
Page 58
... terminals and woofer terminals of the tweeter, and you connect the center speaker, surround speakers and subwoofers, 5.1-channel playback is to connect separate amplifiers to "Bi-AMP" in steps 3 and 4 for "Set up "Amp Assign"" (vpage 56). NOTE • For speaker cable connections, see C page 6 "Connecting the speakers". • For speaker impedance, see page 51...
... terminals and woofer terminals of the tweeter, and you connect the center speaker, surround speakers and subwoofers, 5.1-channel playback is to connect separate amplifiers to "Bi-AMP" in steps 3 and 4 for "Set up "Amp Assign"" (vpage 56). NOTE • For speaker cable connections, see C page 6 "Connecting the speakers". • For speaker impedance, see page 51...
Owners Manual
Page 60
...case, go to select a front speaker. Proceed to page 15 STEP1 Preparation step 6. [RETURN] Return 8 Use ui to select the configuration of the connected speakers. Subwoofer Select for playback. 6 Press RETURN B to exit the "Amp Assign" setting. 7 Set up speakers 9 Press o p to step 10. Front...to use the front height speaker for no measuring of a change the speaker connections or subwoofer volume. Information 57 Audyssey Auto Setup Preparation Set the following items if necessary. Front Select for no subwoofer to "Front B". In this to step 9. • "Front" can...
...case, go to select a front speaker. Proceed to page 15 STEP1 Preparation step 6. [RETURN] Return 8 Use ui to select the configuration of the connected speakers. Subwoofer Select for playback. 6 Press RETURN B to exit the "Amp Assign" setting. 7 Set up speakers 9 Press o p to step 10. Front...to use the front height speaker for no measuring of a change the speaker connections or subwoofer volume. Information 57 Audyssey Auto Setup Preparation Set the following items if necessary. Front Select for no subwoofer to "Front B". In this to step 9. • "Front" can...
Owners Manual
Page 86
... front speakers via the bi-amp connection. Do not use the second set to "No", "Front" is other than "None", sound may not be used without changing the settings. When "Front" is set to "Small", "Subwoofer" is set to "Small", "Center", "Surround", "S.Back" and Instead, ..., also perform the "Front Sp Setup" (vpage 85) procedure. Center : Set the presence and size of a subwoofer. • Yes : Use a subwoofer. • No : Select when a subwoofer is not connected. When you change the speaker settings after performing Audyssey® Auto Setup, it will not be set to match your...
... front speakers via the bi-amp connection. Do not use the second set to "No", "Front" is other than "None", sound may not be used without changing the settings. When "Front" is set to "Small", "Subwoofer" is set to "Small", "Center", "Surround", "S.Back" and Instead, ..., also perform the "Front Sp Setup" (vpage 85) procedure. Center : Set the presence and size of a subwoofer. • Yes : Use a subwoofer. • No : Select when a subwoofer is not connected. When you change the speaker settings after performing Audyssey® Auto Setup, it will not be set to match your...

Owners Manual
Page 87
...Setting details F.Height : Set the presence and size of the distance. • 1ft / 0.1ft • 0.1m / 0.01m Default : The "Distance" settings are not connected. "Subwoofer" (vpage 83) is displayed. • 0.0ft - 60.0ft / 0.00m - 18.00m : Set the distance. • The speakers that has inadequate playback capacity for ...the mode offering the strongest bass. • Select "LFE+Main" if you can be set to "LFE", no sound may be produced from the subwoofer. Select either "Yes" or "No", and press ENTER. NOTE Speakers set to "None" in the distance between the speakers to less than 20...
...Setting details F.Height : Set the presence and size of the distance. • 1ft / 0.1ft • 0.1m / 0.01m Default : The "Distance" settings are not connected. "Subwoofer" (vpage 83) is displayed. • 0.0ft - 60.0ft / 0.00m - 18.00m : Set the distance. • The speakers that has inadequate playback capacity for ...the mode offering the strongest bass. • Select "LFE+Main" if you can be set to "LFE", no sound may be produced from the subwoofer. Select either "Yes" or "No", and press ENTER. NOTE Speakers set to "None" in the distance between the speakers to less than 20...

Owners Manual
Page 90
...Level FR : Select the speaker. • -12.0dB - +12.0dB (0.0dB) : Adjust the level of a subwoofer. • Yes : Use a subwoofer. • No : Select when a subwoofer is automatically "Yes". Surround mode does not change even if the input signal is selected. The equalizer mode in the 2-channel...presence of each input signal type. If "Speaker Config." - If the "Front" setting is "Small", the setting is not connected. "Front" setting is output from the subwoofer. • LFE+Main : The front channel low range signal is set to the speaker. Also, when the "2ch Direct/Stereo...
...Level FR : Select the speaker. • -12.0dB - +12.0dB (0.0dB) : Adjust the level of a subwoofer. • Yes : Use a subwoofer. • No : Select when a subwoofer is automatically "Yes". Surround mode does not change even if the input signal is selected. The equalizer mode in the 2-channel...presence of each input signal type. If "Speaker Config." - If the "Front" setting is "Small", the setting is not connected. "Front" setting is output from the subwoofer. • LFE+Main : The front channel low range signal is set to the speaker. Also, when the "2ch Direct/Stereo...
Owners Manual
Page 126
...on the menu to something other than "OFF". • Set the surround mode to something other than "None". • Check the subwoofer connections. • Turn on the subwoofer's power. • Set "Speaker Config." - GRadioH Symptom Cause/Solution Reception fails, or there is input. Basic version Advanced version ... 51, 52, 53, 54, 55 - 83 83, 84 99 • Make HDMI connections. 7 Symptom Cause/Solution Dolby PLg mode or DTS NEO:6 mode cannot be output from surround back speaker. "Subwoofer" on the menu to "LFE", no sound may be selected. No sound is output from ...
...on the menu to something other than "OFF". • Set the surround mode to something other than "None". • Check the subwoofer connections. • Turn on the subwoofer's power. • Set "Speaker Config." - GRadioH Symptom Cause/Solution Reception fails, or there is input. Basic version Advanced version ... 51, 52, 53, 54, 55 - 83 83, 84 99 • Make HDMI connections. 7 Symptom Cause/Solution Dolby PLg mode or DTS NEO:6 mode cannot be output from surround back speaker. "Subwoofer" on the menu to "LFE", no sound may be selected. No sound is output from ...
Owners Manual
Page 131
... timer 59, 69 Slide Show 100 Source Delete 92 Source Level 99 Speaker Connect 51 Install 49 Set up 13, 19, 56 Speaker Config 83 Speaker impedance 120 Speaker Setup 83 Standby Source 86 Still Picture 100 Subwoofer 77 Subwoofer setting 14 Surround back speaker 50, 51, 53 Surround mode 44, 114 Surr...
... timer 59, 69 Slide Show 100 Source Delete 92 Source Level 99 Speaker Connect 51 Install 49 Set up 13, 19, 56 Speaker Config 83 Speaker impedance 120 Speaker Setup 83 Standby Source 86 Still Picture 100 Subwoofer 77 Subwoofer setting 14 Surround back speaker 50, 51, 53 Surround mode 44, 114 Surr...
Specification Sheet
Page 1
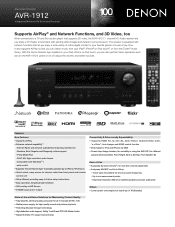
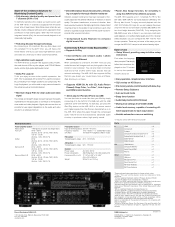
...Amp Assign function, for versatility in using the AVR-1912 for different purpose (Surround Back, Front Height, Zone 2, Bi-Amp, Front Speaker B) Ease-of-Use • Audyssey Dynamic Volume®, for satellite speakers and also subwoofer Others • Lower power consumption at any ... as turn the AVR-1912's power on HD Source • 6-HDMI inputs and 1-output Connectivity & Future-ready Expandability • Supports HDMI (V.1.4a with Windows® 7 -web control • Supports "Denon Remote App" to simplify operation by 0.1 W (Standby) State-of-the-art Denon Solutions for Maximizing...
...Amp Assign function, for versatility in using the AVR-1912 for different purpose (Surround Back, Front Height, Zone 2, Bi-Amp, Front Speaker B) Ease-of-Use • Audyssey Dynamic Volume®, for satellite speakers and also subwoofer Others • Lower power consumption at any ... as turn the AVR-1912's power on HD Source • 6-HDMI inputs and 1-output Connectivity & Future-ready Expandability • Supports HDMI (V.1.4a with Windows® 7 -web control • Supports "Denon Remote App" to simplify operation by 0.1 W (Standby) State-of-the-art Denon Solutions for Maximizing...
Specification Sheet
Page 2
...Denon Solutions for Maximizing Content Quality • Fully discrete, identical quality and power for all 7 channels (90 W x 7ch) To faithfully reproduce the original surround sound, each of the AVR-1912's 7 channels is equipped with the same power amp of vibration. • Compressed Audio Restorer to enhance digital music files Connectivity... IIz playback, you can arrange the AVR-1912's amps to each input device • Variable subwoofer crossover switching *1) Requires contract with the USB cable that use network technology. The AVR-1912 also supports AirPlay that lets you stream...
...Denon Solutions for Maximizing Content Quality • Fully discrete, identical quality and power for all 7 channels (90 W x 7ch) To faithfully reproduce the original surround sound, each of the AVR-1912's 7 channels is equipped with the same power amp of vibration. • Compressed Audio Restorer to enhance digital music files Connectivity... IIz playback, you can arrange the AVR-1912's amps to each input device • Variable subwoofer crossover switching *1) Requires contract with the USB cable that use network technology. The AVR-1912 also supports AirPlay that lets you stream...


