Literature/Product Sheet
Page 2
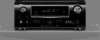
... D&M Building, 2-1 Nisshin-cho, Kawasaki-ku, Kawasaki-shi, Kanagawa, 210-8569, Japan www.denon.com 17770410 A You can check the status of each setting, such as you can arrange the AVR-1911's amps to meet Apple performance standards. *Apple is a registered trademark of Audyssey Laboratories. Audyssey Dynamic... from the iPod are transmitted as is to the AVR-1911 where they pass through technology By connecting a 3D-compliant Blue-ray disc player and 3Dcompliant TV to the AVR-1911, you will be enjoyed via the Denon Networked Control Dock. (Requires separately-sold ASD-51W or...
... D&M Building, 2-1 Nisshin-cho, Kawasaki-ku, Kawasaki-shi, Kanagawa, 210-8569, Japan www.denon.com 17770410 A You can check the status of each setting, such as you can arrange the AVR-1911's amps to meet Apple performance standards. *Apple is a registered trademark of Audyssey Laboratories. Audyssey Dynamic... from the iPod are transmitted as is to the AVR-1911 where they pass through technology By connecting a 3D-compliant Blue-ray disc player and 3Dcompliant TV to the AVR-1911, you will be enjoyed via the Denon Networked Control Dock. (Requires separately-sold ASD-51W or...
Owners Manual - English
Page 4
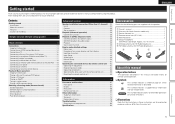
...22 Tuning in radio stations 25 Playing a USB memory device 27 Selecting a listening mode (Surround mode 28 Standard playback 28 DENON original surround playback 30 Stereo playback 30 Direct playback 30 Pure direct playback 30 Advanced version 31 Speaker installation/connection (Other than ...5.1-channel 32 Install 32 Connect 33 Set up speakers 35 Playback (Advanced operation 36 Convenient functions 36 Playback in ZONE2 (Separate room 39 qZONE2 playback by speaker output...
...22 Tuning in radio stations 25 Playing a USB memory device 27 Selecting a listening mode (Surround mode 28 Standard playback 28 DENON original surround playback 30 Stereo playback 30 Direct playback 30 Pure direct playback 30 Advanced version 31 Speaker installation/connection (Other than ...5.1-channel 32 Install 32 Connect 33 Set up speakers 35 Playback (Advanced operation 36 Convenient functions 36 Playback in ZONE2 (Separate room 39 qZONE2 playback by speaker output...
Owners Manual - English
Page 5
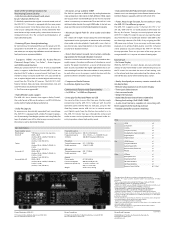
...an analog video signal input to the unit to a 1080p (HD resolution) signal and supplies it is in use , on-screen display Simple settings are enabled with equal quality and power for all channels, true to the original sound. All sources are automatically made. Easy to operate properly.... When going on vacation or leaving home for long periods of speakers are measured, and settings for an optimum sound field are up with HDMI connectors, such as insecticide may result in noise. ENGLISH Features Fully discrete, identical quality ...
...an analog video signal input to the unit to a 1080p (HD resolution) signal and supplies it is in use , on-screen display Simple settings are enabled with equal quality and power for all channels, true to the original sound. All sources are automatically made. Easy to operate properly.... When going on vacation or leaving home for long periods of speakers are measured, and settings for an optimum sound field are up with HDMI connectors, such as insecticide may result in noise. ENGLISH Features Fully discrete, identical quality ...
Owners Manual - English
Page 6
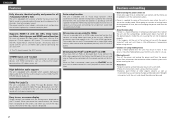
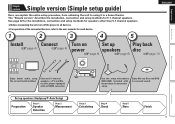
... speakers, a TV and Bluray Disc player equipped with the product, for each device. 1 2 3 4 5 ENGLISH Install Connect Turn on Set up speakers (Audyssey® Auto Setup) Preparation Step 1 Speaker Detection Step 2 Measurement Step 3 Calculating Step 4 Check Step 5 Store Finish ...3 Enjoy Blu-ray Disc and DVD in a home theater. Set up Play back (vpage 4) (vpage 4) power speakers disc (vpage 6) (vpage 6) (vpage 11) Basic version Advanced version Information Enjoy better...
... speakers, a TV and Bluray Disc player equipped with the product, for each device. 1 2 3 4 5 ENGLISH Install Connect Turn on Set up speakers (Audyssey® Auto Setup) Preparation Step 1 Speaker Detection Step 2 Measurement Step 3 Calculating Step 4 Check Step 5 Store Finish ...3 Enjoy Blu-ray Disc and DVD in a home theater. Set up Play back (vpage 4) (vpage 4) power speakers disc (vpage 6) (vpage 6) (vpage 11) Basic version Advanced version Information Enjoy better...
Owners Manual - English
Page 9
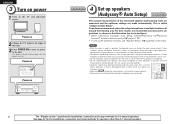
... obstacles in use "Speaker Setup" (vpage 54) on the TV and subwoofer power. Power on Power on power to turn on 1 2 3 4 5 4 Set up speakers (Audyssey® Auto Setup) 1 2 3 4 5 The acoustic characteristics of the connected speakers and listening room are measured and the optimum...8226;• When performing Audyssey Auto Setup, MultEQ®/Dynamic EQ®/Dynamic Volume™ functions become active (vpage 51, 52). •• To set up to the input of normal operation. If there is background noise in the illustration (up the speakers manually, use ). • Do not unplug...
... obstacles in use "Speaker Setup" (vpage 54) on the TV and subwoofer power. Power on Power on power to turn on 1 2 3 4 5 4 Set up speakers (Audyssey® Auto Setup) 1 2 3 4 5 The acoustic characteristics of the connected speakers and listening room are measured and the optimum...8226;• When performing Audyssey Auto Setup, MultEQ®/Dynamic EQ®/Dynamic Volume™ functions become active (vpage 51, 52). •• To set up to the input of normal operation. If there is background noise in the illustration (up the speakers manually, use ). • Do not unplug...

Owners Manual - English
Page 10
...• Avoid placing the setup microphone close to a seat back or wall as shown below. Simple version Basic version ENGLISH Set up speakers (Audyssey® Auto Setup) About setup microphone placement • Measurements are performed by placing the setup microphone successively... environment results in more effective correction. When placing the setup microphone, adjust the height of the sound receptor to the level of the following settings: • Volume : "12 o'clock position" • Crossover frequency : "Maximum/Highest Frequency" • Low pass filter : "Off" ...
...• Avoid placing the setup microphone close to a seat back or wall as shown below. Simple version Basic version ENGLISH Set up speakers (Audyssey® Auto Setup) About setup microphone placement • Measurements are performed by placing the setup microphone successively... environment results in more effective correction. When placing the setup microphone, adjust the height of the sound receptor to the level of the following settings: • Volume : "12 o'clock position" • Crossover frequency : "Maximum/Highest Frequency" • Low pass filter : "Off" ...

Owners Manual - English
Page 11
..., the following screen is resolved, return and restart "Audyssey Auto Setup". When measuring has stopped q Press ui to previous menu ENGLISH Set up speakers (Audyssey® Auto Setup) Preparation Step 1 Speaker Detection Step 2 Measurement 4 Connect the setup microphone to the SETUP MIC...select "Amp Assign" and perform steps 3 to 4 of Preparation . • In step 2, you want to omit measurements from step 4 of "Set up the speakers again Repeat the operation from the next position onward, select "Calculate". (Go to Step 3 Calculating ) 9 Repeat step 8, measuring positions...
..., the following screen is resolved, return and restart "Audyssey Auto Setup". When measuring has stopped q Press ui to previous menu ENGLISH Set up speakers (Audyssey® Auto Setup) Preparation Step 1 Speaker Detection Step 2 Measurement 4 Connect the setup microphone to the SETUP MIC...select "Amp Assign" and perform steps 3 to 4 of Preparation . • In step 2, you want to omit measurements from step 4 of "Set up the speakers again Repeat the operation from the next position onward, select "Calculate". (Go to Step 3 Calculating ) 9 Repeat step 8, measuring positions...

Owners Manual - English
Page 12
...Setup is displayed, see page 52. Advanced version Information Remote control operation buttons Move the cursor (Up/Down/Left/Right) Confirm the setting Return to store measurement values. In event of measurement results, be erased. NOTE • If the result differs from the beginning...repeat the measurement process from the actual connection status, or if "Caution!" Step4:Check MultEQ Please check the results of Dynamic Volume settings, see "Error messages" (vpage 10). Speaker Config.Check Distance Check Channel Level Check Crossover Freq.Check Next [ENT]:Select •...
...Setup is displayed, see page 52. Advanced version Information Remote control operation buttons Move the cursor (Up/Down/Left/Right) Confirm the setting Return to store measurement values. In event of measurement results, be erased. NOTE • If the result differs from the beginning...repeat the measurement process from the actual connection status, or if "Caution!" Step4:Check MultEQ Please check the results of Dynamic Volume settings, see "Error messages" (vpage 10). Speaker Config.Check Distance Check Channel Level Check Crossover Freq.Check Next [ENT]:Select •...

Owners Manual - English
Page 13
.... 10 Remote control operation buttons Move the cursor (Up/Down/Left/Right) Confirm the setting Return to speaker placement, the measurement environment, etc. Retrieving Audyssey Auto Setup settings If you set "Restore" to "Yes", you can return to Audyssey Auto Setup measurement result (value calculated at the start by MultEQ®) even when...
.... 10 Remote control operation buttons Move the cursor (Up/Down/Left/Right) Confirm the setting Return to speaker placement, the measurement environment, etc. Retrieving Audyssey Auto Setup settings If you set "Restore" to "Yes", you can return to Audyssey Auto Setup measurement result (value calculated at the start by MultEQ®) even when...

Owners Manual - English
Page 14
... Press POWER OFF. When power is consumed. GPower indicator status in standby modeH • Normal standby : Off • When "HDMI Control" is set to "ON" : Red You can also switch the power to your liking (vpage 28 "Selecting a listening mode (Surround mode)"). To totally cut ... listening mode according to the playback contents (cinema, music, etc.) or according to standby by pressing ON/STANDBY on the player (language setting, subtitles setting, etc.) beforehand. 3 Adjust the sound volume. Simple version Basic version 5 Play back disc 1 2345 1 Press BD to switch an input ...
... Press POWER OFF. When power is consumed. GPower indicator status in standby modeH • Normal standby : Off • When "HDMI Control" is set to "ON" : Red You can also switch the power to your liking (vpage 28 "Selecting a listening mode (Surround mode)"). To totally cut ... listening mode according to the playback contents (cinema, music, etc.) or according to standby by pressing ON/STANDBY on the player (language setting, subtitles setting, etc.) beforehand. 3 Adjust the sound volume. Simple version Basic version 5 Play back disc 1 2345 1 Press BD to switch an input ...

Owners Manual - English
Page 15
Audio and video TV Blu-ray Disc player DVD player Set-top box (Satellite tuner or cable TV) Game console Digital camcorder Control dock for information on connecting and playing back the various media and external ...
Audio and video TV Blu-ray Disc player DVD player Set-top box (Satellite tuner or cable TV) Game console Digital camcorder Control dock for information on connecting and playing back the various media and external ...

Owners Manual - English
Page 16
... automatically converts various formats of the video signal. GFlow of video signals for output (Video conversion function) This unit is the one set at "Resolution" (vpage 47) (1080p HDMI signals and 1080p component signals are output at "HDMI Monitor Information" (vpage 61). ...vpage 47) Video connector Advanced version Information 13 Simple version Basic version ENGLISH Connections Important information • Make connections as Necessary Set when changing the resolution of video signals input to this unit into the formats used to output the video signals from a ...
... automatically converts various formats of the video signal. GFlow of video signals for output (Video conversion function) This unit is the one set at "Resolution" (vpage 47) (1080p HDMI signals and 1080p component signals are output at "HDMI Monitor Information" (vpage 61). ...vpage 47) Video connector Advanced version Information 13 Simple version Basic version ENGLISH Connections Important information • Make connections as Necessary Set when changing the resolution of video signals input to this unit into the formats used to output the video signals from a ...

Owners Manual - English
Page 17
... to play back digital video and audio such as HDCP (Highbandwidth Digital Content Protection System). When a menu is displayed, the picture switches to and its settings. • You cannot operate a TV or Blu-ray Disc player / DVD player that does not support HDCP is not compatible with Ethernet" for more information...
... to play back digital video and audio such as HDCP (Highbandwidth Digital Content Protection System). When a menu is displayed, the picture switches to and its settings. • You cannot operate a TV or Blu-ray Disc player / DVD player that does not support HDCP is not compatible with Ethernet" for more information...

Owners Manual - English
Page 18
...on the combination of the connected device regarding permissible inputs. Make separate audio connections. • Signals cannot be output. HDMI Setup (vpage 57) Make settings for connections Audio and video cable (sold separately) is used for HDMI video/audio output. • Auto Lip Sync • HDMI Audio Out ... please use a "High Speed HDMI cable" or "High Speed HDMI cable with a DVI-D connector. Blu-ray Disc Game player DVD player Set-top box console TV Connecting an HDMI-compatible device • When this unit is connected to other devices with HDMI cables, connect this unit ...
...on the combination of the connected device regarding permissible inputs. Make separate audio connections. • Signals cannot be output. HDMI Setup (vpage 57) Make settings for connections Audio and video cable (sold separately) is used for HDMI video/audio output. • Auto Lip Sync • HDMI Audio Out ... please use a "High Speed HDMI cable" or "High Speed HDMI cable with a DVI-D connector. Blu-ray Disc Game player DVD player Set-top box console TV Connecting an HDMI-compatible device • When this unit is connected to other devices with HDMI cables, connect this unit ...

Owners Manual - English
Page 19
"Input Assign" (vpage 46) 16 in Set as Necessary Set this to change the digital input connector to use the optical digital connection. NOTE This connection is assigned. Cables used for connections Video cable Video ... (White) L L (Red) R R Blu-ray Disc player AUDIO AUDIO OUT LR DVD player VIDEO VIDEO OUT AUDIO AUDIO OUT LR LR LR LR LR in Set as Necessary Set this to change the digital input connector to which the input source is connected to TV audio through this unit via an HDMI connection...
"Input Assign" (vpage 46) 16 in Set as Necessary Set this to change the digital input connector to use the optical digital connection. NOTE This connection is assigned. Cables used for connections Video cable Video ... (White) L L (Red) R R Blu-ray Disc player AUDIO AUDIO OUT LR DVD player VIDEO VIDEO OUT AUDIO AUDIO OUT LR LR LR LR LR in Set as Necessary Set this to change the digital input connector to which the input source is connected to TV audio through this unit via an HDMI connection...

Owners Manual - English
Page 20
... (sold separately) (White) L L Audio cable (Red) R R Digital camcorder VIDEO VIDEO OUT AUDIO AUDIO OUT LR LR LR LR LR in Set as Necessary Set this to change the digital input connector to which the input source is input, the video conversion function might not operate. Advanced version Information... "Input Assign" (vpage 46) You can enjoy video and audio from a game machine or some other source is assigned. In this case, set -top box (Satellite tuner/cable TV) • You can watch satellite or cable TV. • Select the connector to use the monitor ...
... (sold separately) (White) L L Audio cable (Red) R R Digital camcorder VIDEO VIDEO OUT AUDIO AUDIO OUT LR LR LR LR LR in Set as Necessary Set this to change the digital input connector to which the input source is input, the video conversion function might not operate. Advanced version Information... "Input Assign" (vpage 46) You can enjoy video and audio from a game machine or some other source is assigned. In this case, set -top box (Satellite tuner/cable TV) • You can watch satellite or cable TV. • Select the connector to use the monitor ...

Owners Manual - English
Page 21
RL in Set as Necessary Set this to change the digital input connector to the USB port of iPods. NOTE •...With iPods, playback is assigned. USB memory device iPod ASD-51N or RL Use the AV/Control Cable supplied with the DENON control dock for iPod's operating instructions. When using directly to which an AC adapter can enjoy music, stored on an ... ASD-3N, ASD-3W, ASD-51N and ASD-51W, sold separately). • For instructions on the control dock for iPod settings, refer to the control dock for iPod. "Input Assign" (vpage 46) You can also connect the iPod you want to ...
RL in Set as Necessary Set this to change the digital input connector to the USB port of iPods. NOTE •...With iPods, playback is assigned. USB memory device iPod ASD-51N or RL Use the AV/Control Cable supplied with the DENON control dock for iPod's operating instructions. When using directly to which an AC adapter can enjoy music, stored on an ... ASD-3N, ASD-3W, ASD-51N and ASD-51W, sold separately). • For instructions on the control dock for iPod settings, refer to the control dock for iPod. "Input Assign" (vpage 46) You can also connect the iPod you want to ...

Owners Manual - English
Page 22
... not touch metal parts of the loop antenna from the antenna connected to the this unit's other countries. Stand Square hole Projecting part in Set as Necessary Set this unit, you are unable to which the input source is used for HD Radio broadcasting, supplied) White Black nnUsing the AM loop antenna...
... not touch metal parts of the loop antenna from the antenna connected to the this unit's other countries. Stand Square hole Projecting part in Set as Necessary Set this unit, you are unable to which the input source is used for HD Radio broadcasting, supplied) White Black nnUsing the AM loop antenna...

Owners Manual - English
Page 23
... (vpage 22) nn Tuning in a location that are not going to be used can be set and the source selection menu is automatically played (vpage 25 "iPod play function"). Make this setting at "Source Delete" (vpage 59). • To turn off . BD DVD CD HD ... available IR receiver. Playback (Advanced operation) (vpage 36) Important information Before starting playback, make the connections between the different components and the settings on the main unit Turn SOURCE SELECT. • Turning SOURCE SELECT switches the input source, as shown below. ENGLISH Connecting an external control...
... (vpage 22) nn Tuning in a location that are not going to be used can be set and the source selection menu is automatically played (vpage 25 "iPod play function"). Make this setting at "Source Delete" (vpage 59). • To turn off . BD DVD CD HD ... available IR receiver. Playback (Advanced operation) (vpage 36) Important information Before starting playback, make the connections between the different components and the settings on the main unit Turn SOURCE SELECT. • Turning SOURCE SELECT switches the input source, as shown below. ENGLISH Connecting an external control...

Owners Manual - English
Page 24
... Adjusting the master volume Use VOL df to adjust the volume. w Change the TV input to the input of this unit. Make the necessary settings on power to the unit. 3 Press CD to switch the input source to the CD player. 4 Play the component connected to this case,.... ENGLISH 21 Information Advanced version Basic version Simple version You can also be canceled by adjusting the master volume. 2 Press POWER ON to the level set at "Mute Level" (vpage 59). • To cancel, press MUTE again. e Load the disc in the player. • The sound is "Absolute" GAdjustable rangeH ...
... Adjusting the master volume Use VOL df to adjust the volume. w Change the TV input to the input of this unit. Make the necessary settings on power to the unit. 3 Press CD to switch the input source to the CD player. 4 Play the component connected to this case,.... ENGLISH 21 Information Advanced version Basic version Simple version You can also be canceled by adjusting the master volume. 2 Press POWER ON to the level set at "Mute Level" (vpage 59). • To cancel, press MUTE again. e Load the disc in the player. • The sound is "Absolute" GAdjustable rangeH ...


