
Owners Manual
Page 10
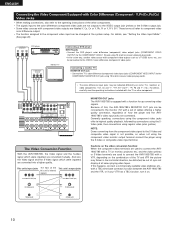
...distorted, be out of how the player and the AVR1905/785's video input jacks are converted mutually. The Video Conversion Function With the AVR-1905/785, the Video signal and the S-video signal which were inputted are used to the VIDEO-2 color difference (component) video jacks. ...on the video conversion function: When the component video terminals are used to connect the AVR-1905/785 with a set of cables offering a higher quality connection, regardless of sync not display at the system setup. And also the Video signal and the S-Video signal which were inputted are connected...
...distorted, be out of how the player and the AVR1905/785's video input jacks are converted mutually. The Video Conversion Function With the AVR-1905/785, the Video signal and the S-video signal which were inputted are used to the VIDEO-2 color difference (component) video jacks. ...on the video conversion function: When the component video terminals are used to connect the AVR-1905/785 with a set of cables offering a higher quality connection, regardless of sync not display at the system setup. And also the Video signal and the S-Video signal which were inputted are connected...

Owners Manual
Page 13
... MULTI ZONE FUNCTIONS. (See page 42 ~ 44) [1] ZONE 2 FIXED OUT CONNECTIONS • If another power amplifier or pre-main (integrated) amplifier is selected at System Setup Menu "Power Amp Assign". In this case , Surround Back Speaker OUT cannot be used for MAIN ZONE. (See page 29) SURROUND BACK/MULTI ZONE SPEAKER...
... MULTI ZONE FUNCTIONS. (See page 42 ~ 44) [1] ZONE 2 FIXED OUT CONNECTIONS • If another power amplifier or pre-main (integrated) amplifier is selected at System Setup Menu "Power Amp Assign". In this case , Surround Back Speaker OUT cannot be used for MAIN ZONE. (See page 29) SURROUND BACK/MULTI ZONE SPEAKER...
Owners Manual
Page 17
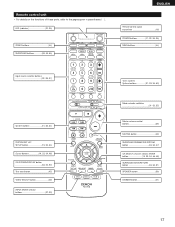
... 18) POWER buttons 21, 32~34, 36) MAIN buttons 44) Input source selector buttons 32~35, 37) System buttons 31, 33, 34) SYSTEM SET UP/ SETUP button 19, 33, 34) Cursor buttons 19, 33, 34, 48) ON SCREEN/DISPLAY button 33, 34, 53) Test tone button 45) VIDEO SELECT button 40...
... 18) POWER buttons 21, 32~34, 36) MAIN buttons 44) Input source selector buttons 32~35, 37) System buttons 31, 33, 34) SYSTEM SET UP/ SETUP button 19, 33, 34) Cursor buttons 19, 33, 34, 48) ON SCREEN/DISPLAY button 33, 34, 53) Test tone button 45) VIDEO SELECT button 40...
Owners Manual
Page 19
... Video Input Mode Set the input signal to prevent flickering. Ext. Set the frequency (Hz) below on the monitor screen using the AVR-1905/785's on the remote control unit or main unit are required to set upon shipment from the factory) Speaker Configuration Delay Time Subwoofer ...Mode Crossover Frequency Test Tone System setup Input the combination of speakers in order to switch the surround back channel's power amplifier for use this button to complete the setting....
... Video Input Mode Set the input signal to prevent flickering. Ext. Set the frequency (Hz) below on the monitor screen using the AVR-1905/785's on the remote control unit or main unit are required to set upon shipment from the factory) Speaker Configuration Delay Time Subwoofer ...Mode Crossover Frequency Test Tone System setup Input the combination of speakers in order to switch the surround back channel's power amplifier for use this button to complete the setting....
Owners Manual
Page 20
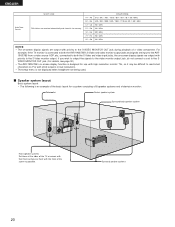
... read small characters on TVs with small screens or low resolutions. • The setup menu is not displayed when headphone are being used. 2 Speaker system layout Basic system layout • The following is connected to both the AVR-1905/785's S-Video and video monitor output jacks and signals are input to the AVR1905...
... read small characters on TVs with small screens or low resolutions. • The setup menu is not displayed when headphone are being used. 2 Speaker system layout Basic system layout • The following is connected to both the AVR-1905/785's S-Video and video monitor output jacks and signals are input to the AVR1905...

Owners Manual
Page 21
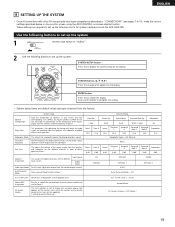
... In this position to turn the power on and off . Press the Power ON/STANDBY switch (button). (Main unit) (Remote control unit) 4 Press the SYSTEM SETUP button to enter the setting. *SYSTEM SET UP NOTE: Please make sure the "AUDIO" position of the slide switch on the remote control unit. 5 Press... the ENTER or (down) button to switch to the Speaker Configuration set up . NOTE: Press the SYSTEM SETUP button again to finish system set up can be turned on and off from the included remote control unit. (Main unit) • £ OFF The...
... In this position to turn the power on and off . Press the Power ON/STANDBY switch (button). (Main unit) (Remote control unit) 4 Press the SYSTEM SETUP button to enter the setting. *SYSTEM SET UP NOTE: Please make sure the "AUDIO" position of the slide switch on the remote control unit. 5 Press... the ENTER or (down) button to switch to the Speaker Configuration set up . NOTE: Press the SYSTEM SETUP button again to finish system set up can be turned on and off from the included remote control unit. (Main unit) • £ OFF The...

Owners Manual
Page 22
Surround Sp. When this setup optimizes the system. • The composition of the signals output to the different channels and the frequency response are adjusted automatically according to the combination ...
Surround Sp. When this setup optimizes the system. • The composition of the signals output to the different channels and the frequency response are adjusted automatically according to the combination ...

Owners Manual
Page 24
...frequency range. • Selection of the "LFE " play mode will play the low frequency signal range of channels set to "SMALL" in the setup. When using a subwoofer. • Set the crossover frequency and subwoofer mode according to "Large" are LFE signals (during Dolby Digital or DTS ...signal playback) and the channel specified as "Small" in the setup menu. • Select the play mode that channel only. Select the setting. 15SW MODE NORM 2 Select the "Crossover Frequency" mode. Select the...
...frequency range. • Selection of the "LFE " play mode will play the low frequency signal range of channels set to "SMALL" in the setup. When using a subwoofer. • Set the crossover frequency and subwoofer mode according to "Large" are LFE signals (during Dolby Digital or DTS ...signal playback) and the channel specified as "Small" in the setup menu. • Select the play mode that channel only. Select the setting. 15SW MODE NORM 2 Select the "Crossover Frequency" mode. Select the...
Owners Manual
Page 30
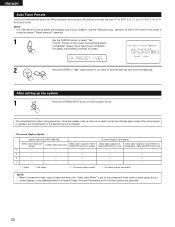
"Search" flashes on the screen and searching begins. The display automatically switches to select "Yes". "Completed" appears once searching is completed. NOTE: • If an FM station cannot be preset automatically due to poor reception, use the "Manual tuning" operation to tune in the station, then preset it using the manual "Preset memory" operation. 1 Use the CURSOR button to screen. 29 PRESET ENGLISH Auto Tuner Presets Use this to automatically search for FM broadcasts and store up to 56 stations at preset channels A1 to 8, B1 to 8, C1 to 8, D1 to 8, E1 to 8, F1 to 8 and ...
"Search" flashes on the screen and searching begins. The display automatically switches to select "Yes". "Completed" appears once searching is completed. NOTE: • If an FM station cannot be preset automatically due to poor reception, use the "Manual tuning" operation to tune in the station, then preset it using the manual "Preset memory" operation. 1 Use the CURSOR button to screen. 29 PRESET ENGLISH Auto Tuner Presets Use this to automatically search for FM broadcasts and store up to 56 stations at preset channels A1 to 8, B1 to 8, C1 to 8, D1 to 8, E1 to 8, F1 to 8 and ...

Owners Manual
Page 33
... details, refer to beginning of track) 3 : Pause 0 ~ 9, +10 : 10 key DISC SKIP +: Disc skip (for DVD changer only) DISPLAY : Switch display MENU : Menu RETURN : Return SETUP : Setup •, ª, 0, 1 : Cursor up, down, left and right ENTER : Enter setting 2. Digital video disc player (DVD) system buttons POWER : Power on/standby (ON/SOURCE) OFF...
... details, refer to beginning of track) 3 : Pause 0 ~ 9, +10 : 10 key DISC SKIP +: Disc skip (for DVD changer only) DISPLAY : Switch display MENU : Menu RETURN : Return SETUP : Setup •, ª, 0, 1 : Cursor up, down, left and right ENTER : Enter setting 2. Digital video disc player (DVD) system buttons POWER : Power on/standby (ON/SOURCE) OFF...

Owners Manual
Page 38
... the component's power is adjusted to the component's manual. 5 Adjust the volume. If the DIGITAL indicator does not light, check whether the digital input component setup (page 26) and connections are being input properly. When playing DTS-compatible sources, be heard. 38 Input mode display • In the AUTO mode AUTO...
... the component's power is adjusted to the component's manual. 5 Adjust the volume. If the DIGITAL indicator does not light, check whether the digital input component setup (page 26) and connections are being input properly. When playing DTS-compatible sources, be heard. 38 Input mode display • In the AUTO mode AUTO...
Owners Manual
Page 42
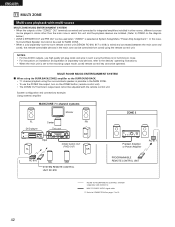
...• When the outputs of separately sold devices, refer to the devices' operating instructions. • When the main unit is selected at System Setup Menu "Power Amp Assignment". MULTI ROOM MUSIC ENTERTAINMENT SYSTEM 2 When using the SURR.BACK/ZONE2 amplifier as the SURROUND BACK. • 7.1-channel ...CONTROL UNIT RC-978 PROGRAMMABLE REMOTE CONTROL UNIT ROOM-TO-ROOM REMOTE CONTROL SYSTEM (separately sold separately room-to-room remote control unit (DENON RC-616, 617 or 618) is wired and connected between the main zone and zone2, the remote-controllable devices in which this case...
...• When the outputs of separately sold devices, refer to the devices' operating instructions. • When the main unit is selected at System Setup Menu "Power Amp Assignment". MULTI ROOM MUSIC ENTERTAINMENT SYSTEM 2 When using the SURR.BACK/ZONE2 amplifier as the SURROUND BACK. • 7.1-channel ...CONTROL UNIT RC-978 PROGRAMMABLE REMOTE CONTROL UNIT ROOM-TO-ROOM REMOTE CONTROL SYSTEM (separately sold separately room-to-room remote control unit (DENON RC-616, 617 or 618) is wired and connected between the main zone and zone2, the remote-controllable devices in which this case...

Owners Manual
Page 45
.... (Remote control unit) 1 1 3 3 2, 4 45 ENGLISH 12 SURROUND Before playing with the surround function • Before playing with the surround function, be performed with the system setup (see page 19) or from the remote control unit, as described below. • Adjusting with the remote control unit using the test tones is the...
.... (Remote control unit) 1 1 3 3 2, 4 45 ENGLISH 12 SURROUND Before playing with the surround function • Before playing with the surround function, be performed with the system setup (see page 19) or from the remote control unit, as described below. • Adjusting with the remote control unit using the test tones is the...

Owners Manual
Page 53
.... "PL IIx Music" ....Processing is performed with the Music mode of the sounds in the soundtrack (but with the subwoofer peak limit level setting (system setup menu), adjust the level as a discrete 6.1-channel source is reproduced using digital matrix processing. "MATRIX" is displayed when matrix processing is conducted on /off with...
.... "PL IIx Music" ....Processing is performed with the Music mode of the sounds in the soundtrack (but with the subwoofer peak limit level setting (system setup menu), adjust the level as a discrete 6.1-channel source is reproduced using digital matrix processing. "MATRIX" is displayed when matrix processing is conducted on /off with...

Owners Manual
Page 58
... F8 and G1 to tune in after the auto preset memory operation is completed. NOTES: • If an FM station cannot be performed at "System setup". (See page 30.) 1 1 When the main unit's power operation switch turn on while pressing the set's PRESET • (+) button the unit automatically begins searching for...
... F8 and G1 to tune in after the auto preset memory operation is completed. NOTES: • If an FM station cannot be performed at "System setup". (See page 30.) 1 1 When the main unit's power operation switch turn on while pressing the set's PRESET • (+) button the unit automatically begins searching for...


