
Literature/Product Sheet
Page 2
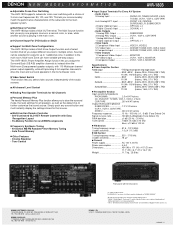
... BOX 867, PINE BROOK, NJ 07058-9777 USA TEL: 973-396-0810 www.usa.denon.com DENON CANADA INC. 17 DENISON STREET, MARKHAM ONTARIO, CANADA L3R 1B5 TEL: 905-475-4085 www.denon.ca Front panel with a choice of the audio sources. ■ All-channel Level Control...Channel Input For DVD-Audio or SACD ■ Support for Multi Zone Configurations The AVR-1803 provides a Multi Zone Output function and a Select function that source. ■ Multi-function Remote Controller • Self-illuminated GLO-KEY Remote Controller with Easy Recognition Layout • Pre-Memory Function for output to up ...
... BOX 867, PINE BROOK, NJ 07058-9777 USA TEL: 973-396-0810 www.usa.denon.com DENON CANADA INC. 17 DENISON STREET, MARKHAM ONTARIO, CANADA L3R 1B5 TEL: 905-475-4085 www.denon.ca Front panel with a choice of the audio sources. ■ All-channel Level Control...Channel Input For DVD-Audio or SACD ■ Support for Multi Zone Configurations The AVR-1803 provides a Multi Zone Output function and a Select function that source. ■ Multi-function Remote Controller • Self-illuminated GLO-KEY Remote Controller with Easy Recognition Layout • Pre-Memory Function for output to up ...
Owners Manual
Page 4
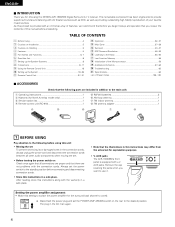
...the power cord and disconnect the connection cords between all other audio components when moving the set for North America model only 1 e Service station list 1 r Remote control unit (RC-916 1 t R6P/AA batteries 2 y AM loop antenna 1 u FM indoor antenna 1 i FM antenna adapter 1 r t y... on Handling 5 v Features ...5 b Part Names and Functions 6, 7 n Read this setting to switch the power amplifier for choosing the DENON AVR-1803/883 Digital Surround A / V receiver. Disconnect the power plug and set the power switch to the standby position before proceeding. This remarkable ...
...the power cord and disconnect the connection cords between all other audio components when moving the set for North America model only 1 e Service station list 1 r Remote control unit (RC-916 1 t R6P/AA batteries 2 y AM loop antenna 1 u FM indoor antenna 1 i FM antenna adapter 1 r t y... on Handling 5 v Features ...5 b Part Names and Functions 6, 7 n Read this setting to switch the power amplifier for choosing the DENON AVR-1803/883 Digital Surround A / V receiver. Disconnect the power plug and set the power switch to the standby position before proceeding. This remarkable ...

Owners Manual
Page 6
... 34) @4 Display @5 Preset station select buttons 53, 55) @6 BAND button 54) @7 INPUT MODE indicator 34) @8 SIGNAL indicator 34) @9 INPUT MODE button 33, 35, 45) #0 Remote control sensor (REMOTE SENSOR 18) #1 Power operation indicator 32) #2 FUNCTION knob 33, 37, 42, 43, 45, 54) #3 MAIN button 33) 6 ENGLISH 5 PART NAMES AND FUNCTIONS Front Panel...
... 34) @4 Display @5 Preset station select buttons 53, 55) @6 BAND button 54) @7 INPUT MODE indicator 34) @8 SIGNAL indicator 34) @9 INPUT MODE button 33, 35, 45) #0 Remote control sensor (REMOTE SENSOR 18) #1 Power operation indicator 32) #2 FUNCTION knob 33, 37, 42, 43, 45, 54) #3 MAIN button 33) 6 ENGLISH 5 PART NAMES AND FUNCTIONS Front Panel...
Owners Manual
Page 7
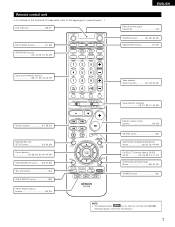
..., refer to the pages given in parentheses ( ). LED (indicator 28, 31) MULTI ZONE buttons 31, 38) SURROUND buttons 34, 40, 42, 44, 45, 49) ENGLISH Remote control signal transmitter 18) POWER buttons 20, 28~30, 32) MAIN ZONE buttons 31, 38) Input source selector buttons 28~31, 33, 42, 43, 45...~26, 29, 30, 41, 43) SURROUND BACK/RETURN button 29, 30, 45) DIMMER button 36) NOTE: • The shaded buttons do not function with the AVR-1803/883. (Nothing happens when they are pressed.) 7
..., refer to the pages given in parentheses ( ). LED (indicator 28, 31) MULTI ZONE buttons 31, 38) SURROUND buttons 34, 40, 42, 44, 45, 49) ENGLISH Remote control signal transmitter 18) POWER buttons 20, 28~30, 32) MAIN ZONE buttons 31, 38) Input source selector buttons 28~31, 33, 42, 43, 45...~26, 29, 30, 41, 43) SURROUND BACK/RETURN button 29, 30, 45) DIMMER button 36) NOTE: • The shaded buttons do not function with the AVR-1803/883. (Nothing happens when they are pressed.) 7
Owners Manual
Page 8
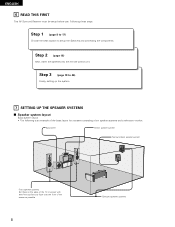
Step 2 (page 18) Next, insert the batteries into the remote control unit. Step 3 (page 19 to setup the Speakers and connecting the components. Step 1 (page 8 to 17) Choose the best location to 26) Finally, setting ...
Step 2 (page 18) Next, insert the batteries into the remote control unit. Step 3 (page 19 to setup the Speakers and connecting the components. Step 1 (page 8 to 17) Choose the best location to 26) Finally, setting ...
Owners Manual
Page 9
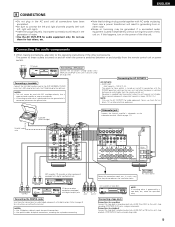
...CD player Connect the CD player's analog output jacks (ANALOG OUTPUT) to this unit. Connecting a turntable Connect the turntable's output cord to the AVR-1803/883's PHONO jacks, the L (left , right with the POWER operation switch on the main unit, and when the power is switched between on... making connections, also refer to page 24 for audio equipment. Refer to the operating instructions of this unit on and standby from the remote control unit or power switch. No power is connected, disconnect the ground wire. Connecting a tape deck Connections for recording: Connect the ...
...CD player Connect the CD player's analog output jacks (ANALOG OUTPUT) to this unit. Connecting a turntable Connect the turntable's output cord to the AVR-1803/883's PHONO jacks, the L (left , right with the POWER operation switch on the main unit, and when the power is switched between on... making connections, also refer to page 24 for audio equipment. Refer to the operating instructions of this unit on and standby from the remote control unit or power switch. No power is connected, disconnect the ground wire. Connecting a tape deck Connections for recording: Connect the ...
Owners Manual
Page 18
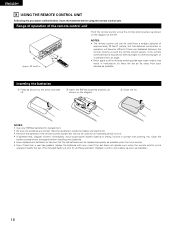
... feet/7 meters, but this distance will shorten or operation will not be used for verifying operation. Clean the battery compartment thoroughly before using the remote control unit. e Close the lid. w Insert the R6P/AA batteries properly, as shown by the arrow and slide off. Approx. 23 ... noise nearby may result in contact with clothing, etc. Inserting the batteries q Press as shown on the diagram. ENGLISH 9 USING THE REMOTE CONTROL UNIT Following the procedure outlined below, insert the batteries before installing new batteries. • Have replacement batteries on hand so that the...
... feet/7 meters, but this distance will shorten or operation will not be used for verifying operation. Clean the battery compartment thoroughly before using the remote control unit. e Close the lid. w Insert the R6P/AA batteries properly, as shown by the arrow and slide off. Approx. 23 ... noise nearby may result in contact with clothing, etc. Inserting the batteries q Press as shown on the diagram. ENGLISH 9 USING THE REMOTE CONTROL UNIT Following the procedure outlined below, insert the batteries before installing new batteries. • Have replacement batteries on hand so that the...

Owners Manual
Page 20
... 1 Check that point are correct, then press the POWER operation switch on the main unit or the POWER button on the remote control unit to turn on the power. (Main unit) (Remote control unit) 2 Press the SYSTEM SETUP button to enter the setting. *SYSTEM SET UP NOTE: Please make sure the "...AUDIO" position of the slide switch on the remote control unit. 3 Press the ENTER or (down) button to switch to the speaker configuration set up . NOTE: • When "Small" has been selected for ...
... 1 Check that point are correct, then press the POWER operation switch on the main unit or the POWER button on the remote control unit to turn on the power. (Main unit) (Remote control unit) 2 Press the SYSTEM SETUP button to enter the setting. *SYSTEM SET UP NOTE: Please make sure the "...AUDIO" position of the slide switch on the remote control unit. 3 Press the ENTER or (down) button to switch to the speaker configuration set up . NOTE: • When "Small" has been selected for ...
Owners Manual
Page 27
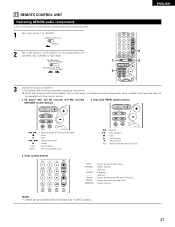
... between decks A and B SHIFT : Switch preset channel range CHANNEL : Preset channel +, - up /down TUNING : Frequency +, - 11 REMOTE CONTROL UNIT Operating DENON audio components • Turn on the power of components may not be operated with this remote control. 1. Tape deck (TAPE) system buttons 6, 7 2 1 8, 9 3 DISC SKIP+ : Manual search (forward and reverse) : Stop : Play :... Set mode switch 2 to the position for CD changers only) 3. CD player (CD) and CD recorder and MD recorder (CDR/MD) system buttons 2. While this remote control is at "AUDIO" position. 27
... between decks A and B SHIFT : Switch preset channel range CHANNEL : Preset channel +, - up /down TUNING : Frequency +, - 11 REMOTE CONTROL UNIT Operating DENON audio components • Turn on the power of components may not be operated with this remote control. 1. Tape deck (TAPE) system buttons 6, 7 2 1 8, 9 3 DISC SKIP+ : Manual search (forward and reverse) : Stop : Play :... Set mode switch 2 to the position for CD changers only) 3. CD player (CD) and CD recorder and MD recorder (CDR/MD) system buttons 2. While this remote control is at "AUDIO" position. 27

Owners Manual
Page 28
... upon shipment from the factory and after resetting: TV, VCR HITACHI CD, TAPE DENON CDR/MD DENON (CDR) DVD/VDP DENON (DVD) DBS/CABLE ABC (CABLE) 28 To avoid accidental operation, cover the remote control unit's transmitting window while setting the preset memory. • Depending on the...are of makes listed on the List of Preset Codes (pages 126~130). This remote control unit can be operated by registering the manufacturer of remote control code. ENGLISH Preset memory DENON and other manufacturers without using the learning function by setting the preset memory. The preset...
... upon shipment from the factory and after resetting: TV, VCR HITACHI CD, TAPE DENON CDR/MD DENON (CDR) DVD/VDP DENON (DVD) DBS/CABLE ABC (CABLE) 28 To avoid accidental operation, cover the remote control unit's transmitting window while setting the preset memory. • Depending on the...are of makes listed on the List of Preset Codes (pages 126~130). This remote control unit can be operated by registering the manufacturer of remote control code. ENGLISH Preset memory DENON and other manufacturers without using the learning function by setting the preset memory. The preset...
Owners Manual
Page 29
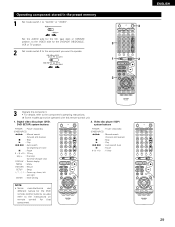
... unit. 1. Operating component stored in the preset memory 1 Set mode switch 1 to the instructions on remote control for that component. 29 Video disc player (VDP) system buttons POWER : Power on/standby (ON/SOURCE) 6,7 : Manual search (forward and reverse) 2 : Stop 1 : Play 8,9 : Auto ... to the component's operating instructions. Set the AUDIO side for the CD, tape deck or CDR/MD position, to the VIDEO side for the DVD remote control buttons, so also refer to "AUDIO" or "VIDEO". Digital video disc player (DVD, DVD SETUP) system buttons 2.
... unit. 1. Operating component stored in the preset memory 1 Set mode switch 1 to the instructions on remote control for that component. 29 Video disc player (VDP) system buttons POWER : Power on/standby (ON/SOURCE) 6,7 : Manual search (forward and reverse) 2 : Stop 1 : Play 8,9 : Auto ... to the component's operating instructions. Set the AUDIO side for the CD, tape deck or CDR/MD position, to the VIDEO side for the DVD remote control buttons, so also refer to "AUDIO" or "VIDEO". Digital video disc player (DVD, DVD SETUP) system buttons 2.

Owners Manual
Page 32
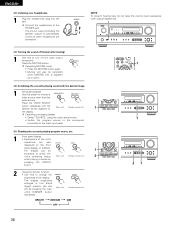
Press the ON/STANDBY button on the main unit or ON/SOURCE button on the remote control unit to turn on the 3 power. 3 ON/STANDBY Light (Main unit) (Remote control unit) • ON/STANDBY When the button is pressed, the power turns on the power. When pressed again...the "ON" position until sound is turned on and off . 2 Several seconds are correct. 2 Set the remote control unit's slide switch to the AUDIO position. (only when operating with the remote control unit) 3 Turn on and the display lights after approximately 1 second. ENGLISH 12 OPERATION Before operating 1...
Press the ON/STANDBY button on the main unit or ON/SOURCE button on the remote control unit to turn on the 3 power. 3 ON/STANDBY Light (Main unit) (Remote control unit) • ON/STANDBY When the button is pressed, the power turns on the power. When pressed again...the "ON" position until sound is turned on and off . 2 Several seconds are correct. 2 Set the remote control unit's slide switch to the AUDIO position. (only when operating with the remote control unit) 3 Turn on and the display lights after approximately 1 second. ENGLISH 12 OPERATION Before operating 1...
Owners Manual
Page 33
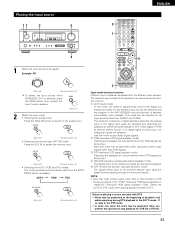
... noise may be selected for the separate input sources are decoded and played. If so, play in the AVR-1803/883's surround decoder is pressed. Example: CD (Main unit) (Remote control unit) To select the input source when ZONE2/REC OUT is selected, press the MAIN button then ...) Decoding and playback are only performed when PCM signals are played without passing through the surround circuitry. AUTO PCM DTS (Main unit) (Remote control unit) 2 Input mode selection function Different input modes can be generated when you preform the operation to stop playback of signals being ...
... noise may be selected for the separate input sources are decoded and played. If so, play in the AVR-1803/883's surround decoder is pressed. Example: CD (Main unit) (Remote control unit) To select the input source when ZONE2/REC OUT is selected, press the MAIN button then ...) Decoding and playback are only performed when PCM signals are played without passing through the surround circuitry. AUTO PCM DTS (Main unit) (Remote control unit) 2 Input mode selection function Different input modes can be generated when you preform the operation to stop playback of signals being ...

Owners Manual
Page 34
... adjusting the surround parameters, channel volume or tone control, press the surround mode button then operate the selector. (Remote control unit) (Main unit) 4 Start playback on the master volume level display. (Main unit) (Remote control unit) The volume can be adjusted within the range of -70 to 0 to "18 dB - (Maximum value...
... adjusting the surround parameters, channel volume or tone control, press the surround mode button then operate the selector. (Remote control unit) (Main unit) 4 Start playback on the master volume level display. (Main unit) (Remote control unit) The volume can be adjusted within the range of -70 to 0 to "18 dB - (Maximum value...

Owners Manual
Page 35
...(EXT. IN) setting, press the INPUT MODE (AUTO, PCM, DTS) or ANALOG button to switch to the desired input mode. (See page 33.) (Main unit) (Remote control unit) • When the input mode is output to +12 dB in steps of 2 dB.) • To decrease the bass or treble: Turn the... listening to sound, select the input source to which the video signal is selected, the input signals connected to switch the external input. (Main unit) (Remote control unit) Once this mode. IN), the play mode (DIRECT, STEREO, DOLBY/DTS SURROUND, 5CH/6CH STEREO or DSP SIMULATION) cannot be played. After ...
...(EXT. IN) setting, press the INPUT MODE (AUTO, PCM, DTS) or ANALOG button to switch to the desired input mode. (See page 33.) (Main unit) (Remote control unit) • When the input mode is output to +12 dB in steps of 2 dB.) • To decrease the bass or treble: Turn the... listening to sound, select the input source to which the video signal is selected, the input signals connected to switch the external input. (Main unit) (Remote control unit) Once this mode. IN), the play mode (DIRECT, STEREO, DOLBY/DTS SURROUND, 5CH/6CH STEREO or DSP SIMULATION) cannot be played. After ...
Owners Manual
Page 36
... • Muting will also be 1 switched to check the unit's operating status (Main unit) (Remote control unit) 2 while playing a source by pressing the main (Main unit) (Remote control unit) unit's DIMMER button repeatedly. In addition, the display can be cancelled when MASTER VOL is... button. • Switch the program source to the component connected to turn off when headphones are also displayed on (Main unit) (Remote control unit) 1 the display. Press the VIDEO SELECT button repeatedly until the desired source appears on the front panel display. BRIGHT MEDIUM...
... • Muting will also be 1 switched to check the unit's operating status (Main unit) (Remote control unit) 2 while playing a source by pressing the main (Main unit) (Remote control unit) unit's DIMMER button repeatedly. In addition, the display can be cancelled when MASTER VOL is... button. • Switch the program source to the component connected to turn off when headphones are also displayed on (Main unit) (Remote control unit) 1 the display. Press the VIDEO SELECT button repeatedly until the desired source appears on the front panel display. BRIGHT MEDIUM...

Owners Manual
Page 38
...ZONE2 source switches directly. 4 The output level of the ZONE 2 SPEAKER OUT terminals can be controlled using the CHANNEL + and - ENGLISH [2] Remote control unit operations during multi-source playback (selecting the source) 1 Set the slide switch to TUNER, the preset channel can be selected using the... unit) DEFAULT SETTING (ZONE2 VOLUME LEVEL) : - - - The main zone output can be turned on the remote control unit. (This is set to "AUDIO" and "ZONE2". 2 (Remote control unit) 2 Press the ZONE2 "ON" button. 3 To cancel the ZONE2 mode. dB (MINIMUM) 5 When the ZONE2 SOURCE ...
...ZONE2 source switches directly. 4 The output level of the ZONE 2 SPEAKER OUT terminals can be controlled using the CHANNEL + and - ENGLISH [2] Remote control unit operations during multi-source playback (selecting the source) 1 Set the slide switch to TUNER, the preset channel can be selected using the... unit) DEFAULT SETTING (ZONE2 VOLUME LEVEL) : - - - The main zone output can be turned on the remote control unit. (This is set to "AUDIO" and "ZONE2". 2 (Remote control unit) 2 Press the ZONE2 "ON" button. 3 To cancel the ZONE2 mode. dB (MINIMUM) 5 When the ZONE2 SOURCE ...
Owners Manual
Page 39
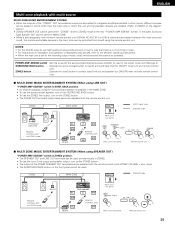
... to -room remote control unit (DENON RC-616, 617 or 618) is wired and connected between the main zone and zone2, the remote-controllable devices in the main zone can be controlled from zone2 using the remote control unit. ZONE2 MAIN ZONE : SPEAKER cable REMOTE CONTROL UNIT with ZONE2 mode RC-617 AVR-1803/883 FL C FR...
... to -room remote control unit (DENON RC-616, 617 or 618) is wired and connected between the main zone and zone2, the remote-controllable devices in the main zone can be controlled from zone2 using the remote control unit. ZONE2 MAIN ZONE : SPEAKER cable REMOTE CONTROL UNIT with ZONE2 mode RC-617 AVR-1803/883 FL C FR...

Owners Manual
Page 40
...SURROUND (Dolby Pro Logic II or Dolby Digital or DTS) modes. (Main unit) (Remote control unit) 2 Press the TEST TONE button. The adjusted playback levels for all the speakers. (Remote control unit) (Remote control unit) NOTE: Please make sure the "AUDIO" position of the slide switch on... the remote control unit. 3 After completing the adjustment, press the TEST TONE button again. (Remote control unit) 1 1 2 2 2, 3 40 Test tones are output from the remote control unit, as (described) below. • The adjustment with the ...
...SURROUND (Dolby Pro Logic II or Dolby Digital or DTS) modes. (Main unit) (Remote control unit) 2 Press the TEST TONE button. The adjusted playback levels for all the speakers. (Remote control unit) (Remote control unit) NOTE: Please make sure the "AUDIO" position of the slide switch on... the remote control unit. 3 After completing the adjustment, press the TEST TONE button again. (Remote control unit) 1 1 2 2 2, 3 40 Test tones are output from the remote control unit, as (described) below. • The adjustment with the ...

Owners Manual
Page 41
... SW SL "SB" appears only when "POWER AMP ASSIGN" switch is pressed. NOTE: Please make sure the "AUDIO" position of the slide switch on the remote control unit. 2 Adjust the level of the selected speaker. (Main unit) Only adjustable when the channel is selected with the CH VOL buttons on the... main unit. (Remote control unit) Default setting of +12 to -12 dB using the test tones, adjust the channel levels either according to the playback sources or to...
... SW SL "SB" appears only when "POWER AMP ASSIGN" switch is pressed. NOTE: Please make sure the "AUDIO" position of the slide switch on the remote control unit. 2 Adjust the level of the selected speaker. (Main unit) Only adjustable when the channel is selected with the CH VOL buttons on the... main unit. (Remote control unit) Default setting of +12 to -12 dB using the test tones, adjust the channel levels either according to the playback sources or to...


