

Literature/Product Sheet
Page 2
... then stored, for each program source, so that you can easily connect your home theater system, including codes for selected DENON models, along with terminal cover. *Design and specifications are subject to change without notice. *"Dolby", "Dolby Digital", "... L/R, CENTER, SUBWOOFER 3 Analog REC OUT Terminals...... s Multi-Function Preset Memory Remote Controller The supplied system remote controller features a large selection of DTS Technology. NEW MODEL I N F O R M AT I O N AVR-1802 s Versatile Input & Output Terminals • Digital Optical Output The AVR-1802 provides 1 digital...
... then stored, for each program source, so that you can easily connect your home theater system, including codes for selected DENON models, along with terminal cover. *Design and specifications are subject to change without notice. *"Dolby", "Dolby Digital", "... L/R, CENTER, SUBWOOFER 3 Analog REC OUT Terminals...... s Multi-Function Preset Memory Remote Controller The supplied system remote controller features a large selection of DTS Technology. NEW MODEL I N F O R M AT I O N AVR-1802 s Versatile Input & Output Terminals • Digital Optical Output The AVR-1802 provides 1 digital...

Owners Manual
Page 8
... system layout Basic system layout • The following is an example of the basic layout for a system consisting of six speaker systems and a television monitor: Subwoofer Center speaker system Front speaker systems Set these steps. Step 3 (page 17 to setup the Speakers and connecting the components. Following these at the sides...
... system layout Basic system layout • The following is an example of the basic layout for a system consisting of six speaker systems and a television monitor: Subwoofer Center speaker system Front speaker systems Set these steps. Step 3 (page 17 to setup the Speakers and connecting the components. Following these at the sides...
Owners Manual
Page 9
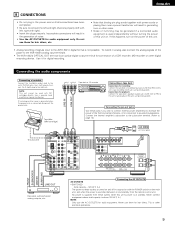
...SUBWOOFER CENTER SURROUND LINE OUT Decoders with MC cartridges directly. Never use the AC OUTLETS for connection to this unit's power is connected, disconnect the ground wire. Do not use them near a power transformer will result in analog, also connect the analog signals of the player to the AVR-1802...'s analog input terminals. • The AVR-1802's OPTICAL OUT terminal is an optical digital output terminal for connection of the front and center channels, or for...
...SUBWOOFER CENTER SURROUND LINE OUT Decoders with MC cartridges directly. Never use the AC OUTLETS for connection to this unit's power is connected, disconnect the ground wire. Do not use them near a power transformer will result in analog, also connect the analog signals of the player to the AVR-1802...'s analog input terminals. • The AVR-1802's OPTICAL OUT terminal is an optical digital output terminal for connection of the front and center channels, or for...
Owners Manual
Page 14
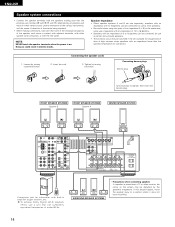
... circuit may be disturbed by the speaker's magnetism. NOTE: NEVER touch the speaker terminals when the power is on the screen may be connected for subwoofer with an impedance lower than the specified impedance are connected. 1. Connecting the speaker cords 2. FRONT SPEAKER SYSTEMS System B FRONT SPEAKER SYSTEMS System A CENTER SPEAKER SYSTEM...
... circuit may be disturbed by the speaker's magnetism. NOTE: NEVER touch the speaker terminals when the power is on the screen may be connected for subwoofer with an impedance lower than the specified impedance are connected. 1. Connecting the speaker cords 2. FRONT SPEAKER SYSTEMS System B FRONT SPEAKER SYSTEMS System A CENTER SPEAKER SYSTEM...

Owners Manual
Page 17
...(•, ª, 0, 1) Press this unit. 1 Set the slide switch to "AUDIO". Small Small Subwoofer Mode This selects the subwoofer speaker for the different input sources. Subwoofer mode = Normal Delay Time Digital Input Channel Level This parameter is selected. 17 Digital Inputs Input source COAXIAL ...15), make the various settings described below on the display. These settings are produced from the speakers and subwoofer according to the listening position. Front & Subwoofer 12 ft (3.6 m) This assigns the digital input jacks for playing deep bass signals. ENGLISH 10 SETTING...
...(•, ª, 0, 1) Press this unit. 1 Set the slide switch to "AUDIO". Small Small Subwoofer Mode This selects the subwoofer speaker for the different input sources. Subwoofer mode = Normal Delay Time Digital Input Channel Level This parameter is selected. 17 Digital Inputs Input source COAXIAL ...15), make the various settings described below on the display. These settings are produced from the speakers and subwoofer according to the listening position. Front & Subwoofer 12 ft (3.6 m) This assigns the digital input jacks for playing deep bass signals. ENGLISH 10 SETTING...

Owners Manual
Page 18
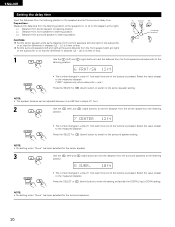
...: Please make sure the "AUDIO" position of the slide switch on the remote control unit. 3 Press the SELECT or (down ) button to switch to the subwoofer setting. 18 System set up can be selected for the front speakers, "Large" cannot be finished at any time. NOTE: Press the SYSTEM button again...
...: Please make sure the "AUDIO" position of the slide switch on the remote control unit. 3 Press the SELECT or (down ) button to switch to the subwoofer setting. 18 System set up can be selected for the front speakers, "Large" cannot be finished at any time. NOTE: Press the SYSTEM button again...

Owners Manual
Page 19
..."SMALL" is set for the front speakers or "NO" is set for the surround speakers. 4 Use the (left) and (right) buttons to select your subwoofer setting. (Initial) 4 S.WOOFER YES YES NO (left ) button (right) button Press the SELECT or setting. (down ) button to enter the settings and... range sound. 19 ENGLISH NOTE: • When "Small" has been selected for the front speakers, "Large" cannot be selected for the subwoofer, the subwoofer mode setting does not affect playback of low frequency signal range. • When the "+MAIN" playback mode is selected, the low frequency signal...
..."SMALL" is set for the front speakers or "NO" is set for the surround speakers. 4 Use the (left) and (right) buttons to select your subwoofer setting. (Initial) 4 S.WOOFER YES YES NO (left ) button (right) button Press the SELECT or setting. (down ) button to enter the settings and... range sound. 19 ENGLISH NOTE: • When "Small" has been selected for the front speakers, "Large" cannot be selected for the subwoofer, the subwoofer mode setting does not affect playback of low frequency signal range. • When the "+MAIN" playback mode is selected, the low frequency signal...
Owners Manual
Page 20
..."None" has been selected for the center speaker. 3 Use the position. (left) and (right) buttons to set the distance from the front speakers and subwoofer to the 6 FRNT/SW 12ft • The number changes in distance (L2 - L3) is 5 feet or less. Select the value closest to the ... the SELECT or (down ) button to switch to the surround speaker setting. Preparations: Measure the distances from the front speakers (left and right) or the subwoofer, or so that the difference in units of 1 foot each time one of 1 foot. 2 Use the position. (left ) and listening position. (right) ...
..."None" has been selected for the center speaker. 3 Use the position. (left) and (right) buttons to set the distance from the front speakers and subwoofer to the 6 FRNT/SW 12ft • The number changes in distance (L2 - L3) is 5 feet or less. Select the value closest to the ... the SELECT or (down ) button to switch to the surround speaker setting. Preparations: Measure the distances from the front speakers (left and right) or the subwoofer, or so that the difference in units of 1 foot each time one of 1 foot. 2 Use the position. (left ) and listening position. (right) ...

Owners Manual
Page 29
IN) jacks 1 Set the external input (EXT. IN) mode. 8 Press the EXT. In addition, the signal input to the PRE OUT SUBWOOFER jack. 2 Cancelling the external input mode To cancel the external input (EXT. IN) setting, press the INPUT MODE (AUTO, PCM, DTS) or ANALOG button to ...switch to the desired input mode. (See page 26.) 8 (Main unit) (Remote control unit) • When the input mode is output to the SW (subwoofer) jack is set this mode. NOTES: • The AUDIO IN's signal selected with the function selector button are output to the CDR/TAPE and VCR...
IN) jacks 1 Set the external input (EXT. IN) mode. 8 Press the EXT. In addition, the signal input to the PRE OUT SUBWOOFER jack. 2 Cancelling the external input mode To cancel the external input (EXT. IN) setting, press the INPUT MODE (AUTO, PCM, DTS) or ANALOG button to ...switch to the desired input mode. (See page 26.) 8 (Main unit) (Remote control unit) • When the input mode is output to the SW (subwoofer) jack is set this mode. NOTES: • The AUDIO IN's signal selected with the function selector button are output to the CDR/TAPE and VCR...

Owners Manual
Page 44
... circuit that lets you play program sources in the surround mode to the walls at the prime listening position. Front speakers Monitor Center speaker Subwoofer 45° • Set the front speakers with their front surfaces as bipolar types, or dipolar types, provide a wider dispersion than ...a direct radiating speaker (monopolar). Path of the surround sound from the surround channels reflect off the walls as shown on placing the subwoofer within each channel are direct-radiating (monopolar) then place them slightly behind and at an angle to the listening position and parallel to...
... circuit that lets you play program sources in the surround mode to the walls at the prime listening position. Front speakers Monitor Center speaker Subwoofer 45° • Set the front speakers with their front surfaces as bipolar types, or dipolar types, provide a wider dispersion than ...a direct radiating speaker (monopolar). Path of the surround sound from the surround channels reflect off the walls as shown on placing the subwoofer within each channel are direct-radiating (monopolar) then place them slightly behind and at an angle to the listening position and parallel to...
Owners Manual
Page 47
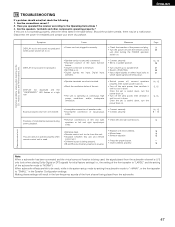
...Common problems arising when listening to the Operating Instructions ? 3. Positions of instruments reversed during stereo playback. • Reverse connections of the subwoofer mode is being input. 14, 15 26 27 28 27 DISPLAY not displayed and the "ON/STANDBY" LED flashes at continuous high ... dead. • Remote control unit too far from this unit. • Obstacle between this unit is cooled down . Note: When a subwoofer has been connected and the virtual surround function is "NORM"). Are the speakers, turntable and other components operating property ? Once the set . ...
...Common problems arising when listening to the Operating Instructions ? 3. Positions of instruments reversed during stereo playback. • Reverse connections of the subwoofer mode is being input. 14, 15 26 27 28 27 DISPLAY not displayed and the "ON/STANDBY" LED flashes at continuous high ... dead. • Remote control unit too far from this unit. • Obstacle between this unit is cooled down . Note: When a subwoofer has been connected and the virtual surround function is "NORM"). Are the speakers, turntable and other components operating property ? Once the set . ...


