
Owners Manual
Page 21
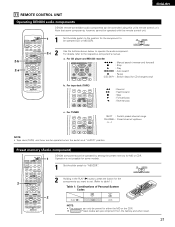
... possible for the components you want to set upon shipment from the factory and when reset. 21 Note that some models. 1 Set the slide switch to "MD/CDR". ... NOTE: • The memory can be controlled using this remote control unit. 2-b 2-a CD MD/CDR AVR/AVC ON AUDIO POWER TV VCR VIDEO DVD/VDP OFF 1 CD DVD/VDP 2 3 V. CD AUDIO ...MASTER CH SELECT VOL SELECT T.TONE STATUS MUTING RETURN DISPLAY CHANNEL TV VOLUME B REMOTE CONTROL UNIT RC-896 1 2 DENON components can only be operated with this unit's remote control unit. AUX 4 VCR 5 TV/DBS 6 7 INPUT ...
... possible for the components you want to set upon shipment from the factory and when reset. 21 Note that some models. 1 Set the slide switch to "MD/CDR". ... NOTE: • The memory can be controlled using this remote control unit. 2-b 2-a CD MD/CDR AVR/AVC ON AUDIO POWER TV VCR VIDEO DVD/VDP OFF 1 CD DVD/VDP 2 3 V. CD AUDIO ...MASTER CH SELECT VOL SELECT T.TONE STATUS MUTING RETURN DISPLAY CHANNEL TV VOLUME B REMOTE CONTROL UNIT RC-896 1 2 DENON components can only be operated with this unit's remote control unit. AUX 4 VCR 5 TV/DBS 6 7 INPUT ...

Owners Manual
Page 31
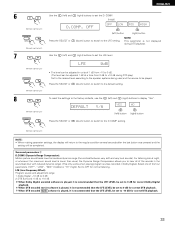
... • DIMENSION setting DIMENSION 3 0 3 6 or or • CENTER WIDTH setting CENTER WIDTH O 0 4 7 or or • DEFAULT setting DEFAULT Y/N Yes Y/N No or or Select "Yes" to reset to 7. 31 NOTE: • When making parameter settings, the display will be heard only from 0 to the factory defaults. Surround parameters q Pro Logic II Mode...
... • DIMENSION setting DIMENSION 3 0 3 6 or or • CENTER WIDTH setting CENTER WIDTH O 0 4 7 or or • DEFAULT setting DEFAULT Y/N Yes Y/N No or or Select "Yes" to reset to 7. 31 NOTE: • When making parameter settings, the display will be heard only from 0 to the factory defaults. Surround parameters q Pro Logic II Mode...
Owners Manual
Page 33
... or (down ) button to switch to the default setting. DEFAULT Y/N YES NO (left ) and (right) buttons to the LFE setting. COMP. (Initial) OFF D.COMP. To reset the settings to the factory defaults, use the (left ) button (right) button (down) button to switch to set the D. NOTE: • When making parameter settings...
... or (down ) button to switch to the default setting. DEFAULT Y/N YES NO (left ) and (right) buttons to the LFE setting. COMP. (Initial) OFF D.COMP. To reset the settings to the factory defaults, use the (left ) button (right) button (down) button to switch to set the D. NOTE: • When making parameter settings...

Owners Manual
Page 36
DEFAULT Y/N YES NO (left ) and (right) buttons to the regular condition several seconds after the last button was pressed and the setting will return to display "Yes". ENGLISH (3) DELAY TIME (Remote control unit) (4) DEFAULT (Remote control unit) Use the (left) and (right) buttons to set the delay time. 0ms DELAY 30ms (Initial) 30ms 110ms (left) button (right) button To reset the settings to the factory defaults, use the (left ) button (right) button NOTE: • When making parameter settings, the display will be completed. 36
DEFAULT Y/N YES NO (left ) and (right) buttons to the regular condition several seconds after the last button was pressed and the setting will return to display "Yes". ENGLISH (3) DELAY TIME (Remote control unit) (4) DEFAULT (Remote control unit) Use the (left) and (right) buttons to set the delay time. 0ms DELAY 30ms (Initial) 30ms 110ms (left) button (right) button To reset the settings to the factory defaults, use the (left ) button (right) button NOTE: • When making parameter settings, the display will be completed. 36
Owners Manual
Page 42
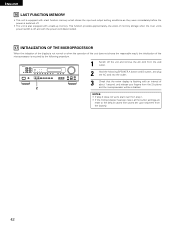
NOTES: • If step 3 does not work, start over from step 1. • If the microprocessor has been reset, all the button settings are reset to the default values (the values set upon shipment from the 2 buttons 2 and the microprocessor will be initialized. B 2 Hold the following SPEAKER A button and B button, ...
NOTES: • If step 3 does not work, start over from step 1. • If the microprocessor has been reset, all the button settings are reset to the default values (the values set upon shipment from the 2 buttons 2 and the microprocessor will be initialized. B 2 Hold the following SPEAKER A button and B button, ...


