
Owners Manual
Page 21
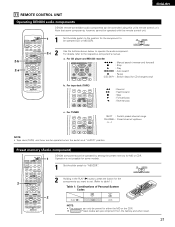
...MD/CDR). For TUNER V. Preset memory (Audio component) 2 CD MD/CDR AVR/AVC ON AUDIO POWER TV VCR VIDEO DVD/VDP OFF 1 CD DVD/VDP...MASTER VOL. CD AUDIO MD/CDR VIDEO 2 2-c Use the buttons shown below to set upon shipment from the factory and when reset. 21 AUX 4 VCR 5 TV/DBS 6 7 INPUT MODE CDR / TAPE TUNER 8 9 0 SURROUND MODE...you want to operate the audio component. ENGLISH 0 0 0 0 11 REMOTE CONTROL UNIT Operating DENON audio components DENON remote-controllable audio components can be operated when the switch is not possible for some components, ...
...MD/CDR). For TUNER V. Preset memory (Audio component) 2 CD MD/CDR AVR/AVC ON AUDIO POWER TV VCR VIDEO DVD/VDP OFF 1 CD DVD/VDP...MASTER VOL. CD AUDIO MD/CDR VIDEO 2 2-c Use the buttons shown below to set upon shipment from the factory and when reset. 21 AUX 4 VCR 5 TV/DBS 6 7 INPUT MODE CDR / TAPE TUNER 8 9 0 SURROUND MODE...you want to operate the audio component. ENGLISH 0 0 0 0 11 REMOTE CONTROL UNIT Operating DENON audio components DENON remote-controllable audio components can be operated when the switch is not possible for some components, ...

Owners Manual
Page 31
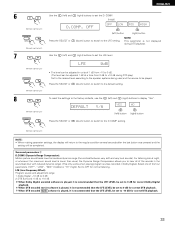
... • DIMENSION setting DIMENSION 3 0 3 6 or or • CENTER WIDTH setting CENTER WIDTH O 0 4 7 or or • DEFAULT setting DEFAULT Y/N Yes Y/N No or or Select "Yes" to reset to the regular condition several seconds the normal display reappears and the settings you have made are automatically set in case the source contents is... Width Control: This control adjust the center image so it may be set . NOTE: • When making parameter settings, the display will return to the factory defaults.
... • DIMENSION setting DIMENSION 3 0 3 6 or or • CENTER WIDTH setting CENTER WIDTH O 0 4 7 or or • DEFAULT setting DEFAULT Y/N Yes Y/N No or or Select "Yes" to reset to the regular condition several seconds the normal display reappears and the settings you have made are automatically set in case the source contents is... Width Control: This control adjust the center image so it may be set . NOTE: • When making parameter settings, the display will return to the factory defaults.
Owners Manual
Page 33
... dynamic range). (This only works when playing program sources recorded in Dolby Digital.) Select one of 1 dB from 0 dB to display "Yes". To reset the settings to the factory defaults, use the (left ) button (right) button Press the SELECT or (down) button to switch to -10 dB for correct Dolby Digital playback...
... dynamic range). (This only works when playing program sources recorded in Dolby Digital.) Select one of 1 dB from 0 dB to display "Yes". To reset the settings to the factory defaults, use the (left ) button (right) button Press the SELECT or (down) button to switch to -10 dB for correct Dolby Digital playback...

Owners Manual
Page 36
ENGLISH (3) DELAY TIME (Remote control unit) (4) DEFAULT (Remote control unit) Use the (left) and (right) buttons to set the delay time. 0ms DELAY 30ms (Initial) 30ms 110ms (left) button (right) button To reset the settings to the factory defaults, use the (left ) button (right) button NOTE: • When making parameter settings, the display will be completed. 36 DEFAULT Y/N YES NO (left ) and (right) buttons to the regular condition several seconds after the last button was pressed and the setting will return to display "Yes".
ENGLISH (3) DELAY TIME (Remote control unit) (4) DEFAULT (Remote control unit) Use the (left) and (right) buttons to set the delay time. 0ms DELAY 30ms (Initial) 30ms 110ms (left) button (right) button To reset the settings to the factory defaults, use the (left ) button (right) button NOTE: • When making parameter settings, the display will be completed. 36 DEFAULT Y/N YES NO (left ) and (right) buttons to the regular condition several seconds after the last button was pressed and the setting will return to display "Yes".
Owners Manual
Page 42
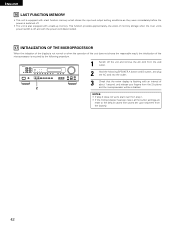
...will be initialized. NOTES: • If step 3 does not work, start over from step 1. • If the microprocessor has been reset, all the button settings are reset to the default values (the values set upon shipment from the wall outlet. B 2 Hold the following procedure. 1 Switch off the unit... and remove the AC cord from the factory). 42 ENGLISH 16 LAST FUNCTION MEMORY • This unit is equipped with a last ...
...will be initialized. NOTES: • If step 3 does not work, start over from step 1. • If the microprocessor has been reset, all the button settings are reset to the default values (the values set upon shipment from the wall outlet. B 2 Hold the following procedure. 1 Switch off the unit... and remove the AC cord from the factory). 42 ENGLISH 16 LAST FUNCTION MEMORY • This unit is equipped with a last ...

